Advertisement
Available languages
Available languages
Quick Links
Advertisement

Subscribe to Our Youtube Channel
Related Manuals for Ford FPWG2900H


Summary of Contents for Ford FPWG2900H
- Page 1 Model: FPWG2900H Gasoline Pressure Washer OPERATOR’S MANUAL www.fordpower.cc...
- Page 2 TABLE OF CONTENTS Introduction ....................................3 Safety Rules .....................................4 Safety Symbols ................................4 Safety Instructions ...............................4 Pressure Washer Features ..............................7 Pressure Washer Parts Assembly............................7 Pressure Washer Parts List ..............................7 Assembly ....................................10 Packing List ................................10 Unpacking ...................................10 Attaching Foot Assembly............................11 Install Handle................................11 Attaching Upper and Lower Gun Hooks ........................11 Attaching Accessory Hook ............................11 Attaching Spray Gun..............................12 Adding Engine Oil and Fuel ............................13...
- Page 3 INTRODUCTION Thankyou for purchasing this superior quality pressure washer from Ford Power Equipment. When operating and maintaining this product as instructed in this manual, your pressure washer will give you many years of reliable service. Product Specifications: This pressure washer operates at 2900PSI with a flow rate of 2.5 gallons per minute. This high end residential use system features a 212cc Ducar engine, no flat foam filled tires, 25’...
- Page 4 SAFETY RULES Safety Symbols Indicates a potentially hazardous WARNING! situation which could result in serious injury or death if not avoided. Indicates a potentially hazardous CAUTION! situation which could result in damage to equipment or property. Slippery surface Risk of explosion Risk of electric shock Hot surface Eye protection...
- Page 5 SAFETY RULES To reduce the risk of injection, injury or possible amputation, never direct water pressure WARNING! towards people or pets. • The high pressure stream of water produced can cut through skin and underlying tissue. Never squeeze the trigger or point the spray gun at other people, animals, plants, or fragile objects such as glass, even if the engine is stopped.
- Page 6 SAFETY RULES WARNING! Stay alert and use common sense. Do not operate this unit if you are under the influence of alcohol, drugs, medication or you feel tired. Pull cord recoils rapidly and pulls arm towards engine faster than you can let go which WARNING! could result in injury.
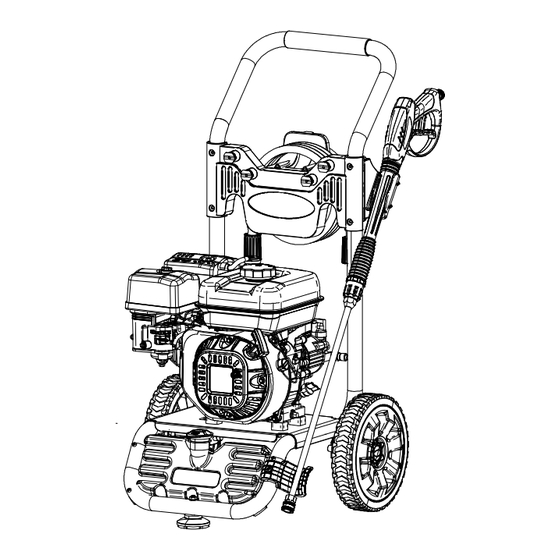
- Page 7 PRESSURE WASHER FEATURES A - 25’ High Pressure Hose H - Locking Trigger I - Pull Cord B - Fuel Tank and cap J - Engine On/Off Switch C - Choke K - Oil Fill and Dipstick D - Fuel Valve Lever L - No Flat Foam Filled Tires E - Soap Tank M - High Pressure Hose Outlet...
- Page 8 PRESSURE WASHER PARTS ASSEMBLY...
- Page 9 PRESSURE WASHER PARTS LIST NO. Code Part name 120021210073VN DYNAMIC DH212 812030 CASTOR 92027 SCREW M6*45 815124-052 THE CHASSIS BASE 90026 NUT M8 813008 MATS 814016 UNDER THE GUN FLAT MAT PHI Φ13*6.2*1 96804 90024 SELF-LOCKING NUT M6 10 812031 CASTOR 10.1 812013 HUB CAP...
- Page 10 ASSEMBLY Packing List • Pressure washer • Quick start guide • Operator’s manual and product registration card • Spray gun • Extension wand with quick-connect fitting High pressure hose • Spray nozzles: 0°, 25°, 40°, and soap nozzle • Spray gun hook (upper) •...
- Page 11 ASSEMBLY Attaching Foot Assembly (See fig 1) • Align the foot support to the mounting hole and tighten it with self-locking nut • Buckle the wheel cover into the corresponding hole position of the wheel, and lock it with tapping screw. Install Handle (See fig 2) •...
- Page 12 ASSEMBLY Attaching the Spray Gun (See fig 4 & 5) • Screw the spray wand and the trigger handle together until they are secure. • nut on by turning clockwise until it is hand tight. FIG 4 FIG 5...
- Page 13 ASSEMBLY Adding / Checking Engine Oil (See fig 6) • Place pressure washer on a level surface. • • Carefully add between 520 ml (17.6 oz) of 4-Cycle engine oil (SAE10W30) to empty reservoir until oil reaches • Be sure to replace both dipsticks before attempting to start the engine. •...
- Page 14 ASSEMBLY Connecting Garden Hose to Pressure Washer (See fig 8) • • Inspect inlet screen and remove any debris. • Connect hose to water inlet and tighten by hand. There must be a minimum of 10 feet of unrestricted hose between pressure washer and faucet or shut off valve.
- Page 15 OPERATION Pre-Operation Check List • Read and understand this operator manual in its entirety before operating pressure washer. • Check oil level and add oil to the proper level if low. • Check fuel level and add fuel if needed. •...
- Page 16 OPERATION Pull cord recoils rapidly and pulls arm towards engine faster than you can let go which WARNING! could result in injury. • Always relieve pressure from spray gun before pulling starter cord, including every failed attempt to start engine. •...
- Page 17 OPERATION Using Spray Nozzle (See fig 15) • To connect or disconnect spray tip, pull back on the quick-connect collar. Insert or remove spray tip then release collar. • When spray tip is connected, pull on the spray tip to make sure it is secured. •...
- Page 18 MAINTENANCE Regular maintenance will extend the life of this pressure washer and improve its performance. The warranty does not cover items that result from operator negligence, misuse, or abuse. To receive full value from the warranty, operator must maintain the pressure washer as instructed in this manual, including proper storage. Before inspecting or servicing this machine, make sure the engine is off and no parts are WARNING! moving.
- Page 19 MAINTENANCE Changing Engine Oil Engine oil will drain better if the engine is still warm, but not hot. • Shut off engine. • Clean the area around the oil fill cap/dipstick to keep out debris then remove oil fill cap/dipstick. •...
- Page 20 MAINTENANCE Checking Spark Plug • Disconnect the spark plug wire from the spark plug. • Before removing the spark plug, clean the area around its base to prevent debris from entering the engine. • Clean carbon deposits off the electrode with a wire brush. •...
- Page 21 TROUBLESHOOTING PROBLEM CAUSE SOLUTION Engine does not start 1. Out of fuel 1. Fill fuel tank 2. Engine oil low 2. Add engine oil 3. Spark plug wire disconnected 3. Connect spark plug wire from spark plug 4. Replace spark plug 4.
- Page 22 Modelo: FPWG2900H Lavadora de Presión de Gasolina MANUAL DEL OPERADOR Producto de Licencia Oficial www.fordpower.cc...
- Page 23 TABLA DE CONTENIDOS Introducción....................................3 Reglas de seguridad.................................4 Símbolos de seguridad..............................4 Instrucciones de seguridad ............................4 Características ..................................7 Montaje de piezas ...................................7 Lista de piezas ..................................7 Montaje....................................10 Lista de empaque................................10 Empaque ..................................10 Acoplamiento de las ruedas............................11 Montaje de conjunto del pie............................11 Levantando la palanca..............................11 Montaje superior e inferior Ganchos Pistola .......................11 Montaje de el gancho de la manguerade alta presión ....................11 Montaje del gancho de accesorios..........................12...
- Page 24 INTRODUCCIÓN Gracias por la compra de la lavadora de presión de Ford. Al operar y mantener este producto tal como se indica en este manual, la lavadora de presión le dará muchos años de servicio confiable. Especificaciones del producto: Esta lavadora funciona a 2900PSI con un caudal de 2.5 galones por minuto. Este final alto uso residencial sistema dispone de un motor 212cc Ducar, neumáticos rellenos de espuma, manguera de 25' de alta presión y 4 boquillas de...
- Page 25 REGLAS DE SEGURIDAD Símbolos de Seguridad Indica una situación potencialmente peligrosa que ¡ADVERTENCIA! puede provocar lesiones graves o la muerte si no se evita Indica una situación potencialmente peligrosa que podría resultar en daños al equipo ¡ATENCIÓN! o a la propiedad. Riesgo de incendio Superficie resbaladiza Riesgo de explosión...
- Page 26 REGLAS DE SEGURIDAD Para reducir el riesgo de inyección, lesión o posible amputación, nunca presión de agua directa ¡ADVERTENCIA! hacia las personas o los animales domésticos. • La corriente de alta presión de agua producida puede atravesar la piel y el tejido subyacente. Nunca se debe apretar el gatillo o apunte la pistola a otra personas, animales, plantas u objetos frágiles tales como vidrio, incluso si el motor está...
- Page 27 • Siempre alivie la presión de la pistola antes de tirar la cuerda de arranque, incluyendo cada intento de arrancar el motor. • Para evitar el retroceso, tire de la cuerda de arranque lentamente hasta sentir resistencia, luego jale rápidamente. Nunca opere esta unidad si hay partes rotas o ausentes y sólo utilizan repuestos Ford ¡ADVERTENCIA! diseñado específicamente para esta unidad.
- Page 28 CARACTERÍSTICAS DE LA LAVADORA DE PRESIÓN A - 25' Manguera de alta presión H - Bloqueo de disparo B - Tanque de combustible y la tapa I -Cuerda del tirón C - Estrangulación J - Motor de encendido / apagado D - Válvula de Combustible Palanca K - Llenado de aceite y varilla L - Llantas...
- Page 29 MONTAJE DE PIEZAS DE LAVADORA A PRESIÓN...
- Page 30 MONTAJE DE PIEZAS DE LAVADORA A PRESIÓN NO. Code Part name 120021210073VN DYNAMIC DH212 812030 CASTOR 92027 SCREW M6*45 815124-052 THE CHASSIS BASE 90026 NUT M8 813008 MATS 814016 UNDER THE GUN FLAT MAT PHI Φ13*6.2*1 96804 90024 SELF-LOCKING NUT M6 10 812031 CASTOR 10.1 812013...
- Page 31 MONTAJE Lista de montaje • Lavadora a presión • Guía de inicio rápido • Manual del operador y tarjeta de registro del producto • Pistola atomizadora (pulverizador para disipar materiales de exterminación) • Varita mágica extensión con conector de conexión rápida •...
- Page 32 MONTAJE Montaje del conjunto de pie (consulte la figura 1) • Abroche la cubierta de la rueda en la posición del orificio correspondiente de la rueda y fíjela con un tornillo de rosca. • Alinee el reposapiés con el orificio de montaje y apriételo con la tuerca autoblocante. Instale la manija (vea la figura 2) •...
- Page 33 MONTAJE L Colocación de la pistola pulverizadora (ver Fig. 4 y 5) • Atornille el tubo rociador y el gatillo manejar juntos hasta que estén firmes. • Inserte el enchufe de entrada de la manguera en el racor roscado de la pistola de alta presión y rosca tuerca de color negro en girando a la derecha hasta que quede apretado a mano.
- Page 34 MONTAJE Agregar / Comprobación del aceite del motor (consulte la figura 6) • Coloque la lavadora a presión sobre una superficie nivelada. • Quite una o ambas varillas del cárter para asegurar yo no llenar en exceso el motor. • Añadir con cuidado entre 520 ml (17,6 onzas) de aceite de motor de 4 tiempos (SAE10W30) al depósito vacío hasta que alcances del petróleo alcance el borde exterior del orificio de llenado (Orificio de la varilla del cárter) •...
- Page 35 MONTAJE Conexión de la manguera de jardín a la lavadora a presión (Consulte la figura 8) • Deje correr el agua a través de la manguera durante unos segundos para eliminar cualquier residuo de la manguera. • Inspeccione el filtro de entrada y eliminar los residuos. •...
- Page 36 FUNCIONAMIENTO Antes de la Operación Check List • Lea y comprenda este manual del usuario en su totalidad antes de lavado a presión de funcionamiento. • Revise el nivel de aceite y agregue aceite hasta el nivel adecuado si está bajo. •...
- Page 37 FUNCIONAMIENTO Cable de tracción retrocede rápidamente y tira el brazo hacia el motor más rápido de lo que ADVERTENCIA! puede dejar ir lo que podría resultar en lesiones. • Siempre alivie la presión de la pistola antes de tirar de la cuerda de arranque, incluyendo cada intento fallido de arrancar el motor. •...
- Page 38 FUNCIONAMIENTO El uso de boquillas de pulverización ( Ver la figura 15) • Para conectar o desconectar la boquilla de pulverización, tire hacia atrás el collar de conexión rápida. Insertar o quitar la punta de rociado y suelte el collar. •...
- Page 39 MANTENIMIENTO El mantenimiento regular se extenderá la vida de esta lavadora a presión y mejorar su rendimiento. La garantía no cubre los elementos que resultan de la negligencia del operador, mal uso o abuso. Para recibir el valor completo de la garantía, el operador deberá...
- Page 40 Vuelva a colocar los tubos de sifón en caso de deterioro. Nunca repare la manguera de alta presión o de la unidad de usarlo si la manguera está ¡ADVERTENCIA! dañada. Si la manguera está dañada reemplace con idéntica parte Power Equipment Ford. Manguera de Alta Presión •...
- Page 41 MANTENIMIENTO Comprobación de la bujía • Desconecte el cable de la bujía de la bujía. • Antes de quitar la bujía, limpie el área alrededor de la base para evitar que entren residuos en el motor. • Depósitos de carbón Limpie el electrodo con un cepillo metálico. •...
- Page 42 SOLUCIÓN DE PROBLEMAS PROBLEMA CAUSA SOLUCION El motor no arranca 1. Por falta de combustible 1. Llene el tank 2. Baja del aceite del moto 2. Agregue aceite 3. Cable de la bujía desconectada 3. Conecte el cable de la bujía de la bujía 4.
Need help?
Do you have a question about the FPWG2900H and is the answer not in the manual?
Questions and answers