Table of Contents
Advertisement
Quick Links
Advertisement
Table of Contents

Related Manuals for EVERCROSS EK5


Summary of Contents for EVERCROSS EK5
- Page 1 EU V1.2.1 User Manual...
- Page 2 Step 3: Click the "Ask a Question" button. Choose your topic from list displayed. Step 4: Select Contact seller. *If you purchased EVERCROSS TECH products by other platforms or channels, please also find the corresponding seller contact support. Thanks for your support and patience!
- Page 3 EN··········································································01-31 FR··········································································32-62 DE··········································································63-93 IT··········································································94-124 ES·······································································125-155 NL·······································································156-186 PL·······································································187-217...
-
Page 4: Table Of Contents
CONTENT Home Page·················································································02 Product Safety Notice·······························································03~04 Warning Message·········································································05 Responsibility statement···································································06 Package Contents·········································································07 Product Overview·········································································08 Assembly···············································································09~17 Remove & Install the battery ···························································18 Battery & Charge·····································································19~21 Function Introduction································································22~25 Product Specification································································26~27 Bike Care Basics and Maintenance·············································28~29 Product warranty··········································································30 Contact Us··················································································31 EN-01... -
Page 5: Home Page
WELCOME TO EVERCROSS TECH Thank you for choosing our EK5 We wish you a happy riding with your new bikes! This manual is designed for EK5 bikes only. Please read and understand all parts of this entire manual before operating the e-bike for the first time. -
Page 6: Product Safety Notice
Even if you are an experienced bike rider, all riders should read and understand this manual before using an electric bike. For your safety and to avoid serious injury or death, please closely review the following safety tips for safe operation of your EVERCROSS Electric Bike. -
Page 7: Before Riding
BEFORE RIDING · Do not use before carefully reading the instructions for use and understanding the performance of the product; · Do not lend a ride to someone who does not know how to handle this product. Before riding a bicycle, check whether the brakes are effective. -
Page 8: Warning Message
Please exercise proper care and avoid actions that could result in damage to the bike. 4. Risk Disclaimer: Riding the EVERCROSS TECH Electric Bike carries inherent risks, including the potential for severe injury or even death due to loss of control, collisions, and falls. Always exercise caution and ride at your own risk, adhering to safety guidelines and regulations. -
Page 9: Responsibility Statement
Responsibility statement: · After riding, please store the car in a place without sunlight and rain, and cannot be placed in a residential building. · Check the motor and brake frequently. · Regularly check all the screws of the car and the places that need to be fastened, and tighten them regularly. ·... -
Page 10: Package Contents
PACKAGE CONTENTS Carefully check package contents, if anything is missing or damaged, please contact EVERCROSS TECH customer service for support: support@evercross.eu. Note: Please retain the outer packaging of the product in case you need to reship the bike in the future. -
Page 11: Product Overview
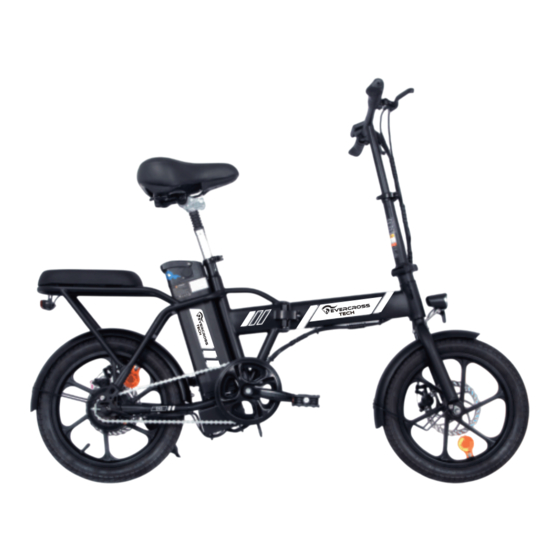
PRODUCT OVERVIEW 10 9 19 Shock absorber 1 LCD Display 13 Battery 7 Tire seat tube 2 Handlebar grip 14 Chain 8 Disc brake pad 20 Saddle 3 Brake 15 Motor 9 Wheel reflector 4 Handle 16 Rear shelf 10 Disc brake 5 Headlight 17 Tail Light 11 Pedal... -
Page 12: Assembly
ASSEMBLY Before beginning the assembly process, please conduct a thorough inspection of the packaging to ensure that all necessary components and accessories are included. If you identify any items that are missing or damaged, please contact us promptly. PARTS DESCRIPTION 3.Wheel Reflectors (2 sets) 1.Pedal 4.16-in-1 Tool... - Page 13 ASSEMBLY - VEHICLE UNFOLD 1. Remove the packaging, place the entire bike on flat ground, and unfold 1.Pull up the folder latch the frame. 2.Close the frame Adjust the angle of the folding handle of the frame, press the folding handle of the frame tightly according to the direction shown in the picture.
- Page 14 Stand the folding riser up and close it according to the direction of the picture. 1. Open the telescopic adjustment buckle of the folding riser. 2. Insert the telescopic riser in the direction, adjust the required height, and tighten the adjustment buckle. Note: If the adjustment buckle is too tight or too loose, please adjust the screw at "3"...
-
Page 15: Assembly-Accessories
ASSEMBLY-ACCESSORIES Pre-assemble the wheel reflector, gaskets Put the bell bracket into the corresponding and screws as shown in the picture, and position of the handlebar and tighten the tighten them with a No. 4 internal hexagon screw with a Phillips screwdriver. and a No. - Page 16 ASSEMBLY- PEDAL How to install the left pedal: The "L" mark on the pedal shaft refers to the left pedal. First, twist the pedal shaft counterclockwise into the crank on the left by hand, and then use a No. 15 open-ended wrench to tighten it counterclock- wise.
- Page 17 How to install the right pedal: The "R" mark on the pedal shaft refers to the right pedal. First, rotate the pedal shaft clockwise by hand and screw it into the crank on the right, and then use a No. 15 open-ended wrench to tighten it clockwise.
- Page 18 ASSEMBLY-REAR FENDER STICK (1)Use the No. 5 Allen wrench in the 16-in-1 tool to remove the fender support fixing screws and washers pre-installed on the left and right sides of the frame, as shown in the picture on the right. (2)Pass the support stick through the fender support stick fixing screw and tighten it into the corre- sponding screw holes on both sides of the frame with a No.
-
Page 19: Remove & Install The Battery
ASSEMBLY-BATTERY REMOVAL & INSTALLATION (3)Use the key to turn to the "PUSH" position to remove the battery. (4)Pick up the battery handle and take out the battery. (1)Flip the handle at the (2)Turn the seat tube tilt bottom of the seat bag upward. - Page 20 5. Align the battery slide with 6. Insert the battery to the 7. Press the seat cushion the battery track on the frame. bottom so that it is in complete downward until the seat contact with the discharge cushion and seat tube are plug on the frame.
- Page 21 POWER ON/OFF THE E BIKE (1)Insert the key into the keyhole in picture 1, and turn the key to the right from the "OFF" position to the "ON" position. (1)Insert the key into the keyhole in picture 1, and turn the key to the right from the "OFF" position to the "ON"...
-
Page 22: Battery & Charge
BATTERY & CHARGE BATTERY SAFETY Only charge at 0°C ~ 45°C, discharge at - 20°C ~ 60°C, keep the battery dry. Do not put the battery in • acidic or alkaline liquids, avoid rain, and keep away from fire, heat and high temperature environments. •... - Page 23 CHARGE YOUR E-BIKE 1.Charging: Unscrew the plastic cover on the battery (Picture 1), connect the supplied charger and start charging. When the battery shows full power and the charger indicator light changes from red to green, it means it is fully charged. EN-20...
- Page 24 2.Turn on: refer to Picture 2, turn on the battery switch ; refer to Picture 3, long press the button to turn on/off the power. 3. Battery display: After turning on the instrument, the instrument panel lights up to display the battery level. The battery level is displayed in 5 grids, corresponding to high, medium, and low battery levels.
-
Page 25: Function Introduction
FUNCTION INTRODUCTION LCD DISPLAY CONTROLS Function description: 1.Display Function Speed display, assist ratio display, battery indicator, fault prompt, mileage display, voltage display, single power- on time, 6km/h boost, brake indicator, headlight display 2.Control and setting functions Power switch control, headlight switch control, 6km/h boost setting, 3-speed boost ratio setting, speed display switching, mileage and single power-on time and voltage display switching. - Page 26 DISPLAY FUNCTION DESCRIPTION The bike interface (Picture 1) provides you with a variety of function modes, to meet your riding needs. Its functions are as follows: DESCRIPTION ICON Battery power indicator Multifunctional display area (Total mileage ODO, single mileage TRIP (unit: mile, km), single power-on time TIME, battery voltage VOL) Speed indicator (including real-time speed, maximum speed, and average speed)
-
Page 27: Error Code
ERROR CODE Note: 1.Due to the upgrade of the company's products, the display content of some parts of the product you get may be different from the instructions, but it will not Code Meaning affect your normal use. Everything is subject to the actual product, and the company reserves the right of final interpretation. - Page 28 BUTTON FUNCTIO The specific combination positions of the buttons are as follows: Introduction to button usage: Key operations are divided into short press and long press Specific operation explanation 1. Switch the LCD display • When the power is off, press and hold the button to power on.
-
Page 29: Product Specification
PRODUCT SPECIFICATION ITEM SPECIFICATIONS Model Unfolded Size 1390*530*1040mm (139*53*104cm) 800*500*680mm (80*50*68cm) Folded size Package Size 810*370*640mm (81*37*64) Net weight 22.5kg (49.6lbs) 29kg (63.9lbs) Gross weight 120kg (264.5lbs) Rated Load MAX Speed 25km/h (15.5mph) 25-45KM(Affected by load,temperature , road conditions,riding mode , etc . E.g. At 70kg and 25 ℃, Max. - Page 30 ITEM SPECIFICATIONS 250W Motor Power Charger 42V 2.0A Charging Time 4-5 hours Tire Size 16inch*2.125 Fat Tire Braking Type Front&Rear Disc Brake Frame Material Iron Wheel Type Pneumatic Tires Note: The maximum speed can be affected by factors such as power, load, tire pressure, road conditions, and lubrication of the chain and axle.
-
Page 31: Bike Care Basics And Maintenance
BIKE CARE BASICS AND MAINTENANCE CLEANING AND STORAGE • Always store your bike in a clean dry place to avoid rust and damage to batter y. • Keep batteries fully charged when between uses of as much as two weeks apart. •... -
Page 32: Battery Maintenance
BATTERY MAINTENANCE 1.Use original battery packs, use the other models or brands may bring about safety issues. 2.Do not touch the contacts. Do not dismantle or puncture the casing. Keep the contacts away from metal objects to prevent short circuit which may result in battery damage or even injuries and deaths. 3.Use original power adapter to avoid potential damage or fire. -
Page 33: Product Warranty
It is essential to understand that EVERCROSS TECH reserves the right to refuse any service claim that falls outside the scope of the warranty. For inquiries regarding repairs outside of the warranty period, including pricing and availabilit y, please contact our customer support at support@evercross.eu. -
Page 34: Contact
CONTACT US Please contact us directly if you experience any riding, maintenance, safety, errors/faults issues with your EVERCROSS TECH product. E-mail Service: support@evercross.eu official_evercross Evercross Official https://www.evercross.eu/ official_evercross EVERCROSS EN-31... - Page 35 CONTENU Avis de sécurité du produit· ·····················································34~35 Message d'alerte···················································································36 Déclaration de responsabilité···································································37 是非成败转头空,青山依旧在,惯看秋月春风。一壶浊酒喜相逢,古今多少事 Contenu du colis· ·······································································38 Présentation du produit ······························································39 Assemblage ········································································40~48 Retirez et installez la batterie························································49 Charge de la batterie······························································50~52 Présentation de la fonction ······················································53~56 Spécification de produi·····························································57~58 Notions de base et entretien du vélo ··········································59~60 Garantie du produit·······································································61 Contactez-nous···········································································62...
- Page 36 Merci d'avoir choisi notre EK5. Nous vous souhaitons une bonne balade avec vos nouveaux vélos ! Ce manuel est conçu uniquement pour les vélos EK5. Veuillez lire et comprendre toutes les parties de ce manuel avant d'utiliser le vélo électrique pour la première fois.
-
Page 37: Avis De Sécurité Du Produit
électrique. Pour VOTRE sécurité et pour éviter des blessures graves, voire la mort, veuillez lire attentivement les conseils de sécurité suivants pour une utilisation en toute sécurité de votre vélo électrique EVERCROSS TECH. CONSEILS D'UTILISATION SÉCURISÉE: ·... - Page 38 AVANT DE CONDUIRE • Ne pas utiliser avant d'avoir lu attentivement les instructions d'utilisation et compris les performances du produit ; • Ne prêtez pas de véhicule à quelqu'un qui ne sait pas comment manipuler ce produit. Avant de faire du vélo, vérifiez si les freins sont efficaces.
-
Page 39: Message D'alerte
Veuillez faire preuve de prudence et éviter les actions qui pourraient endommager le vélo. 4. Avertissement sur les risques : Conduire le vélo électrique EVERCROSS TECH comporte des risques inhérents, y compris le potentiel de des blessures graves, voire la mort, dues à une perte de contrôle, des collisions et des chutes. Faites toujours preuve de prudence et roulez à... -
Page 40: Déclaration De Responsabilité
DÉCLARATION DE RESPONSABILITÉ : • Après avoir roulé, veuillez ranger la voiture dans un endroit sans soleil ni pluie, et ne peut pas être placée dans un immeuble résidentiel. • Vérifiez fréquemment le moteur et les freins. • Vérifiez régulièrement toutes les vis de la voiture et les endroits qui doivent être fixés, et serrez-les régulièrement. -
Page 41: 是非成败转头空,青山依旧在,惯看秋月春风。一壶浊酒喜相逢,古今多少事 Contenu Du Colis
Vérifiez soigneusement le contenu de l'emballage, si quelque chose manque ou est endommagé, veuillez TECH contacter le service client EVERCROSS pour obtenir de l'aide : support@evercross.eu. Remarque : Veuillez conserver l'emballage extérieur du produit au cas où vous auriez besoin de réexpédier le vélo ultérieurement. -
Page 42: Présentation Du Produit
PRÉSENTATION DU PRODUIT 10 9 6 Fourche avant 18 Clip pour tube de selle 12 Carter de chaîne 1 écran LCD 7 Pneu 19 Tube de selle d'amor- 13 Batterie 2 Poignée de guidon 8 Plaquettes de frein à disque tisseur 14 Chaîne 3 leviers de frein... -
Page 43: Assemblage
ASSEMBLAGE Avant de commencer le processus d'assemblage, veuillez effectuer une inspection approfondie de l'emballage pour vous assurer que tous les composants et accessoires nécessaires sont inclus. Si vous identifiez des éléments manquants ou endommagés, veuillez nous contacter rapidement. DESCRIPTION DES PIÈCES 1.Pédale 3.Réflecteurs de roue (2 jeux) 2.Cloche... - Page 44 MONTAGE - DÉPLIAGE DU VÉHICULE 1. Retirez l'emballage, placez l'ensemble du vélo sur un sol plat et 1. Tirez le loquet du dépliez le cadre. dossier 2.Fermez le cadre Ajustez l'angle de la poignée pliante du cadre, appuyez fermement sur la poignée pliante du cadre selon la direction indiquée sur l'image.
- Page 45 Relevez la contremarche pliante et fermez-la selon la direction de l'image. 1. Ouvrez la boucle de réglage télescopique de la colonne montante pliante. 2. Insérez la colonne montante télescopique dans la direction, ajustez la hauteur requise et serrez la boucle de réglage.
-
Page 46: Accessoires De Montage
ACCESSOIRES DE MONTAGE Pré-assemblez le réflecteur de roue, les Placez le support de cloche dans la position joints et les vis comme indiqué sur l'image, et correspondante du guidon et serrez la vis serrez-les avec un hexagone interne n° 4 et avec un tournevis cruciforme. - Page 47 ASSEMBLAGE - PÉDALE Comment installer la pédale gauche : La marque « L » sur l'arbre de la pédale fait référence à la pédale gauche. Tout d'abord, tournez manuellement l'arbre de la pédale dans le sens inverse des aiguilles d'une montre dans la manivelle de gauche, puis utilisez une clé...
- Page 48 Comment installer la pédale droite : La marque « R » sur l'arbre de la pédale fait référence à la pédale droite. Tout d'abord, faites tourner l'arbre de la pédale à la main dans le sens des aiguilles d'une montre et vissez-le dans la manivelle de droite, puis utilisez une clé...
- Page 49 ASSEMBLAGE-BAGUE DE GARDE-BOUE ARRIÈRE (1) Utilisez la clé Allen n° 5 de l'outil 16 en 1 pour retirer les vis de fixation du support de garde-boue et les rondelles préinstallées sur les côtés gauche et droit du cadre, comme indiqué sur l'image de droite. (2) Passez le bâton de support à...
- Page 50 ASSEMBLAGE-RETRAIT ET INSTALLATION DE LA BATTERIE (3) Utilisez la clé pour tourner en position « PUSH » pour retirer la batterie. (4) Prenez la poignée de la batterie et retirez la (1) Retournez la poignée (2) Inclinez le tube de batterie.
- Page 51 5. Alignez le coulisseau de la 7. Appuyez sur le coussin de 6. Insérez la batterie vers le batterie avec la piste de la siège vers le bas jusqu'à ce bas afin qu'elle soit complète- batterie sur le cadre. que le coussin de siège et le ment en contact avec le tube de selle soient complète- bouchon de décharge sur le...
-
Page 52: Retirez Et Installez La Batterie
ALLUMER/ÉTEINDRE LE VÉLO ÉLECTRIQUE (1) Insérez la clé dans le trou de serrure de l'image 1 et tournez la clé vers la droite de la position « OFF » à la position « ON ». (1) Insérez la clé dans le trou de serrure de l'image 1 et tournez la clé... -
Page 53: Charge De La Batterie
CHARGE DE LA BATTERIE SÉCURITÉ DE LA BATTERIE • Chargez uniquement entre 0°C ~ 45°C, déchargez entre -20°C ~ 60°C, gardez la batterie au sec. Ne placez pas la batterie dans des liquides acides ou alcalins, évitez la pluie et tenez-la à l'écart du feu, de la chaleur et des environnements à... - Page 54 RECHARGEZ VOTRE VÉLO ÉLECTRIQUE 1. Chargement : dévissez le couvercle en plastique de la batterie (image 1), connectez le chargeur fourni et commencez à charger. Lorsque la batterie affiche sa pleine puissance et que le voyant du chargeur passe du rouge au vert, cela signifie qu'elle est complètement chargée. FR-51...
- Page 55 2. Allumez : reportez-vous à l'image 2, allumez l'interrupteur de la batterie ; Reportez-vous à l'image 3, appuyez longuement sur le bouton pour allumer/éteindre l'alimentation. 3. Affichage de la batterie : après avoir allumé l'instrument, le tableau de bord s'allume pour afficher le niveau de la batterie.
-
Page 56: Présentation De La Fonction
INTRODUCTION DES FONCTIONS COMMANDES D'AFFICHAGE LCD Description de la fonction: 1. Fonction d'affichage Affichage de la vitesse, affichage du taux d'assistance, indicateur de batterie, invite de panne, affichage du kilométrage, affichage de la tension, heure de mise sous tension unique, boost de 6 km/h, indicateur de freinage, affichage des phares 2. - Page 57 DESCRIPTION DE LA FONCTION D'AFFICHAGE L'interface du vélo (image 1) vous offre une variété de modes de fonctionnement, pour répondre à vos besoins de conduite. Ses fonctions sont les suivantes : DESCRIPTION Icône Indicateur de puissance de la batterie Zone d'affichage multifonctionnelle (Kilométrage total ODO, kilométrage unique TRIP (unité...
-
Page 58: Code D'erreur
Note: CODE D'ERREUR 1. En raison de la mise à niveau des produits de l'entreprise, le contenu affiché du produit que vous obtenez peut être différent du manuel, mais cela n'affectera pas votre utilisation normale. Tout Code Signification prévaudra en nature et la société se réserve le droit d'interprétation finale. - Page 59 FONCTION DU BOUTON Les positions de combinaison spécifiques des boutons sont les suivantes : Introduction à l'utilisation des boutons : Les opérations clés sont divisées en appuis courts et appuis longs Explication du fonctionnement spécifique 1. Changez l'écran LCD • Lorsque l'appareil est hors tension, appuyez et maintenez le bouton pour allumer.
-
Page 60: Spécification De Produi
SPÉCIFICATION DE PRODUIT ARTICLE CARACTÉRISTIQUES Modèle Taille dépliée 1390*530*1040mm (139*53*104cm) 800*500*680mm (80*50*68cm) Taille pliée Taille du paquet 810*370*640mm (81*37*64) Poids net 22,5kg (49,6 livres) Poids brut 29kg (63,9 livres) 120kg (264,5 livres) Charge nominale Vitesse maximale 25km/h (15.5mph) 25-45km (affecté par la charge, la température, les conditions Max. - Page 61 ARTICLE CARACTÉRISTIQUES 250W Puissance du moteur Chargeur 42V 2.0A Temps de charge 4-5 hours La taille des pneus Gros pneu 16 pouces * 2.125 Type de freinage Frein à disque avant arrière Matériau du cadre Type de roue Pneumatiques Remarque :La vitesse maximale peut être affectée par des facteurs tels que la puissance, la charge, la pression des pneus, les conditions de la route et la lubrification de la chaîne et de l'essieu.
-
Page 62: Nettoyage Et Stockage
ENTRETIEN ET ENTRETIEN DU VÉLO NETTOYAGE ET STOCKAGE • Rangez toujours votre vélo dans un endroit propre et sec pour éviter la rouille et les dommages à la batterie. • Gardez les batteries complètement chargées entre deux utilisations, espacées jusqu'à deux semaines. •... -
Page 63: Entretien De La Batterie
ENTRETIEN DE LA BATTERIE 1. Utilisez des batteries d'origine, utiliser d'autres modèles ou marques peut entraîner des problèmes de sécurité. 2. Ne touchez pas les contacts. Ne démontez pas et ne percez pas le boîtier. Gardez les contacts éloignés des objets métalliques pour éviter un court-circuit qui pourrait entraîner des dommages à... -
Page 64: Garantie Du Produit
Il est essentiel de comprendre qu'EVERCROSS TECH se réserve le droit de refuser toute demande de service qui n'- entrepas dans le cadre de la garantie. Pour toute demande concernant les réparations en dehors de la période de garantie, y compris les prix et la disponibilité, veuillez contacter notre service client à... -
Page 65: Contactez-Nous
CONTACTEZ-NOUS Veuillez nous contacter directement si vous rencontrez des problèmes de conduite, d'entretien, de sécurité, d'erreurs/défauts avec votre produit EVERCROSS TECH. Service e-mail : support@evercross.eu official_evercross Evercross Official https://www.evercross.eu/ official_evercross EVERCROSS FR-62... - Page 66 INHALT Hinweis zur Produktsicherheit ·······················································64 Hinweis zur Produktsicherheit ··················································65~66 Warnmeldung························································································67 Erklärung zur Verantwortung ···································································68 是非成败转头空,青山依旧在,惯看秋月春风。一壶浊酒喜相逢,古今多少事 Packungsinhalte··········································································69 Paketübersicht············································································70 · Montage···············································································71~79 Entfernen und Einsetzen des Akkus················································80 Akku & Ladung·······································································81~83 Funktion Einführung································································84~87 Produkt Spezifikationen····························································86~87 Grundlagen und Wartung von Fahrrädern····································91~92 Kontaktieren Uns··········································································93 DE-63...
- Page 67 WILLKOMMEN BEI EVERCROSS TECH Vielen Dank, dass Sie sich für unser EK5 entschieden haben. Wir wünschen Ihnen viel Freude mit Ihren neuen Fahrrädern! Diese Anleitung ist nur für EK5 Fahrräder bestimmt. Bitte lesen und verstehen Sie alle Teile dieser Anlei- tung bevor Sie das E-Bike zum ersten Mal bedienen.
-
Page 68: Hinweis Zur Produktsicherheit
Auch wenn Sie ein erfahrener Fahrradfahrer sind, sollten alle Fahrer diese Anleitung lesen und verstehen, bevor sie ein Elektrofahrrad benutzen. Zu Ihrer Sicherheit und um schwere Verletzungen oder Tod zu vermeiden, lesen Sie bitte die folgenden Sicherheitshinweise für die sichere Benutzung Ihres EVERCROSS TECH Elektrofahrrads aufmerksam durch. - Page 69 VOR DEM FAHREN • Verwenden Sie das Produkt nicht, bevor Sie die Bedienungsanleitung sorgfältig gelesen haben und sich über die Leistung des Produkts im Klaren sind; • Verleihen Sie Ihr Fahrrad nicht an jemanden, der nicht weiß, wie man dieses Produkt bedient. Prüfen Sie vor der Fahrt, ob die Bremsen funktionieren.
-
Page 70: Warnmeldung
Fahrpraktiken verursacht wurden. Bitte lassen Sie angemessene Sorgfalt walten und vermeiden Sie Handlungen, die zu einer Beschädigung des Fahrrads führen könnten. 4. Risikohinweis: Das Fahren mit dem EVERCROSS TECH Elektrofahrrad birgt Risiken, einschließlich der Möglic- hkeit schwerer Verletzungen oder sogar des Todes aufgrund von Kontrollverlust, Kollisionen und Stürzen. Seien Sie immer vorsichtig und fahren Sie auf eigenes Risiko, indem Sie die Sicherheitsrichtlinien und -vorschriften einhalten. -
Page 71: Erklärung Zur Verantwortung
ERKLÄRUNG ZUR VERANTWORTUNG: • Lagern Sie das Fahrrad nach der Fahrt an einem Ort ohne Sonneneinstrahlung und Regen, und stellen Sie es nicht in einem Wohnhaus ab. • Prüfen Sie den Motor und die Bremse regelmäßig. • Überprüfen Sie regelmäßig alle Schrauben des Fahrzeugs und die Stellen, an denen sie befestigt werden müssen, und ziehen Sie sie regelmäßig nach. -
Page 72: Packungsinhalte
PACKUNGSINHALTE Überprüfen Sie den Inhalt der Verpackung sorgfältig. Wenn etwas fehlt oder beschädigt ist, wenden Sie TECH sich bitte an den EVERCROSS -Kundendienst: support@evercross.eu. Hinweis: Bitte bewahren Sie die äußere Verpackung des Produkts für den Fall auf, dass Sie das Fahrrad in Zukunft erneut versenden müssen. - Page 73 10 9 18 Sitzrohr-Clip 6 Vorderradgabel 12 Kettenabdeckung 1 LCD Display 19 Sitzrohr mit 7 Reifen 13 Batterie 2 Lenkergriff Stoßdämpfer 8 Scheibenbremsbelag 14 Kette 3 Bremse 20 Sattel 9 Radreflektor 15 Motor 4 Handhaben 10 Scheibenbremse 16 Hintere Ablage 5 Scheinwerfer 11 Pedal 17 Rücklicht...
-
Page 74: Montage
MONTAGE Bevor Sie mit dem Zusammenbau beginnen, überprüfen Sie bitte die Verpackung gründlich, um sicherzustellen, dass alle notwendigen Komponenten und Zubehörteile enthalten sind. Wenn Sie feststellen, dass Teile fehlen oder beschädigt sind, kontaktieren Sie uns bitte umgehend. BESCHREIBUNG DER TEILE 1.Pedal 3.Rad-Reflektoren (2 Sätze) 2.Glocke... - Page 75 MONTAGE - FAHRZEUG AUSKLAPPEN 1. Entfernen Sie die Verpackung, stellen Sie das gesamte Fahrrad auf 1.Ziehen Sie den einen ebenen Untergrund und eingeklappten Riegel klappen Sie den Rahmen auf. hoch 2.Schließen Sie den Rahmen Stellen Sie den Winkel des Klappgriffs des Rahmens ein und drücken Sie den Klappgriff des Rahmens fest in die in der Abbildung gezeigte Richtung.Hinweis: Wenn sich der Klappgriff des Rahmens nicht fest oder zu fest drück-...
- Page 76 Stellen Sie die klappbare Stange auf und schließen Sie sie in der abgebildeten Rich- 1. Öffnen Sie die Teleskop-Einstellschnal- tung. le der klappbare Stange. 2. Schieben Sie die Teleskopstange in die entsprechende Richtung, stellen Sie die gewünschte Höhe ein und ziehen Sie die Einstellschnalle fest.
- Page 77 MONTAGE-ZUBEHÖR Montieren Sie den Radreflektor, die Dichtun- Setzen Sie die Klingelhalterung in die gen und die Schrauben wie in der Abbildung entsprechende Position des Lenkers und gezeigt vor und ziehen Sie sie mit einem ziehen Sie die Schraube mit einem Innensechskantschlüssel Nr.
- Page 78 MONTAGE - PEDAL Wie wird das linke Pedal montiert: Die Markierung „L“ auf der Pedalwelle bezieht sich auf das linke Pedal. Drehen Sie die Pedalwelle zunächst von Hand gegen den Uhrzeigersinn in die linke Kurbel und ziehen Sie sie dann mit einem Gabelschlüssel Nr.
- Page 79 Wie wird das rechte Pedal montiert: Die Markierung „R“ auf der Pedalwelle bezieht sich auf das rechte Pedal. Drehen Sie die Pedalwelle zunächst von Hand im Uhrzeigersinn und schrauben Sie sie in die rechte Kurbel, und ziehen Sie sie dann mit einem Gabelschlüssel Nr.
- Page 80 MONTAGE-HINTERE SCHUTZBLECHE (1)Verwenden Sie den Inbusschlüssel Nr. 5 des 16-in-1-Werkzeugs, um die Befestigungsschrauben und Unterlegscheiben für die Kotflügelhalterung zu entfernen, die auf der linken und rechten Seite des Rahmens vorinstalliert sind (siehe Abbildung rechts). (2)Führen Sie den Stützstab durch die Befestigungsschraube des Schutzblech-Stützstabs und ziehen Sie ihn mit einem Sechskantschlüssel Nr.
- Page 81 MONTAGE-BATTERIE ENTFERNEN & INSTALLIEREN (3)Drehen Sie den Schlüssel in die Position "PUSH", um die Batterie zu entfernen. (4)Heben Sie den Batter- iegriff an und nehmen Sie (1)Klappen Sie den Griff die Batterie heraus. an der Unterseite des (2)Drehen Sie das Sitz- Sitzes um und ziehen Sie rohr nach oben.
- Page 82 5. Richten Sie die Akkus- 6. Schieben Sie die Batterie 7. Drücken Sie das Sitzkissen chiene an der Batterieschiene nach unten, so dass sie nach unten, bis das Sitzkissen am Rahmen aus. vollständig mit dem Entlades- und das Sitzrohr vollständig tecker am Rahmen in Kontakt ineinander verriegelt sind.
-
Page 83: Entfernen Und Einsetzen Des Akkus
EINSCHALTEN/AUSSCHALTEN DES E-BIKES (1)Stecken Sie den Schlüssel in das Schlüsselloch in Bild 1 und drehen Sie den Schlüssel nach rechts von der Stellung "OFF" in die Stellung "ON". (1)Stecken Sie den Schlüssel in das Schlüsselloch in Abbildung 1 und drehen Sie den Schlüssel nach rechts von der Stellung "OFF"... -
Page 84: Akku & Ladung
AKKU & LADUNG AKKU SICHERHEIT • Laden Sie den Akku nur bei 0°C ~ 45°C, entladen Sie ihn bei - 20°C ~ 60°C, halten Sie den Akku trocken. Legen Sie den Akku nicht in säurehaltige oder alkalische Flüssigkeiten, vermeiden Sie Regen, und halten Sie ihn von Feuer, Hitze und hohen Temperaturen fern. - Page 85 LADEN SIE IHR E-BIKE 1.Aufladen: Schrauben Sie die Kunststoffabdeckung des Akkus ab (Bild 1), verbinden Sie das mitgelief- erte Ladegerät und beginnen Sie mit dem Laden. Wenn der Akku volle Leistung anzeigt und die Anzei- geleuchte des Ladegeräts von rot auf grün wechselt, bedeutet dies, dass der Akku vollständig geladen ist.
- Page 86 2.Einschalten: siehe Abbildung 2, schalten Sie den Akkuschalter ein ; siehe Abbildung 3, drücken Sie lange auf die Taste, um den Strom ein-/auszuschalten. 3. Akku-Anzeige: Nach dem Einschalten des Geräts leuchtet die Instrumententafel auf und zeigt den Akku- stand an. Der Akkustand wird in 5 Feldern angezeigt, die einem hohen, mittleren und niedrigen Akkustand entsprechen.
-
Page 87: Funktion Einführung
FUNKTIONS EINFÜHRUNG LCD DISPLAY KONTROLLEN Beschreibung der Funktion:: 1.Anzeige Funktion Geschwindigkeitsanzeige, Anzeige des Unterstützungsverhältnisses, Akkuanzeige, Fehlermeldung, Kilometerstan- danzeige, Spannungsanzeige, einmalige Einschaltzeit, 6km/h Booster, Bremsanzeige, Scheinwerferanzeige 2.Kontroll- und Einstellungsfunktionen Kontrolle des Leistungsschalters, Kontrolle des Scheinwerferschalters, Einstellung von 6 km/h Booster, Einstellung des 3-Gang-Boost-Verhältnisses, Umschaltung der Geschwindigkeitsanzeige, Umschaltung des Kilometerstandes und der einmaligen Einschaltzeit sowie der Spannungsanzeige. - Page 88 BESCHREIBUNG DER ANZEIGEFUNKTION Die Schnittstelle des Fahrrads (Abbildung 1) bietet Ihnen eine Vielzahl von Funktionsmodi, um Ihren Fahrbedürfnissen gerecht zu werden. Die Funktionen sind wie folgt: BESCHREIBUNG Ikone Anzeige des Batteriestands Multifunktionale Anzeige (Gesamtkilometerstand ODO, Einzelkilometerstand TRIP (Einheit: Meile, km), einmalige Einschaltzeit TIME, Akkuspannung VOL) Geschwindigkeitsanzeige (einschließlich Echtzeitgeschwindigkeit, Höchstgeschwindigkeit und Durchschnittsgeschwindigkeit)
- Page 89 Hinweis: FEHLERCODE 1.Aufgrund des Upgrades der Produkte des Unternehmens kann der Anzeigeinhalt einiger Teile des Produkts, das Sie erhalten, von den Anweisun- gen abweichen, aber dies wird Ihre normale Code Bedeutung Verwendung nicht beeinträchtigen. Alles unterliegt dem tatsächlichen Produkt, und das Unternehmen Normaler Status behält sich das Recht der endgültigen Auslegung.
- Page 90 TASTEN FUNKTION Die spezifischen Kombinationspositionen der Tasten sind wie folgt: Einführung in die Verwendung von Tasten: Die Tastenbedienung ist unterteilt in kurzes und langes Drücken Spezifische Bedienungsanleitungen 1. Ein-/ Ausschalten des LCD-Displays • Wenn das Gerät ausgeschaltet ist, halten Sie die Taste gedrückt, um es einzuschalten.
-
Page 91: Produkt Spezifikationen
PRODUKT SPEZIFIKATIONEN ARTIKEL SPEZIFIKATIONEN Modell Ungefaltet Größe 1390*530*1040mm (139*53*104cm) 800*500*680mm (80*50*68cm) Gefaltete Größe Paketgröße 810*370*640mm (81*37*64) Nettogewicht 22,5kg (49,6lbs) 29kg (63,9lbs) Bruttogewicht 120kg (264,5lbs) Nennbelastung MAX Geschwindigkeit 25km/h (15,5mph) 25-45KM(Beeinflusst durch Last, Temperatur, Straßenbedingungen, Max. Reichweite Fahrmodus usw. Z.B. Bei 70kg und 25 ℃ kann die maximale Reichweite im Elektromodus 25KM erreichen, und die Moped-Re- ichweite hängt von der Last und dem Fahrstil ab.) Max. - Page 92 ARTIKEL SPEZIFIKATIONEN 250W Motorleistung Ladegerät 42V 2.0A Ladezeit 4-5 Stunden Größe des Reifens 16Zoll*2.125 Fette Reifen Bremsen Typ Scheibenbremsen vorne und hinten Material des Rahmens Eisen Rad Typ Luftreifen Hinweis: Die Höchstgeschwindigkeit kann durch Faktoren wie Leistung, Last, Reifendruck, Straßenbedingungen und Schmierung von Kette und Achse beeinflusst werden. Die angegebene Reichweite wird durch kontinuierliche Tests mit einer 60 kg schweren Last auf glatten, befestigten Straßen bei Geschwindigkeiten von 15-25 km/h (9,38-15,5 mph) ermittelt, beginnend mit einer vollen Ladung bis zur vollständigen Erschöpfung.
-
Page 93: Reinigung Und Lagerung
GRUNDPFLEGE UND WARTUNG VON FAHRRÄDERN REINIGUNG UND LAGERUNG • Lagern Sie Ihr Fahrrad immer an einem sauberen, trockenen Ort, um Rost und Schäden an der Batterie zu vermeiden. • Halten Sie die Batterien voll aufgeladen, wenn sie im Abstand von bis zu zwei Wochen nicht benutzt werden. •... -
Page 94: Lagerung Und Entsorgung
AKKU-WARTUNG 1. Verwenden Sie original Akkupacks, die Verwendung anderer Modelle oder Marken kann zu Sicherheitsproble- men führen. 2. Berühren Sie nicht die Kontakte. Zerlegen Sie das Gehäuse nicht und durchstechen Sie es nicht. Halten Sie die Kontakte von Metallgegenständen fern, um einen Kurzschluss zu vermeiden, der zu Batterieschäden oder sogar zu Verletzungen und Todesfällen führen kann. - Page 95 Wenn das Produkt nicht innerhalb eines angemessenen Zeitraums oder zu einem angemessenen Preis rep- ariert werden kann, behält sich EVERCROSS TECH das Recht vor, das Produkt durch ein Gleichwertiges zu ersetzen. (3) Bitte beachten Sie, dass der Garantieanspruch entfällt, wenn Reparaturen oder Änderungen von nicht autorisierten Personen vorgenommen werden oder wenn das Produkt mit anderen Teilen oder Zubehör ausgestattet wird, die nicht...
-
Page 96: Kontaktieren Uns
KONTAKTIEREN UNS Bitte wenden Sie sich direkt an uns, wenn Sie Probleme mit dem Fahren, der Wartung, der Sicherheit, Fehlern/Störungen mit Ihrem EVERCROSS TECH-Produkt haben. E-mail Service: support@evercross.eu official_evercross Evercross Official https://www.evercross.eu/ official_evercross EVERCROSS DE-93... - Page 97 CONTENUTI Avviso sulla Sicurezza del Prodotto ··········································96~97 Messaggio di Avviso ·············································································98 Dichiarazione di Responsabilità·······························································99 是非成败转头空,青山依旧在,惯看秋月春风。一壶浊酒喜相逢,古今多少事 Contenuto del Pacco ·································································100 Panoramica del Prodotto ····························································101 · Assemblea ·······································································102~110 Rimuovere & Installare la Batteria ················································111 Batteria & Carica································································112~114 Introduzione alla Funzione ···················································115~118 Specifiche di Prodotto··························································119~120 Nozioni di Base sulla Cura e Manutenzione ····························121~122 Garanzia di Prodotto ·································································123 Contattaci ···············································································124...
- Page 98 Grazie per aver scelto il nostro EK5. Si auguriamo buone pedalate con le sue nuove bici! Questo manuale è progettato solo per le biciclette EK5. Si prega di leggere e comprendere tutte le parti dell'intero manuale prima di utilizzare l'e-bike per la prima volta.
-
Page 99: Avviso Sulla Sicurezza Del Prodotto
Anche se è un ciclista esperto, tutti i ciclisti dovrebbero leggere e comprendere questo manuale prima di utilizzare una bici elettrica. Per la sua sicurezza e per evitare lesioni gravi o morte, esamina attentamente i seguenti suggerimenti di sicurezza per un funzionamento sicuro della sua bici elettrica EVERCROSS TECH. CONSIGLI OPERATIVI SICURI : ·... - Page 100 PRIMA DI GUIDARE • Non utilizzare prima di leggere attentamente le istruzioni per l'uso e comprendere le prestazioni del prodotto; • Non dare un passaggio a qualcuno che non sa come maneggiare questo prodotto. Prima di andare in bicicletta, verificare se i freni sono efficaci. Quando si frena, frenare prima e poi frenare davanti. •...
-
Page 101: Messaggio Di Avviso
Si prega di prestare la dovuta attenzione ed evitare azioni che potrebbero causare danni alla bicicletta. 4. Dichiarazione di non responsabilità sui rischi: La guida della bici elettrica EVERCROSS TECH comporta rischi intrinseci, incluso il potenziale lesioni gravi o addirittura morte a causa di perdita di controllo, collisioni e cadute. Pre- stare sempre attenzione e guidare a proprio rischio e pericolo, rispettando le linee guida e i regolamenti di sicurezza. -
Page 102: Dichiarazione Di Responsabilità
DICHIARAZIONE DI RESPONSABILITA' : • Dopo la guida, riporre l'auto in un luogo privo di luce solare e pioggia e non può essere collocata in un edificio residenziale. • Controllare frequentemente il motore e il freno. • Controllare regolarmente tutte le viti dell'auto e i punti che devono essere fissati e serrarle regolarmente. •... -
Page 103: Contenuto Del Pacco
CONTENUTO DEL PACCO Controlla attentamente il contenuto della confezione, se qualcosa manca o è danneggiato, contatta il TECH servizio clienti EVERCROSS per supporto: support@evercross.eu. Nota: Conservare l'imballaggio esterno del prodotto nel caso in cui sia necessario rispedire la bicicletta in futuro. -
Page 104: Panoramica Del Prodotto
PANORAMICA DEL PRODOTTO 10 9 18 Clip per Tubo Sella 6 Forcella Anteriore 12 Copricatena 1 LCD Display 19 Tubo sella ammortiz- 7 Pneumatico 13 Batteria 2 Impugnatura del zatore 8 Pastiglia freno a disco 14 Catena manubrio 20 Sella 9 Riflettore della ruota 15 Motore 3 Freno... -
Page 105: Assemblea
ASSEMBLEA Prima di iniziare il processo di assemblaggio, effettuare un'ispezione approfondita dell'imballaggio per garantire che siano inclusi tutti i componenti e gli accessori necessari. Se identifica articoli mancanti o danneggiati, si preghiamo di contattarci tempestivamente. DESCRIZIONE DELLE PARTI 1.Pedale 3. Riflettori per ruote (2 set) 2.Campana 4.Strumento 16-in-1 IT-102... - Page 106 ASSEMBLEA - APERTURA DEL VEICOLO 1. Rimuovere l'imballaggio, posizion- are l'intera bicicletta su un terreno 1.Sollevare il fermo della piano e aprire il telaio. cartella 2.Chiudere il telaio Regolare l'angolo della maniglia pieghevole del telaio, premere saldamente la maniglia pieghevole del telaio secondo direzione mostrata nell'immagine.
- Page 107 Posiziona il rialzo pieghevole verso l'alto e chiudilo secondo la direzione dell'immagine. 1. Aprire la fibbia di regolazione telescopi- ca del montante pieghevole. 2. Inserire il montante telescopico nella direzione, regolare l'altezza richiesta e stringere la fibbia di regolazione. Nota: se la fibbia di regolazione è troppo stretta o troppo allentata, regolare adegua- tamente la vite su "3".
- Page 108 ASSEMBLEA-ACCESSORI Premontare il riflettore della ruota, le Posizionare la staffa della campana nella guarnizioni e le viti come mostrato in figura e posizione corrispondente del manubrio e serrarli con un esagono interno n. 4 e una serrare la vite con un cacciavite a croce. chiave fissa n.
- Page 109 ASSEMBLEA-PEDALE Come installare il pedale sinistro: Il segno "L" sull'albero del pedale si riferisce al pedale sinistro. Innanzitutto, ruotare manualmente l'albero del pedale in senso antiorario nella pedivella a sinistra, quindi utilizzare una chiave aperta n. 15 per serrarlo in senso antiorario. IT-106...
- Page 110 Come installare il pedale destro : Il segno "R" sull'albero del pedale si riferisce al pedale destro. Innanzitutto, ruotare manualmente l'albero del pedale in senso orario e avvitarlo nella pedivella a destra, quindi utilizzare una chiave aperta n. 15 per serrarlo in senso orario. IT-107...
- Page 111 ASSEMBLEA -BASTONE PARAFANGO POSTERIORE (1) Utilizzare la chiave a brugola n. 5 nello strumento 16-in-1 per rimuovere le viti e le rondelle di fissaggio del supporto parafango preinstallate sui lati sinistro e destro del telaio, come mostrato nell'immagine a destra. (2)Passare il bastone di supporto attraverso la vite di fissaggio del bastone di sostegno del parafango e stringerlo nel correfori di vite spugnosi su entrambi i lati del telaio con una chiave esagonale n.
- Page 112 ASSEMBLEA - RIMOZIONE E INSTALLAZIONE DELLA BATTERIA (3)Utilizzare la chiave per girare in posizione "PUSH" per rimuovere la batteria. (4)Prendere la batteria maneggiare ed estrarre la (1) Capovolgere la mani- (2) Ruotare l'inclinazione batteria. glia nella parte inferiore del tubo sella verso l'alto. della borsa del sedile e tirarla verso l'alto.
- Page 113 5. Allineare il cursore della 6. Inserire la batteria fino in 7. Premere il cuscino del batteria con il binario della fondo in modo che sia com- sedile verso il basso fino al batteria sul telaio. pletamente a contatto con la sedile cuscino e tubo sella scarica spina sul telaio.
-
Page 114: Rimuovere & Installare La Batteria
ACCENDERE/SPEGNERE L'E-BIKE (1) Inserire la chiave nella serratura nella figura 1 e girare la chiave a destra dalla posizione "OFF" alla posizione "ON". (1) Inserire la chiave nella serratura nella figura 1 e girare la chiave a destra dalla posizione "OFF" alla posizione "ON". -
Page 115: Batteria & Carica
BATTERIA & CARICA SICUREZZA DELLA BATTERIA • Caricare solo a 0°C ~ 45°C, scaricare a -20°C ~ 60°C, mantenere la batteria asciutta. Non inserire la batteria liquidi acidi o alcalini, evitare la pioggia e tenere lontano da fuoco, calore e ambienti ad alta temperatura. - Page 116 RICARICA LA SUA E-BIKE 1. Ricarica: Svitare il coperchio di plastica della batteria (Immagine 1), collegare il caricabatterie in dotazione e avviare la ricarica. Quando la batteria mostra la piena potenza e la spia del caricabatterie cambia da rosso a verde, significa che è completamente carica. IT-113...
- Page 117 2. Accensione: Fare riferimento alla Figura 2, accendere l'interruttore della batteria ; fare riferimento all'immagine 3, premere a lungo il pulsante per accendere/spegnere l'alimentazione. 3. Visualizzazione della batteria: dopo aver acceso lo strumento, il quadro strumenti si illumina per visualiz- zare il livello della batteria.
-
Page 118: Introduzione Alla Funzione
INTRODUZIONE ALLA FUNZIONE CONTROLLI DISPLAY LCD Descrizione della funzione: 1.Funzione di visualizzazione Visualizzazione della velocità, visualizzazione del rapporto di assistenza, indicatore della batteria, segnalazione di guasto, visualizzazione del chilometraggio, visualizzazione della tensione, tempo di accensione singolo, boost di 6 km/h, indicatore dei freni, display dei fari 2.Funzioni di controllo e impostazione Controllo dell'interruttore di alimentazione, controllo dell'interruttore dei fari, impostazione boost di 6 km/h, impostazi- one del rapporto di boost a 3 velocità, display della velocità... - Page 119 DESCRIZIONE DELLA FUNZIONE DEL DISPLAY L'interfaccia della bicicletta (Immagine 1) offre una varietà di modalità di funzionamento per soddisfare le sue esigenze di guida. Le sue funzioni sono le seguenti : DESCRIZIONE ICONA Indicatore di carica della batteria Area espositiva multifunzionale (Chilometraggio totale ODO, chilometraggio singolo TRIP (unità: miglia, km), tempo di accensione singolo TIME, tensione della Indicatore di velocità...
- Page 120 Nota: ERROR CODE 1. A causa dell'aggiornamento dei prodotti dell'azien- da, il contenuto visualizzato di alcune parti del prodotto ricevuto potrebbe essere diverso dalle istruzioni, ma ciò non influirà sul normale utilizzo. Codice Significato Tutto è soggetto al prodotto reale e l'azienda si riserva il diritto di interpretazione finale.
- Page 121 FUNZIONE DEL PULSANTE Le posizioni specifiche delle combinazioni dei pulsanti sono le seguenti: Introduzione all'utilizzo dei pulsanti: Le operazioni chiave sono suddivise in pressione breve e pressione lunga Spiegazione del funzionamento specifico 1. Cambiare il display LCD • Quando l'alimentazione è spenta, tenere premuto il pulsante per accenderla.
-
Page 122: Specifiche Di Prodotto
SPECIFICHE DI PRODOTTO ARTICOLO SPECIFICAZIONI Modello Dimensioni Spiegate 1390*530*1040mm (139*53*104cm) 800*500*680mm (80*50*68cm) Dimensioni Piegate Dimensioni del Pacchetto 810*370*640mm (81*37*64) Peso Netto 22,5kg (49,6lbs) Peso Lordo 29kg (63,9lbs) 120kg (264,5lbs) Carico Nominale Massima Velocità 25km/h (15,5mph) 25-45KM (Influenzato dal carico, dalla temperatura, dalle condizioni Massimo. - Page 123 ARTICOLO SPECIFICAZIONI 250W Potenza del Motore Caricabatterie 42V 2.0A Tempo di Carica 4-5 ore Dimensioni dei Pneumatici Pneumatico grasso da 16 pollici * 2.125 Tipo di Frenatura Freno a Disco Anteriore e Posteriore Materiale del Telaio Ferro Tipo di Ruota Pneumatici Nota: La velocità...
-
Page 124: Pulizia E Stoccaggio
CURA E MANUTENZIONE DELLA BICICLETTA PULIZIA E STOCCAGGIO • Conservare sempre la bicicletta in un luogo pulito e asciutto per evitare ruggine e danni alla batteria. • Mantenere le batterie completamente cariche tra un utilizzo e l'altro anche a due settimane di distanza. •... -
Page 125: Manutenzione Della Batteria
MANUTENZIONE DELLA BATTERIA 1.Utilizzare pacchi batteria originali, utilizzare altri modelli o marche che potrebbero causare problemi di sicurez- 2.Non toccare i contatti. Non smontare né forare l'involucro. Tenere i contatti lontani da oggetti metallici per evitare cortocircuiti che potrebbero causare danni alla batteria o addirittura lesioni e morte. 3.Utilizzare l'adattatore di alimentazione originale per evitare potenziali danni o incendi. -
Page 126: Garanzia Di Prodotto
Nei casi in cui il prodotto non può essere riparato entro un tempo ragionevole o ad un costo ragionevole, EVERCROSS TECH si riserva il diritto di sostituire il prodotto con uno sostitutivo di pari valore. -
Page 127: Contattaci
CONTATTACI Si preghiamo di contattarci direttamente se riscontrate problemi di guida, manutenzione, sicurezza, errori/guasti con il suo prodotto EVERCROSS TECH. E-mail Servizio: support@evercross.eu official_evercross Evercross Official https://www.evercross.eu/ official_evercross EVERCROSS IT-124... - Page 128 CONTENIDO Aviso de Seguridad del Producto ··········································127~128 Mensaje de Advertencia ·······································································129 Declaración de Responsabilidad ····························································130 是非成败转头空,青山依旧在,惯看秋月春风。一壶浊酒喜相逢,古今多少事 Contenido del Paquete·······························································131 Resumen del Producto·······························································132 · Montaje············································································133~141 Quitar e Instalar la Batería ·························································132 Batería y Carga··································································143~145 Introducción de Funciones ···················································146~149 Especificación del Producto···················································150~151 Mantenimiento y Cuidados Básicos·········································152~153 Garantía del Producto·································································154 Contacto··················································································155...
- Page 129 Si tiene alguna pregunta después de leer esta guía, visite la sección de soporte de nuestro sitio web o envíenos un correo electrónico a a support@evercross.eu. ¡Estamos aquí para ayudarle! SI NECESITA AYUDA, PÓNGASE EN CONTACTO CON NOSOTROS AQUÍ: Sitio web: https://evercross.eu/...
-
Page 130: Aviso De Seguridad Del Producto
Para su seguridad y para evitar lesiones graves o la muerte, por favor revise atentamente los siguientes consejos de seguridad para un funcionamiento seguro de su bicicleta eléctrica EVERCROSS TECH. CONSEJOS PARA UN FUNCIONAMIENTO SEGURO: ·... -
Page 131: Antes De Montar
ANTES DE MONTAR • No lo utilice antes de leer detenidamente las instrucciones de uso y comprender las prestaciones del producto. • No preste la bicicleta a alguien que no sepa manejar este producto. Antes de montar en bicicleta, com- pruebe la eficacia de los frenos. -
Page 132: Mensaje De Advertencia
Por favor, ejerza el cuidado adecuado y evite acciones que puedan resultar en daños a la bicicleta. 4. Descargo de responsabilidad: Conducir la bicicleta eléctrica EVERCROSS TECH conlleva riesgos inherentes, inclu- yen do la posibilidad de lesiones graves o incluso la muerte debido a la pérdida de control, colisiones y caídas. Tenga siempre precaución y conduzca bajo su propia responsabilidad, respetando las directrices y normas de seguridad. -
Page 133: Declaración De Responsabilidad
Declaración de Responsabilidad • Después de utilizarlo, guárdelo en un lugar donde no le dé el sol ni la lluvia, y no lo coloque en un edificio residencial. • Compruebe con frecuencia el motor y el freno. • Compruebe con regularidad todos los tornillos del coche y los lugares que necesitan sujeción, y apriéte- los con regularidad. -
Page 134: 是非成败转头空,青山依旧在,惯看秋月春风。一壶浊酒喜相逢,古今多少事 Contenido Del Paquete
Compruebe cuidadosamente el contenido del paquete, si falta algo o está dañado, póngase en contacto TECH con el servicio de atención al cliente de EVERCROSS para obtener ayuda: support@evercross.eu. Nota: Conserve el embalaje exterior del producto por si necesita reenviar la bicicleta en el futuro. -
Page 135: Resumen Del Producto
RESUMEN DEL PRODUCTO 10 9 18 Clip del tubo del 6 Horquilla delantera 12 Tapa de la cadena 1 Pantalla LCD asiento 7 Neumáticos 13 Batería 2 Manillar empuñadura 19 Amortiguador 8 Pastilla de freno de disco 14 Cadena 3 Freno tubo de asiento 9 Reflector de rueda 15 Motor... -
Page 136: Montaje
MONTAJE Antes de comenzar el proceso de montaje, inspeccione detenidamente el embalaje para asegu- rarse de que se incluyen todos los componentes y accesorios necesarios. Si detecta algún elemen- to que falte o esté dañado, póngase en contacto con nosotros lo antes posible. DESCRIPCIÓN DE PIEZAS 1. - Page 137 MONTAJE - DESPLIEGUE DEL VEHÍCULO 1. Retire el embalaje, coloque toda la bicicleta sobre un suelo llano y 1.Tire hacia arriba del despliegue el cuadro. pestillo de la carpeta 2.Cierre el marco Ajuste el ángulo del asa plegable del marco, presione el asa plegable del marco firmemente según la dirección mostrada en la imagen.
- Page 138 Levante la contrahuella plegable y ciérrela según el sentido de la imagen. 1. Abra la hebilla de ajuste telescópico de la contrahuella abatible. 2. Inserte el elevador telescópico en la dirección, ajuste la altura deseada y apriete la hebilla de ajuste. Nota: Si la hebilla de ajuste está...
- Page 139 MONTAJE-ACCESORIOS Monte previamente el reflector de la rueda, Coloque el soporte de la campana en la las juntas y los tornillos como se muestra en posición correspondiente del manillar y la imagen, y apriételos con una llave hexag- apriete el tornillo con un destornillador onal interior del nº...
- Page 140 MONTAJE - PEDAL Cómo instalar el pedal izquierdo: La marca "L" en el eje del pedal se refiere al pedal izquierdo. En primer lugar, gire a mano el eje del pedal en sentido antihorario en la manivela de la izquierda y, a continuación, utilice una llave de boca del nº...
- Page 141 Cómo instalar el pedal derecho: La marca "R" en el eje del pedal se refiere al pedal derecho. En primer lugar, gire a mano el eje del pedal en el sentido de las agujas del reloj y enrósquelo en la biela de la derecha; a continuación, utilice una llave fija del nº...
- Page 142 MONTAJE-GUARDABARROS TRASERO (1) Utilice la llave Allen nº 5 de la herramienta 16 en 1 para retirar los tornillos de fijación del soporte del guardabarros y las arandelas preinstaladas en los lados izquierdo y derecho del bastidor, como se mues- tra en la imagen de la derecha.
- Page 143 INSTARAR Y QUITAR LA BATERÍA (3) Gire la llave a la posición "PUSH" para extraer la batería. (4) Levante el asa de la batería y sáquela. (1) Gire el asa situada en (2) Gire la inclinación del la parte inferior de la tubo del asiento hacia bolsa del asiento y tire de arriba.
- Page 144 5. Alinee la corredera de la 6. Inserte la batería hasta el 7. Presione el cojín del asien- batería con el carril de la fondo, de modo que quede to hacia abajo hasta que el batería en el bastidor. completamente en contacto cojín y el tubo del asiento con el conector de descarga queden completamente...
- Page 145 ACCENDERE/SPEGNERE L'E-BIKE (1) Introduzca la llave en el orificio de la imagen 1 y gírela hacia la derecha desde la posición "OFF" a la posición "ON". (1) Inserte la llave en el orificio de la imagen 1 y gírela hacia la derecha desde la posición "OFF" a la posición "ON".
-
Page 146: Batería Y Carga
BATERÍA Y CARGA SEGURIDAD DE LA BATERÍA • Cargar sólo a 0°C ~ 45°C, descargar a - 20°C ~ 60°C, mantener la batería seca. No introduzca la batería en líquidos ácidos o alcalinos, evite la lluvia y manténgala alejada del fuego, el calor y las altas temperaturas. - Page 147 CARGA SU E-BIKE 1. Carga: Desenrosque la tapa de plástico de la batería (Foto 1), conecte el cargador suministrado e inicie la carga. Cuando la batería muestre toda su potencia y la luz indicadora del cargador cambie de rojo a verde, significa que está completamente cargada. ES-144...
- Page 148 2. Encendido: consulte la imagen 2, encienda el interruptor de la batería ; consulte la imagen 3, pulse prolongadamente el botón para encender/apagar la alimentación. 3. Visualización de la batería: Después de encender el instrumento, el panel de instrumentos se ilumina para mostrar el nivel de la batería.
-
Page 149: Introducción De Funciones
INTRODUCCIÓN DE FUNCIONES CONTROLES DE PANTALLA LCD Descripción de funciones: 1.Función de visualización Indicador de velocidad, indicador de relación de asistencia, indicador de batería, aviso de avería, indicador de kilometraje, indicador de voltaje, tiempo de encendido único, aumento de 6 km/h, indicador de freno, indicador de faro delantero 2.Funciones de control y ajuste Control del interruptor de encendido, control del interruptor de los faros, ajuste de la aceleración de 6 km/h, ajuste... - Page 150 DESCRIPCIÓN DE LAS FUNCIONES DE LA PANTALLA La interfaz de la bicicleta (ilustración 1) le ofrece una variedad de modos de funcionamiento, para satisfacer sus necesidades de conducción. Sus funciones son las siguientes: DESCRIPCIÓN ICONO Indicador de carga de la batería Área de visualización multifuncional (kilometraje total ODO, kilometraje individual TRIP (unidad: milla, km), tiempo de encendido individual TIME, voltaje de la batería...
-
Page 151: Código De Error
Nota: CÓDIGO DE ERROR 1. Debido a la actualización de los productos de la empresa, el contenido de la pantalla de algunas partes del producto que se obtiene puede ser diferente de las instrucciones, pero no afectará a su Código Significado uso normal. - Page 152 FUNCIÓN DE BOTONES Las posiciones específicas de combinación de los botones son las siguientes: Introducción al uso de los botones: Las operaciones con las teclas se dividen en pulsación corta y pulsación larga Explicación de la operación específica 1. Encienda la pantalla LCD •...
-
Page 153: Especificación Del Producto
ESPECIFICACIÓN DEL PRODUCTO ITEM ESPECIFICACIONES Modelo Tamaño Sin Plegar 1390*530*1040mm (139*53*104cm) 800*500*680mm (80*50*68cm) Tamaño Plegado Tamaño del Paquete 810*370*640mm (81*37*64) Peso Neto 22,5 kg (49,6 libras) Peso Bruto 29 kg (63,9 libras) 120 kg (264,5 libras) Carga Nominal Velocidad MÁX 25 km/h (15,5 mph) 25-45KM (Depende de la carga, la temperatura, las condiciones de la carretera, el modo de conducción, etc. - Page 154 ITEM ESPECIFICACIONES 250W Potencia del Motor Cargador 42V 2.0A Tiempo de Carga 4-5 horas Tamaño de los Neumáticos 16 pulgadas*2.125 Neumático Gordo Tipo de Frenado Freno de Disco Delantero y Trasero Material del Marco Hierro Tipo de Rueda Neumáticos Nota: La velocidad máxima puede verse afectada por factores como la potencia, la carga, la presión de los neumáticos, las condiciones de la carretera y la lubricación de la cadena y el eje.
-
Page 155: Limpieza Y Almacenamiento
CUIDADOS BÁSICOS Y MANTENIMIENTO LIMPIEZA Y ALMACENAMIENTO • Guarde siempre la bicicleta en un lugar limpio y seco para evitar que se oxide y dañe la batería. • Mantenga las baterías completamente cargadas cuando no las utilice durante más de dos semanas. •... -
Page 156: Mantenimiento De La Batería
MANTENIMIENTO DE LA BATERÍA 1. Utilice baterías originales, el uso de otros modelos o marcas puede acarrear problemas de seguridad. 2. No toque los contactos. No desmonte ni perfore la carcasa. Mantenga los contactos alejados de objetos metálicos para evitar cortocircuitos que puedan dañar la batería o incluso provocar lesiones y muertes. 3. -
Page 157: Garantía Del Producto
En los casos en que el producto no pueda repararse en un plazo razonable o a un coste razonable, EVERCROSS TECH se reserva el derecho de cambiar el producto por otro de igual valor. -
Page 158: Contacto
CONTACTO Póngase en contacto con nosotros directamente si experimenta cualquier problema de conducción, mantenimiento, seguridad, errores/defectos con su producto EVERCROSS TECH. Servicio de correo electrónico: support@evercross.eu official_evercross Evercross Official https://www.evercross.eu/ official_evercross EVERCROSS ES-155... - Page 159 INHOUD Productveiligheidsmededeling ·············································158~159 Waarschuwing ··················································································160 Verantwoordelijkheidsverklaring·····························································161 是非成败转头空,青山依旧在,惯看秋月春风。一壶浊酒喜相逢,古今多少事 Verpakkingsinhoud ··································································162 Productoverzicht ·····································································163 Montage ··········································································164~172 Verwijder en Installeer de batterij·················································173 Batterij en Opladen·····························································174~176 Functie Introductie ·····························································177~180 Productspecificatie······························································181~182 Basisprincipes van Fietsonderhoud ·······································183~184 Product Garantie ······································································185 Contacteer Ons ········································································186 NL-156...
- Page 160 WELKOM BIJ EVERCROSS TECH Bedankt dat u voor onze EK5 heeft gekozen. We wensen u veel rijplezier met uw nieuwe fietsen! Deze handleiding is uitsluitend bedoeld voor EK5-fietsen. Lees en begrijp alle delen van deze gehele handleiding voordat u de e-bike voor de eerste keer gebruikt.
-
Page 161: Productveiligheidsmededeling
Zelfs als u een ervaren fietser bent, moeten alle fietsers deze handleiding lezen en begrijpen voordat ze een elektrische fiets gebruiken. Voor uw veiligheid en om ernstig letsel of overlijden te voorkomen, verzoek- en we u de volgende veiligheidstips zorgvuldig door te nemen voor een veilig gebruik van uw EVERCROSS TECH elektrische fiets. - Page 162 VOOR HET RIJDEN • Gebruik het product niet voordat u de gebruiksaanwijzing zorgvuldig heeft gelezen en de prestaties van het product begrijpt; • Leen geen lift uit aan iemand die niet weet hoe hij met dit product moet omgaan. Controleer vóór het fietsen of de remmen werken.
-
Page 163: Waarschuwing
Wees voorzichtig en vermijd handelingen die tot schade aan de fiets kunnen leiden. 4. Risicodisclaimer: Het rijden op de EVERCROSS TECH elektrische fiets brengt inherente risico's met zich mee, - waar onder de kans op ernstig letsel of zelfs de dood als gevolg van verlies van controle, botsingen en vallen. Wees altijd voorzichtig en rijd op eigen risico, waarbij u zich aan de veiligheidsrichtlijnen en -voorschriften houdt. -
Page 164: Verantwoordelijkheidsverklaring
Verantwoordelijkheidsverklaring: • Bewaar de fiets na het rijden op een plaats zonder zonlicht en regen, en mag niet in een woongebouw worden geplaatst. • Controleer de motor en rem regelmatig. • Controleer regelmatig alle schroeven van de fiets en de plaatsen die vastgezet moeten worden, en draai ze regelmatig vast. -
Page 165: Verpakkingsinhoud
Controleer de inhoud van de verpakking zorgvuldig. Als er iets ontbreekt of beschadigd is, neem dan TECH contact op met de klantenservice van EVERCROSS voor ondersteuning: support@evercross.eu. Let op: Bewaar de buitenverpakking van het product voor het geval u de fiets in de toekomst opnieuw moet verzenden. -
Page 166: Productoverzicht
Productoverzicht 10 9 18 Zadelbuisclip 7 Band 12 Kettingafdekking 1 LCD-scherm 19 Zitbuis 8 Schijfremblok 13 Batterij 2 Stuurgreep 20 Zadel 9 Wielreflector 14 Ketting 3 Remhendel 10 Schijfrem 15 Motor 4 Stuur 11 Pedaal 16 Achterdrager 5 Koplamp 17 Achterlicht 6 Voorvork NL-163... -
Page 167: Montage
Montage Voordat u met het montageproces begint, dient u de verpakking grondig te inspecteren om er zeker van te zijn dat alle benodigde componenten en accessoires aanwezig zijn. Als u items ontdekt die ontbreken of beschadigd zijn, neem dan onmiddellijk contact met ons op. ONDERDELENBESCHRIJVING 1. - Page 168 MONTAGE - VOERTUIG UITVOUWEN 1. Verwijder de verpakking, plaats de hele fiets op een vlakke onder- 1.Trek de mapvergren- grond en vouw het frame uit. deling omhoog. 2.Sluit het frame. Pas de hoek van de inklapbare handgreep van het frame aan, druk de inklapbare handgreep van het frame stevig aan in de richting die op de afbeelding wordt weerge- geven.
- Page 169 Zet de opvouwbare verhoger rechtop en sluit hem volgens de richting van de afbeelding 1. Open de telescopische verstelgesp van de opvouwbare verhoger. 2. Steek de telescopische stijgbuis in de richting, pas de gewenste hoogte aan en draai de verstelgesp vast. Opmerking: Als de afstelgesp te strak of te los zit, stel dan de schroef bij "3"...
- Page 170 MONTAGE - ACCESSOIRES Monteer de wielreflector, pakkingen en Plaats de belbeugel in de overeenkomstige schroeven vooraf zoals weergegeven in de positie van het stuur en draai de schroef vast afbeelding, en draai ze vast met een binnen- met een kruiskopschroevendraaier. zeskant nr.
- Page 171 MONTAGE - PEDAAL Hoe het linkerpedaal te installeren: Het merkteken "L" op de pedaalas verwijst naar het linkerpedaal. Draai eerst de pedaalas met de hand tegen de klok in in de crank aan de linkerkant en gebruik vervolgens een steeksleutel nr. 15 om hem tegen de klok in vast te draaien.
- Page 172 Hoe het rechterpedaal te installeren: Het merkteken "R" op de pedaalas verwijst naar het rechterpedaal. Draai eerst de pedaalas met de hand met de klok mee en schroef deze in de crank aan de rechterkant. Gebruik vervolgens een steeksleu- tel nr. 15 om hem met de klok mee vast te draaien. NL-169...
- Page 173 MONTAGE - ACHTER SPATBORDSTICK (1) Gebruik inbussleutel nr. 5 in het 16-in-1 gereedschap om de bevestigingsschroeven en ringen van de spatbordsteun te verwijderen die vooraf aan de linker- en rechterkant van het frame zijn geïnstalleerd, zoals weergegeven in de afbeelding rechts. (2) Steek de steunstok door de bevestigingsschroef van de spatbordsteunstok en draai deze vast in de juiste Draai de schroefgaten aan beide zijden van het frame los met een inbussleutel nr.
- Page 174 MONTAGE - BATTERIJ VERWIJDEREN EN INSTALLEREN (3) Gebruik de sleutel om naar de "PUSH"-positie te draaien om de batterij te verwijderen. (4) Pak de batterijhand- greep op en verwijder de (1)Draai het handvat aan (2) Draai de zitbuis batterij. de onderkant van de omhoog.
- Page 175 5. Lijn de batterijschuif uit met 6. Plaats de accu naar de 7. Druk het zitkussen naar de batterijrail op het frame. onderkant, zodat deze volle- beneden totdat het zitkussen dig contact maakt met de en de zitbuis volledig met ontladingsplug op het frame.
-
Page 176: Verwijder En Installeer De Batterij
AAN-/UITSCHAKELEN VAN DE E-FIETS (1) Steek de sleutel in het sleutelgat in afbeelding 1 en draai de sleutel naar rechts van de "OFF"-positie naar de "ON"-positie (1) Steek de sleutel in het sleutelgat in afbeelding 1 en draai de sleutel naar rechts van de "OFF"-positie naar de "ON"-positie. -
Page 177: Batterij En Opladen
Batterij en Opladen BATTERIJVEILIGHEID • Alleen opladen bij 0°C ~ 45°C, ontladen bij -20°C ~ 60°C, houd de batterij droog. Plaats de batterij niet in zure of alkalische vloeistoffen, vermijd regen en houd hem uit de buurt van vuur, hitte en omgevingen met hoge temperaturen. - Page 178 LAAD UW E-BIKE OP 1.Opladen: Schroef het plastic deksel van de batterij los (Afbeelding 1), sluit de meegeleverde oplader aan en begin met opladen. Wanneer de batterij volledig opgeladen is en het indicatielampje van de oplader van rood naar groen verandert, betekent dit dat de batterij volledig is opgeladen. NL-175...
- Page 179 2. Inschakelen: zie afbeelding 2, schakel de batterijschakelaar in ; zie Afbeelding 3, druk lang op de knop om de stroom in/uit te schakelen. 3. Batterijweergave: Nadat u het instrument hebt ingeschakeld, licht het instrumentenpaneel op om het batterijniveau weer te geven. Het batterijniveau wordt weergegeven in 5 rasters, die overeenkomen met een hoog, gemiddeld en laag batterijniveau.
-
Page 180: Functie Introductie
Functie Introductie LCD-DISPLAYBEDIENINGEN Functiebeschrijving: 1.Weergavefunctie Snelheidsweergave, weergave ondersteuningsverhouding, batterijniveau-indicator, foutmelding, kilometerstandweer- gave, spanningsweergave, opstarttijd, 6 km/u (3,75 mph) assistentiemodus, remindicator, koplampweergave. 2.Controle- en instellingenfunctie Aan/uit-schakelaarbediening, koplampschakelaarbediening, 6 km/u (3,75 mph) ondersteuningsmodusinstelling, 3-niveaus ondersteuningsverhoudinginstelling, schakelen tussen snelheidsweergave, kilometerstand, opstarttijd en schakelen tussen spanningsweergave. 3. - Page 181 DISPLAYFUNCTIE BESCHRIJVING De fietsinterface (Afbeelding 1) biedt u een verscheidenheid aan functiemodi om aan uw rijbehoeften te voldoen. De functies zijn als volgt: BESCHRIJVING LCOON Batterij-indicator Multifunctionele tentoonstellingsruimte (Totale kilometerstand ODO, enkele kilometer TRIP (eenheid: mijl, km), enkele inschakeltijd TIME, accuspanning VOL)batteria VOL) Snelheidsindicator (inclusief realtime snelheid, maximale snelheid en gemiddelde snelheid)
- Page 182 Opmerking: FOUTCODE 1. Als gevolg van de upgrade van de producten van het bedrijf kan de weergave-inhoud van het product dat u ontvangt afwijken van de handleiding, maar dit heeft geen invloed op uw normale gebruik. Alles Code Betekenis prevaleert in natura en het bedrijf behoudt zich het recht voor op definitieve interpretatie.
- Page 183 KNOPFUNCTIE De specifieke combinatieposities van de knoppen zijn als volgt: Inleiding tot het gebruik van knoppen: Toetsbewerkingen zijn onderverdeeld in kort indrukken en lang indrukken. Specifieke werking uitleg: 1. Schakel het LCD-scherm in: • Wanneer de stroom is uitgeschakeld, houdt u de knop ingedrukt om deze in te schakelen.
-
Page 184: Productspecificatie
Productspecificatie ITEM SPECIFICATIES Model Uitgevouwen formaat 1390*530*1040mm (139*53*104cm) 800*500*680mm (80*50*68cm) Gevouwen formaat Pakketgrootte 810*370*640mm (81*37*64) Netto gewicht 22.5kg (49.6lbs) Bruto gewicht 29kg (63.9lbs) 120kg (264.5lbs) Maximaal laadvermogen Maximale snelheid 25 km/u (15.5 mph) 25 - 45 KM (beïnvloed door belasting, temperatuur, wegom- Max. - Page 185 ITEM SPECIFICATIES 250W Motorkracht Oplader 42V 2.0A Laadtijd 4-5 uur Bandenmaat 16 inch * 2.125 Dikke Banden Remtype Voor- en Achterschijfrem Framemateriaal Ijzer Wieltype Pneumatische Banden Let op: De maximale snelheid kan worden beïnvloed door factoren zoals vermogen, belasting, bandenspanning, wegomstandigheden en smering van de ketting en as. Het gespecificeerde bereik wordt bepaald door middel van voortdurende tests met een belasting van 60 kg, op gladde, verharde wegen, bij snelheden variërend van 15-25 km/u (9,38-15,5 mph), beginnend bij een volledige lading tot volledige uitputting van het vermogen.
-
Page 186: Basisprincipes Van Fietsonderhoud
Basisprincipes van Fietsonderhoud SCHOONMAAK EN OPSLAG • Stal uw fiets altijd op een schone, droge plaats om roest en schade aan de accu te voorkomen. • Zorg ervoor dat de batterijen volledig opgeladen zijn als er tussen gebruik maximaal twee weken zit. •... -
Page 187: Onderhoud Van De Batterij
ONDERHOUD VAN DE BATTERIJ 1. Gebruik originele accu's, gebruik van andere modellen of merken kan veiligheidsproblemen veroorzaken. 2. Raak de contacten niet aan. Demonteer of doorboor de behuizing niet. Houd de contacten uit de buurt van metalen voorwerpen om kortsluiting te voorkomen, wat kan leiden tot schade aan de batterij of zelfs tot letsel of overlijden. -
Page 188: Product Garantie
Het is essentieel dat u begrijpt dat EVERCROSS TECH zich het recht voorbehoudt om serviceclaims te weigeren die buiten de reikwijdte van de garantie vallen. Voor vragen over reparaties buiten de garantieperiode, inclusief prijzen en beschikbaarheid, kunt u contact opnemen met onze klantenservice via support@evercross.eu. -
Page 189: Contacteer Ons
Contacteer Ons Neem rechtstreeks contact met ons op als u problemen ondervindt met rijden, onderhoud, veiligheid, fouten/storingen met uw EVERCROSS TECH-product. E-mail Service: support@evercross.eu official_evercross Evercross Official https://www.evercross.eu/ official_evercross EVERCROSS NL-186... - Page 190 是非成败转头空,青山依旧在,惯看秋月春风。一壶浊酒喜相逢,古今多少事 是非成败转头空,青山依旧在,惯看秋月春风。一 PL-187...
- Page 191 UWAGA DLA JAZDÓW PONIŻEJ 16 LAT: Przed jazdą na rowerze elektrycznym upewnij się, że uzyskałeś zgodę rodziców. Jeśli po przeczytaniu tego przewodnika będziesz mieć jakieś pytania lub sugestie, odwiedź sekcję pomocy na naszej stronie internetowej lub napisz do nas na adres support@evercross.eu. Jesteśmy tu, żeby Ci pomóc! SKONTAKTUJ SIĘ Z NAMI, ABY POMÓC TUTAJ: Strona internetowa: https://evercross.eu/...
- Page 192 PRODUKTU · · · · Trzymaj oba klucze w odpowiedni sposób. W przypadku zgubienia · · anego akumulatora. PL-189...
- Page 193 PL-190...
- Page 194 WIADOM OSTRZEGAWCZA 1. Unikanie wody: Rower elektryczny nie jest wodoodporny. Wysta wania w obszarach o wysokich temperaturach lub gazach korozyjn niem roweru. raty kontroli, kolizji i upadków. Zawsze 5. Brak modyfikacji: Nie modyfikuj roweru w stosunku do projekt 6. Przestrzeganie przepisów ruchu drogowego: Podczas jazdy rowe wo swoje i innych na drodze.
- Page 195 budynek. ka, który wymieni T Twoja opona zostanie przypadkowo przebita i przecieka, skontaktuj PL-192...
- Page 196 ZAWARTOŚĆ PACZKI Dokładnie sprawdź zawartość opakowania, jeśli czegoś brakuje lub jest uszkodzone, skontaktuj się z TECH obsługą klienta EVERCROSS w celu uzyskania pomocy: support@eve rcross.eu. Uwaga: Zachowaj zewnętrzne opakowanie produktu na wypadek konieczności ponownej wysyłki roweru w przyszłości. 1 x Blokada 1 x Inflator 1 x Ładowarka...
- Page 197 10 9 PL-194...
- Page 198 PL-195...
- Page 199 PL-196...
- Page 200 PL-197...
- Page 201 PL-198...
- Page 202 PL-199...
- Page 203 PL-200...
- Page 204 PL-201...
- Page 205 PL-202...
- Page 206 PL-203...
- Page 207 PL-204...
- Page 208 mieszanie jest surowo zabronione. PL-205...
- Page 209 PL-206...
- Page 210 PL-207...
- Page 211 WPROWADZENIE DO FUNKCJI Opis Funkcji: 2. Funkcje sterowania i ustawiania PL-208...
- Page 212 OPIS IKONA PL-209...
- Page 213 PL-210...
- Page 214 PL-211...
- Page 215 ℃ ~ ℃ PL-212...
- Page 216 PL-213...
-
Page 217: Czyszczenie I Przechowywanie
KONSERWACJA CZYSZCZENIE I PRZECHOWYWANIE nie. zakresie wydrukowanym na bokach opon. Uwagi: lotnymi rozpuszczalnikami chemic- PL-214... -
Page 218: Konserwacja Akumulatora
KONSERWACJA AKUMULATORA 2.Nie dotykaj kontaktów. Nie demontuj ani nie przebijaj obudowy. Trzymaj styki z dala od metalowych przedmi- PRZECHOWYWANIE I UTYLIZACJA a promienie UV, deszcz i inne czynniki niu. PL-215... - Page 219 GWARANCJA nymi lub plastikowymi elementami. Ponadto gwarancja prawo do wymiany produktu na zamiennik support@evercross.eu. naszych warunków gwarancji. PL-216...
- Page 220 Evercross Official https://www.evercross.eu/ official_evercross EVERCROSS PL-217...
Need help?
Do you have a question about the EK5 and is the answer not in the manual?
Questions and answers
Como cargar
To charge the EVERCROSS EK5:
1. Insert the battery into the bike.
2. Connect the charger to the battery first.
3. Then plug the charger into the power outlet.
4. Charge only within a temperature range of 0°C to 45°C.
5. When the green light is on, disconnect the power immediately.
6. First unplug the charger from the power outlet, then disconnect it from the battery.
7. Do not leave the charger connected to power without charging.
8. Stop charging if there is any unusual indicator light, strange smell, or charger overheating.
9. Keep the charger dry and avoid liquids entering it.
10. Do not disassemble or modify the charger. Use only the original charger, with charging current not exceeding 2A for up to 7 hours.
This answer is automatically generated
Enlever la roue arrière notice
Donde se carga