Table of Contents
Advertisement
Advertisement
Table of Contents

Related Manuals for EVERCROSS H9


Summary of Contents for EVERCROSS H9
- Page 1 ELECTRIC SCOOTER USER MANUAL MODEL NO: H9 EN V1.2.1...
- Page 2 Step 3: Click the "Ask a Question" button. Choose your topic from list displayed. Step 4: Select Contact seller. *If you purchased EVERCROSS products by other platforms or channels, please also find the corresponding seller contact support. Thanks for your support and patience!
-
Page 3: Table Of Contents
CONTENTS Package Contents··························································02 Tool Kit Usage···························································03~06 Product Overview····················································· ·07~14 Charge Your Scooter····················································· ·15 How To Ride·····························································16~17 Folding And Carrying·······················································18 Smart Phone APP···························································19 Specifications & Warranty···········································20~21 Troubleshooting·····························································22 Safety Instructions·····················································23~26 Working Voltage And Wiring Method······························27~29 Safety Reminder·······················································30~31 Daily Care And Maintenance·······································32~34... -
Page 4: Package Contents
PACKAGE CONTENTS Assembled electric scooter Accessories: Charging adapter Electric Scooter Toolkit User Manual Seat TOOLKIT S18-S21 1PC S17-S19 1PC S5*16 S2.5 S10-S13 1PC Carefully check package contents, if anything is missing or damaged, please contact our customer service for support. -
Page 5: Tool Kit Usage
TOOL KIT USAGE This document describes the use of each of the tools in the included tool kit 1. Adjust left and right handle covers. Hex head M3X10 Stainless Steel socket wrench S2.5 head cap screws. 1.Adjustment Controller Screws. 2. Adjust left and right turn signal Hex head assembly screws. - Page 6 2. Adjust kickstand attachment screw. M5X10 socket head cap screws. 3. Adjust rear fender attachment screws. M5X12socket head cap screws. 4. Adjust bottom cover attachment screws. M5X10 Stainless Steel socket Hex head head cap screws. wrench S4 5. Adjust side cover attachment screws. M5X12 flat head socket head screws.
- Page 7 3. Adjust front and rear disc brake screws. M6X16 socket head cap screws. 4. Adjust seat base attachment screws. M6X16 socket head cap screws. 5. Adjust T-bar folding assembly attach- ment screw. Hex head M6X20 socket head cap screws. wrench S5 6.
- Page 8 1. Adjust front wheel axle screw. M10X160 socket head cap screw. Hex head 2. Adjust rear wheel fork assembly wrench S8 screws. M10X150 socket head cap screw. Open end combo wrench 1. Adjust front wheel axle nut. S17-S19 (17mm x 19mm) Open end combo wrench 1.
-
Page 9: Product Overview
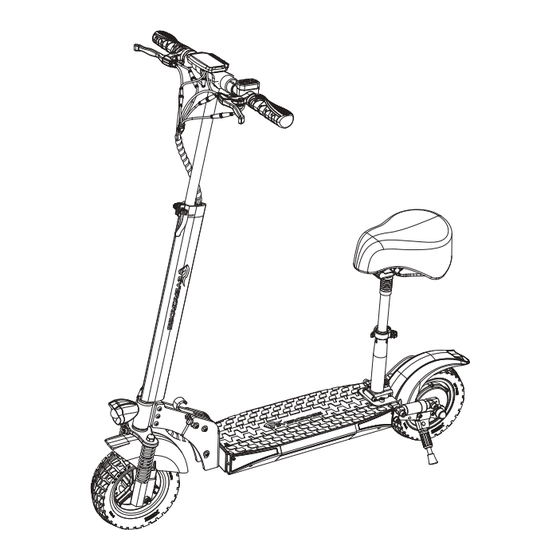
PRODUCT OVERVIEW Instrument Screen Brake Handle Accelerator Paddle Controller Seat Folding Mechanism Headlight Turning Light Taillight Hydraulic Shock Hydraulic Shock Absorption Absorption Solid Front Wheel Power Motor Side Lights Disc Brake Kickstand... - Page 10 1. Function Button Headlight Switch Brake Handle Power Key Horn Switch + - KAY Menu Steering Switch Accelerator Paddle Press the accelerator lightly to speed up the electric scooter.
- Page 11 Warm reminder: To make folding more convenient, the ferrule and shaft are not fully tightened, it is normal if there is a gap. Please be assured that this will not affect driving safety. If necessary, you can adjust it by yourself: adjusting the screw clockwise will loosen the handle, adjusting the screw counterclockwise will tighten the handle.
- Page 12 2. Intelligent Accelerator & Dashboard Headlight Bluetooth Turn Left Icon Error Lock Cruise Dual Drive Turn Right Icon Gear Display Single Drive 3Gear 2Gear Speed 1Gear Maximum Speed Total Mileage Average Speed Single Mileage 7E Indicates That The Handle Is Faulty Power Display...
- Page 13 Function: 1.Speed Icon MPH, KM/H 2.Gear Icon Speed Limit Mode Remove Speed Limit Mode (Press M five times to change the mode) 1st gear: 6.2MPH 1st gear: 9.3MPH 2nd gear: 9.3MPH 2nd gear: 19MPH 3rd gear: 15.5MPH 3rd gear: 28MPH 3.
- Page 14 Function operation tutorial: 1: Press and hold the power button to turn on the machine, display animation; enter the riding mode of the main interface; press and hold the power button for 3 seconds to turn off the instrument. 2.Press the up button to increase the gear, press the button to decrease the gear; the gear is 1-3;...
- Page 15 Parameter settings: Long press the MENU button for 3 seconds to enter the parameter setting; short press the MENU button to switch P01-P06, press the up and down keys to increase or decrease the parameter value; return to the riding mode after no button for 5-8 sec- onds.
- Page 16 3. P06: Set zero start and non-zero start, 0 is zero start, 1 is non-zero start; the default is 0, zero start; 4. P99:To restore the factory settings, press and hold the "+" button for 3-5 seconds in this mode, wait for 99 to become --, that is, restore the factory settings successfully, and automatically return to the riding interface;...
-
Page 17: Charge Your Scooter
CHARGE YOUR SCOOTER Charging condition description: The scooter is fully charged when the LED on the charger changes from red to green NOT FULLY CHARGED FULLY CHARGED Lift up the rubber flap When charging is completed, put back the rubber flap Plug the charging adapter into the charging port... -
Page 18: How To Ride
HOW TO RIDE Warning: Wear a helmet, elbow pads and knee pads. Please read the instruction carefully before using. Do not touch the brake system. Refer to the instruction for more information 1. Turn on the scooter, and check the power indicator... - Page 19 2. Step on the deck with one foot, and slowly 3. When the scooter is at a full stop, the accelerator kicks off the other on the ground. When the automatically turns off. To restart the scooter, it is scooter starts to coast, put both feet on the deck necessary to repeat step 2 and press the accelerator (the accelerator initiates once the coasting speed exceeds 5km/h)
-
Page 20: Folding And Carrying
FOLDING AND CARRYING The scooter needs to be turned off before folding. Hold the handlebar stem, controlled by the folder device. Hold the handlebar stem with either one hand or both hands to carry. -
Page 21: Smart Phone App
SMART PHONE APP Your H9 is an App-enabled electric scooter that works with most mobile devices. You must download the app in order to change certain features of your electric scooter. You could download the APP in the following two ways: Method 1: Search for the APP from either the App Store or Google Play Store to download. -
Page 22: Specifications & Warranty
SPECIFICATIONS & WARRANTY Product Name: Package Dimension: 50*11.8*18.1 IN (127*30*46CM) Gross Weight: 66.49 lbs (30.16KG) Motor Power: Peak power: 800W; Rated power: 500W Battery Capacity: 48V 14AH( Customized according to the model) Standard Voltage Motor Type: Strong Brushless Motor Tire Type: 10’’... - Page 23 Mileage Range: 18-28 Miles (30KM-45KM) Battery Lithium-ion battery Working Temperature -10 ~ 40℃ (14~104°F) 10 ~ 40 ℃ (50~104°F) Charging Temperature Relative Humidity of Storage 5% ~ 95% NOTE: Data may vary due to different speed mode, weight load, battery, temperatureare, road conditions , etc, and are subject to change without notice.
-
Page 24: Troubleshooting
TROUBLESHOOTING Attached table: error code definition table Error Code Definition Rear drive motor stalled or lack of phase. Low battery voltage protection, undervoltage protection. After the system is powered on, check that the brakes are working properly. If the brake signal is less than 0.75 volts for an extended period of time, the brake is faulty Detect whether the Hall commutation signal of the rear drive motor is faulty, and check whether the Hall signal connector is in bad contact. -
Page 25: Safety Instructions
SAFETY INSTRUCTIONS Do not accelerate when you Do not ride in the rain go downhill Do not press the accelerator Look out for doors, elevators when you’re walking alongside and other overhead obstacles the scooter... - Page 26 Do not hang bags or other heavy stuff Always steer clear of obstacles on the handlebar Keep your speed between 5–10 km/h when Keep both feet on the deck all you ride through speed bumps, elevator door time stills, bumpy roads or other uneven surfaces. Slightly bend your knee to better adjust mentioned surfaces...
- Page 27 Do not turn the handlebar violently Do not ride in traffic lanes or residential areas during high-speed riding where vehicles and Pedestrians are both allowed Do not ride through puddles or any Do not ride with anyone else, including other (water) obstacle. In such a children case please lower your speed and bypass the obstacle.
- Page 28 Do not touch the disc brake Do not keep your feet on the rear mudguard Do not keep your hands away from Do not try riding up or down stairs, and jumping over obstacles handlebar...
-
Page 29: Working Voltage And Wiring Method
WORKING VOLTAGE AND WIRING METHOD 1. Working voltage: 48v compatible, other voltages can be customized. 2. Wiring method Controller plug: Six pin male Wiring sequence Standard color Function Blue Positive power supply Yellow Serial port receiving Green Serial sending Black Negative pole of power supply White Electric door lock... - Page 30 Turn the plug: Three pin female Wiring sequence Standard color Function 4.3V Throttle positive Black Throttle negative White Throttle signal Headlight plug: Five pin male Wiring sequence Standard color Function LIGHT Headlight positive Positive electrode of left turn Black signal lamp Green Positive pole of right turn signal lamp HORN...
- Page 31 Electrical Parameters Parameter Description Typical deviation Unit Supply voltage VCC Working current Headlight output voltage Headlight output current Speaker output voltage Speaker output current PCB substrate FR-4 Power main chip SL3036 MCU main chip CX32L003...
-
Page 32: Safety Reminder
SAFETY REMINDER! 1. The scooter is intended for riders older than 15 years. Do not ride the scooter if you suffer from reduced physical, sensorial or mental capabilities. Riders with a lack of experience or knowledge should drive carefully. 2. This electric scooter is a leisure device. But once they're in a public area, they'll be seen as vehicles, subjecting to any risks faced by vehicles. - Page 33 4.Riding with high speed or a speed that is not appropriate or adequate for the situation (bad weather conditions, bad surface conditions, or the like) may lead into a potential loss of stability or loss of control. To reduce any risk, you must follow all instructions in this user manual.
-
Page 34: Daily Care And Maintenance
DAILY CARE AND MAINTENANCE Cleaning and storage If you see stains on the scooter’s body, wipe them off with a damp cloth. If the stains won’t scrub off, put on some toothpaste, and brush them with a toothbrush, then wipe them off with a damp cloth. If you see scratches on plastic parts, use sandpaper or other abrasive materials to polish them. - Page 35 Maintenance: Always charge before exhausting the battery to prolong the battery’s lifespan. The battery pack performs better at normal temperature, and poor when it is below 0°C. For instance, when it is below -20°C, the riding range is only half or less at normal state. When the temperature rises, the riding range restores.
- Page 36 Batteries/rechargable Batteries In accordance with the battery regulation you are legally obliged as an end user to return all used batteries. Disposal in the regular household waste is forbidden by law. On the most batteries you will find the symbol which remember you about this regulation.
- Page 37 FCC WARNING STATEMENT FCC Warning Statement Changes or modifications not expressly approved by the party responsible for compliance could void the user’s authority to operate the equipment. This equipment has been tested and found to comply with the limits for a Class B digital device, pursuant to Part 15 of the FCC Rules. These limits are designed to provide reasonable protection against harmful interference in a residential installation.
- Page 38 2)The warranty will be performed in such a way that we shall decide whether to repair the defective parts or to replace them with working parts free of charge. EVERCROSS reserves the right to exchange the product for a replacement product of equal value if the product sent in cannot be repaired within a reasonable time or at a reasonable cost.
- Page 39 CONTACT Please contact us directly if you experience any riding, maintenance, safety, errors/faults issues with your EVERCROSS product. E-mail Service: support@evercross.eu official_evercross official_evercross Evercross Official EVERCROSS https://www.evercross.eu/...
- Page 40 For warranty information, Please visit us at: https://www.evercross.eu/...
Need help?
Do you have a question about the H9 and is the answer not in the manual?
Questions and answers
Need to buy a stem replacement for my h9