Lenovo IdeaCentre Mini, IdeaCentre Mini 01IRH8 Manual
- User manual (36 pages)
Advertisement
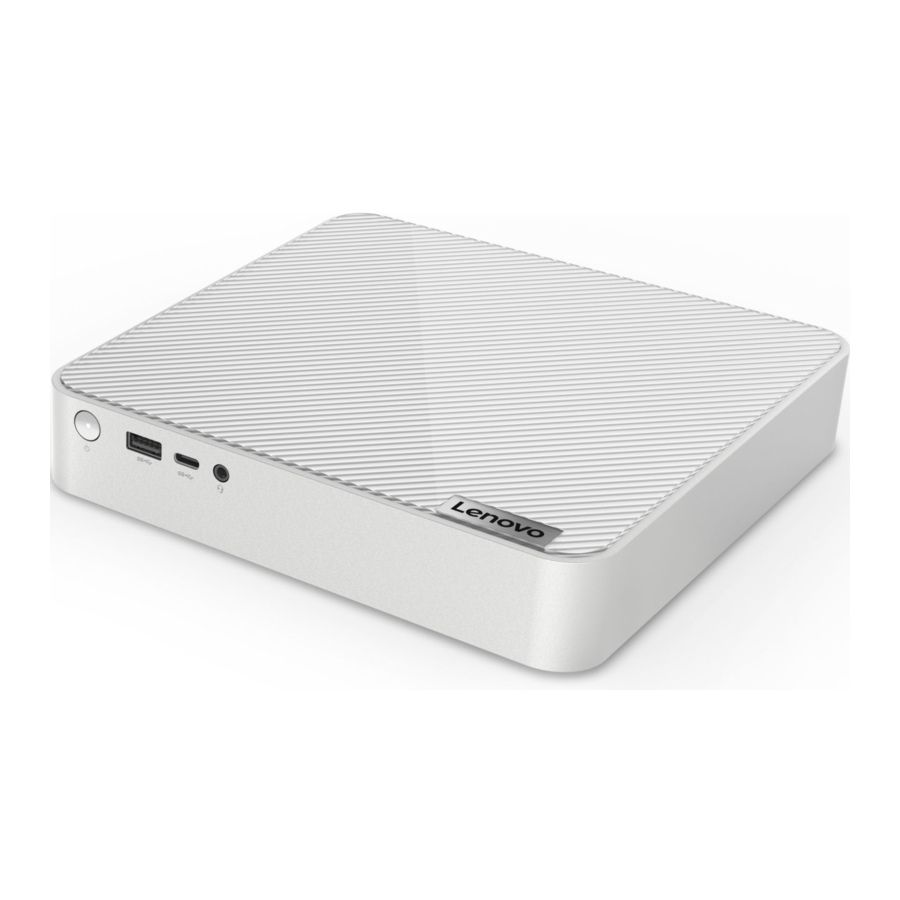
Meet your product
Front

| Item | Description | Item | Description |
| 1 | Power button | 2 | Always On USB-A 3.2 Gen 2 connector |
| 3 | USB-C (3.2 Gen 2) connector | 4 | Headset connector |
Power indicator
Show the system status of your computer.
- On: The computer is on.
- Off: The computer is off or in hibernation mode.
- Blinking: The computer is in standby mode.
Headset connector
The headset connector is compatible with:
- Headsets with a 3.5mm (0.14 inch), CTIA-compliant TRRS (4-pole) plug.
Note: This headset connector does not support standalone external microphones with a TRS (3-pole) plug or headsets with an OMTP-compliant TRRS (4-pole) plug.
Always On USB-A 3.2 Gen 2 connector
With the Always On USB feature enabled, the Always On USB 3.2 connector Gen 2 can charge a USB- compatible device when the computer is on, off, in sleep mode, or in hibernation mode.
Related topics
- "USB specifications".
Rear

| Item | Description | Item | Description |
| 1 | Ethernet connector | 2 | USB-A 3.2 Gen 2 connectors |
| 3 | USB-A 2.0 connector | 4 | Power cord connector |
| 5 | Thunderbolt 4 (USB-C) connector | 6 | HDMI 2.1 TMDS connector |
| 7 | DisplayPort 1.4 out connector |
Related topics
- "Connect an external display".
- "USB specifications".
Features and specifications
| Specifications | Descriptions |
| Hardware | To view the hardware information of your computer, type device manager in the Windows search box and then press Enter. |
| Power supply |
|
| Adaptability for power supply |
|
| Microprocessor | To view the microprocessor information of your computer, type system information in the Windows search box and then press Enter. |
| Memory | Up to two double data rate 4 (DDR4) small outline dual in-line memory modules (SODIMMs) |
| Storage device |
Note: The storage drive capacity indicated by the system is less than the nominal capacity. |
| Expansion |
|
| Network features |
|
USB specifications
Note: Depending on the model, some USB connectors might not be available on your computer.
| Connector name | Description |

| Connect USB-compatible devices, such as a USB keyboard, USB mouse, USB storage device, or USB printer. |

|
|
 USB-A 2.0 connector
 USB-A 3.2 Gen 2 connector
 Thunderbolt 3 (USB-C) connector
Statement on USB transfer rate
Depending on many factors such as the processing capability of the host and peripheral devices, file attributes, and other factors related to system configuration and operating environments, the actual transfer rate using the various USB connectors on this device will vary and will be slower than the data rate listed below for each corresponding device.
| USB device | Data rate (Gbit/s) |
| 3.2 Gen 1 / 3.1 Gen 1 | 5 |
| 3.2 Gen 2 / 3.1 Gen 2 | 10 |
| 3.2 Gen 2 × 2 | 20 |
| Thunderbolt 3 (USB-C) | 40 |
| Thunderbolt 4 (USB-C) | 40 |
Operating environment
Temperature
- Operating: From 10°C (50°F) to 35°C (95°F)
- Storage or transportation: From -40°C (-40°F) to 60°C (140°F)
Relative humidity
- Operating: 20%-80% (non-condensing)
- Storage: 20%-90% (non-condensing)
Altitude
- Operating: -15.2 m (-50 ft) to 3048 m (10,000 ft)
- Storage: -15.2 m (-50 ft) to 10668 m (35,000 ft)
Get started with your device
Work with Windows
The following table contains Windows frequently used settings. You can learn the basics and start working with Windows right away.
To configure settings, type the corresponding keywords in the Windows search box and select the best match. Follow the on-screen instructions to customize settings.
Table 1. Basic settings
| Functions | Descriptions | Search by keywords |
| Control Panel | View or change Windows settings, including hardware and software setup and configuration. | Control Panel |
| Connect to Wi-Fi networks | For models with a wireless LAN module, you can connect your computer to a Wi-Fi® network. Click the network icon in the Windows notification area, and then select a network for connection. Note: The wireless LAN module on your computer may support different standards. For some countries or regions, use of 802.11ax may be disabled according to local regulations. | Wi-Fi |
| Connect to wired networks | For models with an Ethernet (RJ45) connector, you can use an Ethernet cable to connect your computer to a wired network. | — |
| Airplane mode | Airplane mode is a convenient setting to turn all wireless communications of your computer on and off. You may need to turn it on when boarding an airplane. | Airplane mode |
| Night light mode | Night light is a switch in Windows that you can turn on and off. When it is turned on, your screen shows warmer colors and the amount of emitted blue light is reduced. Enabling night light reduces the chances of developing eye fatigue or eye strain. Note: For more guidance on reducing eye fatigue or eye strain, go to https://www.lenovo.com/us/en/compliance/visual-fatigue. | Night light |
| Adjust color temperature | If night light mode is turned on, you can adjust the color temperature of the screen. Note: Selected Lenovo computers are low blue light certified. These computers are tested with night light turned on and color temperature set to the default value of 48. | Night light |
| Windows Updates | Microsoft periodically releases feature and security updates to the Windows operating system. Updates that are applicable to your Windows version are downloaded automatically when your computer is connected to the Internet. When updates are downloaded, you are prompted to restart the computer to install these updates. You can also manually check if there are available updates for the installed version of Windows. Attention: Only use Windows Update to download and install updates. Updates downloaded from other sources may include security risks. | Windows Updates |
Windows help information
If the on-screen instructions cannot solve your problem, refer to the following to get the online Windows help information.
- Type Get Help or Tips in the Windows search box and then press Enter. When the app opens, type the problem description and select the matched result.
- Visit Microsoft support Web site:https://support.microsoft.com. Enter what you are looking for in the search box and get search results.
Connect an external display
Connect a projector or a monitor to your computer to give presentations or expand your workspace.
Connect a wireless display
Ensure that both your computer and the wireless display support Miracast.
Press the Windows and K Keys, and then select a wireless display to connect.
Change display settings
To change display settings, type display settings in the Windows search box and then press Enter. IdeaCentre Mini User Guide
Explore your device
Lenovo Vantage
The preinstalled Lenovo Vantage is a customized one-stop solution to help you maintain your computer with automated updates and fixes, configure hardware settings, and get personalized support.

Access Lenovo Vantage
Type Lenovo Vantage in the search box and then press Enter.
To download the latest version of Lenovo Vantage, go to Microsoft Store and search by the app name.
Key features
Lenovo Vantage enables you to:
- Know the device status easily and customize device settings.
- Download and install UEFI BIOS, firmware and driver updates to keep your computer up-to-date.
- Monitor your computer health, and secure your computer against outside threats.
- Scan your computer hardware and diagnose hardware problems.
- Look up warranty status (online).
- AccessUser Guide and helpful articles.
Notes:
- The available features vary depending on the computer model.
- Lenovo Vantage makes periodic updates of the features to keep improving your experience with your computer. The description of features might be different from that on your actual user interface.
Set the power plan
For ENERGY STAR compliant computers, the following power plan takes effect when your computers have been idle for a specified duration:
- turn off the display: After 10 minutes
- put the computer to sleep: After 10 minutes
To awaken the computer from Sleep mode, press any key on your keyboard.
To change or customize a power plan:
- Type power plan in the Windows search box and then press Enter.
- Customize a power plan of your preference.
Transfer data
Quickly share your files using the built-in Bluetooth technology among devices with the same features. You also can install a disc or media card to transfer data.
Connect to a Bluetooth-enabled device

You can connect all types of Bluetooth-enabled devices to your computer, such as a keyboard, a mouse, a smartphone, or speakers. To ensure that the connection is successful, place the devices 10 meters (33 feet), at most, from the computer.
- Click the action center icon in the Windows notification area. Enable the Bluetooth feature.
- Click the bluetooth options to add a bluetooth device, and then follow the on-screen instructions.
Purchase accessories
Lenovo has a number of hardware accessories and upgrades to help expand the capabilities of your computer. Options include memory modules, storage devices, network cards, power adapters, keyboards, mice, and more.
To shop at Lenovo, go to https://www.lenovo.com/accessories.
CRU replacement
Customer Replaceable Units (CRUs) are parts that can be replaced by the customer. Lenovo computers contain the following types of CRUs:
- Self-service CRUs: Refer to parts that can be replaced easily by customers themselves or by trained service technicians at an additional cost.
- Optional-service CRUs: Refer to parts that can be replaced by customers with a greater skill level. Trained service technicians can also provide service to replace the parts under the type of warranty designated for the customer's machine.
If you intend on installing the CRU, Lenovo will ship the CRU to you. CRU information and replacement instructions are shipped with your product and are available from Lenovo at any time upon request. You might be required to return the defective part that is replaced by the CRU. When return is required:
- return instructions, a prepaid shipping label, and a container will be included with the replacement CRU; and
- you might be charged for the replacement CRU if Lenovo does not receive the defective CRU within thirty (30) days of your receipt of the replacement CRU.
CRU list
The following is the CRU list of your computer.
Self-service CRUs
- Computer stand*
- Power cord
Optional-service CRUs
- Bottom cover
- Computer cover
- M.2 solid-state drive
- Memory module
- Power supply assembly
- System fan
* for selected models
Remove or replace a CRU
This section provides instructions on how to remove or replace a CRU.
Power cord
Prerequisite
Before you start, read Generic Safety and Compliance Notices, and print the following instructions.
For access, do the following:
- Turn off the computer and remove all connected devices and cables.
- Disconnect the computer from ac power and all connected cables.


Computer stand
Prerequisite
Before you start, read Generic Safety and Compliance Notices, and print the following instructions.
For access, do the following:
- Turn off the computer and remove all connected devices and cables.
- Disconnect the computer from ac power and all connected cables.


Computer cover
Prerequisite
Before you start, read Generic Safety and Compliance Notices, and print the following instructions.

Before you open the computer cover, turn off the computer and wait several minutes until the computer is cool.
For access, do the following:
- Turn off the computer and remove all connected devices and cables.
- Place a soft, clean towel or cloth on the desk or surface. Hold the sides of your computer and gently lay it down so that the computer cover is facing up.


- Remove the computer stand. See "Computer stand".


Bottom cover
Prerequisite
Before you start, read Generic Safety and Compliance Notices, and print the following instructions.
Before you open the computer cover, turn off the computer and wait several minutes until the computer is cool.
For access, do the following:
- Turn off the computer and remove all connected devices and cables.
- Place a soft, clean towel or cloth on the desk or surface. Hold the sides of your computer and gently lay it down so that the bottom cover is facing up.


- Remove the computer stand. See "Computer stand".
- Remove the computer cover. See "Computer cover".


Memory module
Prerequisite
Before you start, read Generic Safety and Compliance Notices, and print the following instructions.
Ensure that you follow the installation order for memory modules shown in the following illustration.


Replacement procedure
For access, remove the following parts in order:
- "Computer stand"
- "Computer cover"
- "Bottom cover"
Power supply assembly
Prerequisite
Before you start, read Generic Safety and Compliance Notices, and print the following instructions.
Although there are no moving parts in the computer after the power cord has been disconnected, the following warnings are required for your safety.
![]()
Keep fingers and other parts of your body away from hazardous, moving parts. If you suffer an injury, seek medical care immediately. Never remove the cover on a power supply or any part that has the following label attached.

Hazardous voltage, current, and energy levels are present inside any component that has this label attached. There are no serviceable parts inside these components. If you suspect a problem with one of these parts, contact a service technician.

For access, do the following:
- Remove the computer stand. See "Computer stand"
- Remove the computer cover. See "Computer cover"
- Disconnect the power supply assembly cables from the system board.


M2 solid-state drive
Prerequisite
Before you start, read Generic Safety and Compliance Notices, and print the following instructions.
Before you open the computer cover, turn off the computer and wait several minutes until the computer is cool.
For access, remove the following parts in order:
- "Computer stand"
- "Computer cover"
- "Bottom cover"
- "Power supply assembly"

Replacement procedure
System fan
Prerequisite
Before you start, read Generic Safety and Compliance Notices, and print the following instructions.
Before you open the computer cover, turn off the computer and wait several minutes until the computer is cool.
For access, remove the following parts in order:
- "Computer stand"
- "Computer cover"
- "Bottom cover"

Removal procedure
Frequently asked questions
| Questions | Solutions |
How do I partition my storage drive | Refer to https://support.lenovo.com/solutions/ht503851 |
What should I do if my device stops responding | Press and hold the power button until the computer turns off. Then restart the computer. |
| What should I do if I spill liquid on the computer? |
 Do not try to drain out the liquid by turning over the computer. If your computer has keyboard drainage holes on the bottom, the liquid will be drained out through the holes. |
| Where can I get the latest device drivers and UEFI/BIOS? |
|
Help and Support
Self-help resources
Use the following self-help resources to learn more about the computer and troubleshoot problems.
| Resources | How to access? |
| Troubleshooting and frequently asked questions |
|
| Accessibility information | https://www.lenovo.com/accessibility |
| Reset or restore Windows |
|
Use Lenovo Vantage to:
| Type Lenovo Vantage in the search box and then press Enter. |
Product documentation:
| Go to https://pcsupport.lenovo.com. Then, follow the on-screen instructions to filter out the documentation you want. |
Lenovo Support Web site with the latest support information of the following:
| Go to https://support.lenovo.com. |
| Windows help information |
|
Call Lenovo
If you have tried to correct the problem yourself and still need help, you can call Lenovo Customer Support Center.
Before you contact Lenovo
Prepare the following before you contact Lenovo:
- Record the problem symptoms and details:
- What is the problem? Is it continuous or intermittent?
- Any error message or error code?
- What operating system are you using? Which version?
- Which software applications were running at the time of the problem?
- Can the problem be reproduced? If so, how?
- Record the system information:
- Product name
- Machine type and serial number
The following illustration shows where to find the machine type and serial number of your computer.


Lenovo Customer Support Center
During the warranty period, you can call Lenovo Customer Support Center for help.
Telephone numbers
For a list of the Lenovo Support phone numbers for your country or region, go to: https://pcsupport.lenovo.com/supportphonelist.
Note: Phone numbers are subject to change without notice. If the number for your country or region is not provided, contact your Lenovo reseller or Lenovo marketing representative.
Documents / Resources
References
![www.lenovo.com]() Lenovo Accessories & Software - Shop Now | Lenovo US
Lenovo Accessories & Software - Shop Now | Lenovo US![www.lenovo.com]() Regulatory Compliance | Minimizing Visual Fatigue | Lenovo US
Regulatory Compliance | Minimizing Visual Fatigue | Lenovo US![support.microsoft.com]() Microsoft Support
Microsoft Support![forums.lenovo.com]() English Community-Lenovo Community
English Community-Lenovo Community![www.lenovo.com]() Product Accessibility | Regulatory Compliance | Lenovo US
Product Accessibility | Regulatory Compliance | Lenovo USOfficial Lenovo Laptop, Accessories & PC Support - Lenovo Support US
SupportPhoneList - Lenovo Support US
(English) Generic Safety and Compliance Notices - Lenovo Support US
Download manual
Here you can download full pdf version of manual, it may contain additional safety instructions, warranty information, FCC rules, etc.
Download Lenovo IdeaCentre Mini, IdeaCentre Mini 01IRH8 Manual
Advertisement


Need help?
Do you have a question about the IdeaCentre Mini and is the answer not in the manual?
Questions and answers