Homedics BKS-100CAM, BKS-100BLK, BKS-100CAM-1 Manual
- Instruction manual and warranty (8 pages) ,
- Instruction manual and warranty information (8 pages)
Advertisement
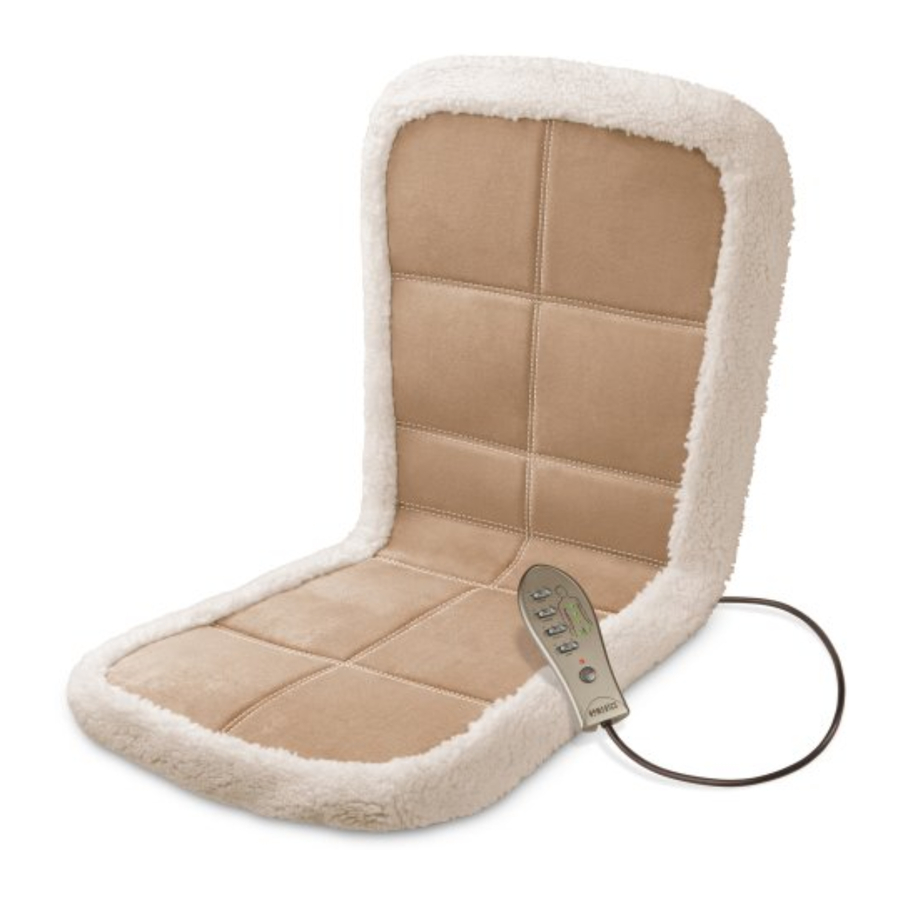
Parts and Features

Instructions for Use
For Use in Home or Office
Plug adapter into a 120 volt AC outlet and plug the receptacle end into the input jack, located along the side of the cushion. Attach the massage cushion to any chair for a luxurious massage as you read, rest or even work.
 Please Note: Not recommended for use on wooden surfaces as the zipper may damage the wood. Caution is also recommended when using on upholstered furniture.
For Use in Your Car
Simply plug the 12 volt auto adapter into a cigarette outlet and plug the receptacle end into the input jack, located along the side of the cushion. Slip the massage cushion straps over your seat to enjoy a relaxing massage as you drive.
Strapping System
This back massager incorporates a unique strapping system which allows you to fasten it to most any chair or auto seat. Set the cushion in your seat and adhere the elastic straps firmly around the seat back. Your massager won't slip or slide around.
Maintenance

All servicing of this massager must be performed by authorized HoMedics service personnel only.
To Store
Place massager in its box or in a safe, dry, cool place.
Avoid contact with sharp edges or pointed objects which might cut or puncture the fabric surface. To avoid breakage, do not wrap the power cord around the unit. Do not hang the unit by the controller cord.
To Clean
Unplug the unit and allow it to cool before cleaning.
Spot clean only with a soft, slightly damp sponge. Never allow water or any other liquids to come into contact with the unit.
- Do not immerse in any liquid to clean.
- Never use abrasive cleaners, brushes, gasoline, kerosene, glass/furniture polish, paint thinner to clean.
- Do not attempt to repair the massager. There are no user serviceable parts. For service, send the unit to the HoMedics address listed in the warranty section.
8 Motor Back Massager - Buttons Description

Targeted Massage Buttons
Zone buttons activate motors to massage specific areas: upper back, middle back, lower back and seat. Customize your massage by choosing one specific area, any combination of areas, or all four at once. To select a massage area, simply slide the button to the right and the corresponding L.E.D. light will illuminate. To deselect, simply slide the button to the far left and the corresponding L.E.D. light will turn off.
Heat
Soothing heat is activated by pressing this button. To turn off heat, simply press the button again. The glowing L.E.D. light indicates that heat is on.
PLEASE NOTE: The heat option will only work while a massage feature is selected.
Power Adaptors
This massager is powered by a custom 120 volt AC home adaptor, and 12 volt DC auto adaptor (cigarette lighter plug-in style). Both are included with your unit.
NOTE: When selecting the heat feature with massaging action, there will be a slight decrease in the strength of the massage output. This adjustment is perfectly normal and should not be interpreted as a defect.
On/Off
Before connecting power source, be sure the controls are in the far left position. Select L or H to activate the massage and select a zone to begin the massage function. To choose the intensity of your massage, adjust the strength from L to H. To turn the power off, slide the switch to the far left position; the LED light will turn off.
NOTE: Replacement parts are available online at homedics.com
SERVICE & WARRANTY
HoMedics Service Center
1.800.466.3342
8:30 –5:00 p.m. (EST) M–F
Mail To:
HoMedics
Service Center Dept. 168 3000 Pontiac Trail
Commerce Township, MI 48390
Email:
cservice@homedics.com
TWO YEAR LIMITED WARRANTY (Valid in USA only)
To obtain warranty service on your HoMedics product, mail the product and your dated sales receipt (as proof of purchase), postpaid, to the following address:
HoMedics Consumer Relations
Service Center Dept. 168
3000 Pontiac Trail
Commerce Township, MI 48390
No COD's will be accepted.
For more information regarding our product line in the USA, please visit: www.homedics.com
IMPORTANT SAFEGUARDS
WHEN USING ELECTRICAL PRODUCTS, ESPECIALLY WHEN CHILDREN ARE PRESENT, BASIC SAFETY PRECAUTIONS SHOULD ALWAYS BE FOLLOWED, INCLUDING THE FOLLOWING:
READ ALL INSTRUCTIONS BEFORE USING

TO REDUCE THE RISK OF ELECTROCUTION:
- ALWAYS unplug the appliance from the electrical outlet immediately after using and before cleaning.
- DO NOT reach for an appliance that has fallen into water. Unplug it immediately.
- DO NOT use while bathing or in shower.
- DO NOT place or store appliance where it can fall or be pulled into a tub or sink. DO NOT place in or drop into water or other liquid.
- NEVER use pins or other metallic fasteners with this appliance.
- Keep dry - DO NOT operate in a wet or moist condition.

TO REDUCE THE RISK OF BURNS, ELECTROCUTION, FIRE OR INJURY TO PERSONS:
- An appliance should NEVER be left unattended when plugged in. Unplug from outlet when not in use and before putting on or taking off parts or attachments.
- Close supervision is necessary when this appliance is used by, on or near children, invalids or disabled persons.
- Use this appliance only for its intended use as described in this manual. DO NOT use attachments not recommended by HoMedics; specifically any attachments not provided with the unit.
- NEVER operate this appliance if it has a damaged cord or plug, if it is not working properly, if it has been dropped or damaged, or dropped into water. Return it to HoMedics Service Center for examination and repair.
- Use heated surfaces carefully. May cause serious burns. Do not use over insensitive skin areas or in the presence of poor circulation. The unattended use of heat by children or incapacitated persons may be dangerous.
- Keep cord away from heated surfaces.
- NEVER use while sleeping or fall asleep while using the massager.
- NEVER drop or insert any object into any opening.
- DO NOT operate where aerosol (spray) products are being used or where oxygen is being administered.
- DO NOT operate under a blanket or pillow. Excessive heating can occur and cause fire, electrocution or injury to persons.
- DO NOT carry this appliance by supply cord or use cord as handle.
- To disconnect, turn all controls to the "off" position, then remove plug from outlet.
- This appliance is designed for personal, non-professional use only.
- DO NOT use outdoors.
- Temperatures sufficiently high to cause burns may occur regardless of the control setting. DO NOT use on an infant or invalid or on a sleeping or unconscious person. DO NOT use on insensitive skin or on a person with poor blood circulation. Check the skin in contact with the heated area of the appliance frequently to reduce the risk of blistering.
- DO NOT crush. Avoid sharp folds.
SAVE THESE INSTRUCTIONS
Please Note:
For your safety, this product is equipped with a pressure activated switch to control the heat function. Heat will not operate unless pressure is applied to this switch, located on the seat of the cushion. Once pressure is removed, heat will turn off. After applying pressure, please allow 5-10 minutes for heat to reach maximum temperature.
PLEASE READ ALL INSTRUCTIONS CAREFULLY BEFORE OPERATING.
- Consult your doctor prior to using this product, if
- You are pregnant
- You have a pacemaker
- You have any concerns regarding your health
- Not recommended for use by Diabetics.
- NEVER leave the appliance unattended, especially if children are present.
- NEVER cover the appliance when it is in operation.
- DO NOT use this product for more than 15 minutes at a time.
- Extensive use could lead to the product's excessive heating and shorter life. Should this occur, discontinue use and allow the unit to cool before operating.
- NEVER use this product directly on swollen or inflamed areas or skin eruptions.
- This product is a non-professional appliance designed to provide a soothing massage. DO NOT use this product as a substitute for medical attention.
- DO NOT use this product before bed. The massage has a stimulating effect and can delay sleep.
- NEVER use this product while in bed.
- This product should NEVER be used by any individual suffering from any physical ailment that would limit the user's capacity to operate the controls or who has sensory deficiencies in the lower half of their body.
- This unit should not be used by children or invalids without adult supervision.
- DO NOT use this product on any wooden surface as it may cause damage.
Documents / Resources
References
![homedics.com]() Homedics Office Site - Massage, relaxation and wellness products - HoMedics.com
Homedics Office Site - Massage, relaxation and wellness products - HoMedics.com![www.homedics.com]() Homedics Office Site - Massage, relaxation and wellness products - HoMedics.com
Homedics Office Site - Massage, relaxation and wellness products - HoMedics.com
Download manual
Here you can download full pdf version of manual, it may contain additional safety instructions, warranty information, FCC rules, etc.
Download Homedics BKS-100CAM, BKS-100BLK, BKS-100CAM-1 Manual
Advertisement


Need help?
Do you have a question about the BKS-100CAM and is the answer not in the manual?
Questions and answers