Advertisement
Quick Links
Advertisement

Related Manuals for Kongsberg EM 2040 PHS


Summary of Contents for Kongsberg EM 2040 PHS
- Page 1 Quick Start Guide for EM Portable Hydrographic System (PHS)
- Page 2 Kongsberg Maritime AS TABLE OF CONTENTS TABLE OF CONTENTS ....................2 About this Quick Setup Guide ................... 4 Introduction ........................5 System description ......................5 System units ........................6 Portable Hydrographic Workstation (HWS) ............. 6 EM Portable Processing Unit (PPU) ................. 6 EM 2040P Sonar Head ....................
- Page 3 Setting transducer offsets in SIS 4.x.x ................52 System Drawings ......................53 EM 2040 PHS – MRU at the bottom, MRU cable facing down - Rear view ..53 EM 2040 PHS – MRU at the bottom, MRU cable facing down - Side view ..54 EM 2040 PHS –...
- Page 4 Kongsberg Maritime AS About this Quick Setup Guide The purpose of this manual is to provide the information, procedures and basic drawings required for the physical installation of the EM 2040 PHS (Portable Hydrographic System). Target audience The manual is intended for technical personnel. You are expected to have basic mechanical skills and familiarity with handling of sensitive electronic equipment.
- Page 5 Kongsberg Maritime AS Introduction The KONGSBERG EM 2040 PHS is designed for quick mobilization. If this is your first time using the system, then follow the below instructions and by the end you should be ready to start a professional hydrographic survey in no time.
- Page 6 Seapath 130 software as well as the SeaCast software for the surface sound velocity probe and the sound velocity profiler. The HWS is a vital part of the EM 2040 PHS Portable Hydrographic System (PHS). In this publication, the laptop is referred to as the Hydrographic Workstation (HWS).
- Page 7 The EM 2040P can be delivered with an integrated AML SV probe or a separate SV Probe. In the EM 2040 PHS, the Sonar Head is attached to the bottom of the Pole Mount. The Sonar Head connects to the PPU through a head cable with an Ethernet data connection.
- Page 8 Kongsberg Maritime AS Rack mount traveling case The PHS system can be delivered with a rack mount traveling case for the Processing unit and laptop. The traveling case is delivered with PU and a 3710 DGNSS receiver (optional) preconnected for a quick and easy setup. Simply remove the three lids on the unit, connect and start.
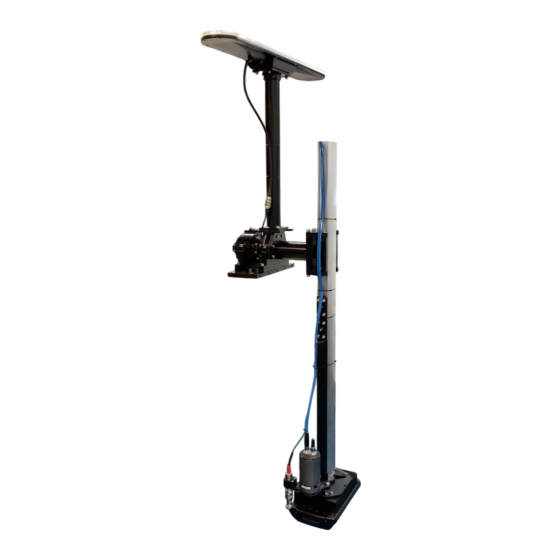
- Page 9 EM 2040P sonar head or separately. Universal Sonar Mount - Pole Mount The EM 2040 PHS Pole Mount provides precise and easy bolt on/off of flanges for all the sensors. 453991 / A / Page 9 of 69...
- Page 10 • The GPS Mast for mounting the Seapath 130 sensor unit. • The Compact Mount for attaching to your gunwale. • The Z Pole and EM 2040 PHS flange for mounting the Sonar Head, Motion Reference Unit, and sound speed sensor.
- Page 11 If you want a high quality survey at high speeds this requires a very rigid installation. Generally, 7 knots of vessel speed is typical with an EM 2040 PHS before a bit of wobble is noticed through the pole. This is installation dependent, a very rigid installation will experience better performance.
- Page 12 Kongsberg Maritime AS Latest design of the Seapath MRU mounting flange allows for mounting the MRU both ways. It also has an improved assembly design that ensures repeatability in installation offsets. The sonar head should be placed under the keel when the pole is down, in such a way the motion of vessel will never cause the sonar to come out of the water.
- Page 13 Kongsberg Maritime AS On the sonar head flange adapter there are several clamps that are well suited to run the cables for the SV probe and the sonar head. Also, when using the Tilt adapter, it’s easy to get most cables through the pole. This is generally recommended if a tilt adapter is available.
- Page 14 Kongsberg Maritime AS The Portable PU (PPU) should be placed in a well-ventilated area inside the vessel. Electrical isolation is an integral part of the entire mounting pole to avoid corrosion on the systems attached. However, as the EM 2040P housing is of aluminium, regular inspection and preferably Zink anodes should be used.
- Page 15 Kongsberg Maritime AS Alternative mounting pole solution - Overside Mount The Kongsberg’s over-the-side mounting package is designed for installation on Vessel of Opportunity (VOOP) and it provides mounting arrangement for the sonar head, MRU/IMU (motion sensor), GNSS antennas, and SV Probe. It comes with Installation Manual and offset lookup table for easy, accurate and precise setup.
- Page 16 Please, refer to separate PDF document ‘ANNEX 1’ for XYZ offsets scenarios with USM Mounting Pole solution. Please, refer to separate PDF document ‘ANNEX 2’ for XYZ offsets scenarios with KONGSBERG Mounting Pole solution. 453991 / A / Page 16 of 69...
- Page 17 Kongsberg Maritime AS USM mount option for Inflatable VOOP (Vessel of Opportunity) The USM mounting package for a Vessel of Opportunity (VOOP) was designed to fit into the smallest, lightest Pelican cases possible giving you everything you need to set up including MRU/IMU (Motion Sensor) and GNSS antennas.
- Page 18 Kongsberg Maritime AS First time system setup The system has been set up before shipping, and to get the system started you need only to plug in all the components and start the PPU and laptop. However, as offsets may vary with the type of sonar mount and the vessel it’s mounted on, it is important to...
- Page 19 Kongsberg Maritime AS System diagrams A. Hydrographic Work Station (Rugged/Semi K. Seapath 130 Antennae Rugged) Provides system with: B. Interfaces: Position • Sound speed sensor Attitude (roll, pitch and heave) • Tide Velocity • Centre depth output Heading ...
- Page 20 Kongsberg Maritime AS A. Transceiver Transducer cable input B. Receiver Transducer cable input and Transceiver/Receive Transducer cable input (EM 2040C and EM 2040P) C. Seapath 130 Antenna interface cable input D. Seapath 130 MRU interface cable input E. PU Serial Com ports (COM3 available from Seapath) F.
- Page 21 Kongsberg Maritime AS A. Kongsberg EM Portable Processing Unit B. Kongsberg Seatex 3710 DGNSS correctional services receiver C. 24VDC output for Sound Velocity Probe 453991 / A / Page 21 of 69...
- Page 22 Kongsberg Maritime AS Powering up the system Once everything is connected you can power up the PPU by pressing the Power on button. Green light: power on Red light: wrong polarity Blinking-Green-light: Not enough power available. The PPU display will let you know when the unit is ready.
- Page 23 Kongsberg Maritime AS Seafloor Information System (SIS 5.x.x) K-Controller runs as a separate program, or as an integrated part of SIS 5. Both software can be accessed from the Windows Start menu. If SIS5 software is started; the K- Controller module will also start automatically.
- Page 24 Kongsberg Maritime AS K-Controller > Installation Parameters > Position System 1 IMPORTANT: There is no need to enter the XYZ offsets for the Seapath 130 antenna as they have already been setup in the Seapath software. K-Controller > Installation Parameters > Attitude System 1 IMPORTANT: There is no need to enter the XYZ offsets for the MRU as they have already been setup in the Seapath software.
- Page 25 Kongsberg Maritime AS K-Controller > Installation Parameters > Sound Velocity Probe In order to setup the options in the Installations Parameters for the SV Probe at the transducer head, the correct Sound Velocity Source needs to be selected in the Runtime Parameters as shown in the image below.
- Page 26 Kongsberg Maritime AS K-Controller > Installation Parameters > Time Setup You are now ready to define a new survey and start pinging. 453991 / A / Page 26 of 69...
- Page 27 Kongsberg Maritime AS Seafloor Information System (SIS 4.x.x) Open the SIS software by clicking the icon on the desktop. 1. Start the sonar by selecting the sonar in the centre top window with text started 2. Click View - Tear off - Installation parameters – PU Communication Setup, then select Input Setup.
- Page 28 Kongsberg Maritime AS 3. Click View - Tear off - Installation parameters – PU Communication Setup, then select Clock Setup. Set ‘Source’ to ‘Active pos. system’ Set ‘1PPS Clock Synch’ to ‘Rising Edge’ 453991 / A / Page 28 of 69...
- Page 29 Kongsberg Maritime AS 4. Click View - Tear off - Installation parameters – Sensor Setup, then select Settings. Check and set all parameters as per the following screen capture: Note that ‘Time to use’ has to be set to ‘Datagram’...
- Page 30 Kongsberg Maritime AS 5. Click Tools - External Sensors. Proceed to configure the SV Probe connected to the Hydrographic Workstation (HWS) accordingly - whether AML, Valeport or any other brand with a datagram type supported in SIS. 453991 / A / Page 30 of 69...
- Page 31 Kongsberg Maritime AS 6. Click View - Tear off - PU Sensor Status. Should look as below Note: Time sync is done via Active positioning system, therefore ‘ZDA Clock’ is not needed. 7. Click View - Tear off and Installation parameters. Click the BIST tab and RUN ALL BIST.
- Page 32 Kongsberg Maritime AS Configuring the offsets/inputs/outputs in Seapath 130 The position sensor offsets should be defined from the Survey Origin (same as NRP in our case) to the position reference point on the primary Seapath antennae. The motion sensor offsets should be defined from the Survey Origin (same as NRP in our case) to the MRU.
- Page 33 Kongsberg Maritime AS Vessel Geometry Select Vessel → Geometry. In the Vessel Geometry view, information needed to specify correct location of various sensors, equipment and monitoring points on a vessel is entered. The drawing is correctly scaled based on the vessel dimensions to ensure correct indication of the various points.
- Page 34 Kongsberg Maritime AS GNSS Geometry Select Sensors→ GNSS → Geometry. The lever arm vector from the NRP to GNSS Antenna 1 has to be measured or calculated based upon drawings or previously measured points, and entered into the software. This is the location of the antennas on the mounting pole with respect to the NRP.
- Page 35 +0.350m and Z= +1.875m (cable facing up) or Z= +1.785m (cable facing down). Other index marks can be found on the pole offset drawing (a separate document associated with this Quick Start Guide). Also, Kongsberg provides an Excel Sheet to help calculating the correct XYZ offsets for different mounting options.
- Page 36 Kongsberg Maritime AS Below is an example of the Kongsberg’s Excel Sheet provided with the system. MRU Heave Filter Select MRU → Heave Filter. The Heave filter is to be set at 5s for smaller vessels. For the ‘Heave mean level’...
- Page 37 Kongsberg Maritime AS Monitoring Point – EM 2040P Geometry Select Monitoring Points → Geometry. The lever arm vector from the NRP to the EM 2040P location has to be measured or calculated based upon drawings or previously measured points and entered into the software.
- Page 38 Kongsberg Maritime AS Seapath Input/Output generic setup Select Communication Interface → Input/Output. DGNSS setup Click on DgnssLink1; configure as follows. The DGNSS Serial port as well as some generic outputs are always the same regardless of the version of software package used.
- Page 39 Kongsberg Maritime AS RTCM Data Output (For Logging in SIS) Click on TelegramOut5; configure as follows. Select to output Delayed Heave over UDP port 31103. Logging RTCM allows for a lot of positioning post-processing options (PPP and PPK). It is recommended to log this output in SIS if you are not using a correctional service to improve your position.
- Page 40 Kongsberg Maritime AS Delayed Heave Click on TelegramOut6; configure as follows. Select to output Delayed Heave over UDP port 31102 @ 100 Hz. Can be logged in SIS or Seapath. It is important to reference the Delayed Heave (PFREEHEAVE) to the sonar head when using SIS 4.x.x as this will ease the workflow during data post-processing for many customers.
- Page 41 Kongsberg Maritime AS Configuration Parameters and vectors for the GNSS antennas, monitoring points and MRU (P2X output for logging in SIS) It is also possible to output and log configuration parameters and vectors for the GNSS antennas, monitoring points and MRU. These configuration parameters are available through the proprietary NMEA formats P25, P26 and P27.
- Page 42 Kongsberg Maritime AS Raw IMU Data Output (For logging in SIS) Click on TelegramOut8; configure as follows. Logging Raw IMU data allows for post- processing of IMU data (smoothing and other options). Raw IMU data can be logged in SIS or Seapath.
- Page 43 Kongsberg Maritime AS Seapath Communication Interface setup Select Communication Interface → Serial port extender. Make sure the Data pool parameters are defined as follows. Select Network Make sure the network Interface Settings are defined as follows. Note: the Seapath will reset everything upon restart if the Default Gateway is not in the same IP range as the IP address.
- Page 44 Kongsberg Maritime AS Seapath setup for K-Controller users (SIS5) The following screen capture from the Seapath Nav Engine shows a summary and description of all inputs and outputs in Seapath for K-Controller users. Because K-Controller allows us to receive all available data from Seapath over ethernet, a different setup is preferred.
- Page 45 Kongsberg Maritime AS TelegramOut1 supplies the system with motion and attitude velocity as well as time and date. Broadcasted as KM Binary over Ethernet at 100 Hz. 453991 / A / Page 45 of 69...
- Page 46 Kongsberg Maritime AS TelegramOut3 supplies the system with NMEA GGA, HDT, VTG and ZDA. Broadcasted as SURVEY Serial 9600/8/N/1 at 1 Hz. 453991 / A / Page 46 of 69...
- Page 47 Kongsberg Maritime AS Seapath setup for SIS 4.x.x users The following screen capture from the Seapath Nav Engine shows a summary and description of all inputs and outputs in Seapath for SIS 4.x.x users. 453991 / A / Page 47 of 69...
- Page 48 Kongsberg Maritime AS TelegramOut1 supplies the system with Attitude velocity corrections. Broadcasted as ‘Seatex Binary 26’ over Ethernet at 100 Hz. 453991 / A / Page 48 of 69...
- Page 49 Kongsberg Maritime AS TelegramOut3 supplies system with motion. Broadcasted as EM 3000 datagram over SURVEY serial 19200/N/8/1 at 100 Hz. 453991 / A / Page 49 of 69...
- Page 50 Kongsberg Maritime AS TelegramOut4 supplies system with NMEA GGA. Broadcasted as NMEA GGA over Ethernet at 1 Hz. Remember to set time as ‘Active Positioning System’ in SIS 4.x.x 453991 / A / Page 50 of 69...
- Page 51 Kongsberg Maritime AS Setting transducer offsets in K-Controller (SIS 5.x.x) The only offsets that should be set in SIS5 is the location of the sonar and angular offsets, all referenced to Survey Origin as seen in the Seapath offset settings. Position and attitude offsets should already be referenced to Survey Origin and so we leave those alone and make modifications only to sonar head.
- Page 52 Kongsberg Maritime AS Setting transducer offsets in SIS 4.x.x The only offsets that should be set in SIS is the location of the sonar and angular offsets, all referenced to Survey Origin as seen in the Seapath offset settings. Position and...
- Page 53 Kongsberg Maritime AS System Drawings EM 2040 PHS – MRU at the bottom, MRU cable facing down - Rear view Please, also refer to ‘ANNEX 1’ document for more details. 453991 / A / Page 53 of 69...
- Page 54 Kongsberg Maritime AS EM 2040 PHS – MRU at the bottom, MRU cable facing down - Side view Please, also refer to ‘ANNEX 1’ document for more details. 453991 / A / Page 54 of 69...
- Page 55 Kongsberg Maritime AS EM 2040 PHS – MRU at the bottom, MRU cable facing up - Rear view Please, also refer to ‘ANNEX 1’ document for more details. 453991 / A / Page 55 of 69...
- Page 56 Kongsberg Maritime AS EM 2040 PHS – MRU at the bottom, MRU cable facing up - Side view Please, also refer to ‘ANNEX 1’ document for more details. 453991 / A / Page 56 of 69...
- Page 57 Kongsberg Maritime AS EM 2040 PHS – MRU at the topside, MRU cable facing up - Rear view Please, also refer to ‘ANNEX 1’ document for more details. 453991 / A / Page 57 of 69...
- Page 58 Kongsberg Maritime AS EM 2040 PHS – MRU at the topside, MRU cable facing up - Side view Please, also refer to ‘ANNEX 1’ document for more details. 453991 / A / Page 58 of 69...
- Page 59 Kongsberg Maritime AS EM 2040 PHS – MRU at the topside, MRU cable facing down - Rear view Please, also refer to ‘ANNEX 1’ document for more details. 453991 / A / Page 59 of 69...
- Page 60 Kongsberg Maritime AS EM 2040 PHS – MRU at the topside, MRU cable facing down - Side view Please, also refer to ‘ANNEX 1’ document for more details. 453991 / A / Page 60 of 69...
- Page 61 Kongsberg Maritime AS EM 2040P PHS overview – Tilt Adapter Please, also refer to ‘ANNEX 1’ document for more details. 453991 / A / Page 61 of 69...
- Page 62 Kongsberg Maritime AS Different offsets scenarios for the EM 2040 PHS Scenario No. 1 (RECOMMENDED and preconfigured state) All standard outputs to Navigation Reference Point (NRP) in Seapath Delayed Heave to EM 2040P. Advantages: • Logs delayed heave at sonar head (to be applied with post-processing software) •...
- Page 63 Kongsberg Maritime AS Scenario No. 2 All standard outputs reference to the EM 2040P Sonar Head. Advantages: • Logs delayed heave at sonar head (to be applied with post-processing software) • Logs all data to the same point Disadvantages: • This option creates the most changes to offsets when changing tilt or index...
- Page 64 Kongsberg Maritime AS Scenario No. 3 EM 2040P is the Navigation Reference Point (NRP) for all offsets Advantages: • Logs delayed heave at sonar head (to be applied with post-processing software) • Logs all data to the same point • Only one reference point in the system Disadvantages: •...
- Page 65 Kongsberg Maritime AS Scenario No. 4 All outputs referenced to Navigation Reference Point (NRP) Advantages: • Logs all data to the same point • Has the least amount of changes to offsets when changing tilt or index setting Disadvantages: • Delayed heave is not referenced to sonar head, this is known to create problems...
- Page 66 Kongsberg Maritime AS The interface cables for the Seapath 130 Seapath Antenna interface cable A single cable from the Processing Unit to the Seapath 130 antennae. 453991 / A / Page 66 of 69...
- Page 67 Kongsberg Maritime AS Seapath MRU interface cable A single cable from The Processing Unit to the MRU. 453991 / A / Page 67 of 69...
- Page 68 Kongsberg Maritime AS Seapath DGNSS interface cable RS232 interface cable from PPU to your correctional services receiver unit. 453991 / A / Page 68 of 69...
- Page 69 Please, refer to document ‘ANNEX 1_EM 2040P PHS on USM Mounting Pole_Drawings and XYZ Offsets’. EM 2040P PHS XYZ offsets considerations for Kongsberg’s Overside pole Please, refer to document ‘ANNEX 2_EM 2040P PHS on Geoacoustics Mounting Pole_Drawings and XYZ Offsets’...
Need help?
Do you have a question about the EM 2040 PHS and is the answer not in the manual?
Questions and answers