Table of Contents
Advertisement
Advertisement
Table of Contents

Subscribe to Our Youtube Channel
Related Manuals for APRILIA HABANA 125 - PART2


Summary of Contents for APRILIA HABANA 125 - PART2
- Page 1 safe drive...
- Page 2 The use of medicins, alcohol and drugs or Most road accidents are caused by the psychotropic substances notably increases driver’s lack of experience. To drive the vehicle it is necessary to be in the risk of accidents. NEVER lend the vehicle to beginners and, possession of all the requirements pre- Be sure that you are in good psychophysi- in any case, make sure that the driver has...
- Page 3 Rigorously observe all road signs and na- Avoid obstacles that could damage the ve- Always keep both hands on the handlebars tional and local road regulations. hicle or make you lose control. and both feet on the footboard (or on the footrests), in the correct driving posture.
- Page 4 If necessary, have the vehicle inspected by an aprilia Official Dealer, who should care- Any modification of the vehicle will result in fully check the frame, handlebars, suspen- the invalidity of the guarantee.
- Page 5 ONLY ORIGINALS which implies the following obligations for the owner: For only vehicles over 50 cm Before starting, always wear a correctly – new homologation; Any modification of the vehicle and/or the fastened crash helmet. Make sure that it is –...
- Page 6 turns.
- Page 7 Avoid hanging bulky, heavy and/or danger- Do not carry any bag if it is not tightly se- Do not exceed the maximum load allowed ous objects on the handlebars, mudguards cured to the vehicle. for each side-bag. and forks: the vehicle might respond more Do not carry bags which protrude too much When the vehicle is overloaded, its stability slowly in turns and its manoeuvrability...
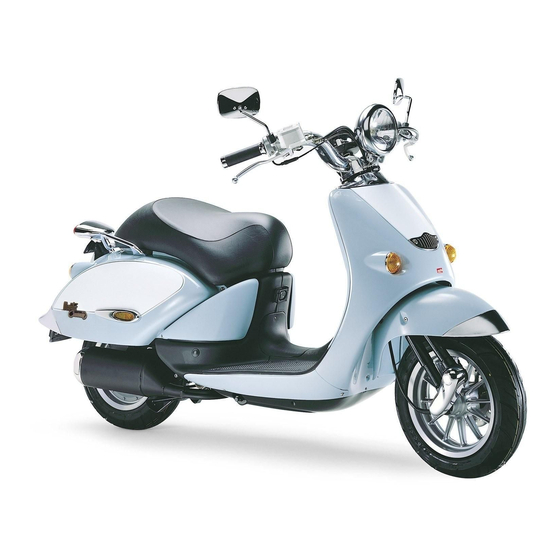
- Page 8 1) Left rear-view mirror 5) Battery 10) Kick starter not provided in the version) 6) Fuse carrier 11) Centre stand 2) Left inspection cover 7) Passenger grab rail 12) Side stand 3) Central inspection cover 8) Saddle lock 13) Spark plug 4) Glove compartment 9) Air cleaner use and maintenance Habana 50/125 - Habana Custom 50/125...
- Page 9 6) Right inspection cover 10) Fuel tank 2) 2 stroke oil tank plug 7) Right rear-view mirror 11) Anti-theft hook (for the aprilia “Body- 3) Fuel tank plug in the countries where required) Guard” armored cable 4) Ignition switch / steering lock...
- Page 10 1) Left rear-view mirror 6) Air cleaner 11) Engine oil filler cap 2) Glove compartment 7) Passenger grab rail 12) Engine oil level sight glass 3) Left inspection cover 8) Saddle lock 13) Side stand 4) Central inspection cover 9) Kick starter 5) Passenger left footrest 10) Centre stand use and maintenance Habana 50/125 - Habana Custom 50/125...
- Page 11 3) Fuel tank plug 9) Horn 14) Battery 4) Ignition switch / steering lock 10) Fuel tank 5) Bag hook 11) Anti-theft hook (for the aprilia “Body- 6) Fuse carrier Guard” armored cable use and maintenance Habana 50/125 - Habana Custom 50/125...
- Page 12 1) Electrical controls on the left side of the handlebar 9) Total kilometres odometer 2) Rear brake lever 10) Green low beam and parking light warning light ( 3) Instruments and indicators 11) Blue high beam warning light ( 4) Throttle grip 12) Fuel level indicator ( ) 5) Front brake lever 13) Green direction indicator warning light (...
- Page 13 Description Function Direction indicator warning light It blinks when the direction indicators are on. It comes on when the ignition switch is in position “ ” and the start push button “ “ is pressed, thus checking the proper functioning of the bulb. If the light does not come on during the starting, provide for replacing the bulb.
-
Page 14: Horn Push Button
NOTE The electrical parts work only when the ignition switch is in position “ ”. NOTE The lighting system works only when the engine is run- ning. 1) HORN PUSH BUTTON ( The horn is activated when the push button is pressed. 2) DIMMER SWITCH ( When the light switch is in position “... -
Page 15: Light Switch
NOTE The electrical parts work only when the ignition switch is in position “ ”. NOTE The lighting system works only when the engine is run- ning. • 1) LIGHT SWITCH ( not provided ) NOTE Before operating the light switch, make sure that the dimmer switch ( ) is in position “... - Page 16 2) DIMMER SWITCH ( When the light switch is in position “ ”: if the dimmer switch is in position “ ”, the high beam comes on, while if it is in po- sition “ ”, the low beam comes on. The high beam signaller is operated by pressing the dimmer switch ( ) to position (A) (...
-
Page 17: Engine Stop Switch
NOTE The electrical parts work only when the ignition switch is in position “ ”. NOTE The lighting system works only when the engine is run- ning. • 1) LIGHT SWITCH ( not provided ) NOTE Before operating the light switch, make sure that the dimmer switch ( ) is in position “... -
Page 18: Operation
Position Function removal The steering It is possible is locked. to remove It is neither the key. possible to Steering start the en- lock gine, nor to switch on the lights. Neither the It is possible engine, nor to remove the lights can the key. - Page 19 To prevent the vehicle from being stolen, it ry time you park the vehicle. Rotate the key anticlockwise and raise is advisable to secure it with the aprilia the saddle (2). The compartment is positioned under the “Body-Guard” armored cable (4), avail- saddle and can contain a “JET”...
- Page 20 The tool kit is positioned inside the crash It is placed under the handlebar, on the in- WARNING helmet / glove compartment. ner part of the shield. Do not hang excessively bulky bags or To reach it: To reach it, proceed as follows: parcels to the hook, as this may seri- Introduce the ignition key (3) in the lock.
- Page 21 WARNING The fuel used for internal combustion engines is extremely inflammable and in particular conditions it can become explosive. It is important to carry out the refuelling and the maintenance op- erations in a well-ventilated area, with the engine off. Do not smoke while refu- elling or near fuel vapours, in any case avoid any contact with naked flames, sparks and any other heat source to...
- Page 22 2 STROKE OIL Top up the 2 stroke oil tank every 500 km WARNING (312 mi). Oil can cause serious damage to the The vehicle is provided with a separate skin if handled every day and for long mixer that makes it possible to mix petrol periods.
-
Page 23: Engine Oil
1000 km (625 mi) and successively every 24000 km (15000 and successively every 3000 km (1875 mi). mi). For the oil change, contact an aprilia Offi- cial Dealer. To check the oil level and to change the oil, contact an aprilia Official Dealer. - Page 24 When the disc pads wear out, the level of the fluid decreases to automatically com- Position the vehicle on the centre stand. Contact an aprilia Official Dealer, who pensate for their wear. Rotate the handlebar, so that the fluid will provide for topping up.
-
Page 25: Adjusting The Brake
ADJUSTING THE BRAKE CAUTION Measure the distance covered by the le- WARNING ver before the brake starts it braking ac- The fact that the adjuster (3) can be The brakes are the parts that most en- tion. The idle stroke at the end of the tightened completely or the indicator (4) sure your safety and for this reason brake lever must be about 10 mm. - Page 26 Some types of tyres homologated for this vehicle are provided with wear indi- cators. There are several kinds of wear indica- tors. For more information on how to check the wear, contact your Dealer. Visually check if the tyres are worn and in this case have them changed.
- Page 27 Make sure that the tyres always have If the tyres are new, they may still be their valve sealing caps (2) on, to pre- covered with a slippery film: drive care- vent them from suddenly going flat. fully for the first miles. Do not oil the The vehicles provided with the Automatic tyres with unsuitable fluids.
- Page 28 If the noise produced by the exhaust sys- the engine. tem increases, immediately contact your The catalytic vehicle is fitted with a silencer aprilia Official Dealer. with metal catalytic converter of the “plati- CAUTION num-rhodium bivalent” type. Do not use leaded petrol, since it caus-...
- Page 29 Component Check Page WARNING Front brake Check the functioning, the fluid level and make sure Before departure, always carry out a there are no leaks. 27, 28, 50 preliminary checking of the vehicle, to Check the wear of the pads. Top up, if necessary. make sure that it functions correctly Rear drum brake Check the functioning, the idle stroke and the control...
-
Page 30: Electric Starting
NOTE Turn the ignition switch (3) to position To avoid the excessive wear of “ ”. the battery, do not keep the start push but- WARNING Move the engine stop switch (4) to posi- ton “ ”“ pressed for more than five sec- tion “... -
Page 31: Kick Start
CAUTION Avoid pressing the start push button “ ” (6) when the engine is running, since you may damage the starter. If the engine does not start in three or four seconds, slightly rotate the throttle grip (7) (Pos. A), keeping the start push but- ton "... -
Page 32: Starting With Cold Engine
STARTING WITH FLOODED ENGINE If the starting is not carried out properly or if there is too much fuel in the intake ducts and in the carburettor, the engine may get flooded. To clean a flooded engine: Press the start push button “ ” (6) for a few seconds (letting the engine spin over) with completely open throttle (7) (Pos. - Page 33 To leave: WARNING Release the throttle grip (Pos. A), put on NOTE Before departure, carefully read If you drive without passenger, make the rear brake, then move the vehicle the “safe drive” chapter, see p. 5 (SAFE sure that the passenger footrests are down the stand.
- Page 34 WARNING If you have to brake, close the throttle and put on both brakes in order to ob- tain uniform deceleration, properly ex- erting pressure on the braking parts. By putting on the front brake only or the rear brake only, you reduce the braking force considerably, thus running the risk of locking one wheel and conse- quently losing grip.
- Page 35 WARNING WARNING WARNING Always use the direction indicators in If the 2 stroke oil reserve warn- After the first 1000 km (625 mi) carry out the checking operations indi- time when you intend to change lane or ing light “ ”...
- Page 36 Avoid driving at constant speed for long distances. For the first 500 km (312 mi), keep to the Keep to the following indications: After the first 1000 km (625 mi), progres- following indications: Do not open the throttle completely if the sively increase the speed until reaching speed is low, both during and after the 0-100 km (0-62 mi)
- Page 37 NOTE Stop the vehicle, see p. 40 (STOPPING). It is not necessary to close the Move the engine stop switch (1) to posi- fuel tap when the engine is off, since it is WARNING tion “ ” (for the countries where re- equipped with an automatic closing sys- quired).
-
Page 38: Centre Stand
NEVER leave the ignition key inserted and always use the steering lock. Park the vehicle in a safe place, possibly in a garage or a protected place. If possible, use the appropriate aprilia “Body-Guard” armored cable , or an ad- ditional anti-theft device. - Page 39 If not expressly indicated otherwise, for the ignition block, wait until the engine Ask your aprilia Official Dealer to test the the reassembly of the units repeat the and the exhaust system have cooled vehicle on the road after a repair or period-...
- Page 40 After running-in Every 4000 km Every 8000 km COMPONENT [500 km (312 (2500 mi) or (5000 mi) or mi)] 8 months 16 months Battery/electrolyte level Spark plug C = check, clean, adjust, lubricate or Carburettor - idling change, if necessary; Driving belt P = clean;...
- Page 41 After running-in Every 6000 km Every 12000 COMPONENT [1000 km (3750 mi) or km (7500 mi) or (625 mi)] 8 months 16 months Spark plug Carburettor - idling C = check, clean, adjust, lubricate or Driving belt change, if necessary; Steering column bearings P = clean;...
-
Page 42: Frame Number
FRAME NUMBER The frame number is stamped on the cen- It is a good rule to write down the frame tral tube of the frame. To be able to read it, and engine numbers in the space provided it is necessary to remove the cover (1). in this manual. - Page 43 Carefully read p. 26 (LUBRICANTS), p. 43 (MAINTENANCE) and p. 85 (LUBRIFI- CANT CHART Always check the engine oil level before starting the vehicle. CHECKING NOTE Position the vehicle on firm and flat ground. Position the vehicle on the centre stand. Check the oil level through the appropri- Pour a small quantity of oil in the filling ate sight glass (1):...
- Page 44 REMOVAL CLEANING Position the vehicle on the centre stand. Separate the grid (4) from the support Carefully read p. 43 (MAINTENANCE). Unscrew and remove the four screws (5). Check the conditions of the air cleaner and (1). Remove the filtering element (6). clean it monthly or every 4000 km (2500 Rotate the start pedal (2) completely and mi), depending on the conditions in which...
- Page 45 REMOVAL CLEANING Position the vehicle on the centre stand. Carefully read p. 43 (MAINTENANCE). WARNING Unscrew and remove the four screws Check the conditions of the air cleaner and Do not use petrol or inflammable sol- (1). clean it monthly or every 6000 km (3750 vents to wash the filtering element, in mi), depending on the conditions in which CAUTION...
- Page 46 WARNING WARNING Check the wear of the brake pads espe- The excessive wear of the friction mate- Carefully read p. 27 (BRAKE FLUID - cially before every trip. rial would cause the contact of the pad recommendations), p. 28 (FRONT metal support with the disc, with conse- To carry out a rapid checking of the wear of BRAKE DISC), p.
Need help?
Do you have a question about the HABANA 125 - PART2 and is the answer not in the manual?
Questions and answers