Table of Contents
Advertisement
Quick Links
Operation Manual
You must read the Usage and Safety Precautions before use.
©2024 ZOOM CORPORATION
Copying or reprinting this manual in part or in whole without permission is prohibited.
Product names, registered trademarks and company names in this document are the property of their respective companies. All trademarks and
registered trademarks in this document are for identification purposes only and are not intended to infringe on the copyrights of their respective owners.
Proper display is not possible on grayscale devices.
Advertisement
Table of Contents

Related Manuals for Zoom MULTISTOMP MS-90LP+


Summary of Contents for Zoom MULTISTOMP MS-90LP+
- Page 1 Operation Manual You must read the Usage and Safety Precautions before use. ©2024 ZOOM CORPORATION Copying or reprinting this manual in part or in whole without permission is prohibited. Product names, registered trademarks and company names in this document are the property of their respective companies. All trademarks and registered trademarks in this document are for identification purposes only and are not intended to infringe on the copyrights of their respective owners.
-
Page 2: Notes About This Operation Manual
Notes about this Operation Manual You might need this manual in the future. Always keep it in a place where you can access it easily. The contents of this document and the specifications of the product could be changed without notice. •... -
Page 3: Terms Used In This Manual
Terms used in this manual Memory Memories, which can be easily recalled, store recorded phrases, looper and rhythm settings and effect selections. Phrases are saved and recalled in memories, and up to 100 of these can be saved. AUTO SAVE This function automatically saves recorded phrases, looper and rhythm setting changes and effect selections. -
Page 4: Table Of Contents
Contents Notes about this Operation Manual........................2 Terms used in this manual............................3 MS-90LP+ overview..............................6 Looping with high audio quality..........................6 MS-90LP+ overview..............................9 Signal flow..................................9 Memory overview..............................11 Functions of parts..............................12 Top....................................12 Back....................................13 Overview of operation screens..........................14 Home Screen................................14 MEMORY Screen................................ - Page 5 Other settings (MENU Screen)..........................60 Looper settings................................60 Rhythm settings................................. 63 MIDI settings................................65 Hardware settings..............................70 Managing the firmware............................78 Checking the firmware version (VERSION)......................78 Updating the firmware............................. 78 Restoring default settings (FACTORY RESET)......................79 Checking the latest MS-90LP+ information (HELP)....................80 Appendix..................................
-
Page 6: Ms-90Lp+ Overview
MS-90LP+ overview Looping with high audio quality With a dual A/D converter circuit and support for 32-bit float WAV files, the MS-90LP+ enables looping with high audio quality. Dual A/D converter circuit overview The MS-90LP+ has two A/D converters with different input gains for one input circuit. Providing amazing dynamic range By combining two A/D converters, a wide dynamic range not possible with a single A/D converter has been realized. - Page 7 Switching between two A/D converters The MS-90LP+ constantly monitors data from the two A/D converters, and automatically selects the one that provides the best input. Moderate-volume performance Quiet performance Noise is low because Clipping does not Noise is low because the AD converter for occur because the AD the AD converter for...
- Page 8 32-bit float WAV file overview Phrases recorded by the MS-90LP+ are saved using 32-bit float WAV file format. 32-bit float WAV files have the following advantages over conventional 16/24-bit WAV files. These advantages allow the sound quality at the time of recording to be retained when the sound is adjusted. ...
-
Page 9: Ms-90Lp+ Overview
MS-90LP+ overview Signal flow ❶ Looper (→ Using the Record phrases and loop their playback. looper) ❷ Effect (→ Using an effect during loop playback (LOOP FX An effect can be applied to loop playback. Screen)) ❸ Rhythm (→ Using rhythms (RHYTHM Rhythms can be played while recording phrases and during loop playback. Screen)) ❹... - Page 10 HINT (→ Setting the output routing Output from the guitar, looper and rhythm can be split as follows. (ROUTING)) • Rhythm sound output from the R jack (guitar and looper sound output from the L (MONO) jack) • Guitar sound output from the R jack (looper sound output from the L (MONO) jack, rhythm output in stereo)
-
Page 11: Memory Overview
Memory overview Memories These store recorded phrases, looper and rhythm settings and effect selections. Up to 100 memories can be used for saving and recall. -
Page 12: Functions Of Parts
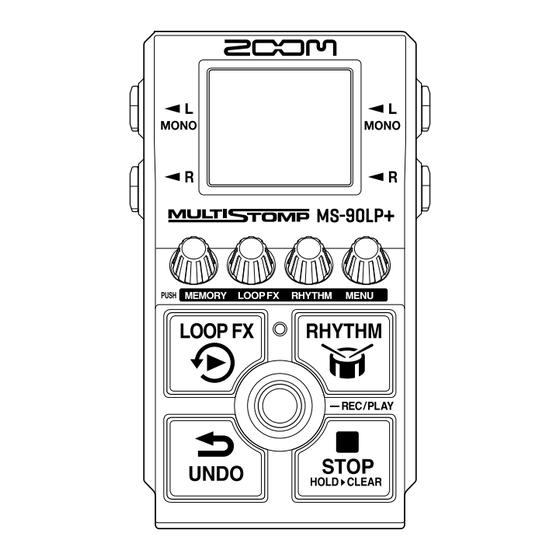
Functions of parts ❶ Display This shows the looper status, parameter settings and other information. ❷ Output jacks Connect an amp or another effect here. Use MONO for mono connections. ❸ Parameter knobs Use these to adjust parameters and make various settings. ❹... -
Page 13: Back
The following operations are possible when connected to a computer, smartphone or tablet. • Back up memories • Import loop sound sources • Control the MS-90LP+ using its MIDI functions This supports operation on USB bus power. ❸ DC 9V AC adapter connector Connect a dedicated AC adapter (ZOOM AD-16) here. -
Page 14: Overview Of Operation Screens
Overview of operation screens This section explains the screens that appear on the MS-90LP+ and the operations available on them. Home Screen This opens when the power is turned on. The selected memory is shown, phrases can be recorded, played and stopped, and looper settings can be made on the screen. - Page 15 ■ The footswitches have the following functions when the Home Screen is open. ❶ Record/play phrases (→ Looper Overdubbing is also possible by pressing this during playback. operations) ❷ Turn the effect on/off (→ Using an effect during loop The effect can be turned on/off during loop playback and recording. playback (LOOP FX Screen)) ❸...
-
Page 16: Memory Screen
MEMORY Screen When the Home Screen is open, press the (MEMORY) knob to open this screen where memories can be selected. ❶ Selected memory ❷ Memory name “Empty” will appear if no phrase has been recorded yet. • Turn the (MEMORY) knob to select memories. -
Page 17: Loop Fx Screen
LOOP FX Screen When the Home Screen is open, press the (LOOP FX) knob to open this screen where an effect can be selected for use on loop playback. ❶ Selected effect • The (LOOP FX) knob can be turned to select the effect. •... -
Page 18: Rhythm Screen
RHYTHM Screen When the Home Screen is open, press the (RHYTHM) knob to open this screen where a rhythm pattern can be selected and its tempo and volume can be adjusted. ❶ Rhythm pattern An animation of the selected rhythm pattern is shown during rhythm playback. ❷... -
Page 19: Menu Screen
MENU Screen Various MS-90LP+ settings can be made on the screen. ❶ Selected setting item The selected setting item is shown larger in the middle. ❷ Setting items Setting items are shown with icons. Turn the (MENU) knob to select them. ❸... - Page 20 Turn the (MENU) knob to show the icon for the desired setting item. Please see the linked reference sections for details about each setting. ■ Memory management Set the automatic saving function. Copy the memory. (This only (→ Setting the automatic saving appears when the automatic function (AUTO SAVE))
- Page 21 Set the channel used to receive Set the channel used to send MIDI. (→ Setting the channel used to (→ Setting the channel used to send MIDI. receive MIDI (MIDI RX CH)) MIDI (MIDI TX CH)) Turn on/off the MIDI clock output Turn on/off...
- Page 22 Turn the (MENU) knob to select a setting. Press the (MENU) knob. This confirms the setting. HINT When a setting screen is open, press the (MEMORY) knob to return to the Home Screen MENU Screen. • When the (EXIT) icon appears at the bottom left of the screen, this opens the Home Screen.
-
Page 23: Making Connections
Guitar amp ❹ Drum machine or another MIDI device ❺ AC adapter (ZOOM AD-16) ❻ Computer (Mac/Windows), iPhone/iPad or portable battery Connect with a USB cable (Type-C). This can be used to back up memories, import loop audio sources, and transmit and receive MIDI over... -
Page 24: Turning The Power On/Off
Turning the power on/off Turning the power on Minimize the volume of the amp. NOTE To prevent noise and malfunction, connect an amp before turning the power on. Provide power. ■ Using batteries Open the cover on the bottom and install batteries into the battery compartment. NOTE •... - Page 25 ■ Using an AC adapter Use a ZOOM AD-16 AC adapter, which is specified for this unit. When an AC adapter is connected, the MS-90LP+ will power on. ■ Using a portable battery Connect a portable battery. When a portable battery is connected, the MS-90LP+ will power on.
- Page 26 Raise the amp volume. ECO MODE overview • By default, ECO MODE is set to ON, so the power will automatically turn off if no use occurs for 10 hours. (→ Setting the ECO • ECO MODE can also be turned OFF. MODE)
-
Page 27: Turning The Power Off
Turning the power off Minimize the volume of the amp. Disconnect cables from the output jacks. ■ If using batteries Disconnect the cable from the L/MONO output jack to turn off the display and the power. ■ If using an AC adapter or portable battery Disconnect the AC adapter or portable battery to turn off... -
Page 28: Using The Looper
Using the looper Played phrases can be recorded, and loop phrases up to 90 minutes long can be created. Format of recorded files Recorded phrases are saved as stereo files in the following format. • File format: WAV • Sample rate: 44.1 kHz •... -
Page 29: Looper Operations
Looper operations This section explains basic looper operations. Recording phrases When the Home Screen is open, press the (MEMORY) knob to open the MEMORY Screen. Then, turn the (MEMORY) knob to select the memory to use for recording a new phrase. “Empty”... - Page 30 HINT • By using the RHYTHM SYNC function, rhythm playback can be started at the same time recording starts. (→ Rhythms can be synchronized with the looper (RHYTHM SYNC)) • By using the AUTO REC function, phrase recording can be started simultaneously with a performance. (→ Turning automatic recording on/off...
- Page 31 Stopping recording and starting loop playback When recording, press the (footswitch) to stop recording. The screen will become green and loop playback will start. NOTE • When the maximum recording time is reached, recording will stop and loop playback will start. •...
-
Page 32: Stopping Playback
Stopping playback Press the (STOP) switch during playback. The screen will become its original color and playback will stop. Once a phrase has been recorded, “USER 001” (001 is the memory number) or similar memory name will be shown. NOTE (→ Setting the stop mode How stopping occurs when the (STOP) switch is pressed can be changed. - Page 33 Adding performances to recorded phrases (overdubbing) During playback, press the (footswitch) to start overdubbing. The screen becomes red during overdubbing. • When the end of the loop is reached, loop playback will continue from the beginning, and overdubbing can be repeated. •...
- Page 34 Erasing the last overdubbed phrase (UNDO function) The most recently overdubbed phrase can be undone with a single operation. Press the (UNDO) switch during playback. “UNDO” will appear and the most recently overdubbed phrase will be erased. Restoring an undone overdub (REDO function) Erased phrases can also be restored with a single operation.
- Page 35 Clearing phrases When stopped, press and hold the (STOP) switch. “CLEAR” will appear and the recorded phrase will be cleared.
-
Page 36: Making Looper Settings
Making looper settings This section explains various looper settings that can be made on the Home Screen (recording time, phrase playback starting/stopping and phrase playback volume). For information about other detailed looper settings, see “Looper settings”. Setting the recording time (TIME) The phrase recording time can be set. - Page 37 Setting the phrase playback start mode (START) How loop playback starts can be set. When the Home Screen is open, turn the (LOOP FX) knob to select the playback start mode. Setting Explanation QUICK The loop will start playback immediately after a play operation. FADE Playback of the phrase will fade in.
- Page 38 Adjusting the looper volume (LOOP VOL) The loop playback volume can be adjusted. When the Home Screen is open, turn the (MENU) knob to adjust the loop playback volume. This adjusts the volume of the loop in the memory. To adjust the overall volume of the MS-90LP+ , see “Adjusting the overall output level (OUTPUT VOLUME)”.
-
Page 39: Using An Effect During Loop Playback (Loop Fx Screen)
Using an effect during loop playback (LOOP FX Screen) Effects can be used during loop playback. These include reverse, half-speed and double-speed playback, as well as repeat playback of a short interval. When the Home Screen is open, press the (LOOP FX) knob to open the LOOP FX Screen. - Page 40 Press the (MENU) knob to return to the Home Screen. During loop playback, press the (LOOP FX) switch to turn the effect on/off. When on, the screen will become blue. HINT • When one of the following effects is selected, pressing the (LOOP FX) switch during loop recording will put the selected effect into standby so that it will turn on during playback.
-
Page 41: Using Rhythms (Rhythm Screen)
Using rhythms (RHYTHM Screen) Phrases can be recorded and loops played along with the built-in rhythms. Starting/stopping rhythm playback Press the (RHYTHM) switch when the Home Screen RHYTHM Screen is open. Rhythm playback will start and the indicator will blink in time with the tempo. If the (RHYTHM) switch is pressed when the RHYTHM Screen... -
Page 42: Selecting Rhythm Patterns (Pattern)
Selecting rhythm patterns (PATTERN) Press the (RHYTHM) knob to open the RHYTHM Screen, and turn the (MEMORY) knob to select a rhythm pattern. “Rhythm patterns” for information about the rhythm pattern types. HINT (→ Starting/stopping rhythm Rhythm patterns can be selected during rhythm playback. playback) -
Page 43: Rhythm Patterns
Rhythm patterns Pattern Time Sig. Pattern Time Sig. Pattern Time Sig. Name Name Name 8 BEATS 1 SHUFFLE 1 LO-FI HH 1 8 BEATS 2 SHUFFLE 2 LO-FI HH 2 8 BEATS 3 SHUFFLE 3 NU JAZZ 1 8 BEATS 4 SHUFFLE 4 NU JAZZ 2 16 BEATS 1... -
Page 44: Setting The Rhythm Tempo (Bpm)
Setting the rhythm tempo (BPM) Press the (RHYTHM) knob to open the RHYTHM Screen. Then, turn the (RHYTHM) knob to set the tempo. NOTE The tempo cannot be changed for memories that already have phrases recorded. HINT • This can be set from 40 to 300. •... -
Page 45: Setting The Rhythm Volume (Volume)
Setting the rhythm volume (VOLUME) Press the (RHYTHM) knob to open the RHYTHM Screen, and turn the (MENU) knob to set the rhythm volume. This adjusts the volume of the rhythm in the memory. To adjust the overall volume of the MS-90LP+ , “Adjusting the overall output level (OUTPUT VOLUME)”. -
Page 46: Switching Memories
Switching memories The MS-90LP+ manages recorded phrases in memories. Looper and rhythm settings along with the selected effect are saved together in memories. When the Home Screen is open, press the (MEMORY) knob to open the MEMORY Screen. ❶ Memory number This shows the number of the selected memory. - Page 47 Turn the (MEMORY) knob to select a memory. If a phrase has already been recorded, the (MEMORY) knob can be pressed to start/stop playback of the selected memory. Press the (MENU) knob. This confirms the memory selection and reopens the Home Screen.
-
Page 48: Managing Memories
Managing memories Saving memories (SAVE MEMORY) When the automatic saving function is set to “OFF” or “SETTING ONLY”, manually save recorded phrases and settings as necessary. “SETTING & PHRASE” is the default setting for the automatic saving function. Using this, recorded phrases and various settings will be saved automatically. - Page 49 Turn the (MENU) knob to select the memory save destination and press the (MENU) knob. “Empty” is shown for memories that have nothing saved in them. Press the (MENU) knob. This saves the memory and reopens the Home Screen. To cancel saving, turn the (MENU) knob to select “CANCEL”...
-
Page 50: Copying Memories (Copy Memory)
Copying memories (COPY MEMORY) Memories can be copied to other locations. Press the (MENU) knob to open the MENU Screen. Turn the (MENU) knob to select “COPY MEMORY” and press the (MENU) knob. This opens the COPY MEMORY Screen. NOTE The COPY MEMORY Screen will not be shown when the AUTO SAVE function is set to “OFF”... - Page 51 Press the (MENU) knob. This copies the memory and reopens the Home Screen. To cancel copying, turn the (MENU) knob to select “CANCEL” and press the (MENU) knob.
-
Page 52: Changing Memory Names (Memory Name)
Changing memory names (MEMORY NAME) When the MEMORY Screen is open, turn the (MEMORY) knob to select the memory to be (→ Switching renamed. Then, press the (MENU) knob. memories) Press the (MENU) knob to open the MENU Screen. Turn the (MENU) knob to select “MEMORY NAME”... - Page 53 Turn the (RHYTHM) knob to insert a character. • Press the (LOOP FX) knob to delete the character before the cursor. • Press and hold the (LOOP FX) knob to delete all the characters. Press the (MEMORY) knob. This confirms the name and reopens the Home Screen.
-
Page 54: Transferring Files To And From A Computer, Smartphone Or Tablet
Transferring files to and from a computer, smartphone or tablet By connecting the MS-90LP+ to a computer, smartphone or tablet, memories can be backed up, and loop sound sources can be imported, for example. Connecting to computers, smartphones and tablets Use a USB (Type-C) cable to connect the MS-90LP+ USB port to a computer, smartphone or tablet. - Page 55 Select “FILE TRANSFER” on the MENU Screen. The FILE TRANSFER Screen will open, showing that the MS-90LP+ is in file transfer mode. When in file transfer mode, operations on the MS-90LP+ are disabled. Use the computer to work with the files saved on the MS-90LP+. •...
-
Page 56: Ms-90Lp+ Folder And File Structure
MS-90LP+ folder and file structure ❶ Memory folders Recorded phrases, looper settings and rhythm settings, for example, are saved in these. ❷ Audio file for recorded phrase Recorded phrases are saved as stereo files. ❸ Memory settings file... -
Page 57: Disconnecting From Computers, Smartphones And Tablets
Disconnecting from computers, smartphones and tablets Disconnect on the computer. • Windows: Select the MS-90LP+ with “Safely Remove Hardware and Eject Media”. • macOS: Drag the MS-90LP+ icon to the Trash and drop it. • Smartphone/tablet: Refer to the operation manual for that device. Press the (MEMORY) knob. -
Page 58: Using Midi Devices
Using MIDI devices A computer or a MIDI device that is connected to the MS-90LP+ can be used to switch memories and synchronize the tempo. Connect a computer, smartphone, tablet or MIDI device to the MS-90LP+. ❶ MIDI device Use 3.5 mm TRS cables to connect a MIDI controller, a drum machine or another MIDI device. To connect MIDI devices with 5-pin DIN connectors, use 5-pin DIN-TRS MIDI (Type-A) conversion cables. - Page 59 Make MIDI settings as described in “MIDI settings”. • Setting the channel used to receive MIDI (MIDI RX CH) • Setting the channel used to send MIDI (MIDI TX CH) • Outputting MIDI clock (MIDI CLOCK OUT) • Outputting program change messages (PROGRAM CHANGE OUT) •...
-
Page 60: Other Settings (Menu Screen)
Other settings (MENU Screen) Looper settings Setting the fade in/out time (FADE TIME) (→ Setting the phrase The fade in/out time can be set when “FADE” is selected for the start or stop mode. playback start mode (START), Setting the stop mode (STOP)) Select “FADE TIME”... - Page 61 Turning automatic recording on/off (AUTO REC) By using the automatic recording function, phrase recording can be started simultaneously with a performance. Set the sound level that starts recording. Select “AUTO REC” on the MENU Screen. Turn the (MENU) knob to select a setting. Setting Explanation (−6 dB –...
- Page 62 Selecting the operation that occurs after the first phrase recording completes (REC MODE) The operation that occurs when the (footswitch) is pressed while recording the first phrase or recording reaches the set time can be set. Select “REC MODE” on the MENU Screen.
-
Page 63: Rhythm Settings
Rhythm settings Setting the precount (PRECOUNT) A count sound can be played before phrase recording starts. Select “PRECOUNT” on the MENU Screen. Turn the (MENU) knob to switch it ON/OFF. Setting Explanation A precount is not played. A precount is played. Press the (MENU) knob. - Page 64 Rhythms can be synchronized with the looper (RHYTHM SYNC) Starting/stopping phrase recording or loop playback can also start/stop the rhythm at the same time. Select “RHYTHM SYNC” on the MENU Screen. Turn the (MENU) knob to switch it ON/OFF. Setting Explanation The looper and rhythm operate separately.
-
Page 65: Midi Settings
MIDI settings Setting the channel used to receive MIDI (MIDI RX CH) The MIDI channel that receives data to control the MS-90LP+ can be set. Select “MIDI RX CH” on the MENU Screen. Turn the (MENU) knob to set the channel used to receive MIDI. The setting value is shown on the display. - Page 66 Setting the channel used to send MIDI (MIDI TX CH) The MIDI channel that the MS-90LP+ uses to transmit can be set. Select “MIDI TX CH” on the MENU Screen. Turn the (MENU) knob to set the channel used to send MIDI. The setting value is shown on the display.
- Page 67 Outputting MIDI clock (MIDI CLOCK OUT) The MS-90LP+ can output MIDI clock to other MIDI devices. Select “MIDI CLOCK OUT” on the MENU Screen. Turn the (MENU) knob to switch it ON/OFF. Setting Explanation MIDI clock is output. MIDI clock is not output. Press the (MENU) knob.
- Page 68 Outputting program change messages (PROGRAM CHANGE OUT) Program change messages can be sent to external MIDI devices when memories are changed. Select “PROGRAM CHANGE OUT” on the MENU Screen. Turn the (MENU) knob to switch it ON/OFF. Setting Explanation Program changes will be output. Program changes will not be output.
- Page 69 Setting MIDI output (MIDI THRU) Set which connectors output MIDI data after the data is input through the MIDI IN and USB connectors. Select “MIDI THRU” on the MENU Screen. Turn the (MENU) knob to select a MIDI output setting. Setting Explanation MIDI data is not output.
-
Page 70: Hardware Settings
Hardware settings Setting the output routing (ROUTING) Output routing can be selected according to use. Select “ROUTING” on the MENU Screen. Turn the (MENU) knob to select the output routing. Setting Explanation The instrument, looper and rhythm sounds will be output in stereo. The rhythm sound will be output independently from the R jack. - Page 71 Press the (MEMORY) knob. This reopens the Home Screen.
- Page 72 Adjusting the overall output level (OUTPUT VOLUME) The volume of the MS-90LP+ output sound can be adjusted. Reduce the volume if the output sound becomes distorted. Select “OUTPUT VOLUME” on the MENU Screen. Turn the (MENU) knob to adjust the volume. The setting value is shown on the display.
- Page 73 Setting the automatic saving function (AUTO SAVE) When the AUTO SAVE function is in use, memories will be saved automatically when their contents are changed. Select “AUTO SAVE” on the MENU Screen. Turn the (MENU) knob to select the AUTO SAVE setting. Setting Explanation This turns off...
-
Page 74: Setting The Battery Type (Battery Type)
Setting the battery type (BATTERY TYPE) Set the type of battery used correctly so that the amount of remaining battery charge can be monitored accurately. Select “BATTERY TYPE” on the MENU Screen. Turn the (MENU) knob to select the type of battery used. Setting Explanation ALKALINE... - Page 75 Adjusting the backlight brightness (BACKLIGHT) The brightness of the backlight can be adjusted. Select “NORMAL” to extend battery life. Select “BACKLIGHT” on the MENU Screen. Turn the (MENU) knob to adjust the backlight brightness. Setting Explanation NORMAL This is regular brightness. BRIGHT This makes the backlight brighter.
-
Page 76: Adjusting The Display Contrast (Contrast)
Adjusting the display contrast (CONTRAST) Adjust the display contrast. Select “CONTRAST” on the MENU Screen. Turn the (MENU) knob to adjust the display contrast. The setting value is shown on the display. Press the (MENU) knob. This confirms the setting. Press the (MEMORY) knob. -
Page 77: Setting The Eco Mode
Setting the ECO MODE This function can be used to turn the power off automatically if unused for 10 hours. Select “ECO MODE” on the MENU Screen. Turn the (MENU) knob to switch it ON/OFF. Setting Explanation The power will automatically turn off if unused for 10 hours. This disables ECO mode. -
Page 78: Managing The Firmware
❶ MS-90LP+ firmware version ❷ Boot version Press the (MEMORY) knob. This reopens the Home Screen. Updating the firmware The MS-90LP+ firmware can be updated to the latest version. The latest firmware can be downloaded from the ZOOM website (zoomcorp.com/help/ms-90lpplus). -
Page 79: Restoring Default Settings (Factory Reset)
Restoring default settings (FACTORY RESET) Settings can be restored to the factory defaults. Select “FACTORY RESET” on the MENU Screen. Turn the (MENU) knob to select “YES”. Press the (MENU) knob. Resetting will be executed, restoring default settings. NOTE Resetting will overwrite all settings, including memories, with their factory defaults. Be certain before using this function. -
Page 80: Checking The Latest Ms-90Lp+ Information (Help)
Checking the latest MS-90LP+ information (HELP) A 2D code for help related to the MS-90LP+ can be shown on its display. Select “HELP” on the MENU Screen. Use a smartphone or tablet, for example, to read the 2D code shown on the HELP Screen. zoomcorp.com/help/ms-90lpplus Press the (MEMORY) knob. -
Page 81: Appendix
There is a lot of noise • Confirm that an instrument cable is not the cause. (→ Making • Use a genuine ZOOM AC adapter. connections) Batteries lose their charge quickly Making the following settings could increase the battery operation time. -
Page 82: Specifications
Input S/N 122 dB Noise floor (residual noise) –100 dBu Power AC adapter: 9V DC 500mA center negative (ZOOM AD-16) 2 AA batteries (alkaline, lithium or rechargeable NiMH batteries) Estimated operation times • These values are Alkaline batteries: about 4.0 hours (about 3.5 hours using using batteries approximate. - Page 83 Weight 367 g (excluding batteries) 414 g (including batteries) Note: 0 dBu = 0.775 V...
-
Page 84: Midi Implementation Chart
MIDI implementation chart [MultiStomp] Model: MS-90LP+ Date: Oct. 1, 2024 MIDI implementation chart Version: 1.00 Function Transmitted Recognized Remarks Basic Channel Default 1–16 1–16 Memorized Changed 1–16 1–16 Mode Default Messages Altered ****************** Note Number True voice ****************** Velocity Note ON Note OFF Aftertouch Channel... - Page 85 ZOOM CORPORATION 4-4-3 Kanda-surugadai, Chiyoda-ku, Tokyo 101-0062 Japan zoomcorp.com Z2I-5457-01...
Need help?
Do you have a question about the MULTISTOMP MS-90LP+ and is the answer not in the manual?
Questions and answers