Zoom F8n Pro Operation Manual
Multitrack field recorder
Hide thumbs
Also See for F8n Pro:
- Quicktour (17 pages) ,
- Firmware update manual (10 pages) ,
- Supplementary manual (6 pages)
Table of Contents
Advertisement
Quick Links
Operation Manual
You must read the Usage and Safety Precautions before use.
©2022 ZOOM CORPORATION
Copying or reprinting this manual in part or in whole without permission is prohibited.
Product names, registered trademarks and company names in this document are the property of their respective companies. All trademarks and
registered trademarks in this document are for identification purposes only and are not intended to infringe on the copyrights of their respective owners.
Proper display is not possible on grayscale devices.
Advertisement
Table of Contents

Subscribe to Our Youtube Channel
Related Manuals for Zoom F8n Pro


Summary of Contents for Zoom F8n Pro
- Page 1 Operation Manual You must read the Usage and Safety Precautions before use. ©2022 ZOOM CORPORATION Copying or reprinting this manual in part or in whole without permission is prohibited. Product names, registered trademarks and company names in this document are the property of their respective companies. All trademarks and registered trademarks in this document are for identification purposes only and are not intended to infringe on the copyrights of their respective owners.
-
Page 2: Notes About This Operation Manual
• Recording from copyrighted sources, including CDs, records, tapes, live performances, video works and broadcasts, without permission of the copyright holder for any purpose other than personal use is prohibited by law. ZOOM CORPORATION will not assume any responsibility related to infringements of copyrights. -
Page 3: Table Of Contents
Contents Notes about this Operation Manual........................2 F8n Pro overview.................................6 Achieving high audio quality throughout recording and editing................. 6 Functions of parts..............................10 Overview of screens that are shown........................15 Recording process..............................28 Making preparations..............................29 Loading an SD card..............................29 Supplying power................................ 30 Connecting input equipment...........................33... - Page 4 Powering the FRC-8 with USB bus power (USB Bus Power)................254 Setting the FRC-8 LED brightness (LED Brightness)...................256 Updating the FRC-8 firmware..........................258 Controlling the F8n Pro from a smartphone/tablet..................261 Making various settings............................262 Setting how timecode is shown (Home Timecode Display Size)..............262...
- Page 5 Setting the date and time (Date/Time (RTC))......................278 Disabling the Automatic Power Saving function (Auto Power Off)..............281 Setting the power supply used (Power Source)....................283 Backing up and loading F8n Pro settings (Backup/Load Settings)..............286 Restoring factory default settings........................290 Managing SD cards..............................291 Checking SD card information (Information)......................291...
-
Page 6: F8N Pro Overview
F8n Pro overview Achieving high audio quality throughout recording and editing With dual AD converter circuits and support for 32-bit float WAV files, the F8n Pro can maintain the highest audio quality from recording to post-production. Recording Dual AD converter circuits enable recording the loudest to the quietest sounds without adjusting gain. - Page 7 Dual AD converter circuit overview For each input circuit, the F8n Pro has two AD converters with different input gains. This design enables high-quality audio recording without the need to adjust gain settings, a step that is normally indispensable. Providing amazing dynamic range By combining two AD converters, a wide dynamic range not possible with a single AD converter has been realized.
- Page 8 Switching between two AD converters The F8n Pro constantly monitors data from the two AD converters, and automatically selects the one that provides the best recording results. Low noise No clipping Low noise because high-gain because low-gain because high-gain...
- Page 9 Clipping advantage If a waveform sounds clipped when output from the F8n Pro or in a DAW, it can be edited after recording to lower its volume and restore an unclipped waveform because the data in the 32-bit float WAV file itself is not clipped.
-
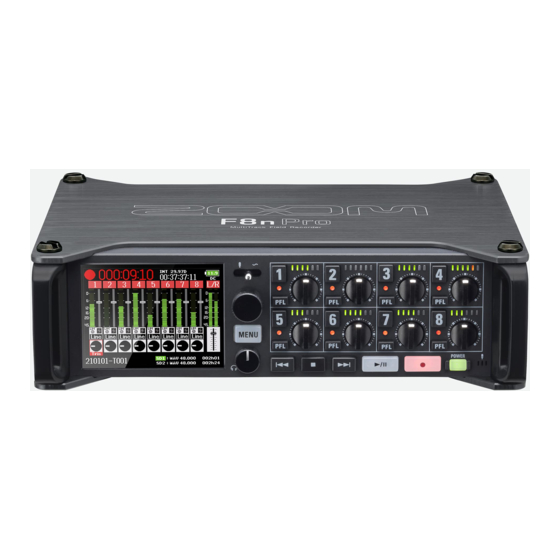
Page 10: Functions Of Parts
Functions of parts Front ❶ Display (LCD) (→Overview of screens that are This shows the recorder status and Menu Screen. shown) ❷ Selection encoder Use this to select and to confirm in various menus. ❸ Slate switch Use this to record slate tones and with the slate mic. ❹... - Page 11 ❿ REW button Use this to search backward and to skip to the previous track. ⓫ STOP button This stops recording and playback. ⓬ FF button Use this to search forward and to skip to the next track. ⓭ PLAY/PAUSE button This starts and pauses track playback.
- Page 12 Back ❶ 12 V DC IN connector Connect the dedicated AC adapter (ZOOM AD-19) here. ❷ TIMECODE IN/OUT connectors Use cables with BNC connectors to input and output timecode. ❸ Battery cover Open this when installing or removing AA batteries.
- Page 13 External DC power supplies that support Hirose 4-pin connectors can be connected here. ❷ USB (Mini-B) port Connect this to a computer, smartphone or tablet to use the F8n Pro as an SD card reader or audio interface. ❸ SD card slots Up to 2 SD cards can be loaded.
- Page 14 Right side ❶ SUB OUT jack This stereo mini jack (unbalanced) can be used to output sound. ❷ Headphone jack This can output sound to headphones. ❸ MAIN OUT jacks Use cables with TA3 connectors to output sound to speakers. ❹...
-
Page 15: Overview Of Screens That Are Shown
Overview of screens that are shown This section explains the screens shown on the F8n Pro display. Screen list ■ Home Screen Mixer Screen This appears on the display You can check the input settings when the F8n Pro power is and adjust the input level. - Page 16 Home Screen ■ Mixer Screen You can easily check the playing/recording elapsed time, input/output level, trim setting, input source, etc. ❶ Status icon This icon shows the recording status. • : Stopped • : Recording • : Paused (during recording) •...
- Page 17 • DC: AC adapter • EXT: external DC power supply • AA: batteries ❻ Track number This shows the track number and status. • Red: input enabled • Green: playback track enabled • Grey: input disabled Stereo-linked inputs are displayed as ❼...
- Page 18 ⓱ Playback card • Green: used for playback • Grey: no card ⓲ Recording/playback file format and sampling rate Showed by card. ⓳ Remaining time The remaining recordable time (when recording) or remaining playback time (when playing) is displayed by card.
- Page 19 ■ MAIN OUT /SUB OUT Setting Screen The levels of MAIN OUT/SUB OUT are displayed and you can set/adjust the output setting such as ON/OFF, standard output level/limiter setting, level adjusting, etc. ❶ Status icon This icon shows the recording status. •...
- Page 20 • EXT: external DC power supply • AA: batteries ❻ MAIN OUT 1/2 setting area You can set/adjust the following items. (→Disabling outputs (Output • On/Off: Sets enabling/disabling of the output. On/Off)) (→Setting the standard output level (Output • Level: Adjusts the standard output level. Level)) (→Using the output limiter (Output •...
- Page 21 ■ Level Meters Screen You can check the level finely by displaying the level meter largely for each track. You can switch the displayed level meter with by registering the desired source to View1 to 4. (→Setting level meter appearance (Level Meter)) ...
- Page 22 Power type • DC: AC adapter • EXT: external DC power supply • AA: batteries ❻ Levels for tracks 1–8 These show the input/playback level for tracks 1-8. ❼ Levels for L/R tracks These show the input/playback level for L/R tracks. ❽...
- Page 23 PFL Screen You can make the input settings of the selected track such as input source, input level, etc. The PFL Screen of the selected track is displayed by pressing of the track that you want to make the input settings or monitor. Press again to return to the previous screen.
- Page 24 Setting items Explanation (→Setting the input source (Input Input Source Sets the input source. Source)) (→Adjusting input levels Trim Sets the input level. (→Changing the phantom power Phantom Makes the phantom settings. settings (Phantom)) (→Cutting low-frequency noise Sets the high pass filter. (HPF)) (→Using the input limiter (Input Input Limiter...
- Page 25 Menu Screen You can make the various settings of the F8n Pro such as input/output setting, recording/playback setting, timecode setting, system setting, SD card setting, etc. and manage files. The Menu Screen is opened by pressing You can open the Home Screen while displaying the Menu Screen by pressing and holding ...
- Page 26 Character input screen A character input screen appears on the display when inputting characters for the file name, etc. Use the select encoder to input characters. to select the desired character or function and press to confirm. The selected character or function is highlighted in red. ...
- Page 27 • Press : Deletes the previous character. • Press : Moves the cursor to “Enter”. • Press : Cancels editing and returns to the previous screen. Repeat the procedure in step 1 to input characters. When you have finished inputting characters, use to select “Enter”...
-
Page 28: Recording Process
Recording process Recording with the F8n Pro follows the process shown below. The data created for each recording occurrence is called a “take”. • Connect mics, instruments, audiovisual equipment and other devices to Connect (→Connecting mics/other devices to Inputs Inputs 1–8. -
Page 29: Making Preparations
• When inserting a SD card, be sure to insert the correct end with the top side up. • Recording and playback are not possible when a SD card is not loaded in the F8n Pro. • After purchasing a new SD card, always format it using the F8n Pro to maximize performance. -
Page 30: Supplying Power
Supplying power The F8n Pro can operate using either an AC adapter, external DC power supply or batteries. A power supply will be used in the following order of priority. AC adapter > external DC power supply > batteries. Installing batteries To run the F8n Pro using batteries, install 8 AA batteries in the battery compartment. - Page 31 NOTE: • Be careful because the battery case could become loose unexpectedly if the cover screw is not tightened firmly. • Use only one type of battery (alkaline, NiMH or lithium) at a time. • Set the type of battery used correctly so that the amount of remaining battery charge can be shown (→Setting the power supply used (Power accurately.
- Page 32 Connecting an AC adapter Connect the cable of the dedicated AC adapter (AD-19) to the 12 V DC IN connector, and connect the AC adapter to an outlet. Using an external DC power supply Connect the external DC power supply equipment to the EXT DC IN connector. Connect a 9–18V direct-current power supply.
-
Page 33: Connecting Input Equipment
Connecting input equipment Connecting mics/other devices to Inputs 1–8 The F8n Pro can record a total of 10 tracks simultaneously: 8 individual tracks with signals coming from Inputs 1–8 and a stereo mix of these inputs on left and right tracks. - Page 34 ■ Connecting line level equipment Connect the TRS plugs of keyboards and mixers directly to Inputs 1–8. (→Setting the input source (Input • When connecting keyboards and mixers, set the input source to “Line”. Source)) • Direct input of passive guitars and basses is not supported. Connect these instruments through a mixer or effects device.
- Page 35 Connecting mic capsules A ZOOM mic capsule can be connected to the MIC IN connector on the back of the F8n Pro. NOTE: • The mic capsule input is assigned to tracks 1/2. • When a mic capsule is connected, Inputs 1/2 cannot be used.
- Page 36 ■ Compatible mic capsules Supported Mic capsules Explanation with F8n Pro XAH-8 XY-AB mic capsule Unsupported VRH-8 Ambisonics VR mic capsule Unsupported EXH-8 External XLR Input capsule Unsupported ○ XYH-6 Adjustable X/Y stereo microphone capsule (→Changing the plugin power setting (Plugin Power)) ○...
- Page 37 Stereo input By enabling the stereo link for tracks 1/2, 3/4, 5/6 or 7/8, the corresponding Inputs (1/2, 3/4, 5/6 or 7/8) can (→Linking inputs as a stereo be handled as a stereo pair. pair) When linked, Input 1, 3, 5 or 7 becomes the left channel and Input 2, 4, 6 or 8 becomes the right channel.
- Page 38 Connection example Recording is possible in the following kinds of situations. ■ While filming • Input 1: gun mic for main subject sound (XLR connection) • Inputs 2–5: wireless lavalier mics for performers (TRS connections) • Inputs 6-7: mics for ambient sound (XLR connections) ...
- Page 39 ■ Concert recording • Inputs 1-4: mics for stage performance (XLR connections) • Inputs 5-6: line-level PA mixer outputs (TRS connections) • Inputs 7-8: mics for audience sound (XLR connections) ...
-
Page 40: Turning The Power On/Off
This turns the F8n Pro power on and turns on. The first time the power is turned on after purchase, as well as after the F8n Pro has been restored to (→Setting its factory default settings, screens to set the date and time will appear. Make these settings. -
Page 41: Setting The Date And Time (First Time Starting Up)
Setting the date and time (first time starting up) The first time the power is turned on after purchase, set the date and time when the Set Date/Time Screen opens. The date and time are added to recording files. to select the setting item and press to change the value and press Repeat steps 1–2 to set the date and time. - Page 42 HINT: (→Setting the date and time The date and time setting can also be changed later from the Menu Screen. (Date/Time (RTC)))
-
Page 43: Making Input Settings
Making input settings Input and output signal flow Recording Track 1 Input 1 Track 2 Input 2 Track 7 Input 7 Track 8 Input 8 Track L Track R Output [MAIN OUT Postfader 1/2]jacks [SUB OUT 1/2]jack Prefader [HE ADPHONE] Jack... -
Page 44: Adjusting The Input Signal Monitoring Balance
Adjusting the input signal monitoring balance You can adjust the volume of each input signal when monitoring. (→Mixer Open the mixer on the Home Screen. Screen) to adjust the faders. NOTE: • The MAIN OUT 1/2 and SUB OUT 1/2 faders do not affect the levels of the slate mic and slate tone. (→Using the slate mic and slate tone) •... -
Page 45: Setting The Track Knob Function (Track Knob Option)
Setting the track knob function (Track Knob Option) The Home Screen layout and track knob functions can be changed. You can adjust trim, fader and pan settings with the track knob by changing the track knob function. Press This opens the Menu Screen. to select “SYSTEM”, and press to select “Track Knob Option”, and press... - Page 46 to select the track knob function, and press Setting Explanation Trim This track knob function is restricted to changing input levels. (→Mixer Screen 1. Open the mixer on the Home Screen. 2. Use a track’s to adjust its trim. HINT: The panning and fader level can be changed as follows.
- Page 47 Setting Explanation Fader The track knobs can be used to quickly adjust the fader. (→Mixer Screen 1. Open the mixer on the Home Screen. 2. Use a track’s to adjust its fader. HINT: The input level can be changed as follows. •...
- Page 48 Setting Explanation Mixer You can switch the parameter that can be adjusted by using the track knob. (→Mixer Screen 1. Open the mixer on the Home Screen. 2. Use to select the function you want to adjust, and press Trim Fader The screen that you can adjust the selected function is displayed.
-
Page 49: Adjusting The L/R Track Volume
Adjusting the L/R track volume (→Home Press while the Home Screen is displayed. Screen) This opens the volume adjustment screen. NOTE: Shortcuts are disabled during playback. to adjust the volume. NOTE: • Volume settings affect the results of recording. • If only the L/R track is recorded, the L/R track fader setting for the take will be saved as 0 dB. When finished adjusting, press NOTE: (→Setting the track knob function (Track... -
Page 50: Monitoring The Input Signals Of Specific Tracks (Pfl/Solo)
Monitoring the input signals of specific tracks (PFL/ SOLO) You can monitor the input signals of specified tracks. Even tracks that have not been set to record can be input to the PFL Screen and their input sounds monitored. This is convenient when using tracks as return inputs. Press on the tracks that you want to monitor. -
Page 51: Setting The Input Source (Input Source)
Setting the input source (Input Source) Follow these procedures to set the input source of each track. Press This opens the Menu Screen. to select “INPUT”, and press to select “Input Source”, and press to select a track, and press HINT: Select “All”... - Page 52 to select the input source, and press Setting Explanation Select this when connecting a mic or other equipment with a low input level. Line Select this when connecting line level equipment. The input level will be reduced 20 dB compared to when “Mic“ is selected. USB 1、USB 2、USB When “Audio Interface with Rec”...
-
Page 53: Setting The Monitoring Sound On The Pfl Screen (Pfl Mode)
Setting the monitoring sound on the PFL Screen (PFL Mode) On the PFL Screen, you can set the monitored sound to be either prefader listening (PFL) or postfader solo (→Monitoring the input signals of specific tracks (SOLO). (PFL/SOLO)) Press This opens the Menu Screen. to select “INPUT”, and press to select “PFL Mode”, and press to select a track, and press... - Page 54 to select the mode, and press Setting Explanation Monitor the prefader sound. SOLO Monitor the postfader sound. NOTE: When the PFL Screen is open during playback, the monitoring sound will be post-fader (SOLO) regardless of the setting. HINT: The selected mode is displayed on the upper part of the PFL Screen. ...
-
Page 55: Cutting Low-Frequency Noise (Hpf)
Cutting low-frequency noise (HPF) The high pass filter can cut low frequencies to reduce the sound of wind, vocal pops and other noise. Press This opens the Menu Screen. to select “INPUT”, and press to select “HPF”, and press to select a track, and press HINT: Select “All”... - Page 56 to set the cutoff frequency, and press HINT: This can be set to “Off” or between 10 and 240 Hz.
-
Page 57: Using The Input Limiter (Input Limiter)
Using the input limiter (Input Limiter) The limiter can prevent distortion by controlling input signals that have excessively high levels. When the limiter is ON, if the input signal level exceeds the set threshold value, the signal level will be suppressed to prevent the sound from distorting. - Page 58 Turning the input limiter on/off You can turn the input limiter on/off for each track. You can select an ordinary limiter (Normal) or optimized limiter prevents distortion by detecting the maximum level in advance (Advanced). Press This opens the Menu Screen. to select “INPUT”, and press to select “Input Limiter”, and press to select a track, and press...
- Page 59 to select “On/Off”, and press to select the setting, and press Setting Explanation Off This disables the limiter. On (Normal) This applies an ordinary limiter. The ratio is 20:1. Peak might remain threshold Before limiter After limiter For the limiter settings, see “Setting the ordinary limiter (Normal)”.
- Page 60 NOTE: • When set to “On (Advanced)”, the input latency of the F8n Pro increases 1 ms. When monitoring sounds being recorded with a mic in real-time, increased latency can cause interference between sound transmitted through the air from the source and the delayed monitored sound, possibly making accurate monitoring of the sounds difficult.
- Page 61 Setting the ordinary limiter (Normal) You can make the setting of the ordinary limiter by selecting “On (Normal)” in “Turning the input limiter on/ off”. Press This opens the Menu Screen. to select “INPUT”, and press to select “Input Limiter”, and press to select a track, and press HINT: Select “All”...
- Page 62 to select the setting item, and press Setting Explanation Type This sets the limiter type. 1. Use to select the type, and press • Hard Knee: Only peaks that exceed the threshold are attenuated. There is no effect below the threshold. •...
- Page 63 Setting Explanation Attack Time This sets the amount of time until limiting starts after the input signal exceeds the threshold. 1. Use to adjust the time, and press This can be set from 1 to 4 ms. Release Time This sets the amount of time until limiting stops after the input signal ...
- Page 64 Setting the target level When the setting of “Turning the input limiter on/off” is set to “On (Advanced)”, use this to set the target output level for the signal. Press This opens the Menu Screen. to select “INPUT”, and press to select “Input Limiter”, and press to select a track, and press HINT:...
- Page 65 to select “Target Level”, and press to adjust the setting, and press NOTE: • This can be set from −16 to 0 dBFS. • After a signal passes through the limiter, it will not exceed the set target level value.
-
Page 66: Inverting The Input Phase (Phase Invert)
Inverting the input phase (Phase Invert) The phase of the input signal can be inverted. This is useful when sounds cancel each other out due to mic positioning. Press This opens the Menu Screen. to select “INPUT”, and press to select “Phase Invert”, and press to select a track, and press HINT: Select “All”... - Page 67 to select “On”, and press...
-
Page 68: Changing The Phantom Power Settings (Phantom)
Changing the phantom power settings (Phantom) The F8n Pro can provide phantom power. The voltage can be set to +24 V or +48 V and it can be turned on/off for each input separately. NOTE: Do not use this function with a device that is not compatible with phantom power. Doing so could damage the device. - Page 69 to select “On/Off”, and press to select a track, and press HINT: Select “All” to set all the tracks at the same time. to select “On”, and press Phantom power of the track selected in step 5 turns on. NOTE: When a mic capsule is connected, phantom power is set to “Off”...
- Page 70 Setting the voltage When using mics and other equipment that can operate with voltages less than +48 V, selecting +24 V can reduce power consumption by the F8n Pro. Press This opens the Menu Screen. to select “INPUT”, and press to select “Phantom”, and press...
- Page 71 to select the voltage, and press NOTE: This setting is applied for all tracks.
- Page 72 Disabling phantom power during playback If mics do not need phantom power during playback, disabling it can reduce F8n Pro power consumption. Press This opens the Menu Screen. to select “INPUT”, and press to select “Phantom”, and press to select “Power Saving (For All Inputs)”, and press...
- Page 73 “On (Phantom off during play back)”, and press Setting Explanation Off Phantom power is supplied even during playback. On (Phantom off during play Phantom power is not supplied during playback. back) This can reduce the F8n Pro power consumption. NOTE: This setting is applied for all tracks.
-
Page 74: Changing The Plugin Power Setting (Plugin Power)
Changing the plugin power setting (Plugin Power) Make this setting when a mic that is compatible with plug-in power is connected to the mic capsule’s MIC/ LINE input jack. Press This opens the Menu Screen. to select “INPUT”, and press to select “Plugin Power”, and press to select “On”, and press NOTE:... -
Page 75: Delaying Input Signals (Input Delay)
Delaying input signals (Input Delay) If there are differences in the timing of input signals, use this function to correct them when recording. Press This opens the Menu Screen. to select “INPUT”, and press to select “Input Delay”, and press to select a track, and press HINT: Select “All”... - Page 76 to adjust the delay time, and press NOTE: (→Setting the sampling rate (Sample When Sample Rate is set to 192 kHz, “Input Delay” is disabled. Rate)) HINT: This can be set from 0 to 30.0 ms.
-
Page 77: Converting Mid-Side Input To Ordinary Stereo (Stereo Link Mode)
Converting mid-side input to ordinary stereo (Stereo Link Mode) Signals from a mid-side stereo mic input connected to stereo-linked inputs can be converted to an ordinary stereo signal. See “Linking inputs as a stereo pair” for how to use stereo linking. Mid-side stereo format overview: This technique creates a stereo recording from signals input by... - Page 78 to select “Stereo Link Mode”, and press to select a track, and press HINT: Select “All” to set all the tracks at the same time. to select “MS Stereo Link”, and press Setting Explanation Stereo Link When stereo-linked, inputs are handled normally. MS Stereo Link When stereo-linked, signals from a mid-side mic are converted to ordinary stereo.
- Page 79 • When “MS Stereo Link” is selected, odd-numbered inputs are handled as mid signals and even-numbered inputs as side signals. • The “MS Stereo Link” setting is disabled if a ZOOM mic capsule is connected that cannot have L/R signals routed individually to inputs 1/2.
-
Page 80: Adjusting The Input Levels Of Multiple Tracks Simultaneously (Trim Link)
Adjusting the input levels of multiple tracks simultaneously (Trim Link) The input levels of multiple tracks can be linked and adjusted at the same time. Press This opens the Menu Screen. to select “INPUT”, and press to select “Trim Link”, and press HINT: You can also open the “Trim Link”... - Page 81 to select a track to link, and press : Linked : Not linked You can clear all settings by selecting “Clear”. NOTE: • A track cannot be in more than one group at a time. • The input levels of tracks set to “MS Stereo Link” will also be linked if those tracks are put into groups. (→Converting mid-side input to ordinary stereo (Stereo Link Mode)) •...
-
Page 82: Adjusting The Side Level Of A Mid-Side Mic Capsule (Side Mic Level)
• When set to “RAW”, recording will occur without stereo encoding. The stereo width of audio in RAW format can be adjusted after recording by using “ZOOM MS Decoder” or other plug-in software. • This can be adjusted only when a mid-side type mic capsule is connected. -
Page 83: Changing The Automatic Mixing Setting (Auto Mix)
Changing the automatic mixing setting (Auto Mix) When using multiple mics to capture audio during a meeting, for example, automatically attenuating the inputs of mics that are not in active use provides the following benefits. • The likelihood of feedback is reduced. •... - Page 84 HINT: Select “All” to set all the tracks at the same time. to select “On”, and press NOTE: • The following functions and settings cannot be used with this function. (→Setting the sampling rate (Sample - The sampling rate cannot be set to 192 kHz. Rate)) (→Setting the format of - The “Ambisonic Mode”...
-
Page 85: Setting The Format Of Ambisonic Mode
Setting the format of Ambisonic Mode By connecting mics that can output ambisonics A-format signals to Inputs 1–4, audio can be converted to ambisonics B-format and recorded. Press This opens the Menu Screen. to select “INPUT”, and press to select “Ambisonic Mode”, and press to select “Format”, and press... - Page 86 to select the format, and press Setting Explanation FuMa This converts the signals from Inputs 1-4 to the ambisonics FuMa B-format, and saves them as a 4-channel polyphonic file. AmbiX This converts the signals from Inputs 1-4 to the ambisonics AmbiX B-format, and saves them as a 4-channel polyphonic file.
- Page 87 Setting Explanation Ambisonics Input Track B-format converter (FuMa or AmbiX) Ambisonics Track B-format converter (FuMa or AmbiX) Ambisonics Stereo Track Monitor converter FuMa + This converts the signals from Inputs 1-4 to the ambisonics FuMa B-format, and Ambisonics A records them to tracks 1-4. It also records the signals from Inputs 1-4 to tracks 5-8 without converting them to an ambisonics B-format.
- Page 88 • When the sampling rate is set to 44.1–48.048 kHz and “Ambisonic Mode” is not set to “Off”, the F8n Pro latency will increase 2 ms. When monitoring sounds being recorded with a mic in real-time, increased latency can cause interference between sound transmitted through the air from the source and the (→Setting the...
- Page 89 HINT: (→Using as an audio interface • “Ambisonic Mode” can be set during use as an audio interface (Multi Track). (Audio Interface)) • Even when “Ambisonic Mode” is not set to “Off”, you can press track to monitor their input sounds. When “PFL mode”...
-
Page 90: Setting The Mic Position Used For Ambisonic Recording (Mic Position)
Setting the mic position used for ambisonic recording (Mic Position) By setting the mic orientation used during ambisonic recording as an F8n Pro parameter, proper positioning can be maintained when converting to ambisonic B format if the mic orientation is changed from upright to upside down or horizontal. - Page 91 to select the mic orientation, and press Setting Explanation Upright Use this setting to record with the mic upright. Upright Upside Down Use this setting to record with the mic upside down. Upside Down Endfire Use this setting to record with the mic oriented horizontally. ...
- Page 92 HINT: • Using the mic upright is recommended for ambisonic recording in order to minimize reflections from the floor and the mic itself. • When it is difficult to use the mic in an upright orientation, you can place it upside down or pointing forward and change the Mic Position setting accordingly.
-
Page 93: Making Output Setting
Making output setting Setting signals sent to headphones (Headphone Routing) You can set the type of signal sent to the headphone output to either prefader or postfader for each track. You can also save 10 setting combinations (Setting 1 – Setting 10). Press This opens the Menu Screen. - Page 94 to select the setting you want to change. The selected “Setting” is displayed on the lower part of the screen. NOTE: • You can also press to open the “Headphone Routing” screen. • You can edit and save up to 10 signal settings. •...
- Page 95 • When mid-side stereo monitoring is enabled, the prefader tracks will be routed automatically to the headphone channels, with the odd-numbered to the left and the even-numbered to the right. In this case, the routing cannot be changed manually. ❸ Prefader setting Set tracks 1–8 to prefader.
-
Page 96: Outputting Alerts Through Headphones (Alert Tone Level)
Outputting alerts through headphones (Alert Tone Level) The volume can be adjusted for alerts output to headphones when, for example, recording starts and stops. Press This opens the Menu Screen. to select “OUTPUT”, and press to select “Headphone”, and press to select “Alert Tone Level”, and press... - Page 97 to adjust the volume, and press HINT: • This can be set to “Off” or between −48 and −12 dBFS. • When set to “Off”, no alerts will be output. ■ Alert sound conditions and types Alert sound condition Sound type Remaining battery low 880 Hz tone 4 times every 30 seconds...
-
Page 98: Setting The Headphone Output Volume Curve
Setting the headphone output Volume Curve The volume curve used when adjusting the headphone volume knob can be set. Press This opens the Menu Screen. to select “OUTPUT”, and press to select “Headphone”, and press to select “Volume Curve”, and press... - Page 99 to select the volume curve, and press Setting Explanation The volume will change evenly from the minimum value to the Linear maximum value. The closer the volume is to its minimum position, the more rapidly it A Curve will change. The closer the volume is to its center position, the more rapidly it will S Curve change.
-
Page 100: Boosting Headphone Output To Alleviate Interference From Recorded Sound (Digital Boost)
Boosting headphone output to alleviate interference from recorded sound (Digital Boost) Boosting the headphone output alleviates the interference of sound waves traveling through the air with the headphone monitoring signal, enabling more accurate monitoring of the sound being recorded. Press This opens the Menu Screen. - Page 101 to adjust the amount of boost, and press NOTE: In situations where the sound being recorded can be heard at the headphone monitoring position, sound waves traveling through the air can interfere with the sound heard from the headphones, altering the monitored sound.
-
Page 102: Disabling Outputs (Output On/Off)
Disabling outputs (Output On/Off) By disabling outputs that you are not using, you can reduce power consumption and increase the length of operation time when using batteries. Press This opens the Menu Screen. to select “OUTPUT”, and press to select “Output On/Off”, and press to select the output, and press HINT: Select “All”... - Page 103 to select “Off”, and press...
-
Page 104: Setting The Standard Output Level (Output Level)
Setting the standard output level (Output Level) The standard output level can be changed. Press This opens the Menu Screen. to select “OUTPUT”, and press to select “Output Level”, and press to select the output, and press... - Page 105 to set the standard output level, and press Setting Explanation This sets the standard level to +4 dBu. Only MAIN OUT1/2 can be Line (+4 dBu) selected. Normal (−10 dBV) This sets the standard level to −10 dBV. This sets the standard level to −40 dBV. Only SUB OUT1/2 can be Mic (−40 dBV) selected.
-
Page 106: Setting Output Levels
Setting output levels The MAIN OUT 1/2 and SUB OUT 1/2 levels can be changed. (→Mixer Open the mixer on the Home Screen. Screen) to open the MAIN OUT 1/2 and SUB OUT 1/2 settings screen. to select a fader, and press... - Page 107 to adjust the output level, and press HINT: • This can be set to “Mute” or from −48.0 to +12.0 dB. (→MAIN • You can also check and adjust various output settings on the MAIN OUT/SUB OUT setting screen. OUT /SUB OUT Setting Screen)
-
Page 108: Delaying Output Signals (Output Delay)
Delaying output signals (Output Delay) By delaying audio outputs, you can correct timing differences for signals input to other devices from the F8n Pro. Press This opens the Menu Screen. to select “OUTPUT”, and press to select “Output Delay”, and press... - Page 109 to adjust the delay in frames, and press NOTE: • The delay in milliseconds depends on the frame rate of the selected timecode. (→Setting the sampling rate (Sample • When Sample Rate is set to 192 kHz, “Output Delay” is disabled. Rate)) HINT: This can be set from 0.0 to 10.0 frames.
-
Page 110: Using The Output Limiter (Output Limiter)
Using the output limiter (Output Limiter) Using a limiter on the output can protect devices connected to the output jacks. HINT: For details about the effect of the limiter, see “Using the input limiter (Input Limiter)”. Turning the output limiter on/off You can turn the output limiter on/off... - Page 111 to select the output, and press HINT: Select “All” to set all outputs at the same time. to select “On/Off”, and press to select “On” or “Off”, and press For the limiter settings, see “Setting the output limiter”.
- Page 112 Setting the output limiter Press This opens the Menu Screen. to select “OUTPUT”, and press to select “Output Limiter”, and press to select the output, and press HINT: Select “All” to set all outputs at the same time.
- Page 113 to select the setting item, and press Setting Explanation Type This sets the limiter type. 1. Use to select the type, and press • Hard Knee: Only peaks that exceed the threshold are attenuated. There is no effect below the threshold. •...
- Page 114 Setting Explanation Attack Time This sets the amount of time until limiting starts after the input signal exceeds the threshold. 1. Use to adjust the time, and press This can be set from 1 to 4 ms. Release Time This sets the amount of time until limiting stops after the input signal ...
-
Page 115: Selecting Signals Sent To The Main Outputs (Main Out Routing)
Selecting signals sent to the main outputs (MAIN OUT Routing) You can send either prefader or postfader signals for each track to the main outputs. Press This opens the Menu Screen. to select “OUTPUT”, and press to select “MAIN OUT Routing”, and press to select the track for MAIN OUT 1 or MAIN OUT 2 routing, and press ❶... - Page 116 • : Postfader selected • : Off ❷ Monitoring mid-side stereo signals Input track stereo signals are converted to mid-side stereo signals for output. When mid-side stereo monitoring is enabled, the prefader tracks will be routed automatically to MAIN OUT 1/MAIN OUT 2, with the odd-numbered to the MAIN OUT 1 and the even-numbered to the MAIN OUT 2.
-
Page 117: Selecting Signals Sent To The Sub Outputs (Sub Out Routing)
Selecting signals sent to the sub outputs (SUB OUT Routing) You send either prefader or postfader signals for each track to the sub outputs. Press This opens the Menu Screen. to select “OUTPUT”, and press to select “SUB OUT Routing”, and press to select the track for SUB OUT 1 or SUB OUT 2 routing, and press ❶... - Page 118 • : Postfader selected • : Off ❷ Monitoring mid-side stereo signals Input track stereo signals are converted to mid-side stereo signals for output. When mid-side stereo monitoring is enabled, the prefader tracks will be routed automatically to SUB OUT 1/SUB OUT 2, with the odd-numbered to the SUB OUT 1 and the even-numbered to the SUB OUT 2.
-
Page 119: Recording
Recording Enabling recording on SD cards and setting file formats The recording file format can be set independently for SD CARD slots 1 and 2. HINT: • Recording the same content to two cards is possible by using the same settings for both card slots. This function can be used to create a backup in case the sound skips on one card, for example. - Page 120 to select the file type, and press Setting value Tracks recorded Explanation None ‐ Nothing is recorded on the SD card. Track1-8 (Poly WAV) Selected tracks 1–8 A single (multitrack) file is created that contains audio for multiple tracks. Track1-8 (Mono/Stereo A single mono file is created for each mono WAV) track and a single stereo file is created for...
-
Page 121: Selecting Inputs And Adjusting Levels
Selecting inputs and adjusting levels You can select which of Inputs 1–8 to use. Inputs will be recorded on tracks with the same numbers. For example, Input 1 will be recorded on track 1 and Input 2 will be recorded on track 2. Selecting inputs Make the track indicator light by pressing the track key for the number of the input to record. - Page 122 NOTE: When a mic capsule is connected, the input levels of Input 1/2 cannot be adjusted with the F8n Pro. Use the level control on the mic capsule to adjust its input volume.
-
Page 123: Setting The Sampling Rate (Sample Rate)
Setting the sampling rate (Sample Rate) You can set the sampling rate used to record files. Press This opens the Menu Screen. to select “REC”, and press to select “Sample Rate”, and press... - Page 124 to select the sampling rate, and press Setting Explanation 44.1 kHz, 48 kHz, 88.2 kHz, These are standard sampling rates. 96 kHz, 192 kHz Select this when recording video at 23.976 frames per second if you 47.952 kHz want to edit at 24 frames per second later. Select this when recording video at 24 frames per second if you want 48.048 kHz to edit at NTSC 29.97 or 23.98 HD later.
-
Page 125: Setting Wav File Bit Depth (Wav Bit Depth)
(+4 dB (when the input source is set to “Mic”)/+24 dB (when the input source is set to “Line”)). In this case, adjust the output level of the device connected to the input jack of the F8n Pro. - Page 126 HINT: This can be set to 16-bit Linear, 24-bit Linear or 32-bit Float.
-
Page 127: Setting Mp3 File Bit Rate (Mp3 Bit Rate)
Setting MP3 file bit rate (MP3 Bit Rate) You can set the bit rate of recorded MP3 files. Press This opens the Menu Screen. to select “REC”, and press to select “MP3 Bit Rate”, and press to select the bit rate, and press HINT: This can be set to 128 kbps, 192 kbps or 320 kbps. -
Page 128: Capturing Audio Before Recording Starts (Pre Rec)
Capturing audio before recording starts (Pre Rec) The input signal can be captured for up to 6 seconds before is pressed (pre-recording). This is useful if, for example, is pressed too late. Press This opens the Menu Screen. to select “REC”, and press to select “Pre Rec”, and press... - Page 129 to select “On”, and press Sampling rate Maximum pre-recording time 44.1 kHz 6 seconds 47.952 kHz 6 seconds 47.952 kHz(F) 6 seconds 48 kHz 6 seconds 48.048 kHz 6 seconds 48.048 kHz(F) 6 seconds 88.2 kHz 3 seconds 96 kHz 3 seconds 192 kHz 1 seconds...
-
Page 130: Maximum File Size (File Max Size)
Maximum file size (File Max Size) The maximum size of recording files can be set. If a recording file exceeds the maximum file size, recording will continue in a new take with a number that is one higher. Press This opens the Menu Screen. to select “REC”, and press to select “File Max Size”, and press to select “Size”, and press... - Page 131 to select the maximum size of recording files, and press NOTE: If a recording file exceeds the maximum file size, recording will continue in a new take with a number that is one higher. No gap will occur in the sound between the two takes when this happens. HINT: Setting the maximum size to 640 MB or 512 MB is convenient for backing up to CDs.
-
Page 132: Showing Total Recording Times For Long Recordings (Time Counter)
Showing total recording times for long recordings (Time Counter) When recording for a long time, if the file size set with “Maximum file size (File Max Size)” is reached, recording will continue in a new take and the recording time will reset. You can change this, however, so that it is not reset and the total recording time is shown. - Page 133 to select “Continuous”, and press Setting Explanation Continuous When recording, even if the file size set with “Maximum file size (File Size)” is reached, the counter shown on the Home Screen will not be reset. Reset When recording, if the file size set with “Maximum file size (File Max Size)Maximum file size (File Max Size)"...
-
Page 134: Moving The Previously Recorded Take To The False Take Folder
Moving the previously recorded take to the FALSE TAKE folder If the just recorded take was a failure, you can use a shortcut to move the recording to the FALSE TAKE folder. (→Home Open the Home Screen. Screen) Press and hold HINT: •... -
Page 135: Using Timecode
Video file with timecode recorded ❷ Audio file with timecode recorded ❸ Nonlinear editing software HINT: The F8n Pro uses a precision oscillator that generates timecode with a high degree of accuracy (+/- 0.2 ppm, or approximately 0.5 frames per 24 hours). - Page 136 Synchronizing with a video camera The F8n Pro records with mic input and transmits timecode. The F8n Pro saves the timecode that it generates with the audio data. The timecode received by the video camera is recorded with the video data.
- Page 137 Setting timecode functions Use the timecode setting screen to set the timecode functions. ■ Displaying the timecode setting screen Press This opens the Menu Screen. to select “TIMECODE”, and press to select “Timecode”, and press The timecode setting screen appears. For the timecode settings, see the link.
- Page 138 ❷ Internal timecode Internal timecode is displayed. ❸ Internal user bits (→Setting the user bits for User bits are data that you can set to be included in the timecode. internal timecode) ❹ External timecode External timecode is displayed. ❺ External user bits External user bits is displayed.
- Page 139 ■ Setting the mode The timecode mode settings allow you to specify: • Whether the F8n Pro generates timecode or receives external timecode • Whether or not timecode continues running when not recording (→Displaying the timecode setting Open the timecode setting screen.
- Page 140 Setting Explanation Int Free Run Internal timecode will be generated regardless of the recording mode. The internal timecode can be set manually using the following operations: • Jamming internal timecode • Restarting internal timecode with a specified value Timecode will always be output from the TIMECODE OUT jack. Int Record Run Internal timecode will be generated only when recording.
- Page 141 ■ Stopping timecode output when recording is stopped You can set whether or not timecode is output from the TIMECODE OUT jack when recording is stopped. (→Displaying the timecode setting Open the timecode setting screen. screen) to select “Mode”, and press to select “Int Auto Mute”, and press to select “On”, and press NOTE:...
- Page 142 ■ Synchronizing audio clock with external timecode (→Displaying the timecode setting Open the timecode setting screen. screen) to select “Mode”, and press to select “Ext Audio Clock Sync”, and press to select “On”, and press NOTE: • When there is no external timecode, the internal audio clock is enabled to preserve continuity. (→Setting •...
- Page 143 ■ Automatically enabling internal timecode when no external timecode is input You can enable the automatic generation of internal timecode to preserve continuity when there is no external timecode. (→Displaying the timecode setting Open the timecode setting screen. screen) to select “Mode”, and press to select “Ext Continuous”, and press to select “On”, and press NOTE:...
- Page 144 ■ Setting the user bits for internal timecode User bits are data that you can set to be included in the timecode. Up to 8 numbers (0–9) and letters (A–F) can be included. Recording date information, for example, can be useful when editing later. ...
- Page 145 to select the mode, and press Setting Explanation uu uu uu uu You can set these values as you like on the “Edit” screen. mm dd yy uu The month, day and year are entered automatically in that order using the RTC setting. You can set the “uu” value as you like on the “Edit”...
- Page 146 Setting user bits (Ubits) (→Displaying the timecode setting Open the timecode setting screen. screen) to select “Ubits”, and press to select “Edit”, and press Edit the value. ■ Editing operations Move cursor or change value: Turn Select parameter to change: Press HINT: User bits can only consist of numbers from 0 to 9 and letters from A to F.
- Page 147 When done changing the setting, use to select “Enter”, and press...
- Page 148 ■ Setting the frame rate for internal timecode (→Displaying the timecode setting Open the timecode setting screen. screen) to select “FPS”, and press to select the frame rate, and press Setting Explanation 23.976ND This is the most common frame rate used with HD cameras and other high- definition video recording.
- Page 149 Setting Explanation This rate is used for special applications. This synchronizes with film sound to be transferred to NTSC using 29.97fps drop frame. The count is 0.1% faster than the actual time. NOTE: Matching frame rates must be set in advance on all connected video and audio devices.
- Page 150 ■ Jamming internal timecode Timecode input through the TIMECODE IN jack is used to set internal timecode. (→Displaying the timecode setting Open the timecode setting screen. screen) to select “Jam”, and press...
- Page 151 ■ Restarting internal timecode with a specified value (→Displaying the timecode setting Open the timecode setting screen. screen) to select “Restart”, and press Set the restart value. ■ Editing operations Move cursor or change value: Turn Select parameter to change: Press to select “Restart”, and press...
- Page 152 Setting automatic timecode recording delay (Auto Rec Delay Time) If set to record automatically when external timecode is received, unnecessary recording could occur when timecode is received for a brief amount time. In order to prevent this, you can set the amount of time until recording starts after timecode is received.
- Page 153 Setting timecode initialization used at startup (Start Timecode) Since internal timecode stops when the F8n Pro is turned off, the timecode is automatically initialized (jammed) during startup. You can set the value that is used for jamming at that time.
- Page 154 Setting Explanation Restart Time When the F8n Pro starts, the value set by “Restart” is used to jam the (→Restarting internal timecode with a specified internal timecode. value) When the F8n Pro starts, its timecode is restored from the timecode when the power was turned off...
- Page 155 ■ Correcting timecode errors after the power has been turned off When “Mode” of “Start Timecode” is set to “RTC”, turning the power off lowers the timecode precision, but this function can improve the error to the value close to 0.2 ppm when the power has been turned off. Press This opens the Menu Screen.
- Page 156 to select “Recalibrate”, and press to select “Yes”, and press Calibration completes. To cancel calibration, press , and use to select “Yes”, and press...
- Page 157 • After calibrating once, the result will be retained. • If the F8n Pro is moved to and used in an extremely hot or cold location, timecode precision could change slightly when the power is turned off. In such cases, we recommend calibrating it again.
- Page 158 The F8n Pro can receive timecode from the connected UltraSync BLUE and record it in audio recording files. • This function cannot be used with an F8n Pro after it is first shipped from the factory. To use this function, a software extension file must be downloaded from the ZOOM website (zoomcorp.com) and installed in the unit.
- Page 159 HINT: • See the UltraSync BLUE manual for the procedures to select connected devices. • Use the F8n Pro and the UltraSync BLUE as close together as possible to make communication more reliable. • Even if communication with the UltraSync BLUE is interrupted during recording, timecode data that is counted on the F8n Pro can be added.
- Page 160 ■ Connecting with the different UltraSync BLUE To receive timecode of different UltraSync BLUE from the connected UltraSync BLUE, you need to cancel pairing of the registered UltraSync BLUE and make pairing to the UltraSync BLUE that you want to newly register.
- Page 161 HINT: • See the UltraSync BLUE manual for the procedures to select connected devices. • Use the F8n Pro and the UltraSync BLUE as close together as possible to make communication more reliable. • Even if communication with the UltraSync BLUE is interrupted during recording, timecode data that is...
-
Page 162: Setting The Recording Take
Setting the recording take Changing the note for the next take recorded (Note) You can input characters for a note to use as metadata in the file. Press This opens the Menu Screen. to select “META DATA (for Next Take)”, and press to select “Note”, and press to select “Edit”, and press... - Page 163 Edit the note. “Character input screen” for how to input characters. NOTE: This note is written to the <NOTE> metadata. HINT: You can select notes from the history list. 1. Use to select “History” , and press in step 4. 2.
- Page 164 Setting how recorded scenes are named and numbered You can set how scenes are named (name mode), the base scene name and how scene numbers advance. ■ Setting how scenes are named (mode) Press This opens the Menu Screen. to select “META DATA (for Next Take)”, and press to select “Scene Name Mode”, and press...
- Page 165 to select the mode, and press Setting Explanation None The scene name and number are not used. When recording files are created, they are named only with the take number, such as “T001”, “T002”, “T003” and so on. cannot be used to advance the scene number by 1. Example: T001.wav Current Folder The name of the currently selected folder is used as the scene name.
- Page 166 ■ Changing scene names If “Scene Name Mode” is set to “User Name”, set the scene name used like this. Press This opens the Menu Screen. to select “META DATA (for Next Take)”, and press to select “User Scene Name”, and press to select “Edit”, and press...
- Page 167 Edit the scene name. “Character input screen” for how to input characters. NOTE: The scene name is written to the <SCENE> metadata. You cannot put a space or an @ mark at the beginning of the name. HINT: You can select a scene name from the history list. 1.
- Page 168 ■ Setting how scene numbers advance Press This opens the Menu Screen. to select “META DATA (for Next Take)”, and press to select “Scene Increment Mode”, and press...
- Page 169 to select how scene numbers advance, and press Setting Explanation Numeric Press on the Home Screen to increase the scene number by one. Example: Scene → Scene1 → Scene2 → … → Scene9999 Character Press on the Home Screen to advance the capital letter at the end of the scene name by one.
- Page 170 Setting the take name reset condition and format You can set the take name reset condition and format used when recording. ■ Setting the take name reset condition Press This opens the Menu Screen. to select “META DATA (for Next Take)”, and press to select “Take Reset Mode”, and press...
- Page 171 to select the reset mode, and press Setting Explanation Off The take number will not be reset. However, if the folder is changed and that folder contains a number higher than the current take number, the take number will be set to one higher than the highest existing take number.
- Page 172 ■ Setting the take name format Press This opens the Menu Screen. to select “META DATA (for Next Take)”, and press to select “Take Name Format”, and press to select the format, and press Setting Explanation ①: Scene name "Scene"-T*** "Scene"-T*** ②: Track name Example: Scene001-T001...
- Page 173 Changing the track name of the next take recorded (Track Name) The track name set with the following procedure will be given to the next recorded track. Press This opens the Menu Screen. to select “META DATA (for Next Take)”, and press to select “Track Name”, and press HINT: On the Home Screen,...
- Page 174 to select “Edit”, and press Edit the track name. “Character input screen” for how to input characters. NOTE: The track name is written to the <TRACK> <NAME> metadata.
- Page 175 HINT: You can select a track name from the history list. 1. Use to select “History” , and press in step 5. 2. Use to select the item to use , and press (→Restoring factory default The history list will be erased if the “Factory Reset” function is used. settings)
- Page 176 Changing the number of the next take recorded The number given to the next recorded take can be changed when the Home Screen is open. (→Home Open the Home Screen. Screen) Press and hold to increase or decrease the take number by one, and press NOTE: This function cannot be used during recording and playback or when the scene naming method “Scene Name Mode”...
-
Page 177: Using The Slate Mic And Slate Tone
filmed or the anticipated cuts. You can also record slate tone signals that can be used to synchronize with video. The F8n Pro has a built-in slate mic for recording comments and the ability to output a variable frequency tone signal. - Page 178 Recording with the slate mic (Slate Mic) You can use the built-in slate mic to record comments and to keep notes about recorded takes. ■ Setting the volume Press This opens the Menu Screen. to select “SLATE”, and press to select “Slate Mic”, and press to select “Level”, and press...
- Page 179 to adjust the level, and press HINT: This can be set from 0 to 24 dB.
- Page 180 ■ Setting the routing Set the destination for the slate mic signal. Press This opens the Menu Screen. to select “SLATE”, and press to select “Slate Mic”, and press to select “Routing”, and press...
- Page 181 All Clear Clear all settings. ❸ Postfader setting All tracks are set to postfader. NOTE: (→Using Routing to tracks 1–8 is not possible when operating the F8n Pro as an audio interface (Stereo Mix). as an audio interface (Audio Interface)) Press...
- Page 182 ■ Recording Press to start recording. Push left toward the mic symbol and release. To disable the slate mic, push left toward the mic symbol again and release. NOTE: • When the slate mic is in use, other signals input to the tracks that it is routed to are muted. •...
- Page 183 ■ Disabling the slate mic You can set the slate mic so that it will not be enabled if is accidentally pushed left toward the mic symbol. Press This opens the Menu Screen. to select “SLATE”, and press to select “Slate Mic”, and press to select “On/Off”, and press...
- Page 184 to select “Off (Lock)”, and press...
- Page 185 Recording a slate tone (Slate Tone) By adding a slate tone when the recording starts, aligning audio to video during editing will be easier. You can also use a slate tone to coordinate levels with connected equipment. ■ Setting the volume Press This opens the Menu Screen.
- Page 186 to adjust the level, and press HINT: This can be set from -20 to 0 dBFS.
- Page 187 ■ Setting the frequency Set the frequency for the slate tone signal. Press This opens the Menu Screen. to select “SLATE”, and press to select “Slate Tone”, and press to select “Frequency”, and press...
- Page 188 to adjust the frequency, and press HINT: This can be set from 100 to 10,000 Hz.
- Page 189 ■ Setting the routing Set the destination for the slate tone signal. Press This opens the Menu Screen. to select “SLATE”, and press to select “Slate Tone”, and press to select “Routing”, and press...
- Page 190 to select the tracks/outputs for slate tone signal routing, and press ❶ Tracks/outputs for slate tone signal routing Press to switch between “Postfader” and “Off”. • : Postfader selected • : Off ❷ All Clear Clear all settings. ❸ Postfader setting All tracks are set to postfader.
- Page 191 ■ Recording Press to start recording. Push right toward the tone symbol and release. NOTE: • When the slate tone is in use, other signals input to the tracks that it is routed to are muted. • The slate tone signal is always routed to the headphone L/R channels regardless of other routing settings. •...
- Page 192 ■ Disabling the slate tone You can set the slate tone so that it will not be enabled if is accidentally pushed right toward the tone symbol. Press This opens the Menu Screen. to select “SLATE”, and press to select “Slate Tone”, and press to select “On/Off”, and press...
- Page 193 to select “Off (Lock)”, and press...
-
Page 194: Recording
HOME screen is open to check the name that will be given to the next take recorded. • Files are automatically saved at regular intervals during recording. Even if the power is interrupted or another unexpected problem occurs during recording, an affected file can be restored to normal by playing it with the F8n Pro. -
Page 195: Playing Recordings
Playing recordings Playing recordings Press ■ Playback operations Select take or jump to mark: Press Search backward/forward: Press and hold Pause/resume playback: Press NOTE: Tracks that have no playback files appear gray. HINT: • The longer you press and hold , the faster the backward/forward search speed. -
Page 196: Mixing Takes
Mixing takes You can change the volume and panning of each track during playback. (→Mixer Open the mixer on the Home Screen. Screen) Press to start playback. Adjust the parameter settings. ■ Editing operations Move cursor or change value: Turn Select parameter to change: Press Parameter Setting range... - Page 197 NOTE: (→Setting the track knob function • The pan cannot be adjusted when “Track Knob Option” is set to “Fader”. (Track Knob Option)) • You can turn to move the cursor, and also adjust the settings of the MAIN OUT 1/2 and SUB OUT 1/2 (→Setting output tracks.
-
Page 198: Monitoring The Playback Signals Of Specific Tracks During Playback
Monitoring the playback signals of specific tracks during playback You can monitor the playback signals of specific tracks using SOLO mode. (→Home Open the Home Screen. Screen) Press to start playback. Press on the tracks that you want to monitor. The background colors for the selected tracks will become green, and their track indicators will light orange. -
Page 199: Changing The Playback Mode (Play Mode)
Changing the playback mode (Play Mode) You can change the playback mode. Press This opens the Menu Screen. to select “PLAY”, and press to select “Play Mode”, and press... - Page 200 to select the play mode, and press Setting Explanation Play One (single playback) Only the selected take will be played. Takes will be played back continuously from the selected one until Play All (all playback) the last take. Repeat One The selected take will be played repeatedly.
-
Page 201: Managing Files
Managing files Folder and file structure When recording with the F8n Pro, folders and files are created on SD cards as shown below. Folders and files are used to manage scenes and takes. Folder and file structure The folder and file structure differs according to the recording file format. In addition, the names of folders and files depend on how scenes are named. - Page 202 ❹ Scene 210101 (2nd take) MP3 format, Stereo file ❺ Scene 210101 (3rd take) WAV format, Mono files (tracks 1–4) ❻ Next scene ❼ Scene 210102 (1st take) WAV format, Stereo file (track 1–2) Stereo file (L/R tracks) ❽ Scene 210102 (2nd take) WAV format, Poly file ❾...
- Page 203 Audio file names File names are given by the F8n Pro according to the file format—poly, mono or stereo. Track numbers and other data are added to file names. File names are given according to the following formats.
-
Page 204: Take And Folder Operations (Finder)
Take and folder operations (FINDER) The FINDER allows you to select and view the contents of SD cards, takes and folders, and to create project/ scene folders. It also allows you to, for example, set and delete recording/playback folders and view their information. - Page 205 ■ SD card selected ❶ Free space ❷ Size ❸ Recordable time ■ Folder selected ❶ Date ❷ Time ■ Take selected ❶ Timecode ❷ Frame rate ❸ Length ❹ Recording format ❺ Date created ❻ Time created ❼...
- Page 206 Creating folders Folders can be created inside the currently selected SD card/folder. Select the SD card or folder that you want to make folders by referring “Selecting the SD card, folder or take”, and press The files and folders in the selected SD card or folder are displayed. to select “New Folder”, and press Edit the folder name.
- Page 207 Selecting the take recording/playback folder Use this procedure to select the folder that contains the take to be played or the folder to use for recording takes. Select the folder by referring “Selecting the SD card, folder or take”. Press and hold to display the Option screen, use to select “Select”, and press After selecting the take recording/playback folder, the Home Screen will reopen.
- Page 208 Checking take marks and using them for playback You can view a list of the marks in a recorded take. Select the take that you want to view the list of the marks by referring “Selecting the SD card, folder or take”.
- Page 209 Changing folder and take names Select the folder or take that you want to change the name by referring “Selecting the SD card, folder take”. Press and hold to display the Option screen, use to select “Rename”, and press Edit the folder/take name. “Character input screen”...
- Page 210 Copying takes to other cards and folders Select the take that you want to copy by referring “Selecting the SD card, folder or take”. Press and hold to display the Option screen, use to select “Copy”, and press to select the take to copy, and press Press and hold to select the copy destination, and press and hold NOTE:...
- Page 211 to select “Yes”, and press...
- Page 212 Deleting folders and takes Select the folder/take that you want to delete by referring “Selecting the SD card, folder or take”. Press and hold to display the Option screen, use to select “Delete”, and press to select the folder/take to delete, and press Press to cancel deletion.
- Page 213 to select “Yes”, and press NOTE: • Deleted folders and takes are not immediately erased from the SD card. They are moved to the TRASH folder. • Deleting the folders and takes in the TRASH folder will completely erase their data.
- Page 214 Emptying the TRASH/FALSE TAKE folder Select “TRASH” or “FALSE TAKE” by referring “Selecting the SD card, folder or take”. TRASH folder FALSE TAKE folder Press and hold to select “Empty”, and press to select “Yes”, and press NOTE: • Emptying the TRASH folder will completely erase the data in it. •...
-
Page 215: Overview Of Take Information (Metadata) Stored In Files
HINT: • Metadata is data that contains information related to other data. The F8n Pro saves scene names and take numbers, for example, as metadata in audio files. • A chunk is a unit that contains multiple data in a single block. -
Page 216: Checking And Editing Take Metadata
Checking and editing take metadata Use the metadata editing screen to check/edit take metadata. Displaying the metadata editing screen Press This opens the Menu Screen. to select “FINDER”, and press to select the take, and press and hold This opens the Option Screen. HINT: For how to select the take, see “Selecting the SD card, folder or... - Page 217 Checking and editing notes (→Displaying the metadata editing Open the metadata editing screen. screen) to select “Note”, and press to select “Edit”, and press Edit the note. “Character input screen” for how to input characters. NOTE: The content of this note is written to the <NOTE> metadata.
- Page 218 HINT: You can select notes from the history list. 1. Use to select “History”, and press in step 3. 2. Use to select the item to use , and press (→Restoring factory default The history list will be erased if the “Factory Reset” function is used. settings)
- Page 219 Checking and editing scene names (→Displaying the metadata editing Open the metadata editing screen. screen) to select “Scene”, and press to select “Edit”, and press Edit the scene name. “Character input screen” for how to input characters. NOTE: The scene name is written to the <SCENE> metadata.
- Page 220 HINT: You can select a scene name from the history list. 1. Use to select “History”, and press in step 3. 2. Use to select the item to use , and press (→Restoring factory default The history list will be erased if the “Factory Reset” function is used. settings)
- Page 221 Checking and editing take number (→Displaying the metadata editing Open the metadata editing screen. screen) to select “Take”, and press Change the take number. ■ Editing operations Move cursor or change value: Turn Select parameter to change: Press NOTE: The take number is written to the <TAKE> metadata. HINT: This can be set from 1 to 999.
- Page 222 Setting the circling takes Use this function to add an @ mark to the beginning of the name of the best take to make it stand out. This is called a “circled take”. (→Displaying the metadata editing Open the metadata editing screen. screen) to select “Circle”, and press to select “Circled”, and press...
- Page 223 Editing folder (tape) names (→Displaying the metadata editing Open the metadata editing screen. screen) to select “Folder (Tape) Name”, and press Edit the folder (tape) name. “Character input screen” for how to input characters. NOTE: • The folder (tape) name is written to the <TAPE> metadata. •...
- Page 224 Editing project names (→Displaying the metadata editing Open the metadata editing screen. screen) to select “Project Name”, and press Edit the project name. “Character input screen” for how to input characters. NOTE: • The project name is written to the <PROJECT> metadata. •...
- Page 225 Checking and editing track names (→Displaying the metadata editing Open the metadata editing screen. screen) to select “Track Name”, and press to select a track, and press to select “Edit”, and press...
- Page 226 Edit the track name. “Character input screen” for how to input characters. NOTE: The track name is written to the <TRACK> <NAME> metadata. HINT: You can select a track name from the history list. 1. Use to select “History” , and press in step 4.
-
Page 227: Writing Sound Reports (Create Sound Report)
Writing sound reports (Create Sound Report) A sound report includes information about recording times and takes. Reports can be written as CSV format files (F8n Pro_“folder name”.CSV). You can edit the comments written in sound reports. Press This opens the Menu Screen. to select “FINDER”, and press to select the folder or SD card for which you want to create a sound report, and press and hold... - Page 228 to select “Create Sound Report”, and press to select “Create”, and press to select “Yes”, and press This writes the sound report inside the selected SD card or folder. NOTE: • Only information about takes in the folder or SD card is written in the sound report. •...
- Page 229 Editing comments for the sound report In step 5 of “Writing sound reports (Create Sound Report)”, use to select “Info Edit”, and press to select “Comments”, and press to select “Edit”, and press...
- Page 230 Edit the comment. “Character input screen” for how to input characters. HINT: You can select comments from the history list. 1. Use to select “History” , and press in step 3. 2. Use to select the item to use , and press (→Restoring factory default The history list will be erased if the “Factory Reset”...
-
Page 231: Using Usb Functions
Using USB functions Exchanging data with a computer (SD Card Reader) By connecting the F8n Pro to a computer, you can check and copy data on SD cards. Connecting to a computer Press This opens the Menu Screen. to select “USB”, and press... - Page 232 • The F8n Pro cannot operate on USB bus power. Use the internal batteries, the dedicated AC adapter or an external DC power supply to power it. HINT: When the F8n Pro is connected to a computer, the SD cards loaded in slots 1 and 2 are recognized as separate SD cards. ■ Disconnecting a computer Disconnect on the computer.
-
Page 233: Using As An Audio Interface
Using as an audio interface Signals input to the F8n Pro can be sent to a computer or iOS/iPadOS device, and playback signals from a computer or iOS/iPadOS device can be output from the F8n Pro. Precautions when using in 32-bit float format: •... - Page 234 Using as an audio interface (Audio Interface) ■ Connecting to a computer or an iOS/iPadOS device Press This opens the Menu Screen. to select “USB”, and press to select “Audio Interface”, and press...
- Page 235 to select the mode, and press Setting Explanation Stereo Mix (iPad) This is a 2-in/2-out connection mode for iOS/iPadOS devices and sends tracks 1–8 as a stereo mix. Multi Track (PC/Mac) This is an 8-in/4-out connection mode for Mac/Windows and sends tracks 1–8 as separate signals (cannot be used with an iOS device).
- Page 236 DC power supply to power it. • When the F8n Pro is used as an audio interface and the sampling rate is set to 44.1/48 kHz, latency increases 2 ms. When latency increases while monitoring sounds being recorded with a mic in real- time, interference occurs between sound transmitted through the air from the source and the delayed monitored sound, possibly making accurate monitoring of the sounds difficult.
- Page 237 This opens the Menu Screen. to select “EXIT”, and press to select “Yes”, and press Disconnect the cable from the computer or iOS/iPadOS device and the F8n Pro. NOTE: Always conduct the removal procedure in steps 1 to 3 before disconnecting the USB cable.
- Page 238 Using SD card recording and audio interface functions at the same time (Audio Interface with Rec) In addition to the two SD cards, a computer can also be used for recording backup. ■ Connecting to a computer Press This opens the Menu Screen. to select “USB”, and press to select “Audio Interface with Rec”, and press to select “On”, and press...
- Page 239 • When “Audio Interface with Rec” is set to “On”, the sampling rate cannot be changed. sampling rate (Sample Rate)) • When “Audio Interface with Rec” is set to “On”, files with sampling rates that differ from the F8n Pro (→Setting the sampling rate (Sample setting cannot be played.
- Page 240 “USB”, and press to select “Audio Interface with Rec”, and press to select “Off”, and press Disconnect the cable from the computer and the F8n Pro. NOTE: Always conduct the removal procedure in steps 1 to 4 before disconnecting the USB cable.
- Page 241 Audio interface block diagrams ■ Stereo Mix Input 1 (Input) Input 2 Input 7 Input 8 Output Postfader MAIN OUT 1/2 jacks Prefader SUB OUT 1/2 jack (Output) Channel 1 Channel 2 HEADPHONE jack...
- Page 242 ■ Multi Track Input 1 (Input) Input 2 Input 7 Input 8 Output Postfader MAIN OUT 1/2 jacks Prefader SUB OUT 1/2 jack (Output) Channel 1 Channel 2 HEADPHONE jack...
- Page 243 Making audio interface settings ■ Setting loop back (Stereo Mix only) This function allows the playback sound from the computer or iOS/iPadOS device and the F8n Pro inputs to be mixed and sent back to the computer or iOS/iPadOS device (loop back).
-
Page 244: Using The Frc-8
Using the FRC-8 Using the FRC-8 as a controller (Connect) By connecting the FRC-8 to the F8n Pro, you can use it to adjust trim, fader and pan settings, for example. Press This opens the Menu Screen. to select “USB”, and press to select “FRC-8”, and press... - Page 245 Turn the FRC-8 power ON. to select “Connect”, and press NOTE: When disconnecting the FRC-8, select “Disconnect” before unplugging the USB cable.
-
Page 246: Setting The Type Of Keyboard Connected To The Frc-8 (Keyboard Type)
Setting the type of keyboard connected to the FRC-8 (Keyboard Type) You can connect a PC keyboard to the FRC-8 and use it to input characters. Set the type of PC keyboard connected to the FRC-8. Press This opens the Menu Screen. to select “USB”, and press to select “FRC-8”, and press to select “Keyboard Type”, and press... - Page 247 to select the type, and press Setting Explanation Use for English-language keyboards. Use for Japanese keyboards.
-
Page 248: Setting Frc-8 Fader And Knob Operation (Knob/Fader Mode)
Setting FRC-8 fader and knob operation (Knob/Fader Mode) How the FRC-8 faders and TRIM/PAN knobs operate when their positions differ from actual parameter values can be set. Press This opens the Menu Screen. to select “USB”, and press to select “FRC-8”, and press to select “Knob/Fader Mode”, and press... - Page 249 to select the FRC-8 fader and knob operation, and press Setting Explanation Absolute When a knob or fader is operated, the parameter value will change to the value shown by that knob or fader. Safety When a knob or fader is operated, the parameter value will not change until the knob or fader first matches that value.
-
Page 250: Setting User Keys For The Frc-8 (User Key)
Setting user keys for the FRC-8 (User Key) You can assign functions to the FRC-8 user keys. Press This opens the Menu Screen. to select “USB”, and press to select “FRC-8”, and press to select “User Key”, and press... - Page 251 to select the key to which to assign a function, and press to select the function to assign, and press Setting Explanation None No function is assigned. (→Recording with the slate mic Slate Mic Enable and disable the slate mic. (Slate Mic)) (→Recording a slate tone (Slate...
-
Page 252: Setting The Power Supply Used By The Frc-8 (Power Source)
This opens the Menu Screen. to select “USB”, and press to select “FRC-8”, and press to select “Power Source”, and press Power settings for the FRC-8 are the same as for the F8n Pro. See “Setting the power supply used (Power Source)”. - Page 253 • When multiple power supplies are connected, they will be used in the following order of priority. DC power supply (Ext DC) > USB bus power (supplied by F8n Pro) > AA batteries (Int AA) • The voltages of each power supply are shown on the display.
-
Page 254: Powering The Frc-8 With Usb Bus Power (Usb Bus Power)
Powering the FRC-8 with USB bus power (USB Bus Power) The F8n Pro can supply USB bus power to the FRC-8. Press This opens the Menu Screen. to select “USB”, and press to select “FRC-8”, and press to select “USB Bus Power”, and press... - Page 255 “Supply to FRC-8”, and press NOTE: When the F8n Pro is supplying bus power, do not connect any device other than an FRC-8 to the USB port. Doing so could damage the and the connected device.
-
Page 256: Setting The Frc-8 Led Brightness (Led Brightness)
Setting the FRC-8 LED brightness (LED Brightness) You can adjust the brightness of the LEDs on the FRC-8. Press This opens the Menu Screen. to select “USB”, and press to select “FRC-8”, and press to select “LED Brightness”, and press... - Page 257 to adjust the brightness, and press NOTE: This can be set from 5 to 100.
-
Page 258: Updating The Frc-8 Firmware
Updating the FRC-8 firmware You can check the FRC-8 firmware version and update it to the latest version. The latest update file can be downloaded from the ZOOM website (www.zoom.co.jp). “Using the FRC-8 as a controller (Connect)”, and connect the F8n Pro and the FRC-8. - Page 259 to select “Firmware Version”, and press The screen for checking the firmware version is displayed. Press This returns to the previous screen. to select “Update Firmware”, and press to select “Yes”, and press NOTE: Do not turn the power off, remove an SD card or disconnect the USB cable during an update. Doing so could cause the FRC-8 to become unstartable.
- Page 260 When finished updating, turn the FRC-8 power off.
-
Page 261: Controlling The F8N Pro From A Smartphone/Tablet
You can operate the F8n Pro wirelessly from a smartphone or tablet using the dedicated “F8 Control” app. • This function cannot be used with an F8n Pro after it is first shipped from the factory. To use this function, a software extension file must be downloaded from the ZOOM website (zoomcorp.com) and installed in the unit. -
Page 262: Making Various Settings
Making various settings Setting how timecode is shown (Home Timecode Display Size) You can change the size of the timecode display on the Home Screen. Press This opens the Menu Screen. to select “SYSTEM”, and press to select “Home Timecode Display Size”, and press... - Page 263 to select the size, and press Setting Explanation Small The timecode is small and the time counter is large. The timecode is large and the time counter is small. ...
-
Page 264: Setting Level Meter Appearance (Level Meter)
Setting level meter appearance (Level Meter) You can set how the level meters appear on the display. Press This opens the Menu Screen. to select “SYSTEM”, and press to select “Level Meter”, and press to select the setting item, and press... - Page 265 Setting Explanation Type You can set whether the level meters use VU or Peak style. 1. Use to select the type, and press • Peak Only: The actual peak level of the signal (dBFS) is shown. • Peak + VU: Both VU and peak level are shown simultaneously. In this mode, the bars function as a VU meter except for the rightmost bar, which shows the peak level.
- Page 266 Setting Explanation Resolution You can set the level meter resolution. 1. Use to select the resolution, and press • Segment (Shown when set to VU Only) • Solid (Shown when set to VU Only) ...
- Page 267 Setting Explanation Level Meter View You can set which tracks are shown on the Home Screen. 1. Use to select “View1” – ”View4”, and press 2. Use to select tracks to show, and press 3. Press HINT: • Multiple tracks can be shown. Not showing any tracks is also possible.
- Page 268 Setting Explanation Track Name View You can show track names on level meters. 1. Use to select “On”, and press • Off: The track names are not shown on the level meters. • On: The track names set with the setting of “Changing the track name of the next take recorded (Track Name)”...
- Page 269 Setting Explanation Reference Level You can set the level meter reference. 1. Use to select the reference level setting, and press ■ When level meter type is “Peak Only” • Normal Level: The center of the level meter is -12 dBFS. Clear monitoring of levels higher than -12 dBFS is possible.
-
Page 270: Setting The Led Brightness (Led Brightness)
Setting the LED brightness (LED Brightness) You can adjust the brightness of the LED level meters on the front of the F8n Pro. Press This opens the Menu Screen. to select “SYSTEM”, and press to select “LED Brightness”, and press... -
Page 271: Making Display Settings (Lcd)
Making display settings (LCD) You can make settings related to the display. Press This opens the Menu Screen. to select “SYSTEM”, and press to select “LCD”, and press to select the setting item, and press... - Page 272 • On (Low-Backlight): The backlight dims after time without use. • On (Backlight-Off): The backlight turns off after time without use. NOTE: This function is available only when the F8n Pro works with the internal batteries or external DC power supply.
- Page 273 Setting Explanation Outdoor Mode The display can be set to be easier to read in bright environments including in sunlight. 1. Use to select “On”, and press...
-
Page 274: Adding Marks When Recording/Playing (Play Key Option)
Adding marks when recording/playing (PLAY Key Option) You can set how marks are added when is pressed while recording or playing back a WAV format file. Press This opens the Menu Screen. to select “SYSTEM”, and press to select “PLAY Key Option”, and press to select the setting item, and press... - Page 275 Setting Explanation Recording You can set how marks are added when recording. 1. Use to select how marks are added, and press • Pause Only: Pressing will pause without adding a mark. • Pause & Mark: Pressing will pause and add a mark. •...
-
Page 276: Setting The Keys Held (Key Hold Target)
Setting the keys held (Key Hold Target) Use the hold function to prevent misoperation during recording. Press to turn it on/off. Follow these instructions to set which keys are disabled by the hold function. Press This opens the Menu Screen. to select “SYSTEM”, and press to select “Key Hold Target”, and press to select the keys held, and press... - Page 277 Press HINT: • Even when hold is on for “STOP” and “Track1-8”, you can press to turn the hold function off. • Operation using the FRC-8 and F8 Control is possible even when the hold function is on.
-
Page 278: Setting The Date And Time (Date/Time (Rtc))
Setting the date and time (Date/Time (RTC)) The date and time set on the F8n Pro are used when recording files, for example. You can also set the date format (order of year, month and day). Press This opens the Menu Screen. - Page 279 to select the setting item and press to change the value and press Repeat steps 5 and 6 to set the date and time. After finished all the setting, use to select “Enter” and press NOTE: If power is not supplied by an AC adapter for a long time, date and time settings will be reset. If the date and time setting screen appears during startup, set them again.
- Page 280 Setting the date format: The date format added to recording files can be changed. 1. In step 4, use to select “Date Format”, and press 2. Use to select the format, and press • mm/dd/yy: Month, day, year order • dd/mm/yy: Day, month, year order •...
-
Page 281: Disabling The Automatic Power Saving Function (Auto Power Off)
Disabling the Automatic Power Saving function (Auto Power Off) The power will automatically turn off if the F8n Pro is unused for 10 hours. If you want the power to stay on continuously until powered off, disable the Automatic Power Saving function. - Page 282 The power does not turn off automatically regardless of the Automatic Power Saving setting in the following cases: • During recording/playing • The F8n Pro is used as an audio interface. • The F8n Pro is used as a card reader. • An SD card is being tested.
-
Page 283: Setting The Power Supply Used (Power Source)
Setting the power supply used (Power Source) Set the external DC power supply shutdown voltage, nominal voltage and type of batteries so that the remaining power supply charge can be shown accurately. On this menu page, you can also check the voltage of each power supply and the remaining battery capacity. - Page 284 You can set the external DC power supply (EXT DC) shutdown voltage. When an external DC power supply is being used, if the voltage drops below the value set here, the F8n Pro will automatically stop recording and turn off. If AA batteries (Int AA) are installed, however, the power supply will switch to Int AA and operation will continue.
- Page 285 • When multiple power supplies are connected, they will be used in the following order of priority. DC power supply (Ext DC) > USB bus power (supplied by F8n Pro) > AA batteries (Int AA) • The voltages of each power supply are shown on the display.
-
Page 286: Backing Up And Loading F8N Pro Settings (Backup/Load Settings)
Backing up and loading F8n Pro settings (Backup/Load Settings) F8n Pro settings can be backed up to and loaded from SD cards. Backing up This saves a backup file to the “F8n Pro_SETTINGS” folder in the root directory of the SD card. - Page 287 to select “Backup”, and press Edit the name of the file saved. “Character input screen” for how to input characters. NOTE: The extension of the saved backup file is “.ZSF”.
- Page 288 Loading You can load a backup file that is saved in the “F8n Pro_SETTINGS” folder in the root directory of the SD card. Press This opens the Menu Screen. to select “SYSTEM”, and press to select “Backup/Load Settings”, and press to select the SD card to use for loading, and press...
- Page 289 to select “Load/Delete”, and press to select the file to load, and press HINT: You can press and hold to delete a file. Deleting a file will completely erase its data. to select “Yes”, and press...
-
Page 290: Restoring Factory Default Settings
“Factory Reset”, and press to select “Yes”, and press After the F8n Pro is restored to its factory default settings, the power will turn off. NOTE: Conducting a factory reset will overwrite all settings to their factory defaults. Be certain before using this... -
Page 291: Managing Sd Cards
Managing SD cards Checking SD card information (Information) You can check the size and free space of SD cards. Press This opens the Menu Screen. to select “SD CARD”, and press to select “Information”, and press SD card information is displayed. ... -
Page 292: Testing Sd Card Performance (Performance Test)
Testing SD card performance (Performance Test) You can test whether an SD card can be used with the F8n Pro. A basic test can be done quickly, while a full test examines the entire SD card. Conducting a quick test Press This opens the Menu Screen. - Page 293 to select “Quick Test”, and press to select “Yes”, and press The card performance test will start. The test should take about 30 seconds. The result of the test will be shown when it completes. NOTE: Even if a performance test result is “OK”, there is no guarantee that writing errors will not occur. This information is just to provide guidance.
- Page 294 Conducting a full test Press This opens the Menu Screen. to select “SD CARD”, and press to select “Performance Test”, and press to select the SD card to test, and press...
- Page 295 to select “Full Test”, and press to select “Yes”, and press The amount of time required for the full test will be shown. The result of the evaluation will be shown. If the access rate MAX reaches 100%, the card will fail (NG). ...
-
Page 296: Formatting Sd Cards (Format)
Formatting SD cards (Format) SD cards must be formatted for use with the F8n Pro. Press This opens the Menu Screen. to select “SD CARD”, and press to select “Format”, and press to select the card to initialize, and press... - Page 297 • Before using SD cards that have just been purchased or that have been formatted by a computer, they must be formatted by the F8n Pro. • Be aware that all data previously saved on an SD card will be deleted when it is formatted.
-
Page 298: Managing The Firmware
Managing the firmware Checking the firmware versions You can check the firmware version. Press This opens the Menu Screen. to select “SYSTEM”, and press to select “Firmware Version”, and press This shows the firmware versions. ... -
Page 299: Updating The Firmware
Updating the firmware The F8n Pro firmware can be updated to the latest versions. The latest update file can be downloaded from the ZOOM website (zoomcorp.com). Follow the instructions in the “F8n Pro Firmware Update Guide” on the F8n Pro download page. -
Page 300: About The F8N Pro Shortcut Function
About the F8n Pro Shortcut function Checking the F8n Pro Shortcut function (Shortcut List) The F8n Pro has a shortcut feature that allows quick access to various functions. See the “List of shortcuts” for information about the shortcut functions. Press This opens the Menu Screen. -
Page 301: List Of Shortcuts
List of shortcuts ■ Home Screen Shortcut Explanation Press and hold Show the name that will be given to the next take recorded. Example: Scene001-T002 Advance the scene number by 1 (when the Home Screen is open). Press and hold Move the previously recorded take to the FALSE TAKE folder (when the Home Screen is open). - Page 302 Shortcut Explanation (→Setting timecode Open the “Timecode” screen. functions) (Track 2) ■ Mixer Screen Shortcut Explanation Press and hold Reset the selected pan/fader to the default value (when the Home Screen mixer is open). If already set to its default value, selecting a fader mutes the track. ■...
-
Page 303: Appendix
Appendix Troubleshooting If you think that the F8n Pro is operating strangely, check the following items first. Recording/playback trouble There is no sound or output is very quiet • Check the connections to your monitoring system and its volume setting. - Page 304 Computer does not recognize it even though it is connected to a USB port • The operation mode must be set on the F8n Pro to allow the computer to recognize the F8n Pro. (→Using as an audio interface (Audio...
-
Page 305: Detailed Product Diagrams
Detailed product diagrams Slate Mic, Tone INPUT Input 1-8 Input Source Track 1 Track 2 Input Track 3 Trim Input 1 Limiter φ Delay Track 4 Track 5 Track 6 Trim Track 7 Input 2 Limiter φ Delay Track 8 L L , , R R Track L Trim... - Page 306 Routing MAIN OUT Routing SUB OUT Routing Headphoen Routing Prefader Prefader Prefader Track 1 Track 1 Track 1 Track 8 Track 8 Track 2 MS Stereo Postfader Postfader Track 8 Track 1 Track 1 Postfader Track 8 Track 8 Track 1 Track 8 Audio Interface with Rec Audio Interface with Rec...
-
Page 307: Metadata List
Metadata list Metadata contained in BEXT chunks in WAV files Explanation Remarks SPEED= Frame rate MENU>TIMECODE>Timecode>FPS TAKE= Take number UBITS= User bits MENU>TIMECODE>Timecode>Ubits SCENE= Scene name MENU>META DATA (for Next Take)>Scene Name Mode MENU>META DATA (for Next Take)>User Scene Name MENU>FINDER>Option>Meta Data Edit>Scene MENU>FINDER>Option>Rename TAPE=... - Page 308 Metadata contained in iXML chunks in WAV files ○ = YES × = NO iXML master tag iXML sub tag Written Read Remarks ○ ○ <PROJECT> MENU > FINDER (SD card root folder) MENU>FINDER>Option>Meta Data Edit>Project Name ○ ○ <SCENE> MENU>META DATA (for Next Take)>Scene Name Mode MENU>META DATA (for Next...
- Page 309 iXML master tag iXML sub tag Written Read Remarks <SPEED> ○ <SPEED> <NOTE> × ○ ○ <SPEED> <MASTER_SPEED> MENU>TIMECODE>Timecode>FPS ○ <SPEED> <CURRENT_SPEED> × MENU>TIMECODE>Timecode>FPS ○ <SPEED> <TIMECODE_RATE> × MENU>TIMECODE>Timecode>FPS ○ <SPEED> <TIMECODE_FLAG> × MENU>TIMECODE>Timecode>FPS ○ <SPEED> <FILE_SAMPLE_RATE> × MENU>REC>Sample Rate ○...
- Page 310 iXML master tag iXML sub tag Written Read Remarks <HISTORY> ○ <HISTORY> <ORIGINAL_FILENAME> × <HISTORY> <PARENT_FILENAME> × × <HISTORY> <PARENT_UID> × × iXML master tag iXML sub tag Written Read Remarks <FILE_SET> ○ <FILE_SET> <TOTAL_FILES> × ○ <FILE_SET> <FAMILY_UID> ×...
- Page 311 Metadata and ID3 fields contained in MP3 files Metadata ID3 field Format Timecode Artist Name TC=[HH:MM:SS:FF] Scene name, take number Track Title SC=[scene name] TK=[take number] Frame rate, file length (time) Album Title FR=[frame rate] D=[file length (time)]...
-
Page 312: Specifications
113 dB typ. (−60 dBFS input, A- weighted) Crosstalk −90 dB or less (between adjacent channels, 1 kHz) MIC IN ZOOM mic capsule input (use disables Inputs 1/2) SLATE MIC Built-in mic for voice memos can be assigned to tracks freely Outputs... - Page 313 Maximum output level +10 dBV (normal output level) −20 dBu (mic output level) 1 kHz, 10 kΩ load HEADPHONE Connector 1/4 inch stereo (unbalanced output) Output impedance 18 Ω or less Maximum output level 100 mW + 100 mW (32 Ω load) D/A dynamic range 105 dB typ.
- Page 314 AC adapter ZOOM AD-19, DC 12 V/2 A, center plus External DC power supply HIROSE HR10A-7R-4S 4-pin connector (1 pin: -, 4 pin: +), 9–18 V Estimated 2 channels to SD 1 Alkaline batteries: about 6 hours continuous 48 kHz sampling frequency (32-bit float/16-bit linear/24- NiMH batteries (2500 mAh): about 8.5...
- Page 315 External 7.0 in. (W) × 5.5 in. (D) × 2.1 in. (H) dimensions 178.2 mm (W) × 140.3 mm (D) × 54.3 mm (H) Weight (including batteries) 1200 g Note: 0 dBu = 0.775 Vrms...
- Page 316 ZOOM CORPORATION 4-4-3 Kanda-surugadai, Chiyoda-ku, Tokyo 101-0062 Japan zoomcorp.com Z2I-4528-01...
Need help?
Do you have a question about the F8n Pro and is the answer not in the manual?
Questions and answers