
Related Manuals for Yardworks 239-1573


Summary of Contents for Yardworks 239-1573
- Page 1 239-1573 TOLL-FREE HELPLINE: 1-888-497-7273 Read this operator manual before using this product. Failure to do so can result in serious injury. SAVE THIS MANUAL...
- Page 2 TABLE OF CONTENTS Safety symbols ........................2 Important safety instrucions ....................4 Know your tools ........................9 Charging your battery ......................11 Assembly ..........................12 Operation ..........................14 Maintenance ........................21 Trouble shooting .........................26 Warranty ..........................27 READ ALL INSTRUCTIONS! WARNING: Some dust created by power sanding, sawing, grinding, drilling and other construction activities contains chemicals known to the state of California to cause cancer, birth defects or other repro- ductive harm.
- Page 3 To reduce the risk of injury, user must read and Read the operator’s manual understand operator’s manual before using this product. Always wear safety goggles or safety glasses with Wear ear protection/Cap protection/ side shields and a full face shield when operating Eye Protection this product.
- Page 4 1) Avoid Dangerous Environment – Do not use power tools in damp or wet locations. 2) Do not Use in Rain. 3) Keep Children Away - All visitors should be kept at a distance from work area. 4) Dress Properly - Do not wear loose clothing or jewelry. They can be caught in moving parts. Use of heavy duty nonslip gloves and substantial footwear is recommended when working outdoors.
- Page 5 11. Do not modify or attempt to repair the power tool or the battery pack (as applicable) except as indicated in the instructions for use and care. CHAIN SAW SAFETY WARNINGS 1. Keep all parts of the body away from the saw chain when the chain saw is operating. Before you start the chain saw, make sure that the saw chain is not contacting anything.
- Page 6 CAUSES AND OPERATOR PREVENTION OF KICKBACK Kickback may occur when the nose or tip of the guide bar touches an object, or when the wood closes in and pinches the saw chain in the cut. Tip contact in some cases may cause a sudden reverse reaction, kicking the guide bar up and back towards the operator.
- Page 7 is free from obstructions. Do not let the nose of the guide bar contact a log, branch, fence, or any other obstruction that could be hit while you are operating the saw. 6. Always cut with the unit running at full speed. Fully squeeze the switch trigger and maintain cutting speed do not force.
- Page 8 10. Battery pack need to be charged before use. Always use the correct charger and refer to the manufactur- er’s instructions or equipment manual for proper charging instructions. 11. Do not leave battery pack on prolonged charge when not in use. 12.
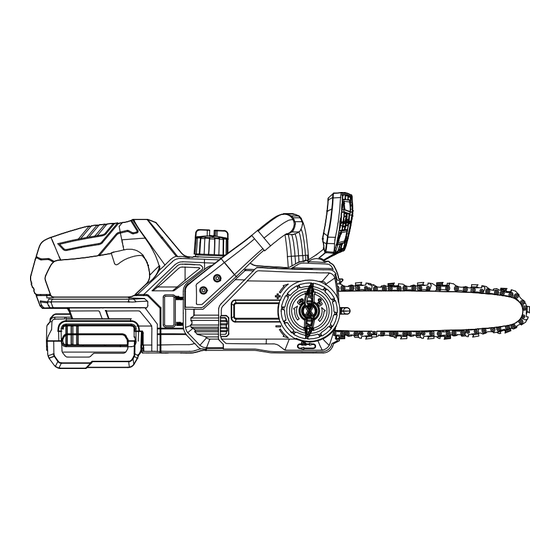
- Page 9 1. Rear Handle 2. Oiler Cap 3. Front Guard 12. Front Handle 4. 10” Chain 13. Battery Pack Release Button 5. 10” Guide Bar 14. Battery LED Indicators 6. Chain Tensioning Knob 15. Power Indicator Button 7. Chain Sprocket Cover Knob 16.
- Page 10 Chain Saw EGT050035 Voltage Guidebar Length 10” Chain Pitch 3/8” Chain Gauge 0.050” Number of chain drive links Chain Type ES100SDEA041 Guidebar Type 3/8.LP.050.40E 91X Chain Speed 16.4f/s Cutting Up to 28 Cuts Per Charger (Full 2.0AH to cut Dia 3.9” Wood) Battery 2.0 Ah (D01104300/D01102700/SKU: 2673206) Charger...
- Page 11 The battery pack is equipped with a push button for checking the charge level. Simply press the push button 3 lights on 2 lights on 1 light on the battery pack. You can only charge one battery at a time with the charger provided. a.
- Page 12 Use the table below to determine charger light patterns and possible causes. For all other issues, please ask the helpline for help. •No load charging –There’s no battery inserted in the charger. •Green Light – On •Red Light – On •Normal charging –...
- Page 13 d. Place the chain drive links into the guide bar groove. Position the chain so there is a loop at the back of the guide bar. e. Hold Chain in position on the guide bar and place the loop around the sprocket of the power head.
- Page 14 Hold the tip of the guide bar up and tighten the optimum lubrication. The chain is automatically side cover knob securely. The chain is correctly lubricated with chain oil during operation. tensioned when there is no sag on the underside a.
- Page 15 a. Remove the battery pack. b. Make sure that the chain is properly mounted and correctly tensioned. c. Lift the tip of the guide bar up to check for any sagging in the chain. The chain is correctly ten- sioned when there is no sag on the underside of the guide bar and the chain is snug, but it can be turned by hand without binding.
- Page 16 d. When felling a tree, keep everyone - helpers, bystanders, children, and animals - a safe distance from the cutting area. During felling operations, the safe distance should be a least twice the height of the largest trees in the felling area.
- Page 17 speed before beginning the cut. WARNING: Do not operate the trigger switch with your left hand and hold the front handle with c. Begin cutting by lightly pressing the guide bar your right hand. Never allow any part of your body against the wood.
- Page 18 When bucking and felling operations are being a. Make the felling back cut at least 2 inches (50.8 performed by two or more persons at the same mm) higher than the horizontal notching cut time, the felling operation should be separated Keep the felling back cut parallel to the from the bucking operation by a distance of at horizontal notching cut.
- Page 19 When the log is supported along its entire length, it should be cut from the top (overbucking) Bucking is cutting a log into lengths. It is important Cut From Top (Overbuck) Avoid Cutting Earth is evenly distributed on both feet. When possible, the log should be raised and supported by the use of limbs, logs or chocks.
- Page 20 When bucking on a slope, always stand on the uphill side of the log (Fig. 25). To maintain complete control when cutting through, release the cutting pressure near the end of the cut without relaxing the grip on the chain saw handles. Don’t allow the chain to contact the ground.
- Page 21 a. Remove the battery, allow the saw to cool and tighten the oil tank cap. surface, so that the side cover is facing upwards c. Wear gloves. Remove the side cover by turning the side cover knob counterclockwise Clean the side cover with a dry cloth. d.
- Page 22 cutting, or the chain cuts to one side. During mainte- nance of your chain, consider the following: crease the risk of a severe kickback. Raker (depth gauge) clearance. Too low increases the potential for kickback. Not low enough de- creases cutting ability. If cutter teeth have hit hard objects, such as nails and stones, or have been abraded by mud or sand on the wood, have the chain sharpened by...
- Page 23 WARNING:A dull or improperly sharp- 0.177” (4.5mm) Cutter tooth ened chain can cause excessive motor Round File speed during cutting, which may result in severe motor damage. WARNING: Improper chain sharpening increases the potential of kickback. Sharpening Filing Direction Angle:30° WARNING: Failure to replace or repair a damaged chain can cause serious injury.
- Page 24 GUIDE BAR MAINTENANCE When the guide bar shows signs of wear, reverse it SIDE PLATE ANGLE on the saw to distribute the wear for maximum bar life. The bar should be cleaned every day of use and Hook Backward Slope checked for wear and damage.
- Page 25 TRANSPORTING AND STORING Do not store or transport the chain saw when it is running. Always remove the battery pack before storing or transporting. Always place the guide bar sheath on the guide bar and chain before storing or trans- porting the chain saw.
- Page 26 The battery pack is not Attach the battery pack to the chainsaw. attached to the chainsaw. No electrical contact between Remove battery, check contacts and reinstall the the chainsaw and battery. battery pack. The battery pack is depleted. Charge the battery pack. The battery pack or chain saw Cool the battery pack and chain saw until the is too hot.
- Page 27 With (1) 20-Volt 2.0Ah Lithium-ion Battery Copyright All Rights Reserved Two (2) year limited warranty on all Yardworks 20V lithium ion power tools from date of purchase when used for personal, household, or family use. Two (2) year limited warranty on all Yardworks 20V lithium ion batteries and chargers from date of purchase when used for personal, household, or family use.
Need help?
Do you have a question about the 239-1573 and is the answer not in the manual?
Questions and answers