Roland SP-404MK2 Reference Manual
Applicable to version 4.00
Hide thumbs
Also See for SP-404MK2:
- Quick start manual ,
- Reference manual (136 pages) ,
- Using manual (26 pages)
Advertisement
Quick Links
Advertisement

Related Manuals for Roland SP-404MK2


Summary of Contents for Roland SP-404MK2
- Page 1 SP-404MK2 Applicable to version 4.00 Reference Manual...
- Page 2 Contents Introduction............... Turning Effects on/off at the desired timing....... 52 Panel descriptions ..............Temporarily output only the effect sound (MUTE BUS) ... 53 Edit section................... Sampling (SAMPLING) ............55 Control section (1) ................Configuring the sampling settings (RECORD SETTING)..56 Control section (2) ................
- Page 3 Contents Deleting effect operations recorded in a pattern (EFX Saving an opening image to a project ........158 MOTION ERASE) ............... 112 Customizing the screen saver..........159 Deleting specific effect operations from a pattern....113 Preparing a screen saver image ............ 160 Recording pad mute operations to a pattern (PAD Enabling a custom screen saver............
- Page 4 Contents Super Filter ................... 220 WrmSaturator ..................221 303 VinylSim ..................222 404 VinylSim ..................223 Cassette Sim..................224 Lo-fi ......................225 Reverb ....................226 Chorus ....................227 JUNO Chorus..................228 Flanger ....................229 Phaser..................... 230 Wah ......................231 Slicer......................232 Tremolo/Pan ..................
- Page 5 Introduction The SP-404MK2 lets you do everything from audio sampling to editing, creating your own songs and performing... all in one unit. MEMO This Reference Manual assumes that your unit is using software version 4 or later.
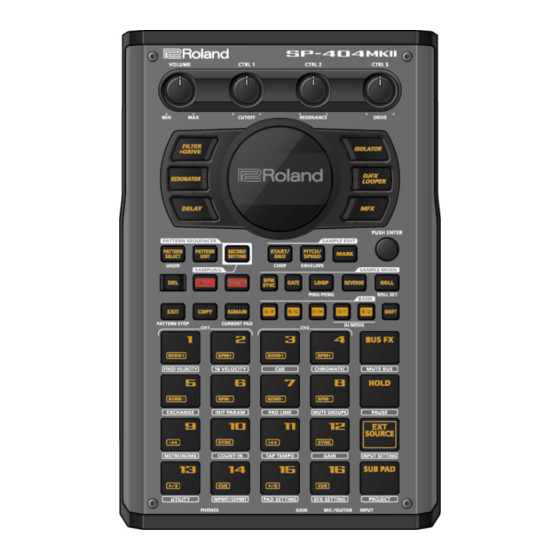
- Page 6 Introduction Panel descriptions...
- Page 7 Introduction Edit section [VOLUME] knob Adjusts the overall volume. [CTRL 1]–[CTRL 3] knobs Use these to edit parameters.
- Page 8 Introduction Control section (1) Display Shows various information depending on the operation. Effect buttons Use these buttons to select the effect you want to use.
- Page 9 Introduction Control section (2) [PATTERN SELECT] button Press to select a pattern. The pattern sequencer turns on. [PATTERN EDIT] button Press this when the pattern sequencer is on to display the pattern edit screen. From here you can edit the pattern. [RECORD SETTING] button Press this to make the settings for sampling and for pattern recording.
- Page 10 Introduction Control section (3) [START/END] button Press this to set the playback range (start point and end point) for a sample, or to edit a sample. [PITCH/SPEED] button Press this to set the pitch and speed at which a sample plays back. [MARK] button Press this to set a marker, or when you want to use skip-back sampling.
- Page 11 Introduction Pad section Pads [1]–[16] The pads play back the samples and patterns saved in each one. Use these as controllers when in DJ mode. [BUS FX] button Press this to switch between buses for playing back samples, or to use the MUTE BUS function. [HOLD] button You can make the samples keep playing back even after you take your fingers off the pads, by holding down pads [1]–[16] (to play back their samples) and pressing the [HOLD] button.
- Page 12 Introduction Side panel SD card slot Insert an SD card here.
- Page 13 Introduction Front panel PHONES jack Connect your headphones or earphones here. [GAIN] knob Adjusts the input level of the device connected to the INPUT jack. [MIC/GUITAR] switch Switches the input impedance to match the device that’s connected to the INPUT jack. When connecting a high-impedance instrument (such as a guitar or bass guitar), flip the switch to the right (towards the INPUT jack).
- Page 14 Introduction Rear panel DC IN jack Connect the included AC adaptor to this jack. [POWER] switch Turns the power on/off. USB port Use this to connect your computer, or to receive power via the USB port. MIDI IN/OUT jacks Connect an external MIDI device here. To make these connections, use TRS/MIDI connecting cables (sold separately: BMIDI-5-35). LINE IN (L/MONO, R) jacks These are jacks for inputting the audio signal.
- Page 15 What you should know about this unit (how data is organized) The SP-404MK2 handles a large amount of data, including audio materials and data used to create songs. In this section, we explain the role of each type of data and the structure used to manage data on the SP-404MK2.
- Page 16 Introduction What’s a sample? A sample is a collection of audio that has been sampled (recorded audio data) and settings such as loop settings and routings to BUS FX (effects). Sample Samples can be assigned to pads [1]–[16] and played back, or you can use them as parts of patterns to construct your song. MEMO A collection of 16 patterns is a called a “bank”, and you can store up to 10 banks (A–J).
- Page 17 Introduction What’s a pattern? A pattern is a set of data that contains the order in which the samples should be played back. You can create a song by pressing the pads to play back several samples and then recording your performance as a pattern. Use the pattern sequencer to record patterns.
- Page 18 Introduction Banks and projects The 10 banks of samples and 10 banks of patterns are collectively managed as a “project”. The SP-404MK2 can store 16 different projects. Project 16 Project 1 Bank J Bank J Bank A Bank A Bank J...
- Page 19 Introduction Getting things ready Now, let’s get ready to use the SP-404MK2. This section explains how to prepare and connect to external equipment for outputting sound, as well as the different ways to power this unit.
- Page 20 Introduction Connecting external equipment NOTE To prevent malfunction and equipment failure, always turn down the volume, and turn off all the units before making any connections. Connect your amp or speakers to the LINE OUT jacks on the rear panel. Speakers Use the PHONES jack when connecting headphones or earphones.
- Page 21 You can transmit and receive audio and MIDI data by connecting a USB cable from your computer or mobile device (smartphone or tablet) to the SP-404MK2. You don’t need to install a device driver on your computer or other device to do this (the SP-404MK2 supports USB Audio Device Class 2.0 specs). MEMO ¹...
- Page 22 Introduction About the power supply Connect the included adaptor to the DC IN jack of this unit, and plug the adaptor into an AC outlet. To AC outlet MEMO ¹ You can also use this unit without an adaptor, such as by supplying power to the USB port or by using batteries. →...
- Page 23 When supplying power to this unit via the USB port, be sure to use a cable with USB Type-C® connectors on both ends. No other USB cables can be used, as they cannot provide enough power to operate the SP-404MK2. Also note that even when using cables that have a USB Type-C® connector on both ends, you cannot power this unit from devices like USB hubs with insufficient current output.
- Page 24 Adjust the volume of this unit with the [VOLUME] knob. About the sample mode display (top screen) The top screen is shown once you turn on the power of the SP-404MK2 and the unit is ready to play. Assigned BUS FX...
- Page 25 Introduction Turn off the power of your amp and speakers. Slide the [POWER] switch of this unit to “OFF” to turn off this unit.
- Page 26 There are many preset samples available on this unit by factory default. MEMO When you turn on the SP-404MK2, the pads light up orange and the unit enters sample mode. If the unit is not in sample mode, press the [EXIT] button a number of times.
- Page 27 Playing back samples (SAMPLE MODE) Selecting a sample bank Select the bank to use from the 10 available banks (A–J). Press the bank [A/F]–[E/J] buttons. The bank switches. Each time you press the bank [A/F] button, the bank switches between A and F. When bank A–E is selected, the bank [A/F]–[E/J] button lights up.
- Page 28 Playing back samples (SAMPLE MODE) Adjusting the volume for all banks (BANK VOLUME) Adjusts the volume for the specified bank overall. This lets you adjust the volume if the volume varies between banks. Hold down the [SHIFT] button and press the bank [A/F]–[E/J] buttons. The BANK VOLUME screen appears.
- Page 29 Playing back samples (SAMPLE MODE) Playing back a sample to the tempo of a song (BPM SYNC) You can synchronize the tempo (playback speed) of one sample with another sample. You can also synchronize the tempo of a sample with that of an external device that’s playing, such as a musical instrument or computer. Press the [BPM SYNC] button.
- Page 30 Playing back samples (SAMPLE MODE) Playing back only while a pad is pressed (GATE) This switches the gate function on/off. When the [GATE] button is on, samples play back only while the pads are pressed (gate playback). When the [GATE] button is off, samples begin playing back each time a pad is pressed. MEMO You can also use the gate function with the [EXT SOURCE] button.
- Page 31 Playing back samples (SAMPLE MODE) Playing back samples only one time (One-shot Playback) When the sample playback mode is set to one-shot playback, the sample plays back once to the end when you press a pad. The pad’s operations are disabled (ignored) until playback is finished. Even if a phrase that’s shorter than the sample length is recorded in a pattern, the sample plays back to the end without returning to the beginning (no retriggering).
- Page 32 Playing back samples (SAMPLE MODE) Playing back samples repeatedly (LOOP) Use the loop function to make a sample play back repeatedly. The loop settings can be made per sample. When the [LOOP] button is turned on, the loop switches between playback and stopping with each press of the pad (trigger playback). When the [LOOP] button is off, samples play back from the beginning each time a pad is pressed.
- Page 33 Playing back samples (SAMPLE MODE) Playing back a sample in reverse (REVERSE) You can use the reverse function to play back samples in reverse (from end to start). Press pads [1]–[16] to select the sample you want to play back in reverse. Press the [REVERSE] button to turn reverse playback on (the button lights up).
- Page 34 Playing back samples (SAMPLE MODE) Playing back samples in detailed steps (ROLL) You can use the roll function to repeatedly play back samples at a set interval. Hold down the [ROLL] button and press pads [1]–[16]. The sample plays back as a roll. MEMO You can play back up to four samples at the same time as a roll.
- Page 35 Playing back samples (SAMPLE MODE) Setting the roll interval This shows how to set the roll interval (how fast the roll repeats). Hold down the [SHIFT] button and press the [ROLL] button. Set the roll interval. Each time you press the [ROLL] button while holding down the [SHIFT] button, the roll interval changes in the order shown below: quarter-note (1/4) →...
- Page 36 Playing back samples (SAMPLE MODE) Setting a fixed sample volume (FIXED VELOCITY) Sets the sample’s velocity so that it always plays back at 127 (the maximum). Hold down the [SHIFT] button and press the pad [1]. “FIXED VELOCITY ON” is shown. The sample velocity is fixed at 127. To cancel this setting, hold down the [SHIFT] button again and press pad [1].
- Page 37 Playing back samples (SAMPLE MODE) Changing the sample volume for playback (16 VELOCITY) You can use the 16 VELOCITY function to change a sample’s velocity (volume) in steps when it plays back. Press pads [1]–[16] to select the sample you want to use with the 16 VELOCITY function. Hold down the [SHIFT] button and press the pad [2].
- Page 38 Playing back samples (SAMPLE MODE) Playing back samples in scale pitches (CHROMATIC) You can play back samples (changing their pitches) as a chromatic scale with the pads. Press pads [1]–[16] to select the sample to use in chromatic mode. Hold down the [SHIFT] button and press the pad [4]. The unit enters chromatic mode.
- Page 39 Playing back samples (SAMPLE MODE) Muting the playback of a sample (Pad MUTE) You can momentarily mute (silence) the playback of a sample. By using part mute on a sample that’s playing back, you can create a break. MEMO When a pattern is selected (the pad lights up purple), the pad can’t be muted. To mute a pad, press the [PATTERN SELECT] button and switch to sample mode (the pad lights up orange).
- Page 40 Playing back samples (SAMPLE MODE) Playing back multiple pads at the same time (PAD LINK GROUPS) The PAD LINK GROUPS function lets you group multiple pads (up to four) into one group. By setting a group ahead of time, you can make all the pads in the group play back just by operating a single pad within that group.
- Page 41 Playing back samples (SAMPLE MODE) Merging multiple samples into a single sample (SAMPLE MERGE) You can combine multiple samples that are assigned to different pads into a single pad. While holding down the [SHIFT] button, press [RESAMPLE] button. Press pads [1]–[16] to select more than one sample that you want to merge (up to four). Turn the knobs listed below to configure the merge processing, and press the [VALUE] knob to execute.
- Page 42 Playing back samples (SAMPLE MODE) Preventing samples from playing back at the same time (MUTE GROUP) The MUTE GROUP function lets you group together all the samples that should not play at the same time (in other words, the samples you don’t want to layer).
- Page 43 Playing back samples (SAMPLE MODE) Stopping all sample playback (STOP) You can make all samples and patterns that are currently playing back stop. Press the [EXIT] button quickly four times. All samples and patterns that are playing back stop. MEMO You can also press the [EXIT] button while holding down the [SHIFT] button to stop all samples and patterns that are playing back.
- Page 44 Playing back samples (SAMPLE MODE) Pausing the sound of a sample (PAUSE) Pauses the sample that’s currently playing back. Hold down the [SHIFT] button and press the [HOLD] button. All samples that are playing back pause. Hold down the [SHIFT] button and press the [HOLD] button again to resume playback. The samples resume playback.
- Page 45 Playing back samples (SAMPLE MODE) Disabling buttons that are not used when playing live (LIVE MODE) Normally, the buttons related to features like sampling and editing are not used when you are playing live. Accidentally pressing these buttons while you’re performing live might be a show-stopper. By turning live mode on, you can disable these buttons and avoid such accidents.
- Page 46 You can use the built-in effects on the SP-404MK2 to process the audio in unique ways. Use the built-in effects on the SP-404MK2 by assigning them to a bus (an audio routing inside the SP-404MK2). With BUS 1 and BUS 2, you can apply the effects that are appropriate for your performance, per sample. BUS 3 and BUS 4 are mainly used to apply effects to the overall sound output from the SP-404MK2.
- Page 47 Using the effects Adding effects to a sample (BUS FX) You can use the various effects built into the SP-404MK2 to process the playback audio in unique ways. Press the effect buttons. Press the buttons of the effects you want to apply, including the [FILTER+DRIVE] button, the [RESONATOR] button, the [DELAY] button, the [ISOLATOR] button, the [DJFX LOOPER] button, and the [MFX] button.
- Page 48 Using the effects Assigning effects to BUS 1 and BUS 2 Here’s how to assign the built-in effects of this unit to BUS 1 or BUS 2. You can use two types of effects separately. Press the [BUS FX] button to select the bus to configure. When the button is lit orange, BUS 1 is selected;...
- Page 49 Using the effects Deciding on effects to use for each sample Sets which sample playback audio is sent to which bus (meaning which effects are used) for each sample. In this example, we apply the effect assigned to BUS 2 to the sample on pad [1]. MEMO Set which effect is applied to the bus beforehand.
- Page 50 Using the effects Using the MFX effects You can select and use the effects you like for the MFX effects. While holding down the [MFX] button, turn the [VALUE] knob or the [CTRL 3] knob to select the effect to use. MEMO You can also use pads [1]–[16] instead of the [VALUE] knob or the [CTRL 3] knob to select an effect.
- Page 51 Using the effects Editing the effects When you press an effect button (such as the [FILTER+DRIVE] button) to turn the effect on, the effect edit screen appears. Turn the [CTRL 1]–[CTRL 3] knobs while the effect edit screen is displayed to edit the main parameters of the effect. You may be able to access the sub-parameters by holding down the [VALUE] knob, depending on the effect.
- Page 52 Using the effects Turning Effects on/off at the desired timing Applies effects only while you hold down the effect buttons (EFFECT GRAB). This lets you quickly turn an effect on/off in time with what you play. Play back a sample. While holding down the [VALUE] knob, press an effect button (such as the [FILTER+DRIVE] button).
- Page 53 Using the effects Temporarily output only the effect sound (MUTE BUS) Temporarily turns off the audio sent to the bus (the sample playback sound or the sound inputted to the INPUT jack), and outputs only the sound of the effect. This lets you output just the sound of reverberation or delay feedback to create a break when you’re playing.
- Page 54 Using the effects MUTE BUS Audio Playback Muted Playback (samples, input) Effects Audio output Creates a break in the sound Individually selecting the bus to mute with MUTE BUS When MUTE BUS is turned on, you can individually select the buses on which audio is muted. For details, refer to the “Mute Bus”...
- Page 55 Sampling (SAMPLING) You can sample (record) the sound that’s inputted into this unit to create your own samples (audio data materials).
- Page 56 Sampling (SAMPLING) Configuring the sampling settings (RECORD SETTING) Here you can configure the settings for sampling, such as the recording level, as well as apply input effects to the sound input from an external source. In sample mode, press the [REC] button. The unit enters sampling standby mode.
- Page 57 Sampling (SAMPLING) Configuring the input effects (INPUT FX) The INPUT FX (input effects) are effects used only for the input jacks. You can apply effects to the audio that’s inputted to this unit. On the input setting screen, press the [VALUE] knob. The INPUT FX Setting screen appears.
- Page 58 Sampling (SAMPLING) Sampling This shows how to sample (record) the audio that’s inputted into this unit to create your own samples. Press the [REC] button. Empty pads to which samples haven’t been assigned blink red. MEMO The metronome sounds when the “Metronome:REC” parameter is “ON” (the SYSTEM parameter “CLICK (p.
- Page 59 Sampling (SAMPLING) Adding a count-in before sampling This feature adds a count-in before sampling begins. This gives you time to get ready to play before sampling actually begins. Hold down the [SHIFT] button and press the pad [10]. The value changes in order each time you press pad [10] while holding down the [SHIFT] button. Edit the count-in setting.
- Page 60 Sampling (SAMPLING) Automatically setting the end point of a sample (END SNAP) By setting the BPM (tempo) and then sampling, you can automatically set the beat that’s just before the sampling end beat as the “end point” (the timing at which the sample stops). Press the [REC] button.
- Page 61 Sampling (SAMPLING) START ņ ņ ņ ņ...
- Page 62 Sampling (SAMPLING) Resampling a sample (RESAMPLE) Resampling means sampling a sample itself while it’s playing back. You can sample the sound of a sample to which effects are applied, or sample the sound of multiple samples that are playing back at the same time, creating a single sample. MEMO Also, by turning the pattern sequencer on beforehand (the [PATTERN SELECT] button lights up), you can resample a pattern in the same way as you would resample a sample.
- Page 63 Sampling (SAMPLING) If you decide to cancel sampling, press the [EXIT] button. MEMO ¹ You can also press the [REC] button to begin sampling. You can begin sampling when you want, while playing back samples as backing sounds. ¹ You can control the start/stop of recording from an external MIDI device using the start command (FA)/stop command (FC). To quit sampling, press the pads [1]–[16] used for sampling or the [REC] button once more.
- Page 64 Sampling (SAMPLING) Sampling what you previously played (SKIP-BACK SAMPLING) You can sample what you played up to 25 seconds ago (default) using the skip-back sampling function, which works even if you hadn’t started sampling. This lets you “go back in time” to sample a passage you played well during repeated practice, or to sample a phrase you played well when you were just improvising.
- Page 65 Sampling (SAMPLING) AUTO TRIG LEVEL 3 sec. 3 sec. Skip-back memory Approx. 25 sec. (default)
- Page 66 Recording samples by looping (LOOPER) This unit has a looper, which lets you record the sound that’s currently playing back as a sample. Set the value of MARK Function parameter to “Looper” by following the steps in “Editing the settings related to this unit (System) (p.
- Page 67 Recording samples by looping (LOOPER) Controller Explanation [REC] button Starts/stops sampling. [RESAMPLE] button Activates overdubbing mode. [DEL] button Deletes the content sampled by the looper. This is enabled only when the sample is stopped. [COPY] button Assigns the sampled data (result) to the pads. Press pads [1]–[16] to select the save destination pad, and press the [VALUE] knob.
- Page 68 Creating bass and other sounds (SOUND GENERATOR) You can use the synthesizer built into the SP-404MK2 to generate sounds. You can also sample these generated sounds and assign them to the pads. Hold down the [SHIFT] button, and press the [RECORD SETTING] button.
- Page 69 Editing a sample (SAMPLE EDIT) You can edit the playback speed, waveform and other parameters for the samples.
- Page 70 Editing a sample (SAMPLE EDIT) Setting the playback and loop regions (START/END) You can prevent unnecessary parts of a sample from playing, such as silence or noise at the beginning or at the end. This shows you how to set the start point (where a sample begins playing back) and the end point (where a sample stops playing back). You can also use the same operations to set the loop point (the starting point for loop playback).
- Page 71 Editing a sample (SAMPLE EDIT) Controller Operation [RESAMPLE] button Moves the start point to the zero cross-point (*) that’s closest to the start point time (SNAP to Zero-Cross function). Similarly, the loop point and end point are also moved. This function is enabled when the [RESAMPLE] button is lit. * The “zero cross-point”...
- Page 72 Editing a sample (SAMPLE EDIT) Processing a sample You can use the start point and end point settings to process a sample. NOTE Note that this operation directly processes the original sample data. Once you process a sample in this way, it cannot be restored. Set the start and end points by following the steps in “Setting the playback and loop regions (START/END) (p.
- Page 73 Editing a sample (SAMPLE EDIT) Marking and splitting samples (MARK) You can split a sample up into multiple smaller samples. To split a sample, you must first mark the locations where the sample is to be split using markers. Here we explain about the different ways to add markers. Adding a marker at the desired location You can choose where to place a marker (the location where the sample is to be split) while looking at the sample’s waveform.
- Page 74 Editing a sample (SAMPLE EDIT) Press the pad [1]. The corresponding samples play back. Press the pads [2]–[16] that are blinking blue, at the timing where you want to add a marker. This adds the marker to the sample. You can press pads [1]–[16] to preview the audio at the corresponding marker. Automatically adding markers based on conditions (AUTO MARK function) You can use the AUTO MARK function to automatically add markers based on certain conditions you specify.
- Page 75 Editing a sample (SAMPLE EDIT) Use the [CTRL 3] knob to edit the setting value, and press the [VALUE] knob. A confirmation message appears. Use the [VALUE] knob to select “OK”, and press the [VALUE] knob. The sample is split according to the specified conditions. You can press pads [1]–[16] to preview the audio at the corresponding marker. Deleting all markers from a sample You can delete all the markers at once that are used on a sample.
- Page 76 Editing a sample (SAMPLE EDIT) Using a marker to split and assign a sample to a pad (CHOP) Splits the sample at the marker positions, and assigns the resulting samples to separate pads. Follow the steps in “Marking and splitting samples (MARK) (p. 73)”...
- Page 77 Editing a sample (SAMPLE EDIT) Making fade-in/fade-out settings (ENVELOPE) Sets how the volume changes when the sample plays back. You can use fade-in settings (making the volume gradually get louder) and fade-out settings (making the volume gradually get softer). Hold down the [SHIFT] button and press the [PITCH/SPEED] button. The envelope settings screen appears.
- Page 78 Editing a sample (SAMPLE EDIT) ¹ HOLD ¹ RELEASE ¹ BPM SYNC ¹ GATE ¹ LOOP ¹ REVERSE For details on the mute group settings, refer to “Preventing samples from playing back at the same time (MUTE GROUP) (p. 42)”. Example settings for ATTACK, HOLD and RELEASE Here are some examples of how the volume of a eight-second sample changes when you set different ATTACK, HOLD and RELEASE values.
- Page 79 Editing a sample (SAMPLE EDIT) Eight-second sample 1.5 sec. 3 sec. MEMO For samples with the [GATE] button turned on (→ Playing back only while a pad is pressed (GATE) (p. 30)), if you release your finger from the pad while the sample is playing back, the fade-out begins at that timing.
- Page 80 Editing a sample (SAMPLE EDIT) Changing the pitch or playback speed of a sample (PITCH/SPEED) Here’s how to change the pitch (key) or playback speed of a sample. You can independently edit the pitch and playback speed, or make a sample’s length match that of the tempo.
- Page 81 Editing a sample (SAMPLE EDIT) Controller Parameter Value Explanation Hold down [SHIFT] button + turn VINYL MODE Turns VINYL mode on/off. [VALUE] knob By using VARI mode, you can improve unnatural sound quality problems that occur when changing a sample’s pitch or speed. VARI mode is enabled when VINYL mode is set to “No”.
- Page 82 Editing a sample (SAMPLE EDIT) Adding unique rhythmic character to a sample (Groove) You can add a unique rhythmic character to a sample to make it groove. For instance, this lets you shift the timing of a sample’s beat to create a distinctive groove, even if the looped drum sound that you’ve input was played straight on the beat.
- Page 83 Editing a sample (SAMPLE EDIT) Setting the pad colors for each sample (Pad Color <SAMPLE>) You can set the pad illumination color for each sample. Hold down the [SHIFT] button, and press pad [15]. The pad setting screen appears. Turn the [CTRL 3] knob to select the LED tab and set the Pad LED Mode parameter to “SAMPLE”. Press the [EXIT] button.
- Page 84 Editing a sample (SAMPLE EDIT) Displaying parameters set in a sample Hold down the [REMAIN] button to show the sample parameters assigned to the currently selected pad. When a sample is playing back, this shows the remaining playback time.
- Page 85 Editing a sample (SAMPLE EDIT) Initializing the sample parameters (INIT PARAM) This restores the parameters set in a sample (such as the start point, end point, tempo and so on) to their default values. Hold down the [SHIFT] button and press the pad [6]. A confirmation message appears.
- Page 86 Editing a sample (SAMPLE EDIT) Organizing the samples This section explains the functions for making effective use of the samples.
- Page 87 Editing a sample (SAMPLE EDIT) Exchanging (swapping) samples between pads Here’s how to exchange (swap) the samples that are assigned to two different pads. Hold down the [SHIFT] button and press the pad [5]. The EXCHANGE PAD screen appears. Press the two pads for which you want to exchange the samples. To cancel exchanging, press the [EXIT] button.
- Page 88 Editing a sample (SAMPLE EDIT) Copying the sample from a pad Here’s how to copy the sample that’s assigned to a pad to a different pad. Press the [COPY] button. The COPY PAD screen appears. Press the sample (pad) you want to copy, and then the copy destination sample (pad). If you decide to cancel copying, press the [EXIT] button.
- Page 89 Editing a sample (SAMPLE EDIT) Copying all samples in a bank to another bank This is how to copy all the samples in a bank to another bank. Hold down the [COPY] button and press the [EXIT] button. The COPY BANK PAD screen appears. Press the bank [A/F]–[E/J] buttons to select the bank to copy (source).
- Page 90 Editing a sample (SAMPLE EDIT) Protecting a sample (PROTECT) This function prevents the samples and patterns assigned to a pad from being copied, overwritten by editing or accidentally deleted. Protection is set on a bank by bank basis. Protection is set for both samples and patterns. Press the bank [A/F]–[E/J] buttons to select the banks to protect.
- Page 91 Editing a sample (SAMPLE EDIT) Deleting the sample from a pad This is how to delete the sample assigned to a pad. Press the [DEL] button. The SELECT PAD screen appears. Press the pad containing the sample you want to delete. If you decide to cancel deleting, press the [EXIT] button.
- Page 92 Combining samples to create a pattern (PATTERN SEQUENCER) You can record the order in which the samples play back, so that multiple samples play back at the timing you choose. The data in which the playback order is recorded is called a “pattern”. In this section, we explain how the patterns are played back and how to create (record) them.
- Page 93 Combining samples to create a pattern (PATTERN SEQUENCER) Playing a pattern This shows you how to recall a pattern, which contains the sample playback order, and play it back. Press the [PATTERN SELECT] button. The SELECT screen appears. BPM of the pattern Pads to which patterns are assigned light up purple.
- Page 94 Combining samples to create a pattern (PATTERN SEQUENCER) Creating a new pattern (real-time recording) Here’s how to create a pattern by recording what you play on the keyboard and how you operate the controllers, just as-is. Press the [PATTERN SELECT] button. Press the [REC] button.
- Page 95 Combining samples to create a pattern (PATTERN SEQUENCER) Controller Parameter Value Explanation [VALUE] knob QTZ (QUANTIZE) Off, GRID 32, GRID 16.3, GRID When the player presses a pad to play 16, GRID 8.3, GRID 8, GRID 4.3, back a sample, the timing inevitably GRID 4, SHUFFLE 16, SHUFFLE 8 varies.
- Page 96 Combining samples to create a pattern (PATTERN SEQUENCER) Adding a count-in before recording a pattern This feature adds a count-in before the pattern start recording. This gives you time to get ready to play before the pattern actually begins recording. Hold down the [SHIFT] button and press the pad [10].
- Page 97 Combining samples to create a pattern (PATTERN SEQUENCER) Creating a new pattern (TR-REC) Here’s how to create a pattern by setting the sample playback timing at the position you like on the steps. This method of recording is suitable for creating drum patterns. Press the [PATTERN SELECT] button.
- Page 98 Combining samples to create a pattern (PATTERN SEQUENCER) Press the [REC] button. TR-REC pattern recording begins. Press pads [1]–[16] while holding down the [SUB PAD] button to select the sample. Set the parameters for the sample to input. Controller Parameter Value Explanation [CTRL 1] knob...
- Page 99 Combining samples to create a pattern (PATTERN SEQUENCER) Controller Parameter Value Explanation [SHIFT] button + [CTRL 3] knob START -50–99 (%) Sets the timing at which the sample starts playing back. If this is set to a value other than 0%, sub steps cannot be set.
- Page 100 Combining samples to create a pattern (PATTERN SEQUENCER) ¹ Press the [EXIT] button to return to the previous screen. ¹ You can switch to pattern TR-REC by pressing the [REC] button while holding down the [SHIFT] button during pattern playback.
- Page 101 Combining samples to create a pattern (PATTERN SEQUENCER) SUBSTEP parameter values The relationship between step divisions and the patterns used for playing notes is shown below. Value Pattern...
- Page 102 Combining samples to create a pattern (PATTERN SEQUENCER) Editing patterns note by note (Microscope) You can edit what’s recorded in a pattern, note by note (Microscope). Follow steps 1–6 in “Creating a new pattern (TR-REC) (p. 97)” to start TR-REC recording. Press pads [1]–[16] while holding down the [SUB PAD] button to select the sample to record.
- Page 103 Combining samples to create a pattern (PATTERN SEQUENCER) Tap recording Follow steps 1–6 in “Creating a new pattern (TR-REC) (p. 97)” to start TR-REC recording. Press pads [1]–[16] while holding down the [SUB PAD] button to select the sample to record. Press the [REC] button at the timing where you want to record the note.
- Page 104 Combining samples to create a pattern (PATTERN SEQUENCER) Converting patterns to samples Here’s how to convert a performance that’s recorded in a pattern into a sample. There are two ways to convert performance data to a sample, each with their own characteristics. Differences between bouncing and resampling Type How each type works differently...
- Page 105 Combining samples to create a pattern (PATTERN SEQUENCER) Sampling a pattern (RESAMPLE) You can sample the performance you recorded to a pattern as-is, and turn it into a sample. Press the [PATTERN SELECT] button. Press the [RESAMPLE] button. MEMO The metronome sounds when the “Metronome:REC” parameter is “ON” (the SYSTEM parameter “CLICK (p.
- Page 106 Combining samples to create a pattern (PATTERN SEQUENCER) Converting patterns to samples (BOUNCE) Here’s how to convert a pattern that’s assigned to a pad into a sample, and then assign that sample to a pad. Follow the steps in “Copying the pattern of a pad (p. 125)”...
- Page 107 Combining samples to create a pattern (PATTERN SEQUENCER) Selecting a pattern bank Select the bank to use from the 10 available banks (A–J). Press the bank [A/F]–[E/J] buttons. The bank switches. Each time you press the bank [A/F] button, the bank switches between A and F. When bank A–E is selected, the bank [A/F]–[E/J] button lights up.
- Page 108 Combining samples to create a pattern (PATTERN SEQUENCER) Playing back patterns in order (PATTERN CHAIN) Pattern chain is a function that lets you play back patterns you’ve created with the pattern sequencer, in a specified order. You can record and play back up to 16 patterns with a single pattern chain. Up to 16 pattern chains can be stored per project. Creating a pattern chain Use the pattern sequencer to create patterns beforehand (Creating a new pattern (real-time recording) (p.
- Page 109 Combining samples to create a pattern (PATTERN SEQUENCER) While holding down the [HOLD] button, press pads [1]–[16] to select the pattern chain number to play back. The PATTERN CHAIN screen appears. Press the [SUB PAD] button. The selected pattern chain plays back. To stop playback, press the [SUB PAD] button again.
- Page 110 Combining samples to create a pattern (PATTERN SEQUENCER) Press pads [1]–[16] while holding down the [HOLD] button to select the pattern chain to play back. The PATTERN CHAIN screen appears. Press the [SUB PAD] button. Sampling begins when the selected pattern chain starts playing back. If you decide to cancel sampling, press the [EXIT] button.
- Page 111 Combining samples to create a pattern (PATTERN SEQUENCER) Recording effect operations to a pattern (EFX MOTION REC) Here’s how to record your effect on/off and effect parameter ([CTRL 1]–[CTRL 3] knob) operations to a pattern in real time. Press the [PATTERN SELECT] button. Pads to which patterns are assigned light up purple.
- Page 112 Combining samples to create a pattern (PATTERN SEQUENCER) Deleting effect operations recorded in a pattern (EFX MOTION ERASE) Here’s how to delete effect operations that you recorded using the steps shown in “Recording effect operations to a pattern (EFX MOTION REC) (p. 111)”...
- Page 113 Combining samples to create a pattern (PATTERN SEQUENCER) Deleting specific effect operations from a pattern This shows how to delete specific effect operations that you recorded using the steps shown in “Recording effect operations to a pattern (EFX MOTION REC) (p. 111)”...
- Page 114 Combining samples to create a pattern (PATTERN SEQUENCER) Recording pad mute operations to a pattern (PAD MUTE MOTION REC) Here’s how to record the pad mute on/off operations to a pattern in real time. Press the [PATTERN SELECT] button. Pads to which patterns are assigned light up purple. Press pads [1]–[16] to select the pattern to which you want to record the pad mute operations.
- Page 115 Combining samples to create a pattern (PATTERN SEQUENCER) Deleting pad mute operations recorded in a pattern (PAD MUTE MOTION ERASE) Here’s how to delete pad mute operations that you recorded using the steps shown in “Recording effect operations to a pattern (EFX MOTION REC) 111)”...
- Page 116 Combining samples to create a pattern (PATTERN SEQUENCER) Deleting specific pad mute operations from a pattern This shows how to delete specific pad mute operations that you recorded using the steps shown in “Recording pad mute operations to a pattern (PAD MUTE MOTION REC) (p.
- Page 117 Combining samples to create a pattern (PATTERN SEQUENCER) Recording a roll in the pattern You can record notes into a pattern that simulate the sound of playing a roll. Follow steps 1–5 in “Creating a new pattern (real-time recording) (p. 94)”...
- Page 118 Combining samples to create a pattern (PATTERN SEQUENCER) Editing a pattern (PATTERN EDIT) You can change the length of a pattern or change the range within which it plays back. You can also copy and chain patterns, and delete unwanted sections of a pattern. Press the [PATTERN SELECT] button.
- Page 119 Combining samples to create a pattern (PATTERN SEQUENCER) Copying and connecting patterns (DUPLICATE) This shows how to copy a pattern and connect it to the current pattern. By doing this, the overall pattern becomes twice as long. Press the [PATTERN SELECT] button. Press the [PATTERN EDIT] button.
- Page 120 Combining samples to create a pattern (PATTERN SEQUENCER) Cropping unnecessary sections from a pattern (CROP) This deletes all the sections from a pattern except for the range you select. Press the [PATTERN SELECT] button. Press the [PATTERN EDIT] button. Press pads [1]–[16] to select the pattern you want to edit. The pattern edit screen appears.
- Page 121 Combining samples to create a pattern (PATTERN SEQUENCER) Aligning the playback timing of samples inputted to a pattern (QUANTIZE) You can quantize the notes of a pattern that you’ve inputted in real time. This lets you correct patterns in which the beginning of the sample playback is out of time with the beat of the song. Press the [PATTERN SELECT] button.
- Page 122 Combining samples to create a pattern (PATTERN SEQUENCER) Controller Parameter Value Explanation [CTRL 3] knob 0–100 (%) Sets the strength of quantization used for adjusting the note timing, as set in the QTZ parameter. If you’ve selected “GRID” for the QTZ parameter, a setting of 100% corrects the note timing to match the timing set in the QTZ...
- Page 123 Combining samples to create a pattern (PATTERN SEQUENCER) Organizing the pattern data This section explains the functions for making effective use of the patterns.
- Page 124 Combining samples to create a pattern (PATTERN SEQUENCER) Exchanging (swapping) patterns between pads Here’s how to exchange (swap) the patterns that are assigned to two different pads. MEMO You can’t perform the following operations while a pattern is playing back. Stop the pattern before performing the operation. Hold down the [SHIFT] button and press the pad [5].
- Page 125 Combining samples to create a pattern (PATTERN SEQUENCER) Copying the pattern of a pad Here’s how to copy the pattern that’s assigned to a pad to a different pad. Press the [COPY] button. The COPY screen appears. Press the pads in order, first the pattern (pad) you want to copy and then the copy destination pattern (pad). If you decide to cancel copying, press the [EXIT] button.
- Page 126 Combining samples to create a pattern (PATTERN SEQUENCER) Extracting specific samples (pads) from a pattern You can create a pattern using only specific samples that were taken from a pattern that you’ve inputted using multiple samples. Following the steps in “Copying the pattern of a pad (p.
- Page 127 Combining samples to create a pattern (PATTERN SEQUENCER) Copying all patterns in a bank to another bank This is how to copy all the patterns in a bank to another bank. MEMO You can’t perform the following operations while a pattern is playing back. Stop the pattern before performing the operation. Hold down the [COPY] button and press the [EXIT] button.
- Page 128 Combining samples to create a pattern (PATTERN SEQUENCER) Protecting a pattern (PROTECT) This function prevents the samples and patterns assigned to a pad from being copied, overwritten by editing or accidentally deleted. Protection is set on a bank by bank basis. Protection is set for both samples and patterns. Press the bank [A/F]–[E/J] buttons to select the banks to protect.
- Page 129 Combining samples to create a pattern (PATTERN SEQUENCER) Deleting the pattern from a pad Here’s how to delete the pattern assigned to a pad. MEMO You can’t perform the following operations while a pattern is playing back. Stop the pattern before performing the operation. Press the [DEL] button.
- Page 130 Setting the tempo You can set the tempo data for samples and patterns. This tempo data can be used to change the sample playback speed and pitch, so that you can play in tempo with other songs. Here we explain about the different tempo data used by this unit. Project tempo Project tempo Project 16...
- Page 131 100-199, 80-159, 70-139, 50-99 A method of detecting the tempo that’s unique to the SP-404MK2. This analyzes the frequency characteristics over the entire sample to detect the tempo. This specifies the value as the estimated tempo of the sample.
- Page 132 Setting the tempo Press pads [1]–[16] to select the sample you want to edit. Turn the [VALUE] knob to change BPM SET to “MANU,” and press the [VALUE] knob. Use the “MANU” setting to set the tempo in the 0.1 decimal range and the “MANU-F” setting to set the tempo in the 0.01 decimal range. Use the [VALUE] knob to select the BPM, and press the [VALUE] knob.
- Page 133 Setting the tempo Setting the tempo for a bank or project By setting a tempo (BPM) for a bank, the same tempo is used for all patterns within the same bank or project during playback. The tempo you set becomes the base tempo when playing back samples using BPM SYNC. Hold down the [SHIFT] button and press the pad [11].
- Page 134 Setting the tempo Setting the tempo in time with the rhythm (Tap Tempo) This feature lets you set the tempo in an intuitive way by tapping the pad in time, as if you were clapping out the beat (Tap Tempo). This is useful function when you want to play in time with other instruments or to the rhythm of a song.
- Page 135 Mixing the samples (DJ MODE) You can assign two samples to CH1 and CH2 and mix them freely. Press the bank [D/I] button and the [E/J] button simultaneously. The unit enters DJ MIXER mode. Select the samples to respectively assign to CH1 and CH2. Press the [VALUE] knob.
- Page 136 Mixing the samples (DJ MODE) Controller Parameter Operation CH1: Pad [13] Switches between play/pause. ñ CH2: Pad [15] CH1: Pad [9] Returns to the playback start position. õ CH2: Pad [11] CH1: Pad [14] Sends the sample audio to CUE. CH2: Pad [16] →...
- Page 137 Mixing the samples (DJ MODE) Controller Parameter Operation [BPM SYNC] button Selects the channel (CH1/CH2) used to control reverse playback ([REVERSE] button). [REVERSE] button REVERSE Starts reverse playback immediately from the playback position of the current sample. When playing back in reverse, this works the same as when the “Reverse Type (p.
- Page 138 Mixing the samples (DJ MODE) Playing back samples while in DJ mode (PAD MODE) In this mode (pad mode), you can temporarily change the pad arrangement to the same arrangement used in sample mode, while still retaining the same functions of DJ mode. Pad mode lets you play back samples by pressing pads while you perform in DJ mode.
- Page 139 Mixing the samples (DJ MODE) Playing back patterns while in DJ mode In DJ mode, you can play back the patterns that you created. Press the [PATTERN SELECT] button. Press pads [1]–[16] to select a pattern to play back. Press the [PATTERN SELECT] button. Press the [PATTERN EDIT] button.
- Page 140 Mixing the samples (DJ MODE) Playing back a sample from the marker position You can play back a sample from the position of the marker that’s set for that sample. Press pad [13] or [15]. The corresponding samples play back. Hold down the [SHIFT] button and press pads [1]–[16].
- Page 141 Mixing the samples (DJ MODE) Adding a marker while playing back a sample You can add markers while playing samples in DJ mode. Play back a sample. Hold down the [SHIFT] button and press the [MARK] button at the position where you want to add a marker. This adds a marker to the sample.
- Page 142 Mixing the samples (DJ MODE) Editing a marker while playing back a sample You can edit markers while playing samples in DJ mode. Press pad [13] or [15]. The corresponding samples play back. Hold down the [SHIFT] button and press the [START/END] button. The marker edit screen appears.
- Page 143 Mixing the samples (DJ MODE) Deleting all set markers from a sample While in DJ mode, you can delete the markers you’ve set for samples. Hold down the [SHIFT] and [DEL] buttons, and press pads [1]–[16]. Select the marker to delete. The relationship between the markers to delete and the pads are as follows.
- Page 144 Mixing the samples (DJ MODE) Editing a sample in DJ mode You can edit the samples that are used in DJ mode. Press the [VALUE] knob. A menu appears. Use the [VALUE] knob to select “CH1 EDIT” or “CH2 EDIT,” and press the [VALUE] knob. The sample edit screen appears.
- Page 145 Mixing the samples (DJ MODE) Importing samples that were saved in DJ mode to an SD card You can import samples that were saved in DJ mode to an SD card. Press the bank [D/I] button and the [E/J] button simultaneously to enter DJ MIXER mode. Press the [VALUE] knob.
- Page 146 Monitoring with headphones (CUE) Adjusts the balance of the audio output from the PHONES jack. When the sample audio is sent to CUE, the audio is only output from the PHONES jack (and is not output to the LINE OUT jack or USB port). When playing live or in similar situations, only the player can preview (check) the sample’s sound in headphones.
- Page 147 You can connect your electronic musical instrument, mic or guitar to the SP-404MK2 for audio input. Connect an electronic musical instrument to the LINE IN jack(s) on the rear panel. When using a mic or guitar, plug them into the INPUT jack on the front panel.
- Page 148 Inputting audio from a computer or mobile device (USB AUDIO) The SP-404MK2 can receive audio input from a computer or mobile device (such as a smartphone or tablet). Configuring the OS audio settings You must make the appropriate settings on your computer when inputting audio from a computer to the SP-404MK2.
- Page 149 Selecting a project Here’s how to recall a project (1–16). Once a project is recalled, the unit is ready to play back samples and create patterns. Hold down the [SHIFT] button and press the [SUB PAD] button. The SELECT PROJECT screen appears. Press pads [1]–[16] to select a project you want to recall.
- Page 150 Directly loading project files saved to an SD card You can directly select project files that were saved to an SD card. By using this feature, there is no need to import files into the internal storage of the SP-404MK2. NOTE ¹...
- Page 151 Organizing projects On this unit, you can copy projects and delete projects you no longer need.
- Page 152 Organizing projects Copying a project Here’s how to copy a project. Hold down the [SHIFT] button and press the [SUB PAD] button. The SELECT PROJECT screen appears. Press the [COPY] button. The COPY PROJECT screen appears. Press the pads in order, beginning with the pad you want to copy (project), and then the copy destination pad. If you decide to cancel copying, press the [EXIT] button.
- Page 153 Organizing projects Deleting a project Here’s how to delete projects you don’t need. Hold down the [SHIFT] button and press the [SUB PAD] button. The SELECT PROJECT screen appears. Press the [DEL] button. The project deletion screen appears. Press pads [1]–[16] to select the project to delete. If you decide to cancel deleting, press the [EXIT] button.
- Page 154 Customizing this unit You can customize the design of this unit to match your tastes.
- Page 155 Customizing this unit Attaching/removing the faceplate of this unit You can remove the faceplate of this unit to customize the top panel. NOTE ¹ Make sure you don’t cut your fingers on the edges when removing or attaching the faceplate. ¹...
- Page 156 Customizing this unit Customizing the opening screen You can use your own custom images for the opening screen. Two opening images can be registered per project. Steps for setting your custom image data as the opening image You must perform the following operations (summarized) to use your custom image data as the opening image. Create your custom image (Preparing a screen saver image (p.
- Page 157 Customizing this unit Preparing an opening image Create your custom image in the format shown below. Format Specifications Image file format Size 128 (x) × 64 (y) pixels Color depth 1-bit, 4-bit, 8-bit, 24-bit * Note that only monochromatic images can be displayed. Intermediate colors cannot be displayed. Filename and extension startup_*.bmp Substitute a number (1–2) for the asterisk.
- Page 158 Customizing this unit Saving an opening image to a project Here’s how to save your custom image to a project. As an example, the following shows how to change the opening image of project 01 to your own custom image. Export the project for which you want to change the opening image (project 01 in this example) to an SD card (“Exporting a project (EXPORT PROJECT) (p.
- Page 159 Customizing this unit Customizing the screen saver You can set your own custom image as the screen saver image. A maximum of 16 screen saver images can be registered per project. Steps for using your custom images as the screen saver You must perform the following operations (summarized) to use your custom images as the screen saver.
- Page 160 Customizing this unit Preparing a screen saver image Create your custom image in the format shown below. Format Specifications Image file format Size 128 (x) × 64 (y) pixels Color depth 1-bit, 4-bit, 8-bit, 24-bit * Note that only monochromatic images can be displayed. Intermediate colors cannot be displayed. Filename and extension screen_saver_*.bmp Substitute a number (1–16) for the asterisk.
- Page 161 Customizing this unit Enabling a custom screen saver This shows how you can load a custom image as a screen saver (the “Screen Saver Type” parameter). Hold down the [SHIFT] button and press the pad [13]. The UTILITY MENU screen appears. Use the [VALUE] knob to select “SYSTEM”, and press the [VALUE] knob.
- Page 162 Customizing this unit Saving the screen saver image to a project Here’s how to save your custom image to a project. As an example, the following shows how to edit the custom image for the screen saver of project 01. Prepare the image to use for the screen saver, and edit the settings to use a custom screen saver (“Preparing a screen saver image (p.
- Page 163 Configuring the various settings (UTILITY) This menu lets you edit the parameters and view information related to the overall unit. SYSTEM SCREEN PAD SETTING SCREEN EFX SETTING SCREEN FACTORY RESET FUNCTION BACKUP/RESTORE FUNCTION IMPORT/EXPORT FUNCTION...
- Page 164 Configuring the various settings (UTILITY) Editing the settings related to this unit (System) Here’s how to configure the overall settings for this unit. Hold down the [SHIFT] button and press the pad [13]. The UTILITY MENU screen appears. Use the [VALUE] knob to select “SYSTEM”, and press the [VALUE] knob. The system setting screen appears.
- Page 165 Configuring the various settings (UTILITY) Configuring the pad-related settings (PAD SET) The pad setting screen lets you configure various pad-related settings. Hold down the [SHIFT] button and press the pad [13]. The UTILITY MENU screen appears. Use the [VALUE] knob to select “PAD SET”, and press the [VALUE] knob. The pad setting screen appears.
- Page 166 Configuring the various settings (UTILITY) Configuring the effect settings (EFX SET) This shows how to edit the routing (connection order) for the effects built into this unit, and how to configure the effects to use. Hold down the [SHIFT] button and press the pad [13]. The UTILITY MENU screen appears.
- Page 167 Configuring the various settings (UTILITY) Configuring the effect routing This shows how to edit the routing (connection order) for the effects built into this unit. Hold down the [SHIFT] button and press the pad [13]. The UTILITY MENU screen appears. Use the [VALUE] knob to select “EFX SET”...
- Page 168 Configuring the various settings (UTILITY) Adding effects to the overall sound (BUS 3, BUS 4) Here’s how to apply effects to the overall sound output from this unit. Hold down the [SHIFT] button and press the pad [13]. The UTILITY MENU screen appears. Use the [VALUE] knob to select “EFX SET”...
- Page 169 Configuring the various settings (UTILITY) Changing the effects assigned to BUS 3 and BUS 4 Changes the type of effects to apply to the overall sound. MEMO Refer to “Adding effects to a sample (BUS FX) (p. 47)” to change the type of effects (BUS 1, BUS 2) that are applied to the samples. Hold down the [SHIFT] button and press the pad [13].
- Page 170 Configuring the various settings (UTILITY) MEMO Press the [BUS FX] button while holding down the [VALUE] knob to temporarily bypass the BUS 3 and BUS 4 effects.
- Page 171 Configuring the various settings (UTILITY) Editing the effects for BUS 3 and BUS 4 Here’s how to edit the effects (BUS 3, BUS 4) applied to the overall sound. MEMO “Editing the effects (p. 51)” for how to edit the effects (BUS 1, BUS 2) applied to a sample. Hold down the [SHIFT] button and press the pad [13].
- Page 172 Configuring the various settings (UTILITY) Assigning the desired effect to an effect button (DIRECT FX) You can assign the effects you like to the effect buttons on the top panel. Hold down the [SHIFT] button and press the pad [13]. The UTILITY MENU screen appears.
- Page 173 Configuring the various settings (UTILITY) Use the [VALUE] knob to select the effect, and press the [VALUE] knob. The effect is assigned to the effect button you selected. After this, you can use the effect buttons on the top panel to switch the assigned effects on/off.
- Page 174 Configuring the various settings (UTILITY) Configuring the input effects (INPUT FX) The INPUT FX (input effects) are effects used only for the input jacks. You can apply effects to the audio that’s inputted to this unit. MEMO These are the same parameters as the “INPUT FX parameters”, which are used for sampling and resampling. Hold down the [SHIFT] button and press the pad [13].
- Page 175 Configuring the various settings (UTILITY) To finish making settings, press the [EXIT] button.
- Page 176 Configuring the various settings (UTILITY) Sending the audio input from the INPUT jack to a bus You can set the bus to which the playback audio signals coming into the INPUT jack are sent (meaning which effects are used). Hold down the [SHIFT] button and press the pad [13]. The UTILITY MENU screen appears.
- Page 177 Configuring the various settings (UTILITY) Editing a filename (RENAME) You can edit the filenames for samples and projects. Hold down the [REMAIN] button and turn the [VALUE] knob to select “PROJECT” or “NAME”. Press the [VALUE] knob. The name edit screen appears. Controller Operation [VALUE] knob (turn)
- Page 178 Configuring the various settings (UTILITY) Importing/exporting (using the SD card) Using a SD card lets you import the samples you like into the SP-404MK2, or exchange patterns and other data between different SP-404MK2 units. MEMO ¹ You can perform other operations while samples are being imported/exported. An indicator appears in the display while this operation is in progress.
- Page 179 Configuring the various settings (UTILITY) Importing samples (IMPORT SAMPLE) You can import commercially available audio material or audio material created on your computer from an SD card. Using your computer or similar device, save the samples you wish to import to the “IMPORT” folder on the SD card (Importing/exporting (using the SD card) (p.
- Page 180 Configuring the various settings (UTILITY) Use the [VALUE] knob to select the sample to import, and press the [VALUE] knob. The samples are imported and assigned to the selected pads. MEMO ¹ You can preview the samples when you turn the [VALUE] knob to select a sample (this is the automatic preview function). You can also preview the sample by pressing the [SUB PAD] button.
- Page 181 Exporting samples (EXPORT SAMPLE) You can export the samples to an SD card to use on your computer or on a different SP-404MK2. Insert the SD card to which the samples are to be exported into the SD card slot of this unit.
- Page 182 Configuring the various settings (UTILITY) NOTE Never turn off the power or remove the SD card while the screen indicates “Working...”.
- Page 183 Configuring the various settings (UTILITY) Importing a project (IMPORT PROJECT) You can import a project into this unit that was created on a different SP-404MK2 and exported to an SD card. Follow the steps in “Exporting a project (EXPORT PROJECT) (p.
- Page 184 Configuring the various settings (UTILITY) Pad status Explanation Unlit (dark orange) Project number that already contains a project Blinking yellow Project number for which a project hasn’t been created (empty project) Blinking red Project number to which the imported project is saved Lit red Project number to which the imported project is saved (if a project already exists at that project number, it is overwritten with the newly imported project)
- Page 185 You can use an SD card to import projects into this unit that were created on a SP-404SX/SP-404A. Using an SD card that was formatted on the SP-404MK2 Save the “SP-404SX” project folder that was created on the SP-404SX/SP-404A to the “IMPORT” folder of the SD card.
- Page 186 Exporting a project (EXPORT PROJECT) You can export projects to an SD card if you want to use them on another SP-404MK2. Insert the SD card to which the samples are to be exported into the SD card slot of this unit.
- Page 187 Configuring the various settings (UTILITY) NOTE Never turn off the power or remove the SD card while the screen indicates “Working...”.
- Page 188 Configuring the various settings (UTILITY) Converting a phrase recorded in a pattern to audio for individual pads (MULTIPAD EXPORT) You can convert phrases that are recorded in a pattern to audio for individual pads (MULTIPAD EXPORT). Hold down the [SHIFT] button and press the pad [14]. The IMPORT/EXPORT MENU screen appears.
- Page 189 Backing up your data (BACKUP) By backing up the data on this unit, you can transfer your data to another SP-404MK2 or restore your data in the event that something happens to You can save up to 64 sets of backup data to a single SD card (note that this depends on the SD card’s capacity).
- Page 190 Configuring the various settings (UTILITY) Restoring from backup data (RESTORE) You can use the backup data that you created with the backup function to restore the data to the SP-404MK2. NOTE Note that once you restore data on this unit from the backup data, all data that was saved on this unit is erased (overwritten).
- Page 191 Configuring the various settings (UTILITY) Formatting an SD card To use an SD card with this unit, you must first format (initialize) it on the unit. Insert the SD card into the SD card slot. Hold down the [SHIFT] button and press the pad [14]. The IMPORT/EXPORT MENU screen appears.
- Page 192 Configuring the various settings (UTILITY) Restoring the factory settings (FACTORY RESET) This operation restores the sample and pattern data as well as the system settings saved on this unit to their factory defaults. NOTE Doing this causes all data saved on this unit to be lost. To save the data of this unit, use the backup function to make a backup (Backing up your data (BACKUP) (p.
- Page 193 Appendix...
- Page 194 Appendix Parameter guide...
- Page 195 Appendix SYSTEM GENERAL Parameter Value Explanation Edit Knob Mode This sets how the values change when you move the knobs. Catch When you move a knob, control data is only outputted when the position of the knob reaches or “catches up” to the value of its internal parameter. * In “Mixing the samples (DJ MODE) (p.
- Page 196 Appendix Parameter Value Explanation PTN Change Mode This sets how the samples play back when switching between patterns during pattern playback. MKII Sample playback stops when the pattern changes. Sample playback continues when the pattern changes. Pop-up Time Normal, Short, OFF Sets how long the popup screens are displayed.
- Page 197 Appendix CLICK Parameter Value Explanation Output Assign OFF, ON When this is set to ON, the metronome sound is output from the LINE OUT jacks and from the USB port. Click Level 1–5 Sets the volume of the metronome. Metronome:REC OFF, ON When this is ON, the metronome sound is output while you are sampling or resampling.
- Page 198 Appendix Parameter Value Explanation Bend SYNC(DJ) This sets how the MIDI clock output from this unit changes when you press the [BEND-] or [BEND+] pads to change the playback speed of this unit. MIDI clocks are output at a fixed rate. MIDI clocks outputted from this unit are synchronized with this unit’s playback speed.
- Page 199 Appendix Parameter Value Explanation Anti Feedback OFF, ON When this is “ON”, the anti-feedback function is enabled for the mic input. This helps prevent mic feedback. VERSION Displays the version of this unit.
- Page 200 Appendix PAD SETTING TRIGGER Parameter Value Explanation Curve Type Sets how the volume changes according to how hard you strike a pad. This is the standard setting. This produces the most natural balance between playing dynamics and volume change. Compared to “Lin”, playing strongly produces a greater change in volume. Compared to “Lin”, playing softly produces a greater change in volume.
- Page 201 Appendix BUS COLOR Parameter Value Explanation BUS1 Color Default, 1–127, White Changes the pad color for each bus through which sample audio is sent. This can be set for BUS 1, BUS 2 and DRY respectively. BUS2 Color This is enabled when Pad LED Mode is “BUS”. DRY Color * Hold down the [SHIFT] button and turn the [VALUE] knob to change the value in steps of 10.
- Page 202 Appendix EFX SETTING FAVORITE Parameter Value Explanation Routing TYPE A, TYPE B Selects the routing (connection) of the bus to which effects are assigned. “Configuring the effect routing (p. 167)” FAVORITE Bypass, 1–16 Selects the combination of effects assigned to BUS 3 and BUS 4. “Changing the effects assigned to BUS 3 and BUS 4 (p.
- Page 203 Appendix Parameter Value Explanation Mute Bus This individually selects the bus to mute with Mute Bus. Both BUS 1 and BUS 2 are muted. Only the bus selected with the [BUS FX] button is muted. Input FX Bypass, Auto Pitch (*), Vocoder (*), Harmony (*), Gt Amp Sim (*), Chorus, JUNO You can apply effects to the audio Chorus, Reverb, TimeCtrlDly, Chromatic PS, Downer, WrmSaturator, 303 that’s inputted to this unit.
- Page 204 Appendix MFX List...
- Page 205 Appendix Filter+Drive This is a filter with overdrive. It cuts the specified frequencies and adds distortion. Parameter Value Explanation CUTOFF 20–16000 (Hz) Sets the cutoff frequency range in which the filter works. RESONANCE 0–100 Adjusts the filter’s resonance level. The larger the value, the more that the frequency range set in CUTOFF is emphasized. DRIVE 0–100 Adds distortion.
- Page 206 Appendix Resonator This effect uses “Karplus-Strong synthesis”, which is often used in physical modeling of sounds. This lets you alter the sound with a maximum of six “resonators” that match different keys or chords. Parameter Value Explanation ROOT C-1–G9 Sets the reference pitch (root note). BRIGHT 0–100 Adjusts the tonal brightness.
- Page 207 Appendix Sync Delay Gives an echo effect in sync with the tempo. Parameter Value Explanation TIME 1/32, 1/16T, 1/32D, 1/16, 1/8T, 1/16D, 1/8, 1/4T, 1/8D, 1/4, 1/2T, 1/4D, 1/2, Sets the sound delay time. 1/1T, 1/2D, 1/1 FEEDBACK 0–99 (%) Adjusts the amount of feedback for the effect.
- Page 208 Appendix Isolator This effect lets you cut off sounds in a specified frequency range. Parameter Value Explanation -INF, -41.87–+12 (dB) Adjusts the amount of boost/cut in the low-frequency range. -INF, -41.87–+12 (dB) Adjusts the amount of boost/cut in the mid-frequency range.
- Page 209 Appendix DJFX Looper This effect loops the sound in short cycles. You can vary the playback direction and playback speed of the input sound to get a turntable-type effect. Parameter Value Explanation LENGTH 0.230–0.012 (sec) Sets the length of the loop. SPEED -100–100 Sets the playback direction and playback speed.
- Page 210 Appendix Scatter This effect swaps the sound played back by a loop in steps, altering its playback direction and gate length. This gives you the loop playback a digital groove feeling. Parameter Value Explanation TYPE 1–10 Sets the scatter type. DEPTH 10, 20, 30, 40, 50, 60, 70, 80, 90, 100 Adjusts the scatter depth.
- Page 211 Appendix Downer Cyclically slows down the audio playback speed. Parameter Value Explanation DEPTH 0–100 Sets how much the playback speed should be slowed down. RATE 2/1, 1/1, 1/2, 1/4, 1/8, 1/16, 1/32 Sets the period at which the playback speed is changed. FILTER 0–100 Attenuates the high-frequency range.
- Page 212 Appendix Ha-Dou This effect generates a wave-like sound based on the input audio. Parameter Value Explanation MOD DEPTH 0–100 Adjusts the depth of the effect sound. TIME 0–100 Sets the length of the effect sound. LEVEL 0–100 Adjusts the volume of the effect sound.
- Page 213 Appendix Ko-Da-Ma This creates a reverberating audio effect. Parameter Value Explanation TIME 1/32, 1/16T, 1/32D, 1/16, 1/8T, 1/16D, 1/8, 1/4T, 1/8D, 1/4, 1/2T, 1/4D, 1/2, 1/1T, Sets how much the effect sound is 1/2D, 1/1 delayed. FEEDBACK 0–99 (%) Adjusts how much the effect sound is repeated.
- Page 214 Appendix Zan-Zou For left and right sounds, this effect applies delay to the negative phase of the sound. This gives the lingering effect of a sonic “afterimage”. The effect works for stereo sound, and does not have any effect on mono sound. Parameter Value Explanation...
- Page 215 Appendix To-Gu-Ro This gives the sound an undulating effect, based on the image of a coiled-up snake. Parameter Value Explanation DEPTH 0–100 Adjusts how much the playback speed should be slowed down. RATE 0–100 (when the SYNC parameter is OFF) Sets the period at which the playback speed is lowered.
- Page 216 Appendix A sideband filter that lets specific frequency components pass through. Parameter Value Explanation INTERVAL 0–100 Sets the band interval. Larger values produce wider band intervals, and the frequency of each band increases. WIDTH 0–100 Sets the bandwidth. Larger values produce a narrower bandwidth, which further isolates the specific frequency components that pass through the filter.
- Page 217 Appendix Stopper This effect lowers the sample playback speed, reproducing the sound of a turntable stopping. Parameter Value Explanation DEPTH 0–100 Adjusts how much the playback speed should be slowed down. RATE 4/1, 2/1, 1/1, 1/2, 1/4, 1/8, 1/16, Sets the period at which the playback speed is changed. 1/32, 1/64 RESONANCE 0–100...
- Page 218 Appendix Tape Echo This is a virtual tape echo effect that gives a realistic tape delay sound. The effect simulates the tape echo section of a Roland RE-201 Space Echo. Parameter Value Explanation TIME 10–800 (msec) Sets the tape speed.
- Page 219 Appendix TimeCtrlDly This is a delay in which the delay time can be varied smoothly. Parameter Value Explanation TIME 0–100 (msec) (when the SYNC parameter is OFF) Sets the sound delay time. 1/32, 1/16T, 1/32D, 1/16, 1/8T, 1/16D, 1/8, 1/4T, 1/8D, 1/4, 1/2T, 1/4D, 1/2, 1/1T, 1/2D, 1/1 (when the SYNC parameter is ON) FEEDBACK 0–99 (%)
- Page 220 Appendix Super Filter This is a filter with an extremely sharp slope (attenuation characteristics). The cutoff frequency can be varied cyclically. Parameter Value Explanation CUTOFF 0–100 Sets the frequency range in which the filter works (the cutoff frequency). Higher values increase the frequency range. RESONANCE 0–100 Adjusts the filter’s resonance level.
- Page 221 Appendix WrmSaturator This is a saturator effect with a characteristic warm sound. NOTE This effect may output a very loud sound, depending on how the parameters are set. Use caution not to raise the values too much. Parameter Value Explanation DRIVE 0–48 (dB) Adjusts the strength of the distortion.
- Page 222 Appendix 303 VinylSim This effect models the Vinyl Sim effect of the SP-303. The effect simulates the sound of an analog record playing. Parameter Value Explanation COMP 0–100 Sets the compression feel, a unique part of the analog record’s sound. NOISE 0–100 Adjusts the volume of the noise.
- Page 223 Appendix 404 VinylSim This effect models the Vinyl Sim effect of the SP-404SX. The effect simulates the sound of an analog record playing. Parameter Value Explanation FREQUENCY 0–100 Sets the frequency characteristics of the playback system. NOISE 0–100 Adjusts the volume of the noise. WOW FLUT 0–100 Sets the inconsistencies (wow/flutter) heard when the analog record...
- Page 224 Appendix Cassette Sim This effect simulates the sound of a cassette tape playing. Parameter Value Explanation TONE 0–100 Sets the tone. HISS 0–100 Adjusts the volume of the noise. 0–60 (years) Sets how many years the cassette tape has deteriorated. DRIVE 0–100 Adjusts the amount of distortion.
- Page 225 Appendix Lo-fi Degrades the tonal character. Parameter Value Explanation PRE FILT 1–6 Sets the type of pre-filter (the filter that the sound passes through before effects are applied). LOFI TYPE 1–9 Larger settings cause more tonal degradation. TONE -100–100 Sets the tone. Larger settings emphasize the high-frequency range.
- Page 226 Appendix Reverb This adds reverberation to the sound. Parameter Value Explanation TYPE AMBI, ROOM, HALL1, HALL2 Sets the type of reverb. TIME 0–100 Sets the reverb time. LEVEL 0–100 Adjusts the volume of the effect sound. LOW CUT FLAT, 20–800 (Hz) Sets the frequency range at which the effect sound is attenuated.
- Page 227 Appendix Chorus Adds spaciousness and richness to the sound. Parameter Value Explanation DEPTH 0–100 Sets the depth of the effect sound. RATE 0.33–2.30 (sec) Sets the cycle (period) of the effect sound. BALANCE 100-0–0-100 (%) Adjusts the volume balance between the dry (original) sound and effect sound. EQ LOW -15–15 (dB) Adjusts the amount of boost/cut of the low-frequency range.
- Page 228 Appendix JUNO Chorus This effect models the chorus section of the Roland JUNO-106 and JX series. Parameter Value Explanation MODE JUNO 1, JUNO 2, JUNO12, JX-1 1, JX-1 2 Sets the type of effect. NOISE 0–100 Adjusts the volume of noise generated by the effect.
- Page 229 Appendix Flanger This effect creates modulation like a jet airplane taking off and landing. Parameter Value Explanation DEPTH 0–100 Sets the depth of the effect sound. RATE 0–100 (when the SYNC parameter is OFF) Sets the cycle (period) of the effect sound. 4.000–0.016 (bar;...
- Page 230 Appendix Phaser This effect creates modulation by adding a phase-shifted sound. Parameter Value Explanation DEPTH 0–100 Sets the depth of the effect sound. RATE 0–100 (when the SYNC parameter is OFF) Sets the cycle (period) of the effect sound. 4.000–0.016 (bar; when the SYNC parameter is ON) MANUAL 0–100 Sets the frequency range in which the effect is applied.
- Page 231 Appendix This effect gives a wah-wah sound, by cyclically changing the tone. Parameter Value Explanation PEAK 0–100 Larger values narrow the frequency range at which the effect is applied. RATE 0–100 (when the SYNC parameter is OFF) Sets the cycle (period) of the effect. 1.000–0.010 (bar;...
- Page 232 Appendix Slicer This slices the sound up into small pieces, creating the impression that a backing phrase is being played. This slices up the sound at certain intervals into 16 parts (16 steps), breaking the sound into a rhythm that follows the sequence pattern (a pattern used for slicing up the sound).
- Page 233 Appendix Tremolo/Pan Cyclically varies the volume or panning. Parameter Value Explanation DEPTH 0–100 Sets the depth of the effect. RATE 0–100 (when the SYNC parameter is OFF) Sets the cycle (period) of the effect. 1.000–0.010 (when the SYNC parameter is ON) TYPE Sets the type of effect.
- Page 234 Appendix Chromatic PS A two-voice pitch shifter that changes the pitch in semitone steps. Parameter Value Explanation PITCH1, PITCH2 -24–12 (semi) Adjusts the amount that PITCH1 or PITCH2 is pitch-shifted. BALANCE 100-0–0-100 (%) Adjusts the volume balance between the dry (original) sound and effect sound.
- Page 235 Appendix Hyper-Reso This is a resonator effect that is adjusted to make creating melodies and bass lines easier. Parameter Value Explanation NOTE -17– -1, 1–18 Sets which note in the chromatic scale should resonate, counting from the root of the SCALE value. SPREAD UNISON, TINY, SMALL, MEDIUM, HUGE Sets the octave of the resonator.
- Page 236 Appendix Ring Mod This effect alters the tonal character to make the sound more metallic. Parameter Value Explanation FREQUENCY 0–100 Sets the frequency range to which the effect is applied. SENS 0–100 Adjusts the volume of the effect sound. BALANCE 100-0–0-100 (%) Adjusts the volume balance between the dry (original) sound and effect sound.
- Page 237 Appendix Crusher Produces a lo-fi effect. Parameter Value Explanation FILTER 331–15392 (Hz) Sets the frequency range in which the pre-filter (the filter that the sound passes through before effects are applied) works. RATE 0–100 Sets the sample rate of the effect. Larger values make the sample rate lower, for a more lo-fi sound.
- Page 238 Appendix Overdrive Mildly distorts the sound. Parameter Value Explanation DRIVE 0–100 Adjusts the amount of distortion. TONE -100–100 Sets the tone. Larger settings emphasize the high-frequency range. Smaller settings emphasize the low-frequency range. BALANCE 100-0–0-100 (%) Adjusts the volume balance between the dry (original) sound and effect sound. LEVEL 0–100 Adjusts the volume of the effect sound.
- Page 239 Appendix Distortion Intensely distorts the sound. Parameter Value Explanation DRIVE 0–100 Adjusts the amount of distortion. TONE -100–100 Sets the tone. Larger settings emphasize the high-frequency range. Smaller settings emphasize the low-frequency range. BALANCE 100-0–0-100 (%) Adjusts the volume balance between the dry (original) sound and effect sound. LEVEL 0–100 Adjusts the volume of the effect sound.
- Page 240 Appendix Equalizer This is a three-band equalizer. Parameter Value Explanation LOW GAIN -15–15 (dB) Adjusts the amount of boost/cut of the low- frequency range. MID GAIN -15–15 (dB) Adjusts the amount of boost/cut of the mid- frequency range. HIGH GAIN -15–15 (dB) Adjusts the amount of boost/cut of the high-...
- Page 241 Appendix Compressor This effect reduces high volume levels while bringing up the level of quieter sounds, smoothing out any variations in overall volume. Parameter Value Explanation SUSTAIN 0–100 Sets how long the effect is applied to the decaying sound. ATTACK 0–100 Sets how long it takes to reduce the volume when a high input level is detected.
- Page 242 Appendix SX Reverb This adds reverberation to the sound. As with the SP-404SX, you can adjust the volume balance between the dry (original) sound and the effect sound with this effect. Parameter Value Explanation TIME 0–100 Sets the reverb time. TONE -100–100 Adjusts the tonal character of the reverb.
- Page 243 Appendix SX Delay Gives an echo effect in sync with the tempo. As with the SP-404SX, you can adjust the volume balance between the dry (original) sound and the effect sound with this effect. Parameter Value Explanation TIME 1/32, 1/16T, 1/32D, 1/16, 1/8T, 1/16D, 1/8, 1/4T, 1/8D, 1/4, 1/2T, 1/4D, Sets the sound delay time.
- Page 244 Appendix Cloud Delay Adds multiple delays to the dry sound, as well as reverberations for a thick “cloudy” effect. Parameter Value Explanation WINDOW 0–100 Adjusts the interval for the delayed sound. Larger settings produce a deeper reverberation. PITCH -12.0–+12.0 Adjusts the volume of the pitch shifter for the effect sound. BALANCE 100-0–0-100 (%) Adjusts the volume balance between the dry (original) sound and...
- Page 245 Appendix Back Spin This gives the effect of spinning a record backwards. Parameter Value Explanation LENGTH 1/1, 1/2, 1/4, 1/8, 1/16 Sets the length of the back spin. SPEED 0–100 Sets the speed of the back spin. BACK SW OFF, ON If you turn this ON while a sound is playing, the back spin plays for a length of time specified by the LENGTH parameter.
- Page 246 Appendix DJFX Delay This is a combination effect that uses both DJFX Looper (p. 209) TimeCtrlDly (p. 219). Parameter Value Explanation LENGTH 0.230–0.012 (sec) Sets the length of the loop. TIME 0–100 (msec) (when the SYNC parameter Sets the sound delay time. is OFF) 1/32, 1/16T, 1/32D, 1/16, 1/8T, 1/16D, 1/8, 1/4T, 1/8D, 1/4, 1/2T, 1/4D, 1/2, 1/1T, 1/2D,...
- Page 247 Appendix Auto Pitch Processes the human voice to create a variety of characters. * This is enabled with INPUT FX. Parameter Value Explanation PITCH -100–100 Sets the pitch of the voice. You can change the pitch up and down one octave.
- Page 248 Appendix Vocoder Changes the voice to a vocoder voice. * This is enabled with INPUT FX. Parameter Value Explanation NOTE -17– -1, 1–18 Sets which note in the chromatic scale should sound, counting from the root of the SCALE value. The scale and chord structure that is used depends on the SCALE and CHORD settings.
- Page 249 Appendix Harmony This effect adds a harmony to your voice. Parameter Value Explanation PITCH -100–100 Sets the pitch of the voice. You can change the pitch up and down one octave. FORMANT -100–100 Sets the formant of the voice. Lower settings give a more masculine vocal character, and higher settings give a more feminine vocal character.
- Page 250 * This is enabled with INPUT FX. Parameter Value Explanation AMP TYPE Selects the guitar amp type. Models the sound of a Roland JC-120. TWIN Models a Fender Twin Reverb. Models a lead guitar sound played using a MESA/Boogie combo amp. MATCH Models a Matchless D/C-30.
- Page 251 Appendix Control change messages and corresponding effects You can use a control change message (CC#83) to select the effects. The effects (selectable effects) corresponding to the respective CC#83 values are shown below. BUS1 (MIDI ch 1), BUS2 (MIDI ch 2) Value of CC#83 Effect name (OFF)
- Page 252 Appendix Value of CC#83 Effect name Compressor SX Reverb SX Delay Cloud Delay Back Spin DJFX Delay 43–127 – BUS3 (MIDI ch 3), BUS4 (MIDI ch 4) Value of CC#83 Effect name (OFF) 303 VinylSim 404 VinylSim Cassette Sim Lo-fi Downer Compressor Equalizer...
- Page 253 Appendix Value of CC#83 Effect name Slicer Tremolo/Pan To-Gu-Ro DJFX Looper Scatter SX Reverb SX Delay Cloud Delay DJFX Delay 41–127 – INPUT FX (MIDI ch 5) Value of CC#83 Effect name (OFF) Auto Pitch Vocoder Harmony Gt Amp Sim Chorus JUNO Chorus Reverb...
- Page 254 Appendix List of shortcut keys You can quickly recall a desired function or screen by pressing a button or pad while holding down the [SHIFT] button.
- Page 255 Appendix Shortcuts that use the [SHIFT] button While holding down the [SHIFT] button Function Explanation Pad [1] FIXED VELOCITY Sets the sample’s velocity so that it always plays back at 127 (the maximum). Pad [2] 16 VELOCITY Changes a sample’s velocity (volume) in steps when it plays back. Pad [3] Adjusts the balance of the audio you monitor via the PHONES jack.
- Page 256 Appendix While holding down the [SHIFT] button Function Explanation [REMAIN] button (at least three seconds) LIVE MODE Use this to disable buttons that are not used when playing live (sampling and edit-related buttons). [COPY] button BANK PROTECT This function prevents the samples and patterns assigned to a pad from being copied, overwritten by editing or accidentally deleted.
- Page 257 Appendix Shortcuts that use the [REMAIN] button While holding down the [REMAIN] button Function (explanation) Pads [1]–[16] Sets which sample playback audio is sent to which bus (meaning which effects are used) for each sample. Bank [A/F]–[E/J] buttons Sets the bus send destination for all samples in a bank. [MFX] button Makes the effect edit screen keep displaying.
- Page 258 Appendix Shortcuts that use the [VALUE] button While holding down the [VALUE] knob Function (explanation) Pads [1]–[16] Selects a sample (no sound is produced). Also, selects a pattern when [PATTERN SELECT] is lit (the pattern does not play back). [BUS FX] button Temporarily bypasses BUS 3 and BUS 4.
- Page 259 Appendix Shortcuts that use the [DEL] button While holding down the [DEL] button Function (explanation) [MARK] button Deletes the effect operations recorded using EFX MOTION REC from a pattern. * Enabled on the pattern edit screen [REVERSE] button Deletes the pad mute operations recorded using EFX MOTION REC from a pattern.
- Page 260 Appendix Shortcuts that use the [COPY] button While holding down the [COPY] button Function (explanation) Edits the following parameters on the pitch/speed Lets you simultaneously edit the parameters of samples that are registered to the settings screen same mute group. ¹...
- Page 261 Appendix Shortcuts that use the [MFX] button While holding down the [MFX] button Function (explanation) [DJFX LOOPER] button Displays the MFX LIST from #17 onwards. [ISOLATOR] button Displays the MFX LIST from #33 onwards.
- Page 262 Appendix Shortcuts used in DJ mode Operation Parameter Explanation [SHIFT] button + [REVERSE] button + pad MUTE Mutes the sample that’s playing back. [13] (CH1) [SHIFT] button + [REVERSE] button + pad [15] (CH2) [SHIFT] button + pads [1]–[16] – You can play back a sample from the position of the marker that’s set for that sample.
- Page 263 Appendix Shortcuts used in TR-REC Operation Explanation [DEL] button + [A/F] button Deletes the notes (for one measure) corresponding to the selected pad. [DEL] button + [B/G] button Deletes the notes (for one measure) corresponding to all pads. [ROLL] button + [CTRL 1] knob You can record the motion of [CTRL 1] knob in the steps.
- Page 264 Appendix Error messages Error messages Explanation Action Battery Low! The batteries are nearly depleted. Replace the batteries, or switch to an AC adaptor. → “About the power supply (p. 22)” Unsupported FILE The file type is not supported on Check the file extension, format and folder directory. this unit.
- Page 265 Appendix Audio diagram...
- Page 266 Skip back sampling time Data format 16-bit linear Import format WAV, AIFF, MP3 import supported. * SP-404MK2 App supports WAV, AIFF, MP3, FLAC, M4A. Sample rate 48 kHz Resolution: 480 ticks per quarter note Pattern sequencer Pattern length: 1 to 64 bars...
- Page 267 TRS/MIDI connecting cable: BOSS BMIDI series, BOSS BCC series Wireless MIDI Expression Pedal: BOSS EV-1-WL Wireless Footswitch: BOSS FS-1-WL * This document explains the specifications of the product at the time that the document was issued. For the latest information, refer to the Roland website.
- Page 268 Appendix MIDI implementation chart Model: SP-404MK2 Date: Apr. 4, 2024 Version: 4.04 Function Transmitted Recognized Notes Basic Channel Default × (MIDI mode A) × (MIDI mode A) 1–10 (MIDI mode B) 1–10 (MIDI mode B) Changed × (MIDI mode A) ×...
- Page 269 Appendix Function Transmitted Recognized Notes System Song Position × × Common Song Select × × Tune Request × × System Clock ○ *3 ○ *4 Realtime Commands ○ *3 ○ *4 Aux Messages All Sound Off × ○ *5 Reset All Controllers ×...
- Page 270 Appendix *8 Control change message numbers and corresponding controllers in DJ mode CC#8 [Ctrl 3] knob: X-FADE (CH1: CH2 = 127:0– – – 0:127) CC#20 [ñ] button (0: pause, 127: play) [ñ] button (0: pause, 127: play) [ñ] button (0: pause, 127: play) CC#21 [õ] button (0: release the button, 127: press [õ] button (0: release the button, 127:...
- Page 271 Appendix MIDI note map MIDI Mode MIDI Channel CH 1 … CH 10 CH 1–9 CH 2–10 Note Number BANK PAD … BANK BANK BANK Blank … Blank Blank Blank (for Note Offset) (for Note Offset) A³6 F´6 E³6 C´6 B³5 A³5 F´5...
- Page 272 Appendix MIDI Mode A³3 F´3 E³3 … C´3 B³2 A³2 F´2 E³2 C´2 EXT SOURCE Blank … Blank B³1 A³1 F´1 E³1 C´1 B³0 A³0 F´0...
- Page 273 Appendix MIDI Mode E³0 C´0 Blank Blank (for Note Offset) (for Note Offset) C´-1 EXT SOURCE...
- Page 274 SP-404MK2 Applicable to version 4.00 Reference Manual Roland Corporation © 2024 Roland Corporation...
Need help?
Do you have a question about the SP-404MK2 and is the answer not in the manual?
Questions and answers