Table of Contents
Advertisement
Quick Links
Advertisement
Table of Contents

Related Manuals for BMW Motorrad R 1250 GS Adventure HP 2018


Summary of Contents for BMW Motorrad R 1250 GS Adventure HP 2018
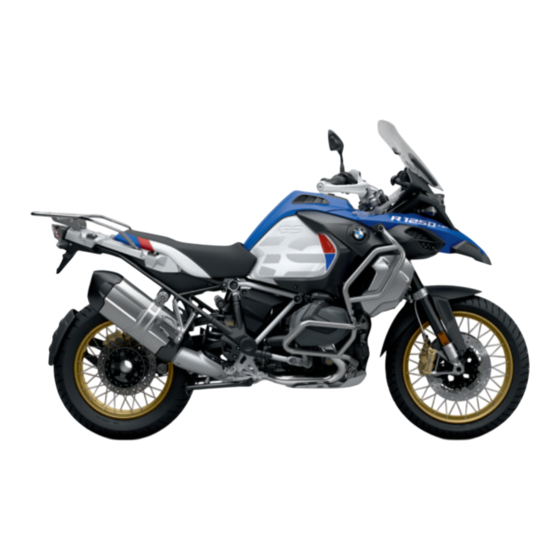
- Page 1 BMW Motorrad Supplementary rider's manual R 1250 GS Adventure HP...
- Page 2 Motorcycle/Retailer Data Motorcycle Data Retailer Data Model Contact in Service Ms./Mr. Vehicle identification number Phone number Color number Initial registration Retailer's address/phone number (com- License plate pany stamp)
-
Page 3: Welcome To Bmw
Should you have any questions Read this rider's manual before about your vehicle, your autho- starting your new BMW. It con- rized BMW Motorrad retailer is tains important vehicle operating always happy to provide you with information that will enable you advice and assistance. -
Page 4: Table Of Contents
Table of Contents Milled handlebar lever ..44 5 Operation ....19 Rallye seat ....20 Enduro engine guard . -
Page 5: General Instructions
General instructions Overview ......4 Abbreviations and symbols ..4 Equipment . -
Page 6: Overview
Abbreviations and Optional extra. specting your motorcycle as well symbols as maintenance and adjustment BMW Motorrad optional procedures. extras are already com- CAUTION Hazard with pletely installed during low risk. Failure to avoid Indicates the end of an motorcycle production. -
Page 7: Equipment
Electronic chassis and authorized BMW Motorrad re- in this manual on account of suspension adjustment. tailer or other qualified service country-specific differences. -
Page 8: Additional Sources Of Information
In addition, BMW Motorrad can- not guarantee the total absence of errors. We hope you will ap- preciate that no claims can be recognized based on the data, il- lustrations or descriptions in this manual. -
Page 9: Overviews
Overviews General view ......9... -
Page 11: General View
General view Rallye seat (low) ( Cover caps ( Cross spoke wheels Frame guard ( Sports windshield (... -
Page 13: Introduction
Introduction HP style version ....12... -
Page 14: Hp Style Version
HP style version Sports windshield, cut low, for a clear view of the rough The HP style version establishes terrain in front and freedom the sporty character of the of movement when riding in a R 1250 GS Adventure HP. standing position. -
Page 15: Setting
Setting Windshield ......14 Clutch ......14 Mirrors . -
Page 16: Windshield
Windshield Turn the adjustment wheel 1 counter-clockwise to raise the Adjusting windshield windshield. Clutch with Option 719 milled part package, Classic with Option 719 milled part Turn the adjustment lever 1 to package, Storm the desired position. Adjustment options: with HP machined-parts pack- From position A: smallest dis- WARNING tance between handlebar grip... -
Page 17: Mirrors
Mirrors with Option 719 milled part package, Classic with Option 719 milled part package, Storm with HP machined-parts pack- Move mirror 1 into desired po- Remove screw 1 and remove Adjusting mirrors sition by turning it. cover 2. Loosen adjusting screw 3 and Adjusting mirror arm NOTICE turn mirror arm 4 into the de-... -
Page 18: Gearshift Lever
Brakes Gearshift lever turning the foot piece into dif- ferent positions. with Option 719 milled part with Option 719 milled part Remove screw 1. package, Classic package, Classic with Option 719 milled part with Option 719 milled part package, Storm package, Storm with HP machined-parts pack- with HP machined-parts pack-... -
Page 19: Footrests
Footrests From position A: smallest dis- Remove screw 1. tance between handlebar grip with Option 719 milled part and handbrake lever. package, Classic Five steps toward position B to increase the distance be- with Option 719 milled part tween the handlebar grip and package, Storm the handbrake lever. - Page 20 Remove screws 1. Install clamping block 1 in the Position footrest 3 on clamping desired position A or B and block 2. Remove the footrest 3 from tighten screw 2. the clamping block 2. Install screws 1. Clamping block on Footrest on clamping footrest hinge block...
-
Page 21: Operation
Operation Rallye seat ......20 Frame guard ......21 HP Battery . -
Page 22: Rallye Seat
Rallye seat Note height adjustment Removing the Rallye seat The rear height adjustment 1 must always be set to the low The front height adjustment 1 position (marked L). must always be set to the high Unlock seat lock 1 in a clock- position (marked H). -
Page 23: Frame Guard
downwards at the rear until the avoid the rubber bands open- locking mechanism audibly en- ing when kicked. gages. Install frame guard on the op- posite side in the same way. NOTICE HP Battery To remove and install seat with optional equipment, see the vehi- with HP battery cle rider's manual. - Page 24 NOTICE Installing and removing the HP battery is the same as for the standard battery; details can be found in the rider's manual for the vehicle.
-
Page 25: Off-Road Use
Off-road use Conversion ......24 Riding....... 28 Cleaning . -
Page 26: Conversion
Conversion Installing luggage rack Removing bracket for covers passenger footrest Removing the luggage rack NOTICE NOTICE Passenger footrests and grab handles must always be installed Passenger footrests and grab when riding with a passenger. handles must always be installed when riding with a passenger. Attach luggage rack covers 2. - Page 27 Removing luggage rack Position the luggage rack 1. covers Install new microencapsu- lated screws 1. Luggage rack on rear frame Thread-locking compound: micro-encapsulated Joint compound: or, Loctite Remove screws 1 and take off 243, Medium-firm bracket for passenger footrest 14 lb/ft (19 Nm) on the right 2.
- Page 28 Removing end muffler Attach bracket for passenger footrest on the left 2 and install using new microencapsu- lated screws 1. Footrest bracket on rear frame Thread-locking compound: micro-encapsulated Clean the thread. 28 lb/ft (38 Nm) Attach bracket for passenger Remove screws 1. The muffler must be removed footrest on the right 2 and in- Remove muffler cover 2.
- Page 29 Installing end muffler Muffler on rear frame 14 lb/ft (19 Nm) Remove screw 1 and form washer 2. Lightly lubricate inside of Remove end muffler 3 with clamp 1 and push onto end scuff-protection washer 4 and muffler. clamp 5. Lightly lubricate inner diameter of end muffler 2 and push on Position clamp 1 with recess in...
-
Page 30: Riding
Riding permissible maximum rated speed of the tires. Riding with lugged tires Risk of accident due to tire dam- The R 1250 GS Adventure HP age at high speed. can be equipped with lugged Observe the maximum permis- tires for off-road use. sible speed for the tyres. - Page 31 After riding off-road BMW Motorrad recommends Brake early until the brakes are checking the rims for possible BMW Motorrad recommends the clean again. following after riding off-road: damage after riding off-road. Checking rims. (...
-
Page 32: Cleaning
the use air cleaner elements spe- Removing the protective cially developed for these kinds radiator grille of applications. Cleaning Cleaning after off-road NOTICE Remove the protective radiator The general cleaning instructions grille 1 in a downward motion. can be found in the vehicle's rid- Remove screws 1. -
Page 33: Removing The Windshield
lug 2 and snap-in hooks 3, into Removing engine guard Position engine guard 2. the mounts on the radiator 4. Install screws 3. Engine guard to holder 6 lb/ft (8 Nm) Removing the windshield Remove screws 1 and remove engine guard 2. Install screws 1. -
Page 34: Installing The Windshield
Windshield on windshield adjustment 3 lb/ft (4 Nm) Remove screws 1. Loosen windshield 2 at base and remove. Installing the windshield Place windshield 1 in position. Install screws 2. -
Page 35: Maintenance
Maintenance General notes ..... . . 34 Service tool set ..... 34 Tires . -
Page 36: General Notes
Information on additional main- fitting and removing wheels), WARNING tenance and repair work is pro- BMW Motorrad has set up a vided in the Repair Manual for Automatic opening of verti- service toolkit designed for your your vehicle on DVD, which you cally installed valve inserts at motorcycle. -
Page 37: Check Wheel Rims
Tread wear marks are integrated ity, preferably an authorized 42.1 psi (2.9 bar) (with tire into the main grooves on every BMW Motorrad retailer. cold) tire. If the tire tread has worn Checking spokes down to the level of the marks, If tyre pressure is too low: the tire is completely worn. -
Page 38: Maintenance Work After Off
Have side stand checked support surface is firm and by a specialist workshop, level. preferably by an authorized BMW Motorrad Retailer. Checking function of side support switch Switch off engine and fold out side stand. Press and hold clutch, switch Check the gearshift lever bear- on ignition and start engine. - Page 39 Check gaiter 1 is sitting cor- rectly and is free from cracks. If the gaiter has loosened or cracks are forming: Have gaiter checked by a spe- Remove frame 1. cialist workshop, preferably by Remove air filter element 2. an authorized BMW Motorrad Retailer.
- Page 40 Close lid 4 of storage compart- ment. Fitting the Rallye seat ( 20). Clean air filter element 2 or Place the tank cover 1 in posi- replace, if necessary. tion, taking care during instal- lation that the guide (arrow) Insert air filter element 2 and is underneath the upper front frame 1.
-
Page 41: Accessories
Accessories General notes ..... . . 40 Accessories for HP style version ..40 HP style version accessories ..43 LED turn indicator . -
Page 42: Accessories For Hp Style Version
BMW is not be Safety risk liable for unapproved parts and Accessories for HP accessory products of any kind. BMW Motorrad cannot exam- style version ine or test each product of out- Comply with legal requirements side origin to ensure that it can To complement the HP style for any modifications. -
Page 45: Hp Style Version Accessories
HP style version accessories LED turn indicator ( Milled handlebar lever Preparation for navigation system ( Headlight guard ( Enduro engine guard Cylinder-Head Cover Guard ( Adjustable driver footrests Studded tires ( Sports muffler (... -
Page 46: Led Turn Indicator
LED turn indicator Headlight guard Milled handlebar lever Attractively contoured, handlebar- Protects the headlight lens from Milled clutch and brake lever in mounted turn indicator featuring flying stones when used off-road. high-strength aluminum alloy, modern, wear-free LED technol- gray anodized, to protect against Snap-Lock system for quick and ogy. -
Page 47: Cylinder-Head Cover Guard
Enduro engine guard Adjustable driver Cylinder-Head Cover footrests Guard Protects the lower engine com- partment from stone chips and High-quality, forged footrests, Comprehensive protection of grounding the cylinder head cover against anodized in gold color, height- Significantly wider and longer adjustable with 3 heights. -
Page 48: Sports Muffler
Advanced Mount Cradle with Manufactured completely out of lock cylinder, and Multi-Controller titanium, end cap and heat shield for operating the BMW Motorrad from carbon. navigator on the handlebars. Torque increase in the lower and middle engine speed range. -
Page 49: Case System
Case system The optional case carriers enable the sturdy aluminum cases, which are suitable for off-road use, to be installed. They are lockable, watertight, dust-proof, and also visually emphasize the Enduro credentials of the R 1250 GS Adventure HP. -
Page 51: Technical Data
Technical data Frame ......50 Chassis and suspension ... . 50 Wheels and tires . -
Page 52: Frame
Frame Frame design Steel-tube frame with partially self-supporting drive unit, steel-tube rear frame Location of type plate Frame at front left on steering head mount Location of the vehicle identification number Frame at front right on steering head Chassis and suspension Front wheel Type of front suspension BMW Telelever, upper fork bridge tilt decoupled,... -
Page 53: Wheels And Tires
Wheels and tires Recommended tire combinations An overview of the current tire approvals is avail- able from your authorized BMW Motorrad retailer or on the Internet at bmw-motorrad.com. Speed category of front/rear tires V, minimum requirement: 149 mph (240 km/h) -
Page 54: Dimensions
Rear wheel Rear-wheel rim size 4.50"x17" Rear tire designation 170/60 - R17 Load index for rear tire At least 72 Permissible rear-wheel imbalance max 1.6 oz (max 45 g) Tire inflation pressures Tire pressure, front 36.3 psi (2.5 bar), with tire cold Tire pressure, rear 42.1 psi (2.9 bar), with tire cold Dimensions... - Page 55 Motorcycle width 37.5 in (952 mm), with mirrors 38.6 in (980 mm), with hand protector Rider's seat height 35...35.8 in (890...910 mm), without rider at un- laden weight with HP style 34.6 in (880 mm), without driver at DIN unladen weight with HP style 35.4 in (900 mm), without driver at DIN unladen...
- Page 56 with lowered 72.8...74.4 in (1850...1890 mm), without rider at unladen weight with lowered 71.3...72.8 in (1810...1850 mm), without rider at unladen weight with seat, black...
-
Page 57: Index
Abbreviations and symbols, 4 Footbrake lever Notice concerning current Check, 36 status, 6 Accessories, 40 Frame Air filter Technical data, 50 Checking, replacing insert, 37 Radiator grille Frame guard Installing, 30 Installing, 21 Brakes Removing, 30 Adjust brake lever, 16 Rallye seat Gaiter Adjust footbrake lever, 17... - Page 58 Frame, 50 General notes, 5 Standards, 5 Wheels and tires, 51 Tires Checking tire inflation pressures, 34 Checking tire tread depth, 34, Inflation pressures, 52 Maximum speed, 28 Technical data, 51 Wheels Check wheel rims, 35 Checking spokes, 35 Checking wheel rims, 35 Technical data, 51 Windshield Adjusting, 14...
- Page 60 Errors and omissions excepted. © 2018 Bayerische Motoren Werke Aktiengesellschaft 80788 Munich, Germany Reprints and duplication of this work, in whole or part, are pro- hibited without the express writ- ten approval of BMW Motorrad, Aftersales.
- Page 61 You can find further information on all aspects of your vehicle at: bmwmotorrad.com BMW recommends *01409457477* Order No.: 01 40 9 457 477 06.2018, 2nd edition, 07...
Need help?
Do you have a question about the R 1250 GS Adventure HP 2018 and is the answer not in the manual?
Questions and answers