Table of Contents
Advertisement
Quick Links
Owner's Manual
All-Terrain Vehicle Model Number
Coolster Mountopz ATV-3050C
For Maintenance and Safety: READ THIS MANUAL CAREFULLY. IT CONTAINS IMPORTANT
SAFETY AND OPERATION INFORMATION.
YOUNG RIDERS ARE REQUIRED TO BE SUPERVISED BY AN ADULT AT ALL TIMES.
OPERATION IS PROHIBITED FOR ANYONE UNDER AGE (6).
Advertisement
Table of Contents

Related Manuals for Coolster Mountopz ATV-3050C


Summary of Contents for Coolster Mountopz ATV-3050C
- Page 1 Owner’s Manual All-Terrain Vehicle Model Number Coolster Mountopz ATV-3050C For Maintenance and Safety: READ THIS MANUAL CAREFULLY. IT CONTAINS IMPORTANT SAFETY AND OPERATION INFORMATION. YOUNG RIDERS ARE REQUIRED TO BE SUPERVISED BY AN ADULT AT ALL TIMES. OPERATION IS PROHIBITED FOR ANYONE UNDER AGE (6).
- Page 2 - Operating, servicing and vehicle can expose you to chemicals including engine exhaust, carbon monoxide, phthalates, and lead, which are known to the State of California to cause cancer and birth defects or other reproductive harm. To minimize exposure, avoid breathing exhaust, do not idle the engine except as necessary, service your vehicle in a well-ventilated area, and wear gloves or wash your...
-
Page 3: Introduction - Safety- Training
This manual has been prepared to help familiarize you with the proper operation and maintenance procedures of your Coolster vehicle. It is HIGHLY recommended that you read all the information within this manual before operating this vehicle. Thoroughly reading this manual will greatly minimize the risk of injury and damage. -
Page 4: Important Safety Message To Parents & Children
Important Safety Message to Parents & Children This vehicle is intended for riders (6) years of age or older. Never allow a child under the age of (6) to operate this vehicle. This ATV is not a toy. Before you let your child ride this ATV be sure they have completed an ATV Training Course. -
Page 5: Table Of Contents
TABLE OF CONTENTS Introduction – Safety- Training...................... 3 Important Safety Message to Parents & Children ................ 4 ........................6 Safety Symbols and Signal Words ....................7 Safety Warnings, Safety Labels and Locations ................8 ....................14 Vehicle Features and Controls ..................... 15 Safe Riding Guidelines ......................... - Page 6 below. Your vehicle has a permanent label for the Engine Model and Serial Number and can be located as shown.
-
Page 7: Safety Symbols And Signal Words
Safety Symbols and Signal Words The following signal words and symbols appear throughout this manual and on your vehicle. Your safety is involved when these words and symbols are used. Become familiar with their meanings before reading the manual. personal injury hazards. Obey all safety messages that follow this symbol to avoid possible injury or death. -
Page 8: Safety Warnings, Safety Labels And Locations
Safety Warnings, Safety Labels and Locations Failure to operate this vehicle properly can result in a collision, loss of control, accident or rollover, which may result in serious injury or death. Heed all safety warnings outlined in this section of the owner’s manual. - Page 9 Tire Pressure Warning Label, Overloading Warning Label or Combined Tire Pressure and Overloading Warning Label Located on the Left Rear Fender, either Two (2) Separate Warning Labels or One (1) Combined Label as show Below: Tire Pressure Warning Label WARNING Improper tire pressure can cause loss of control.
- Page 10 Combined Tire Pressure and Overloading Warning Label WARNING Improper tire pressure or overloading can cause loss of control. Loss of control can result in severe injury or death. • Cold tire pressure: Front: 10 psi (68.9 kPa) Rear : 10 psi (68.9 kPa) •...
- Page 11 General Warning Label – Located on the left front fender...
- Page 12 Age Recommendation Warning Label – Located on the front right area of the frame when the operator is seated on the vehicle...
- Page 13 Passenger Warning Label - T read by a potential passenger. WARNING NEVER ride as a passenger. Passengers can cause a loss of control, resulting in SEVERE INJURY or DEATH.
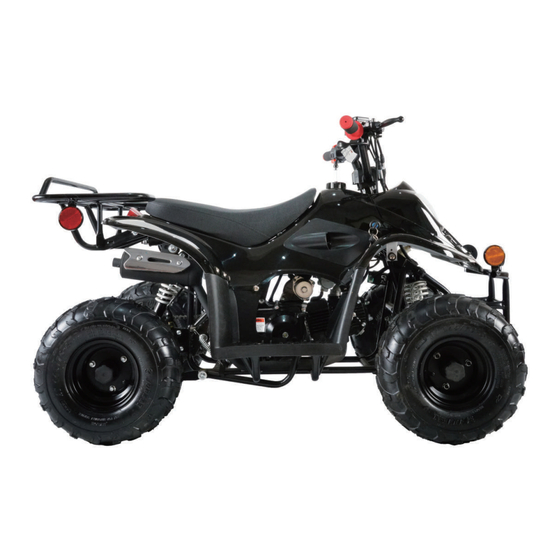
- Page 14 (1) Rear Rack (3) Seat (4) Foot Brake (5) Engine (6) Key Switch (7) Front Guard Handle Bar Fuel Box (10) Front Wheel (11) Rear Wheel (12) Rear Light (13) Rear Suspension (14) Plastic (Body) (15) Front Brake (16) Accelerator...
-
Page 15: Vehicle Features And Controls
Vehicle Features and Controls 1. IGNITION SWITCH LOCATION FUNCTION KEY STATE All Circuits are disconnected Pull out Circuits connected Do not pull out engine started 2. MULTIFUNTION SWITCH PROXIMITY LOCATION FUNCTION SWITCH STARTER When state switch is pressed, SWITCH engine rotation begins SWITCH engine rotation stops 3. - Page 16 This ATV comes equipped with a remote key which consists of two buttons: KILL SWITCH UNLOCK BUTTON The engine can be stopped using the remote from a short distance. The adult who trains the operator should always keep the kill switch on hand, until the vehicle operator develops the skills needed to operate the vehicle safely.
-
Page 17: Safe Riding Guidelines
Safe Riding Guidelines risk of injury to the riders or others if the rider is not properly informed. If the driver does not take precautions, dangerous accidents such as collisions or rollovers can occur, even during routine maneuvers such as turning or driving on hills or obstacles. Please read the following safe riding guidelines thoroughly, as doing so can drastically reduce the risk of serious injury or death: 1. - Page 18 overobstacles as described in this manual. roads at low speeds. On slippery surfaces, such as ice, go slowly and be very cautious in order to minimize the chances of skidding or sliding out of control. 21. Avoid operating the vehicle through deep or fast moving water. Avoid water which exceeds therecommended maximum depth, as this wets and jeopardizes the functions of the brakes.
-
Page 19: Pre-Ride Inspection Checklist
Pre-Ride Inspection Checklist Prior to the use of this vehicle, please check that the following components and features are functioning properly and are not damaged: Ensure that: 1. The fuel tank has enough fuel before riding. 2. Check the oil level. 3. - Page 20 Oil Levels wait for a few minutes. Remove the dipstick, wipe it with a clean rag, and reinsert it in the receptacle. Remove the dipstick again and check oil level. The oil should be located between the highest and lowest marks along the oil dip stick.
-
Page 21: Operation
Operation Tires 1. Tire pressure 2. Tire Inspection Before the vehicle is in operation, check the tires. If there is excessive tire wear, replace the tires. Use of the worn-out tires is dangerous Tire Size Pressure Front Tire 145/70-6 10 PSI Rear Tire 145/70-6 10 PSI... - Page 22 Cold Start and Engine Preheating When doing a cold start, the choke should be closed to limit the amount of air entering the engine. This will help with warming up the engine. This vehicle requires the front brake handle to be depressed in order to start the engine. Squeeze the engine brake handle to start.
- Page 23 Acceleration Speed limiter For beginning riders, riders less experienced with this model, or whenever limited speed is desirable, the throttle lever housing is equipped with a vehicle speed limiter. The speed limiter keeps the throttle from fully opening, even when the throttle lever is pushed to the maximum. Turning in the adjusting screw limits the maximum engine power available and decreases the maximum speed of the ATV.
- Page 24 Braking This ATV is equipped with both foot and hand brakes. To slow the vehicle to a stop, gradually apply pressure to both the front and rear brakes simultaneously for a controlled stop. Avoid sudden depression of the brakes and never apply only the front brakes.
-
Page 25: Parking And Storage
Parking and Storage Please use parking brake when you are parking the ATV (pictured) 1. Hold down front brake lever and make sure the vehicle is at a full stop 2. Press parking brake button to lock the front axle parking brake 3. -
Page 26: Regular Maintenance And Minor Repairs
Regular Maintenance and Minor Repairs If you are not familiar with this vehicle’s maintenance services, consult your local Coolster repair shop. Regular Maintenance / Lubrication Schedule ITEM NOTES RUN- INITIAL EVERY NING 150 1000 2000 KM OR KM OR KM OR... - Page 27 DRIVE ADJUST, REPLACE OR CLEAN AND LUBRICATE PARTS AND CHECK ALL PARTS AND FASTENERS. FASTENERS CORRECT IF NECESSARY BATTERY* CHECK CHARGE. IF NECESSARY, REPLACE *: We suggest that these items be repaired at Coolster **: Medium weight wheel bearing grease.
- Page 28 Parts and Fasteners Prior to the use of the vehicle, ensure that all parts and fasteners are secured tightly. We suggest you do this during regular inspections. If the self-locking nut is destroyed, replace immediately. TIGHTENING TORQUE CORRESPONDENCE TABLE SCREW SCREW STANDARD STANDARD...
- Page 29 When replacing oil or checking oil pressure, please do so in accordance to the following method: A. Remove the cylinder cover by the oil release bolts. Coolster dealer or maintenance shop for repair. C. After the test is completed, tighten the released oil bolts.
- Page 30 Carburetor Adjustment The carburetor is a key part of the vehicle engine and requires proper adjustments. Most adjustments should be handled by those with expertise or experience with Coolster repairs. Idle Adjustment SCREW IDLING RELEASE OIL POINT Standard Idle: 1500 100 to/min...
- Page 31 Crankcase Ventilation System This part operates 150 hours at a time. Please carry out regular maintenance to ensure the system can function properly. 1. Take out the oil separator, use kerosene to wash. 3. The part can be cleaned and used repeatedly as long as it is not damaged. 4.
-
Page 32: Throttle Cable Adjustment
Air Filter & Throttle Cable Adjustment Clean or replace if needed. Throttle Cable Adjustment LOCKED NUT ADJUSTER Note: When adjusting the throttle cable, we must also adjust engine idling. Connect the tachnometer, and adjust the throttle to limit the idle speed. Adjust the screw and idle speed to an ideal value Loosen lock nut. - Page 33 Spark Plug Inspection Model: D7TC Clearance: 0.6~0.7 mm Torque: 12.5 N - M 0.6~0.7mm 1. Remove the spark plug and inspect it each time you change the oil. The electrodes should be kept clean and free of carbon. The presence of carbon or excess oil will greatly reduce engine is 0.6 - 0.7 mm.
- Page 34 3. Tighten the lock nut. ADJUSTER 4. If the brake handle is not operating properly, please visit your local Coolster dealer or repair shop. ADJUSTER LOCK NUT Rotate the wheel several times to identify the most compact location of the chain.
- Page 35 Drive Chain Adjustment Adjuster Locked Nut Adjuster Fastening the chain regulator and the locking adjustment nut. For tightening the chain, rotate the chain adjuster clockwise on the bottom of the lock nut, then adjust the nut. If the chain needs to loosen, turn the adjuster counter-clockwise. Tighten all the loosen parts.
- Page 36 Drive Chain Lubrication The chain includes many mutual operating parts. If the chain is not properly maintained, the chain can wear quickly. It is a must to carry out regular maintenance of the chain. Regular maintenance is vital for preseving the structural integrity of the chain. You may use any brand of spray-can lubricant.
- Page 37 Battery Check the battery electrolyte level and make sure the terminal and wiring of the battery casing is not leaking. If the electrolyte level is low, add distilled water. Note: Check the battery electrolyte at least once a month. • When recharging batteries, allow 30 minutes for it to be cooled back to room temperature to ensure the proper use of batteries.
-
Page 38: Replacement Fuse
After correct installation of the new fuse, connect the switch and observe the electrical functions. If you have trouble with installation, please your local Coolster dealer or repair shop. Warning: Do not use the recommended ampere rating higher than the fuse. Doing so can cause... -
Page 39: Common Problems
Common fault causes and troubleshooting methods Problem Cause of Issue Solution 1. There is Tighten the screw of the air Air leakage in the intake system no mixed inlet system seal gas in the The fuel circuit is blocked Dredge the fuel circuit cylinder Disassemble the spark plug to 2. - Page 40 Common fault causes and troubleshooting methods Recharge battery or replace 9. Weak pressure from the kick start rod. The grooves on the kick start screw are worn or kick Repair and replace 10. Electric The starter motor rotor is seizing Replace starter 11.
- Page 41 Common fault causes and troubleshooting methods 1. The front and rear shock absorber springs are Replace broken 2. The shock absorber is not straight Replace 3. The shock absorber leaks oil Replace 4. The front and rear wheel bearings are damaged Replace 1.
-
Page 42: Cleaning, Storage, And Transport
Cleaning 1. In order to keep the vehicle clean and protect the appearance of the paint, cleaning should be done regularly. When cleaning, use a soft cloth or sponge dipped in water and cleaning liquid with water. 2. Attention: When washing, avoid using high pressure water on the following parts. (1) ignition switch (2) multi-purpose switch (3) under seat cushion... - Page 43 Storage In order to preserve the condition of your vehicle, please follow the methods listed below for storage: 1. Select an ideal parking spot. The location should have security, ventilation, be moisture-proof, and have above-freezing conditions. 2. Make sure the conditions are not too hot, cold, dry or moist for engine lubricant. 3.
- Page 44 Transport preventative measures taken that can protect the vehicle against bumps, dips, or water. Make sure the vehicle is securely fastened and has cushioning to help prevent against scratches or dents. After Long Term Storage more than 4 months, replace the engine oil. 2.
-
Page 45: Safe Operation
Safe Operation Loaded ATV: As originally equipped, this ATV is not designed to carry cargo or tow a trailer. If you choose to add accessories to carry cargo, do not exceed the maximum loading limits for the vehicle (see “MAXIMUM LOADING LIMIT”... - Page 46 Safe Operation Complete the recommended safety training before operating this vehicle. Do not allow anyone under age 6 to operate the vehicle. Never consume alcohol or drugs (over the counter or prescription medication included) before or while operating this vehicle. Always keep your feet on the footboards during operation;...
- Page 47 Avoid wheelies and jumping. Attempting wheelies, jumps, and other stunts increases the chance of an accident, including an overturn. Never attempt stunts, such as wheelies or jumps. the ATV, and may cause the ATV to go out of control. Always avoid paved surfaces, including sidewalks, driveways, parking lots and streets.
- Page 48 Safe Operation Driving Uphill procedure could cause loss of control or overturn. Whenever traveling uphill, follow these precautions: 1. Drive straight uphill. 2. Avoid steep hills (15° maximum). 3. Always check the terrain carefully before ascending any hill. 4. Never climb hills with excessively slippery or loose surfaces. 5.
- Page 49 Safe Operation Driving on a Sidehill – Driving on a sidehill is not recommended. Improper procedure could cause loss of control or overturn. Avoid crossing the side of any hill unless absolutely necessary. If crossing a sidehill is unavoidable, follow these precautions: 1.
- Page 50 Safe Operation Driving Downhill – When driving downhill, follow these precautions: 1. Avoid steep hills (15° maximum). 2. Shift body weight uphill. Transfer your weight to the rear of the vehicle. 3. Drive straight downhill. 4. Slow down. Excessive speed when traveling downhill can cause loss of control. 5.
- Page 51 Safe Operation Turning Around on a Hill – If the vehicle stalls while climbing a hill, never back it down the hill! Use the K-turn to turn around. 1. Stop the vehicle and lock the parking brake while keeping body weight uphill. 3.
- Page 52 Safe Operation Parking on a Hill or Incline – Avoid parking on a hill or incline if possible. If it’s unavoidable, follow these precautions: 1. Stop the engine. 2. Lock the parking brake. 3. Always block the rear wheels on the downhill side.
- Page 53 Safe Operation Driving on Slippery Surfaces – Whenever riding on slippery surfaces such as wet trails or loose gravel, or during freezing weather, follow these precautions: 1. Do not operate on excessively rough, slippery or loose terrain. 2. Slow down when entering slippery areas. 3.
- Page 54 Safe Operation Driving Over Obstacles – Follow these precautions when operating over obstacles: 1. Always check for obstacles before operating in a new area. 2. Look ahead and learn to read the terrain. Be constantly alert for hazards such as logs, rocks and low hanging branches.
- Page 55 Safe Operation Driving Through Water – Your ATV can safely operate through shallow water. The recommended maximum depth for your ATV is below the bottom of the footrests. Follow these precautions when operating through water: 1. Determine water depth and current before entering water. 2.
- Page 56 Model Number: ATV-3050C Engine Type: Single Cylinder, 4-Stroke Displacement: 107cc Max Torque: 6.9N.m/6,500 ± 500r/min (N.m/r/min) Max Power: 4.8kW/8,000 ± 500r/min (kW/r/min) Bore & Stroke: 52.4 x 49.5mm Ignition: CDI Spark Plug Model: D7TC Spark Plug Gap: 0.6~0.7 mm Starting System: Electric Battery: 12V, 4Ah Clutch: Automatic Transmission: Chain, Rear Wheel Drive...
-
Page 57: Emissions Warranty Parts List
Emissions Warranty Parts List Fuel Metering System Exhaust System Emissions Control System Carburetor, Fuel Tank Spark Plug Exhause Manifold Air Cleaner Housing Fuel Line, Fuel Tank Cap Igni�on Coil, Pair Sys. Air Cleaner Housing Cov. Model Year: 2022 or Later Models Manufacture Name: Zhejiang Qiye Scooter Co., LTD Importer Name: Maxtrade LLC. -
Page 58: Electrical Diagram
Electrical Diagram...
Need help?
Do you have a question about the Mountopz ATV-3050C and is the answer not in the manual?
Questions and answers