
Related Manuals for Magic Chef URBANLiving UBLBRG24W


Summary of Contents for Magic Chef URBANLiving UBLBRG24W
- Page 1 URBANLiving ™ 24-Inch Freestanding Gas Range User Guide Please read this manual carefully before using your gas range and keep it for future reference. urbanlivingappliance.com MODEL # UBLBRG24B / UBLBRG24W...
- Page 2 PRODUCT REGISTRATION Thank you for purchasing this Urban Living product. The first step to protect your new product is to complete the product registration on our website at urbanlivingappliance.com/register. The benefits of registering your product include the following: 1. Registering your product will allow us to contact you regarding a safety notification or product update. 2.
- Page 3 CONTENTS PRODUCT REGISTRATION ........... . . 2 PRECAUTIONS .
- Page 4 PRECAUTIONS ExPLANATION OF SYMBOLS WARNING Hazards or unsafe practices which COULD result in severe personal injury or death. CAUTION Hazards or unsafe practices which COULD result in minor personal injury. THIS PRODUCT IS INTENDED FOR HOUSEHOLD USE ONLY WARNING: Read and understand all safety precautions. Failure to follow all instructions described in this user manual may result in electric shock, fire, serious personal injury, and/or loss of life.
- Page 5 • DO NOT touch any electrical switch. • DO NOT use any phones in home. • Immediately call your gas supplier from a phone outside of the home. (Ex: Go to a neighbor’s home to call your gas supplier or fire department.) • If the gas supplier cannot be reached, call the fire department.
- Page 6 IMPORTANT SAFETY INSTRUCTIONS WARNING: To reduce the risk of fire, electrical shock, injury to persons, or damage when using the oven, follow basic precautions. The anti-tipping bracket must be installed and securely attached to the range. Check to ensure the anti- tipping bracket is securely attached to the range prior to use.
- Page 7 could build up and the container can burst, causing injury. 20. Make sure the broiler pan is in place correctly to reduce the possibility of grease fires. NEVER leave jars of fat drippings on or near your range. 22. DO NOT let cooking grease deposits accumulate in or near the range, as this may cause a grease fire.
- Page 8 SPECIFICATIONS Figure 1 1.8’’ (46mm) 35.5” (900 mm) Height 35.5” (900 mm) Width 23.6” (600 mm) Depth 23.6” (600 mm) Product Weight 125 lbs (56.5 kg) Gross / Usable Capacity 2.9 Cu. Ft.
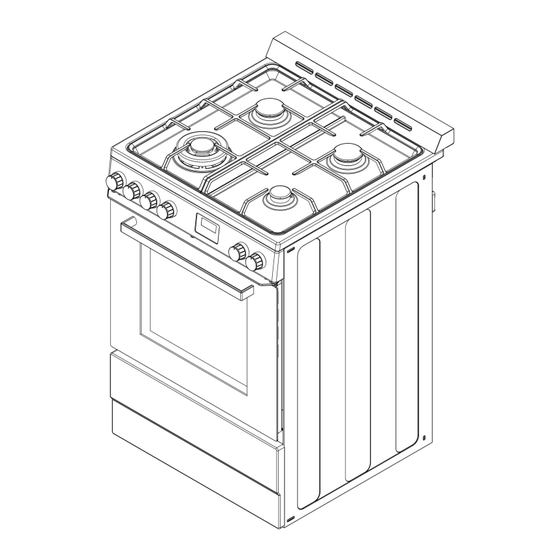
- Page 9 PARTS AND FEATURES PRODUCT PARTS & ACCESSORIES Figure 2 Left Rear Surface Burner Anti-tip Bracket Door Gasket Left Front Surface Burner Grate Broil Burner Oven Vent Right Rear Surface Burner Oven Light Model and Serial Number Plate Right Front Surface Burner m.
- Page 10 BEFORE USE WARNING: Failure to follow these instructions can result to serious injury or death. • DO NOT let the burner flames extend beyond the edge of the pan. • Turn off all controls when burners are not in use. • ALWAYS use the LITE position when igniting the top burners and make sure the burners have ignited.
- Page 11 OPERATION INSTRUCTIONS - GAS BURNER BURNER GRATES Figure 4 Triplering Burner: The front left burner is designed to give maximum power when fully on. This burner is used to rapidly bring liquids to a boil and cook large quantities of food. Auxiliary Burner: The front right burner allows for more precise simmering and low temperature cooking.
- Page 12 HOW TO LIGHT THE SURFACE BURNERS Figure 6 Push in and turn the control knob counterclockwise to the light position ( ). All surface burners will click but only the burner with control knob turned to LITE will produce a flame. After the burner ignites, turn the control knob to the desired flame size.
- Page 13 OPERATION INSTRUCTIONS - OVEN OVEN Figure 8 Control Panel Oven Interior Light Convection Fan Bottom Burner Cooling Vents Top Central Burner Rack Position Guide (not visible) POSITIONING RACKS AND BAKEWARE NOTE: To avoid damage to the porcelain finish, DO NOT place food or bakeware directly on the oven door or bottom. Positioning Oven Rack Slightly tilt up the front edge of the rack and slide rack back until it clears the stop position.
- Page 14 • Preheat the oven based on your recipe. Figure 9 °F • Preheating is great for baking cakes, cookies, pastries and breads. Baking (Refer to Figure 9.) NOTE: This oven utilizes a gas burner located under the oven cavity. This Broil allows the heat to rise naturally to bake foods evenly.
- Page 15 CLOCK & TIMER Set Time of Day Figure 13 When the range is first connected with power, the display will blink “12:00”. To set the correct time, press the “ ” Function � button until the indicator for the Clock blinks, and use the “...
- Page 16 CARE AND MAINTENANCE CLEANING COOKTOP Removing Trivets The trivets located in the recessed area of the hob. They can be removed for cleaning by carefully lifting them from the hob. Clean by washing in warm soapy water. Make sure to dry thoroughly. DO NOT drop the trivet into place.
- Page 17 Oven Door Exterior • It is recommended to use glass cleaner and paper towel or non-abrasive plastic scrubbing pad. • It is recommended to apply glass cleaner to soft cloth or sponge. • DO NOT apply directly to panel. Grates and End Caps •...
- Page 18 TROUBLESHOOTING Cooktop Problem Possible Causes Solutions Check to see the unit is plugged in. There is no power to the cooker Burner does not ignite. top. Replace fuse or reset circuit breaker. To release air from the gas line, turn on any one of the surface Air may be in the gas line.
- Page 19 Check for obstruction in oven door. Oven light stays on. Door is not properly closed. Check to see if the hinge is bent or door switch is broken. When utilizing bake mode pre-heat the oven. Convection Bake Normal Excessive moisture and Convection Roast will eliminate any moisture in the oven.
- Page 20 LIMITED WARRANTY MC Appliance Corporation warrants each new Gas Range to be free from defects in material and workmanship, and agrees to remedy any such defect or to furnish a new part(s), at the company’s option, for any part(s) of the unit that has failed during the warranty period.
- Page 21 ™ URBANLiving Urban Living TM is a trademark of CNA International, Inc. d/b/a MC Appliance Corporation urbanlivingappliance.com Printed in China...
Need help?
Do you have a question about the URBANLiving UBLBRG24W and is the answer not in the manual?
Questions and answers