Advertisement
Quick Links
9 Fin / 11 Fin Digital Oil Filled Radiator
With Touch Control
Model Number:
RHOFR2009 (B) & RHOFR2521-D (B)
220-240V AC, 50Hz/60Hz, 1830-2180W & 2290W-2720W
This product is only suitable for well insulated spaces or occasional use
PLEASE RET AIN
FOR FUTURE REFERENCE
Advertisement

Related Manuals for Russell Hobbs RHOFR2009


Summary of Contents for Russell Hobbs RHOFR2009
- Page 1 9 Fin / 11 Fin Digital Oil Filled Radiator With Touch Control Model Number: RHOFR2009 (B) & RHOFR2521-D (B) 220-240V AC, 50Hz/60Hz, 1830-2180W & 2290W-2720W This product is only suitable for well insulated spaces or occasional use PLEASE RET AIN...
- Page 2 CONTENTS Page(s) Safety Instructions 3 - 5 Battery Replacement Information Product Overview Base Assembly Control Panel and Remote Operations and Functions 10 - 13 Cleaning and Care Problem Solving Guarantee and Customer Services Spare Parts Connection to the Mains Supply Specification 19 - 20 Notes...
- Page 3 SAFETY INSTRUCTIONS When using electrical appliances, basic safety precautions should always be observed, including the following: • Read all instructions. • Check that the your mains voltage corresponds with the rating on the appliance. • The appliance must not be left unattended while it is connected to the mains supply.
- Page 4 SAFETY INSTRUCTIONS • Never use the appliance in a room with explosive gas such as petrol, or while using any kinds of flammable glues, sprays or solvents. • The appliance must not be used with an extension lead. • Do not place any part of your body near the air inlet, outlet or on the fins ,to avoid personal injury, electric shock or fire.
- Page 5 SAFETY INSTRUCTIONS • Warning: This appliance is not intended for use by persons (including children) with reduced physical, sensory or mental capabilities, or lack of experience and knowledge, unless they have been given supervision or instruction concerning use of the appliance by a person responsible for their safety. Children should be supervised to make sure that they do not play with the appliance.
- Page 6 BATTERY REPLACEMENT INFORMATION This appliance comes with 1 CR2025 (3V) battery which is to be fitted into the remote. • CAUTION : Batteries are a chemical burn and choking hazard. Keep batteries away from children. • Ensure that the battery compartment is always completely secure. If the battery compartment does not close securely, stop using the remote, remove the batteries, and keep it away from children.
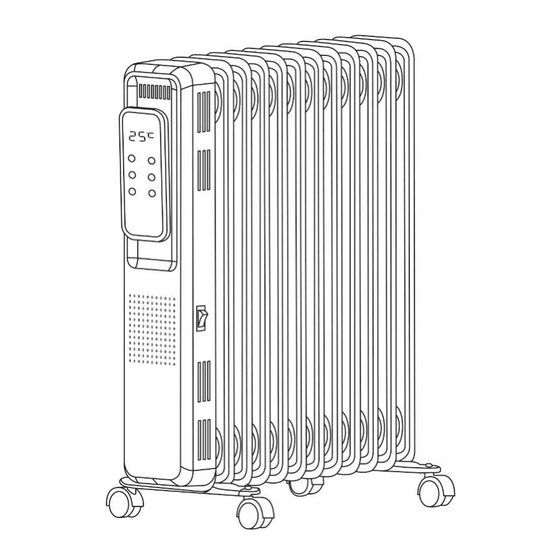
- Page 7 PRODUCT OVERVIEW 1. Integrated handle 6. On/Off switch 2. LED display 7. Power cord 3. Control panel 8. Castors 9. Remote control 4. Cord wrap 5. Fins WARNING: In order to avoid overheating, do not cover the heater.
- Page 8 BASE ASSEMBLY 1. Turn the heater upside down. 2. As shown in Fig. 1, align the mounting holes on the castor assembly units with the screws on the castor pad plates, one at the bottom of the control panel and one at the bottom of the end radiator fin. 3.
- Page 9 CONTROL PANEL & REMOTE A. LED display B. Remote control receiver C. Power on/off button D. Mode selection button E. Temperature/timer increase button F. Timer button G. Temperature/timer decrease button H. Temperature button...
- Page 10 OPERATIONS AND FUNCTIONS Before connecting your appliance to the mains socket, position the appliance upright on the floor, at least 90cm away from the wall, curtains, furniture or wall coverings. Insert the mains plug into a suitable wall mains socket and press the power switch of the side on the unit to the on position.
- Page 11 OPERATIONS AND FUNCTIONS Temperature Button • When the unit is on, press the “Temperature” button on the appliance/remote control. • The “Temperature”, “^” or “˅” buttons will illuminate, and the current set temperature will be displayed and flash. • Use the “^” or “˅” buttons on the appliance/remote control to adjust the temperature from 7℃...
- Page 12 OPERATIONS AND FUNCTIONS Timer Button • When the power is on, you can schedule to shut off the heater, or when in standby mode you can schedule to turn on the heater. • To set press the “Timer” button; the “Timer” button will now illuminate.
- Page 13 OPERATIONS AND FUNCTIONS Other Functions Memory Function - If the heater is turned off then on again, it will resume operation in the mode it was in before it was turned off. If the heater is unplugged then plugged back in again, it will default to the original settings.
- Page 14 CLEANING AND CARE WARNING: Electrical Shock Hazard. Before you clean the appliance, disconnect the mains plug from the wall socket. • Allow the appliance to cool down completely before cleaning. • Do not immerse cord, plug or appliance in any liquid or allow moisture to come into contact with electrical parts.
- Page 15 PROBLEM SOLVING My appliance does not work when I turn it on: 1. Check that your appliance is plugged in and the power is turned on at the mains socket. 2. Try another mains socket. 3. Check the appliance is in an upright position. 4.
- Page 16 GUARANTEE AND CUSTOMER SERVICES This product is guaranteed for 12 months from the date of the original purchase. If any defect arises due to faulty materials or workmanship, the faulty product must be returned to the place of purchase. Refund or replacement is at the discretion of the retailer. The following conditions apply: •...
- Page 17 SPARE PARTS To check the availability of the following spare parts, simply contact our friendly Customer Services team using the details provided on the previous page. Castors U-bolts Base Plate Remote Control...
- Page 18 CONNECTION TO THE MAINS SUPPLY This appliance is designed to operate from a mains supply of 220-240V~50Hz. Check that the voltage marked on the product corresponds with your supply voltage. How to change the fuse 1. Slot the end of a screwdriver into the recess in the fuse holder of the plug.
- Page 19 SPECIFICATION Model number RHOFR2009 (B) Rated voltage 220V - 240V ~ 50Hz/60Hz Power consumption 1830W - 2180W Product dimensions (CMS) (H)63 x (W)24.5 x (D)42.5 Model number RHOFR2521 (B) Rated voltage 220V - 240V ~ 50Hz/ 60Hz Power consumption 2290W - 2720W Product dimensions (CMS) (H)63 x (W)24.5 x (D)50.5...
- Page 20 SPECIFICATION Model number RHOFR2521 (B) Item Symbol Value Unit Item Unit Heat output Type of heat input, for electric storage local space heaters only Nominal heat manual heat charge control, with 2.29-2.72 output integrated thermostat manual heat charge control with Minimum heat 1.00 room and/or outdoor temperature...
- Page 21 NOTES...
- Page 22 NOTES...
- Page 23 NOTES...
- Page 24 Swan Lane, Hindley Green, Wigan, WN2 4AY, United Kingdom / Product Care (Ireland) Ltd, Unit 3D North Point House, North Point Business Park, New Mallow Road, Cork, T23 AT2P, Ireland. Russell Hobbs is the registered trademark of Spectrum Brands (UK) Ltd.
Need help?
Do you have a question about the RHOFR2009 and is the answer not in the manual?
Questions and answers