Table of Contents
Advertisement
Quick Links
Advertisement
Table of Contents

Related Manuals for Russell Hobbs RHOFHL11


Summary of Contents for Russell Hobbs RHOFHL11
- Page 1 INSTRUCTIONS AND WARRANTY MODEL NO. RHOFHL11 RUSSELL HOBBS 11 FIN OIL HEATER...
-
Page 2: Important Safeguards
Congratulations on purchasing your Russell Hobbs 11 Fin Oil Heater. Each unit is manufactured to ensure safety and reliability. Before using this appliance for the first time, please read the instruction manual carefully and keep it for future reference. FEATURES OF THE 11 FIN OIL HEATER •... - Page 3 9. Do not use the oil heater if it has been dropped or damaged in any way. In case of damage, take the unit in for examination and/or repair by an authorised service agent. 10. To reduce the risk of electric shock, do not in immerse or expose the oil heater assembly, plug or the power cord to water or any other liquid.
- Page 4 24. The manufacturer does not accept responsibility for any damage or injury caused by improper or incorrect use, or for repairs carried out by unauthorised personnel. 25. In case of technical problems, switch off the heater and do not attempt to repair it yourself.
-
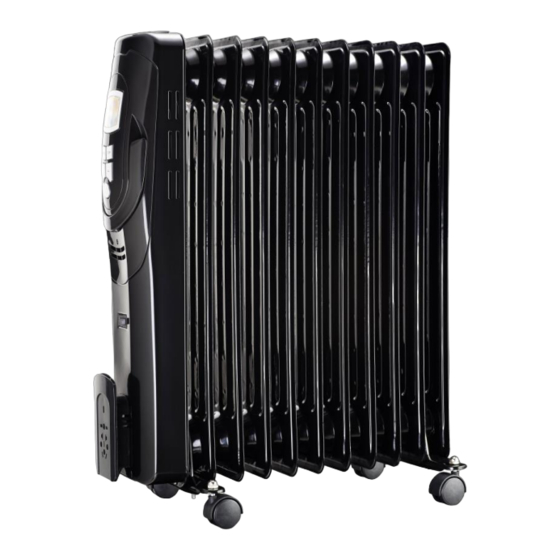
Page 5: Parts Diagram
43. Do not use the appliance in rooms that are smaller than 4m². 44. Do not use this heater with a programmer; timer, separate control system or any other device that switches the heater on automatically. CAUTION — Some parts of this product can become very hot and cause burns. Particular attention must be given where children and vulnerable people are present. - Page 6 ASSEMBLY INSTRUCTIONS The heater is packaged with the castor wheels unattached. You must attach the castor wheels before operating the heater. WARNING: Do not operate without feet attached. Only operate the heater in a upright position (feet on the bottom, controls on the top), any other position could be dangerous.
- Page 7 OPERATING INSTRUCTIONS Temperature settings POWER Connect the power cord to the nearest power outlet socket. Toggle the Power Switch shown in the Parts Diagram - (4), into the “ON” position. Press the Power button . The heater is now standby mode. Note: If the ambient temperature is below 4 ℃, the heater will automatically start the heating function.
- Page 8 3. Pressing the“MODE”button again, will navigate you to the “SET TIMER (AUTO- OFF)” function Press either the“+”or“-” button to set the required heater operating period, from 1 to 24 hours. This function will activate once the timer icon stops blinking. The heater will automatically turn-off when the timer runs out.
-
Page 9: Cleaning And Maintenance
CLEANING AND MAINTENANCE • This appliance is for household use only and is not user-serviceable. • Do not open or change any parts by yourself. Please refer to a qualified electrical service department or return to the supplier if servicing is necessary. •... - Page 10 CHANGING THE PLUG Should the need arise to change the fitted plug, follow the instructions below. This unit is designed to operate on the stated current only. Connecting to other power sources may damage the appliance.
- Page 11 PLEASE AFFIX YOUR PROOF OF PURCHASE/RECEIPT HERE IN THE EVENT OF A CLAIM UNDER WARRANTY THIS RECEIPT MUST BE PRODUCED. 2 YEAR WARRANTY 1 year retail ⵏ 1 year extended warranty upon registration* visit www.russellhobbs.co.za W A R R A N T Y AND EXTENDED WARRANTY Home of Living Brands (Pty) Limited ("Home of Living Brands") warrants to the original purchaser of this product ("the customer") that this product will be free of defects in quality and workmanship which under normal personal, family or household use and purpose may manifest within a period of...
- Page 12 EXCLUSIONS TO W A R R A N T Y AND EXTENDED WARRANTY Any accessories supplied with the product, including but not limited to, bowls, jugs, mills or carafes made either of glass or plastic and supplied with this appliance (hereinafter referred to as “the accessory or accessories”), is warranted to be free from material and workmanship defects for the duration of the appliance warranty.
Need help?
Do you have a question about the RHOFHL11 and is the answer not in the manual?
Questions and answers