
Related Manuals for LENCO CR-334


Summary of Contents for LENCO CR-334
- Page 1 CR-334 Instruction Manual Dual Alarm AM/FM Clock Radio with Triple Display Touchless Snooze and Display Control and SmartSet Function For information and support, www.lenco.eu...
-
Page 2: Important Safety Instructions
TO PREVENT FIRE OR SHOCK HAZARD, DO NOT USE THIS PLUG WITH AN EXTENSION CORD, RECEPTACLE OR OTHER OUTLET UNLESS THE BLADES CAN BE FULLY INSERTED TO PREVENT BLADE EXPOSURE. TO PREVENT FIRE OR SHOCK HAZARD, DO NOT EXPOSE THIS APPLIANCE TO RAIN OR MOISTURE. -
Page 3: Unpacking And Setting Up
Before Setting Up the Unit • Operate controls and switches as described in the manual. • Before turning on the power, make certain that the power cord is properly installed. • When moving the set, be sure to first disconnect the AC power cord. •... -
Page 4: Location Of Controls And Indicators
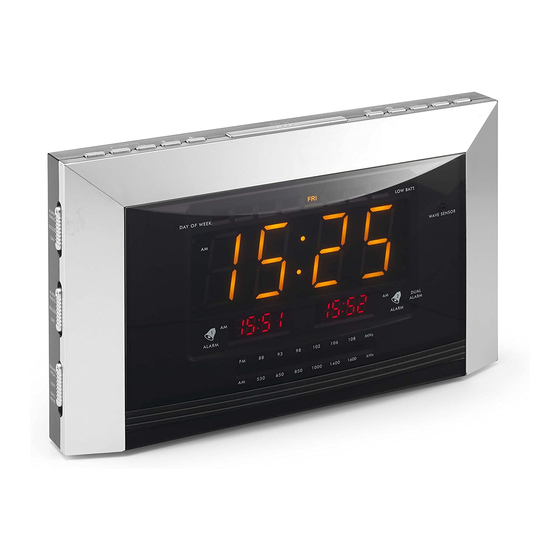
LOCATION OF CONTROLS AND INDICATORS ALARM 1 Time (Month/Date) Display DIMMER (HIGH-LOW-OFF/WAVE) Selector Switch ALARM 2 (RADIO/BUZZER/OFF) Selector Switch ALARM 1 (RADIO/BUZZER/OFF) Selector Switch Time Display WAVE SENSOR DAY OF WEEK (MON, TUE, WED, THU, FRI, SAT, SUN) Indicators LOW BATT. Indicator VOLUME Control 10.) BAND (AM/FM) Selector Switch 11.) TUNING Control... -
Page 5: Setting The Time, The First Time
Setting The Time, The First Time IMPORTANT: The first time you connect your new automatic time setting clock radio to the AC outlet, the internal computer will automatically set the time for the area you live which is the initial default setting. - Page 6 Summertime and Leap-year Adjustments All Daylight Saving and Leap Year adjustments are made automatically by the automatic time setting internal computer as follows: • Start of summertime: At 1:59.59 AM on the last Sunday of daylight saving time, the clock will automatically advance to 3:00 AM.
-
Page 7: Listening To The Radio
To check the Alarm Mode setting for Alarm 1, press the ALARM 1 setting button. The ALARM 1 display will show the Alarm 1 wake up time and the day of the week indicators will show you the alarm mode which is selected. •... -
Page 8: Wake To Radio
Wake To RADIO 1.) Turn the radio ‘On’ by pressing the RADIO ON/OFF button and select the Band, Station, and volume level that you wish to hear when the alarm comes on, then turn the radio ‘Off’ again. 2.) Reconfirm the wake up time and alarm mode settings for the alarm you are using, Alarm 1, Alarm 2, or both Alarms. - Page 9 2.) Set the ALARM selector switch for one or both alarms to the BUZZER position. The appropriate ALARM 1 and/or ALARM 2 display will change from “OFF” to the selected wake up time. 3.) At the selected wake up time the buzzer will sound. It will begin softly and gradually increase in volume to wake you up.
-
Page 10: Display Brightness Control
SLEEP To Music Timer You can program the sleep timer to play the radio for up to “99” minutes and then shut off automatically. 1.) Press the SLEEP button. The display will briefly show “L:30” and the radio will begin to play. After 30 minutes the radio will shut ‘Off’... -
Page 11: Changing The Lithium Battery
NOTES: A.) The clock radio must be at room temperature for the WAVE SENSOR to function properly. If the radio has been in a cold location the WAVE SENSOR may not operate immediately. Place the radio in the room where it will be used, connect it to the AC outlet, and allow approximately 30 minutes to 60 minutes for the radio to come to room temperature before testing the WAVE SENSOR function. -
Page 12: Lithium Battery Precautions
If you do not change the built-in lithium battery within a reasonable period of time after you see the warning indicator, the lithium battery may become exhausted and will no longer be able to supply back up power to the automatic time setting system internal computer. If the unit is disconnected from the AC outlet after the battery is exhausted, or if a power interruption occurs, the automatic time setting memory will be lost and the clock will need to be reset when the power is restored. - Page 13 Never use any abrasive cleaners or cleaning pads as these will damage the finish of your radio.
Need help?
Do you have a question about the CR-334 and is the answer not in the manual?
Questions and answers