Nokia 4.2, TA-1157, TA-1150, TA-1133, TA-1149, TA-1152 Manual
- User manual (69 pages) ,
- Manual (58 pages) ,
- Quick start manual (2 pages)
Advertisement
- 1 About this user guide
- 2 Get started
-
3
Basics
- 3.1 OPEN AND CLOSE AN APP
- 3.2 PERSONALISE YOUR PHONE
- 3.3 NOTIFICATIONS
- 3.4 CONTROL VOLUME
- 3.5 GOOGLE ASSISTANT
- 3.6 BATTERY LIFE
-
3.7
WRITE TEXT
- 3.7.1 Use the on-screen keyboard
- 3.7.2 Switch between upper and lower case characters
- 3.7.3 Enter a number or special character
- 3.7.4 Insert emojis
- 3.7.5 Copy or paste text
- 3.7.6 Add an accent to a character
- 3.7.7 Delete a character
- 3.7.8 Move the cursor
- 3.7.9 Use keyboard word suggestions
- 3.7.10 Correct a word
- 3.7.11 Switch spell checker off
- 3.8 DATE AND TIME
- 3.9 CLOCK AND ALARM
- 3.10 ACCESSIBILITY
- 3.11 FM RADIO
- 4 Connect with your friends and family
- 5 Camera
- 6 Internet and connections
- 7 Organize your day
- 8 Maps
- 9 Apps and services
- 10 Software updates and backups
-
11
Product and safety information
- 11.1 FOR YOUR SAFETY
- 11.2 NETWORK SERVICES AND COSTS
- 11.3 EMERGENCY CALLS
- 11.4 TAKE CARE OF YOUR DEVICE
- 11.5 BATTERY AND CHARGER INFORMATION
- 11.6 SMALL CHILDREN
- 11.7 MEDICAL DEVICES
- 11.8 IMPLANTED MEDICAL DEVICES
- 11.9 HEARING
- 11.10 PROTECT YOUR DEVICE FROM HARMFUL CONTENT
- 11.11 VEHICLES
- 11.12 POTENTIALLY EXPLOSIVE ENVIRONMENTS
- 11.13 ACCESS CODES
- 12 Documents / Resources
About this user guide

For important information on the safe use of your device and battery, read "Product and safety information" before you take the device into use. To find out how to get started with your new device, read the user guide.
Get started
KEEP YOUR PHONE UP TO DATE
Your phone software
Keep your phone up to date and accept available software updates to get new and enhanced features for your phone. Updating the software may also improve your phone's performance.
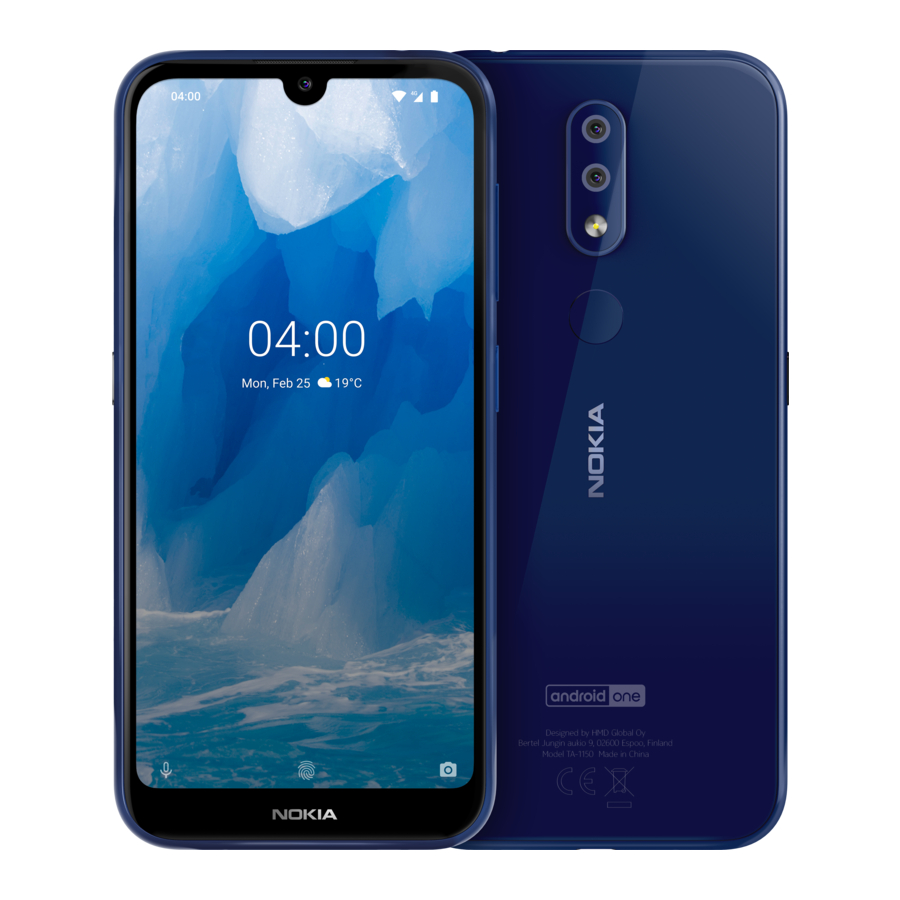
KEYS AND PARTS
Explore the keys and parts of your new phone.
Your phone

This user guide applies to the following models: TA-1157, TA-1150, TA-1133, TA-1149, and TA-1152.
- Fingerprint sensor
- Flash
- Camera
- Headset connector
- SIM and memory card slot
- Google Assistant/Google search key*
- Front camera
- Earpiece
- Volume keys
- Power/Lock key
- USB connector
- Microphone
- Loudspeaker
Some of the accessories mentioned in this user guide, such as charger, headset, or data cable, may be sold separately.
*Google Assistant is available in selected markets and languages. Where not available Google Assistant is replaced by Google Search.
Parts and connectors, magnetism
Do not connect to products that create an output signal, as this may damage the device. Do not connect any voltage source to the audio connector. If you connect an external device or headset, other than those approved for use with this device, to the audio connector, pay special attention to volume levels.
Parts of the device are magnetic. Metallic materials may be attracted to the device. Do not place credit cards or other magnetic stripe cards near the device for extended periods of time, since the cards may be damaged.
INSERT THE SIM AND MEMORY CARDS
Insert the cards

- Open the SIM and memory card tray: Push the tray opener pin into the tray hole and slide the tray out.
- Put the nano-SIM in slot 1 on the tray with the contact area face down. If you have a second SIM, put it in slot 2.
- Put the memory card in the memory card slot.
- Slide the tray back in.
Use only original nano-SIM cards. Use of incompatible SIM cards may damage the card or the device, and may corrupt data stored on the card.
Use only compatible memory cards approved for use with this device. Incompatible cards may damage the card and the device and corrupt data stored on the card.
Do not remove the memory card when an app is using it. Doing so may damage the memory card and the device and corrupt data stored on the card.
CHARGE YOUR PHONE
Charge the battery

- Plug a compatible charger into a power socket.
- Connect the cable to your phone.
Your phone supports the USB micro-B cable. You can also charge your phone from a computer using a USB cable, but it may take longer.
If the battery is completely discharged, it may take several minutes before the charging indicator is displayed.
SWITCH ON AND SET UP YOUR PHONE
When you switch your phone on for the first time, your phone guides you to set up your network connections and phone settings.
Switch on your phone
- To switch on your phone, press and hold the power key until the phone vibrates.
- When the phone is switched on, choose your language and region.
- Follow the instructions shown on your phone.
Transfer data from your previous phone
You can transfer data from an old phone to your new phone using your Google account.
To back up data on your old phone to your Google account, refer to your old phone's user guide.
- Tap Settings > Accounts > Add account > Google.
- Select which data you want to restore on your new phone. The sync starts automatically once your phone is connected to the internet.
Restore app settings from your previous Android™ phone
If your previous phone was an Android, and back up to Google account is enabled on it, you can restore your app settings and Wi-Fi passwords.
- Tap Settings > System > Advanced > Backup.
- Switch Backup to Google Drive to On.
DUAL SIM SETTINGS
If you have a dual SIM variant, you can have 2 SIMs in your phone. For example, one for your work and one for your personal use.
Choose which SIM to use
When, for example, making a call, you can choose which SIM to use by tapping the corresponding SIM 1 or SIM 2 button after you dial the number.
Your phone shows the network status for both SIMs separately. Both SIM cards are available at the same time when the device is not being used, but while one SIM card is active, when, for example, making a call, the other may be unavailable.
Manage your SIMs
Don't want work to interfere with your free time? Or do you have a cheaper data connection on one SIM? You can decide which SIM you want to use.
Tap Settings > Network & Internet > SIM Cards.
Rename a SIM card
Tap the SIM you want to rename, then type in the name you want.
Select which SIM to use for calls or data connection
Under Preferred SIM for, tap the setting you want to change and select the SIM.
SETTING UP FINGERPRINT ID
You can unlock your phone with just a touch of your finger. Set up your fingerprint ID for extra security.
Add a fingerprint
- Tap Settings > Security & location > Fingerprint. If you don't have screen lock set up on your phone, tap NEXT.
- Select which backup unlocking method you want to use for the lock screen and follow the instructions shown on your phone.
PROTECT YOUR PHONE WITH A SCREEN LOCK
You can set your phone to require authentication when unlocking the screen.
Set a screen lock
- Tap Settings > Security & location > Screen lock.
- Choose the type of lock and follow the instructions on your phone.
USE THE TOUCH SCREEN
Avoid scratching the touch screen. Never use an actual pen, pencil, or other sharp object on the touch screen.
Tap and hold to drag an item
Place your finger on the item for a couple of seconds and slide your finger across the screen.

Swipe
Place your finger on the screen and slide your finger in the direction you want.

Scroll through a long list or menu
Slide your finger quickly in a flicking motion up or down the screen and lift your finger. To stop the scrolling, tap the screen.

Zoom in or out
Place 2 fingers on an item, such as a map, photo, or web page, and slide your fingers apart or together.

Lock the screen orientation
The screen rotates automatically when you turn the phone 90°.
To lock the screen in portrait mode, swipe down from the top of the screen, and tap Auto-rotate.
Use the navigation keys
To see which apps you have open, swipe up the home key  .
.
To switch to another app, swipe right.
To close an app, swipe it up.
To go back to the previous screen, tap the Back key <. Your phone remembers all the apps and websites you've visited since the last time your screen was locked.
To go to the home screen, tap the Home key . The app you were in stays open in the background.
Open two apps at once
- To navigate more easily between apps, swipe up the home key
![]() .
. - Tap the app icon at the top of the app and tap the
![]() icon.
icon. - Tap another app in the app list to divide the screen between two apps.
 icon.
icon.To go back to the normal view, tap one of the apps and swipe up.
Basics
OPEN AND CLOSE AN APP
Open an app
On the home screen, tap an app icon to open it. To open one of the apps running in the background, swipe up the home key then swipe right and select the app.
Close an app
Swipe up the home key , then swipe up the app you want to close.
Find your apps
Swipe up the home key , then swipe up again to see all your apps.
Close all running apps
Swipe up the home key , swipe right through all apps, then tap CLEAR ALL.
PERSONALISE YOUR PHONE
Learn how to personalise the home screen and how to change ringtones.
Change your wallpaper
Tap Settings > Display > Wallpaper.
Change your phone ringtone
Tap Settings > Sound > SIM1 Phone ringtone or SIM2 Phone ringtone.
Change your message notification sound
Tap Settings > Sound > Advanced > Default notification sound.
NOTIFICATIONS
Stay in touch with what's happening on your phone with notifications.
Use the notification panel
When you receive new notifications, such as messages or missed calls, indicator icons appear on the status bar at the top of the screen. To see more information about the notifications, drag the status bar down. To close the view, swipe up on the screen.
To open the notification panel, drag the status bar down. To close the notification panel, swipe up on the screen.
To change the notification settings of an app, tap Settings > Apps & notifications and tap the app name to open the app's settings. Tap Notifications. You can turn notifications on or off for each app individually.
 Tip: To see notification dots, tap Settings > Apps & notifications > Notifications and switch Allow notification dots on. A small dot will appear on the app icon if you've got a notification, but haven't attended to it yet. Tap and hold the icon to see available options. You can tap the notification to open it or swipe to dismiss it.
Use the quick setting icons
To activate certain features, tap the quick settings icons on the notification panel. To see more icons, drag the menu down.
To rearrange the icons, tap  , tap and hold an icon, and then drag it to another location.
![]()
CONTROL VOLUME
Change the volume
If you have trouble hearing your phone ringing in noisy environments or calls are too loud, you can change the volume to your liking by using the volume keys on the side of your phone.
Do not connect to products that create an output signal, as this may damage the device. Do not connect any voltage source to the audio connector. If you connect an external device or headset, other than those approved for use with this device, to the audio connector, pay special attention to the volume levels.
Change the volume settings
Press a volume key on the side of your phone to see the volume status bar, tap  , and then drag the sliders on the volume bars left or right.
Set the phone to silent
To set the phone to silent, press a volume key, tap  to set your phone to vibrate only or tap
  to set it to silent.
GOOGLE ASSISTANT
Google Assistant is available in selected markets and languages only. Where not available, Google Assistant is replaced by Google Search. Google Assistant can help you search information online, translate words and sentences, and make notes and calendar appointments, for example. You can use Google Assistant even when your phone is locked. However, Google Assistant asks you to unlock your phone before accessing your private data.
Use the Google Assistant key
To access the Google Assistant services, use the Google Assistant key on the side of your phone:
- Press the key once to start the Google Assistant. When you press the key for the first time, you will be asked to sign in with your Google account or create a new account.
- Press the key twice to see a visual overview of your day, and get suggestions and personalised information
- Press and hold the key to speak with the Google Assistant. Ask your question and release the key. You see the Google Assistant's answer on your phone's display.
If your country or region does not support the Google Assistant, you can still use the Google Assistant key:
- Press the key once to open Google Search
- Press the key twice to open Google visual snapshot and see your agenda for today
- Press and hold the key to use Google voice search. Ask your question and release the key. You will see Google's answer on your phone's display.
Switch off the Google Assistant key
To switch off the Google Assistant key, tap Settings > System > Gestures > Google Assistant Key, and switch Google Assistant Key off.
BATTERY LIFE
Get the most out of your phone while getting the battery life you need. There are steps you can take to save power on your phone.
Extend battery life
To save power:
- Always charge the battery fully.
- Mute unnecessary sounds, such as touch sounds. Tap Settings > Sound > Advanced, and under Other sounds and vibrations, select which sounds to keep.
- Use wired headphones, rather than the phone's speaker.
- Set the phone screen to switch off after a short time. Tap Settings > Display > Advanced > Sleep and select the time.
- Tap Settings > Display > Brightness level. To adjust the brightness, drag the brightness level slider. Make sure that Adaptive brightness is disabled.
- Stop apps from running in the background: swipe up the home key
![]() and swipe up the app you want to close.
and swipe up the app you want to close. - Enable adaptive battery. Limit battery for apps that you don't use often. The notifications may be delayed for these apps. Tap Settings > Battery > Adaptive Battery.
- Switch on the power saver: tap Settings > Battery > Battery saver and switch to On.
- Use location services selectively: switch location services off when you don't need them. Tap Settings > Security & location > Location, and disable Use location.
- Use network connections selectively: switch Bluetooth on only when needed. Use a Wi-Fi connection to connect to the internet, rather than a mobile data connection.
- Stop your phone scanning for available wireless networks. Tap Settings > Network & internet > Wi-Fi, and disable Use Wi-Fi.
- If you're listening to music or otherwise using your phone, but don't want to make or receive calls, switch airplane mode on. Tap Settings > Network & internet > Advanced > Airplane mode. Flight mode closes connections to the mobile network and switches your device's wireless features off.
 and swipe up the app you want to close.
To save power:
- Always charge the battery fully.
- Mute unnecessary sounds, such as touch sounds. Tap Settings > Sound > Advanced, and under Other sounds and vibrations, select which sounds to keep.
- Use wired headphones, rather than the loudspeaker.
- Set the phone screen to switch off after a short time. Tap Settings > Display > Advanced > Sleep and select the time.
- Tap Settings > Display > Advanced > Brightness level. To adjust the brightness, drag the Brightness level slider. Make sure that Adaptive brightness is disabled.
- Stop apps from running in the background: tap
![]() and close the apps you don't need.
and close the apps you don't need. - Enable the Background activity manager. The notifications of some apps or emails may not be able to be retrieved instantly. You can manage the battery life by adding apps to or removing them from the whitelist. Tap Settings > Battery > Background activity manager.
- Switch on the power saver: Tap Settings > Battery > Battery saver and switch to On.
- Use location services selectively: Switch location services off when you don't need them. Tap Settings > Security & Location > Location and switch to Off.
- Use network connections selectively: Switch Bluetooth on only when needed. Use a Wi-Fi connection to connect to the internet, rather than a mobile data connection. Stop your phone from scanning for available wireless networks. Tap Settings > Network & Internet > Wi-Fi and switch to Off. If you're listening to music or otherwise using your phone, but don't want to make or receive calls, switch Flight mode on. Tap Settings > Network & Internet > Flight mode.
 and close the apps you don't need.
Flight mode closes connections to the mobile network and turns your device's wireless features off.
WRITE TEXT
Learn how to write text quickly and efficiently using your phone's keyboard.
Use the on-screen keyboard
Writing with the on-screen keyboard is easy. You can use the keyboard when holding your phone in portrait or landscape mode. The keyboard layout can vary in different apps and languages.
To open the on-screen keyboard, tap a text box.
Switch between upper and lower case characters
Tap the shift key. To switch caps lock mode on, double-tap the key. To return to normal mode, tap the shift key again.
Enter a number or special character
Tap the numbers and symbols key. Some special character keys bring up more symbols. To see more symbols, tap and hold a symbol or special character.
Insert emojis
Tap the emoji key and select the emoji.
Copy or paste text
Tap and hold a word, drag the markers before and after the word to highlight the section you want to copy, and tap Copy. To paste the text, tap where you want to paste the text and select Paste.
Add an accent to a character
Tap and hold the character, then tap the accent or the accented character, if supported by your keyboard.
Delete a character
Tap the backspace key.
Move the cursor
To edit a word you just wrote, tap the word and drag the cursor to the place you want.
Use keyboard word suggestions
Your phone suggests words as you write, to help you write quickly and more accurately. Word suggestions may not be available in all languages.
When you start writing a word, your phone suggests possible words. When the word you want is shown in the suggestion bar, select the word. To see more suggestions, tap and hold the suggestion.
Tip: If the suggested word is marked in bold, your phone will automatically use it to replace the word you wrote. If the word is wrong, tap and hold it to see a few other suggestions. If you do not want the keyboard to suggest words while typing, turn off the text corrections. Tap Settings > System > Languages & input > Virtual keyboard. Select the keyboard you normally use. Tap Text correction and switch off the text correction methods you do not want to use.
Correct a word
If you notice that you have misspelled a word, tap it to see suggestions for correcting the word.
Switch spell checker off
Tap Settings > System > Languages & input > Advanced > Spell checker, and switch Use spell checker off.
DATE AND TIME
Keep track of time – learn how to use your phone as a clock, as well as an alarm clock, and how to keep your appointments, tasks, and schedules up to date.
Set date and time
Tap Settings > System > Date & time.
Update the time and date automatically
You can set your phone to update the time, date, and time zone automatically. Automatic update is a network service and may not be available depending on your region or service provider.
- Tap Settings > System > Date & time.
- Switch Automatic date & time on.
- Switch Automatic time zone on.
Change the clock to the 24-hour format
Tap Settings > System > Date & time, and switch Use 24-hour format on.
CLOCK AND ALARM
Your clock is not just for alarms – learn what else you can do.
Use the countdown timer
No more overcooking – use the countdown timer to measure your cooking times.
- Tap Clock >
![]() TIMER.
TIMER. - Set the duration of the timer.
 TIMER.
 Use the stopwatch
Use the stopwatch to see how you improve on the running track.
Tap Clock >  STOPWATCH.
Set an alarm
You can use your phone as an alarm clock.
- Tap Clock >
![]() ALARM.
ALARM. - To add an alarm, tap
![]() .
. - To modify an alarm, tap it. To set the alarm to repeat on specific dates, select Repeat and highlight the days of the week.

 .
.Set an alarm to Snooze
If you don't want to get up just yet, when the alarm sounds, swipe the alarm left. To adjust the snooze length, tap Clock >  > Settings > Snooze length and select the desired length.
Switch an alarm off
When the alarm sounds, swipe the alarm right.
Delete an alarm
Tap Clock >  ALARM. Select the alarm and tap
  Delete.
ACCESSIBILITY
You can change various settings to make using your phone easier.
Increase or decrease the font size
Do you want to have larger fonts on your phone?
- Tap Settings > Accessibility.
- Tap Font size. To increase or decrease the font size, drag the Font size slider.
Increase or decrease the display size
Do you want to make the items on your screen smaller or larger?
- Tap Settings > Accessibility.
- Tap Display size and adjust the display size by dragging the display size level slider.
FM RADIO
To listen to the radio, you need to connect a compatible headset to the phone. The headset acts as an antenna. The headset may be sold separately.
Listen to FM radio
After you have connected the headset, tap FM Radio.
- To switch the radio on, tap
![]() .
. - To search radio stations, tap
![]() > Scan.
> Scan. - To switch to another station, slide the channel frequency row left or right.
- To save a station, tap
![]() .
. - To listen to a radio station using the phone's speakers, tap
![]() . Keep the headset connected.
. Keep the headset connected. - To switch the radio off, tap
![]() .
.
 .
. >
>  .
. . Keep the headset connected.
 .
. Troubleshooting tip: If the radio doesn't work, make sure the headset is connected properly.
Connect with your friends and family
CALLS
Make a call
- Tap
![]() .
. - Tap
![]() and type in a number, or tap
and type in a number, or tap ![]() and select a contact you want to call.
and select a contact you want to call. - Tap
![]() . If you have a second SIM card inserted, tap the corresponding icon to make a call from that SIM.
. If you have a second SIM card inserted, tap the corresponding icon to make a call from that SIM.
 .
. and type in a number, or tap
  and select a contact you want to call.
Answer a call
When the phone rings, swipe up to answer.
Tip: Don't want to keep your phone in silent mode, but can't answer right now? To silence an incoming call, press the Volume down key.
Reject a call
To reject a call, swipe down.
CONTACTS
Save and organize your friends' and family members' phone numbers.
Save a contact from your call history
- In Phone, tap
![]() to see call history.
to see call history. - Tap the number you want to save.
- Select if you want to Create new contact or Add to a contact.
- Enter the contact information and tap
![]() .
.
 to see call history.
 .
.Add a contact
- Tap Contacts > Create new contact.
- Fill in the information.
- Tap
![]() .
.
Edit a contact
- Tap Contacts and tap the contact you want to edit.
- Tap
![]() .
. - Edit the information.
- Tap
![]() .
.
 .
.Search for a contact
- Tap Contacts.
- Tap
![]() .
.
 .
.SEND AND RECEIVE MESSAGES
Keep in touch with your friends and family members through text messages.
Send a message
- Tap Messages.
- Tap Start chat.
- To add a recipient, tap
![]() in the To field, and type their number. If the recipient is in your contacts list, start typing their name and then tap the contact. If you want to send the message to several recipients, tap Start group conversation, select all the recipients, and tap >.
in the To field, and type their number. If the recipient is in your contacts list, start typing their name and then tap the contact. If you want to send the message to several recipients, tap Start group conversation, select all the recipients, and tap >. - Write your message in the text box.
- Tap
![]() .
.
 in the To field, and type their number. If the recipient is in your contacts list, start typing their name and then tap the contact. If you want to send the message to several recipients, tap
  .
. Tip: If you want to send a photo in a message, tap Photos, tap the photo you want to share, and tap. Select Messages.
Read a message
- Tap Messages.
- Tap the message you want to read. You can also read a message from the notification panel. Slide down from the top of the screen and tap the message.
Reply to a message
- Tap Messages.
- Tap the message you want to reply to.
- Write your reply in the text box below the message and tap
![]() .
.
 .
.You can use your phone to read and reply to emails when you're on the go.
Add an email account
When you use the Gmail app for the first time, you are asked to set up your email account.
- Tap Gmail.
- You can select the address connected with your Google account or tap Add an email address.
- After adding all the accounts, tap TAKE ME TO GMAIL.
Delete an email account
- Tap Settings > Accounts.
- Tap the account you want to delete and then tap REMOVE ACCOUNT.
Send email
- Tap Gmail.
- Tap
![]() .
. - In the To box, type in an address, or tap
![]() > Add from Contacts.
> Add from Contacts. - Enter the message subject and the email.
- Tap
![]() .
.
 .
. >
>  .
.Read and reply to email
- Tap Gmail.
- Tap the message you want to read.
- To reply to the message, tap
![]() or tap
or tap ![]() > Reply all.
> Reply all.
 or tap
 Delete emails
- Tap Gmail.
- Tap the message you want to delete and tap
![]() .
. - To delete multiple messages, tap the circle with the recipient's initial to select messages and tap
![]() .
.
 .
.GET SOCIAL
Want to connect and share stuff with the people in your life? With social apps, you can stay up to date with what's happening with your friends.
Social apps
To keep in touch with your friends and family, sign in to your instant messaging, sharing, and social networking services. Select the service you want to use from your Home screen. Social apps are available in the Google Play Store. The available services may vary.
Camera
CAMERA BASICS
Why carry a separate camera when your phone has all you need for capturing memories? With your phone's camera, you can easily take photos or record videos.
Take a photo
Shoot sharp, vibrant photos – capture the best moments in your photo album.
- Tap Camera.
- Take aim and focus.
- Tap
![]() .
.
 .
.Take a selfie
Need that perfect selfie? Use the phone's front camera to take one.
- Tap Camera >
![]() to switch to the front camera.
to switch to the front camera. - Tap
![]() .
.
 to switch to the front camera.
Take panoramas
- Tap Camera.
- Tap
![]() > Panorama.
> Panorama. - Tap
![]() and follow the instructions on your phone.
and follow the instructions on your phone.
 >
> Take photos with a timer
Want to have time to get in the shot too? Try out the timer.
- Tap Camera >
![]() .
. - Select the time and tap
![]() .
.
 .
.Use Google Lens
With Google Lens, you can use the viewfinder of your camera to identify things, copy text, scan codes, and search for similar products, for example.
- Tap Camera.
- Tap
![]() >
> ![]() .
. - Point the camera at the thing you want to identify, and follow the instructions on the display.
 .
. Tip: You can use Google Lens with the photos you've already taken. Tap Photos, tap the photo, and tap.
VIDEOS
Record a video
- Tap Camera.
- To switch to the video recording mode, swipe left.
- Tap
![]() to start recording.
to start recording. - To stop recording, tap
![]() .
. - To go back to camera mode, swipe right.
 .
.USE YOUR CAMERA LIKE A PRO
Set the camera to Pro mode
Tap Camera > Pro.
Pick the best exposure
To change the exposure settings, in Pro mode, tap  , and choose the setting.
Take high quality photos
In Camera app, tap  > Photo Resolution, and set the resolution that you want to use.
HAVE FUN WITH THE CAMERA
Want a laugh? Try out the different animojis. Or if you're looking dreary, use a filter to take a beauty shot.
Use animated emojis
Tap Camera >  .
.
- To take an animated emoji shot of your friend, aim the camera at your friend's face, select an animal character, and tap
![]() .
. - To take an animated emoji shot of yourself, tap
![]() , select an animal character, and tap
, select an animal character, and tap ![]() .
.
 .
. , select an animal character, and tap
 Take a beauty shot
Even after a long night, you can still look your best. Take a selfie with the beauty filter.
- Tap Camera >
![]() .
. - Tap
![]() >,
>, ![]() and drag the slider to adjust it.
and drag the slider to adjust it. - Tap
![]() .
.
 and drag the slider to adjust it.
 .
.YOUR PHOTOS AND VIDEOS
View photos and videos on your phone
Want to relive those important moments? View photos and videos on your phone.
Tap Photos.
Copy your photos and videos to your computer
Do you want to view your photos or videos on a larger screen? Move them to your computer.
You can use your computer's file manager to copy or move your photos and videos to the computer.
Connect your phone to the computer with a compatible USB cable. To set the USB connection type, open the notification panel and tap the USB notification.
Share your photos and videos
You can share your photos and videos quickly and easily for your friends and family to see.
- In Photos, tap the photo you want to share and tap
![]() .
. - Select how you want to share the photo or video.
 .
.Internet and connections
ACTIVATE WI-FI
Using a Wi-Fi connection is generally faster and less expensive than using a mobile data connection. If both Wi-Fi and mobile data connections are available, your phone uses the WiFi connection.
Turn on Wi-Fi
- Tap Settings > Network & internet > Wi-Fi.
- Switch Use Wi-Fi on.
- Select the connection you want to use.
Your Wi-Fi connection is active when  is shown on the status bar at the top of the screen.
Use encryption to increase the security of your Wi-Fi connection. Using encryption reduces the risk of others accessing your data.
Tip: If you want to track locations when satellite signals are not available, for example when you're indoors or between tall buildings, switch Wi-Fi on to improve positioning accuracy.
1  Note: Using Wi-Fi may be restricted in some countries. For example, in the EU, you are only allowed to use 5150‑5350 MHz Wi-Fi indoors, and in the USA and Canada, you are only allowed to use 5.15‑5.25 GHz Wi-Fi indoors. For more information, contact your local authorities.
Use encryption to increase the security of your Wi-Fi connection. Using encryption reduces the risk of others accessing your data.
USE A MOBILE DATA CONNECTION
Close the mobile data connection
Swipe down from the top of the screen, tap Mobile data and switch it off.
Turn on the mobile data connection
Swipe down from the top of the screen, tap Mobile data and switch it on.
Use a mobile data connection when roaming
Tap Settings > Network & internet > Mobile network, and switch Roaming to On. 1
Tip: To follow your data usage, tap Settings > Network & internet > Data usage.1
Connecting to the internet when roaming, especially when abroad, can raise data costs substantially.
BROWSE THE INTERNET
Use your phone to connect your computer to the internet
It's simple to use the internet on your laptop on the go. Turn your phone into a Wi-Fi hotspot and use your mobile data connection to access the internet with your laptop or other device.
- Tap Settings > Network & Internet > Hotspot & tethering.
- Switch on the Wi-Fi hotspot to share your mobile data connection over Wi-Fi, USB tethering to use a USB connection, or Bluetooth tethering to use Bluetooth.
The other device uses data from your data plan, which may result in data traffic costs. For information on availability and costs, contact your network service provider.
Start browsing
No need for a computer – you can easily browse the internet on your phone. Catch up on the news and visit your favourite websites. You can use the browser on your phone to view web pages on the internet.
- Tap Chrome.
- Enter a web address and tap
![]() .
.
 .
. Tip: If your network service provider doesn't charge you a fixed fee for data transfer, to save on data costs, use a Wi-Fi network to connect to the internet.
Search the web
Explore the web and the outside world with Google Search. You can use the keyboard to enter your search words.
In Chrome,
- Tap the search bar.
- Enter your search word in the search box.
- Tap
![]() .
.
 .
.You can also select a search word from the proposed matches.
BLUETOOTH®
You can connect wirelessly to other compatible devices, such as phones, computers, headsets, and car kits. You can also send your photos to compatible phones or to your computer.
Connect to a Bluetooth accessory
You can connect your phone with many useful Bluetooth devices. For example, with a wireless headset (sold separately), you can speak on the phone hands-free – you can continue what you're doing, such as working at your computer, during a call. Connecting a phone to a Bluetooth device is called pairing.
- Tap Settings > Connected devices > Connection preferences > Bluetooth .
- Switch Bluetooth to On.
- Make sure the other device is switched on. You may need to start the pairing process from the other device. For details, see the user guide for the other device.
- To pair your phone and the device, tap the device in the list of discovered Bluetooth devices.
- You may need to enter a passcode. For details, see the user guide for the other device.
Since devices with Bluetooth wireless technology communicate using radio waves, they do not need to be in direct line-of-sight. Bluetooth devices must, however, be within 10 metres (33 feet) of each other, although the connection may be subject to interference from obstructions such as walls or from other electronic devices.
Paired devices can connect to your phone when Bluetooth is switched on. Other devices can detect your phone only if the Bluetooth settings view is open.
Do not pair with or accept connection requests from unknown devices. This helps to protect your phone from harmful content.
Remove a pairing
If you no longer have the device that you paired your phone with, you can remove the pairing.
- Tap Settings > Connected devices > PREVIOUSLY CONNECTED DEVICES.
- Tap
![]() next to a device name.
next to a device name. - Tap FORGET.
 next to a device name.
Connect to your friend's phone with Bluetooth
You can use Bluetooth to wirelessly connect to your friend's phone, to share photos, and much more.
- Tap Settings > Connected devices > Connection preferences > Bluetooth.
- Make sure Bluetooth is switched on on both phones.
- Make sure the phones are visible to each other. You need to be in the Bluetooth settings view for your phone to be visible to other phones.
- You can see the Bluetooth phones within range. Tap the phone you want to connect to.
- If the other phone needs a passcode, enter or accept the passcode, and tap Pair.
The passcode is only used when you connect to something for the first time.
Send your content using Bluetooth
When you want to share your content or send photos you've taken to a friend, use Bluetooth to send them to compatible devices.
You can use more than one Bluetooth connection at a time. For example, while using a Bluetooth headset, you can still send things to another device.
- Tap Settings > Connected devices > Connection preferences > Bluetooth.
- Switch Bluetooth to On.
- Go to the content you want to send and tap
![]() > Bluetooth.
> Bluetooth. - Tap the device to connect to. You can see the Bluetooth devices within range.
- If the other device needs a passcode, enter the passcode. The passcode, which you can make up, must be entered on both devices. The passcode in some devices is fixed. For details, see the user guide for the other device.
 >
> The location of the received files depends on the other device. For details, see the user guide for the other device.
NFC
Explore the world around you. If your phone supports Near Field Communication (NFC), you can tap accessories to connect to them, and tap tags to call someone or go to a website. The NFC functionality can be used with some specific services and technologies like tap to pay with your device. These services might not be available in your region. For additional info about the availability of these services, contact your network service provider.
Get started with NFC
Switch on the NFC features in your phone and start tapping to share stuff or connect to devices. To see if your phone supports NFC, tap Settings > Connected devices > Connection Preferences.
With NFC, you can:
- Connect to compatible Bluetooth accessories that support NFC, such as a headset or a wireless loudspeaker.
- Tap tags to get more content for your phone or to access online services.
- Pay with your phone, if supported by your network service provider.
The NFC area is on the back of your phone. Tap other phones, accessories, tags, or readers with the NFC area.
- Tap Settings > Connected devices > Connection preferences > NFC.
- Switch NFC on.
Before using NFC, make sure the screen and keys are unlocked.
Read NFC tags
NFC tags can contain information, such as a web address, a phone number, or a business card. The information you want is just a tap away.
To read a tag, tap the tag with the NFC area of your phone.
Note: Payment and ticketing apps and services are provided by third parties. HMD Global does not provide any warranty or take any responsibility for any such apps or services including support, functionality, transactions, or loss of any monetary value. You may need to reinstall and activate the cards you have added as well as the payment or ticketing app after repair of your device.
Connect to a Bluetooth accessory with NFC
Hands busy? Use a headset. Or why not listen to music using wireless speakers? You only need to tap the compatible accessory with your phone.
- Tap the NFC area of the accessory with the NFC area of your phone.*
- Follow the instructions on the screen.
*Accessories are sold separately. The availability of accessories varies by region.
Disconnect the connected accessory
If you don't need to be connected to the accessory anymore, you can disconnect the accessory.
Tap the NFC area of the accessory again.
For more information, see the accessory's user guide.
VPN
You may need a Virtual Private Network (VPN) connection to access your company resources, such as intranet or corporate mail, or you may use a VPN service for personal purposes.
Contact your company IT administrator for details of your VPN configuration or check your VPN service's website for additional information.
Use a secure VPN connection
- Tap Settings > Network & Internet > Advanced > VPN.
- To add a VPN profile, tap +.
- Enter the profile information as instructed by your company IT administrator or VPN service.
Edit a VPN profile
- Tap
![]() next to a profile name.
next to a profile name. - Change the information as required.
Delete a VPN profile
- Tap
![]() next to a profile name.
next to a profile name. - Tap FORGET VPN.
Organize your day
CALENDAR
Keep track of time – learn how to keep your appointments, tasks, and schedules up to date.
Manage calendars
Tap Calendar >  , and select the type of calendar you want to see.
Calendars are added automatically when you add an account to your phone. To add a new account with a calendar, go to the apps menu and tap Settings > Accounts > Add account.
Add an event
To remember an appointment or an event, add it to your calendar.
- Tap Calendar > + and select an entry type.
- Type in the details you want and set the time.
- To make an event repeat on certain days, tap More options > Does not repeat, and select how often the event should repeat.
- To add a notification to the event, tap Add a notification.
- Tap Save.
Tip: To edit an event, tap the event and  , and edit the details.
Delete an appointment
- Tap the event.
- Tap
![]() > Delete.
> Delete.
 >
> Maps
FIND PLACES AND GET DIRECTIONS
Find a spot
Google Maps helps you find specific locations and businesses.
- Tap Maps.
- Enter search words, such as a street address or place name, in the search bar.
- Select an item from the list of proposed matches as you write or tap to search.
The location is shown on the map. If no search results are found, make sure the spelling of your search words is correct.
See your current location
Tap Maps >  .
.
Get directions to a place
Get directions for walking, driving, or using public transport – use your current location or any other place as the start point.
- Tap Maps and enter your destination in the search bar.
- Tap Directions. The highlighted icon shows the mode of transportation, for example
![]() . To change the mode, select the new mode under the search bar.
. To change the mode, select the new mode under the search bar. - If you don't want the starting point to be your current location, tap Your location and search for a new starting point.
- Tap START to start the navigation.
 . To change the mode, select the new mode under the search bar.
The route is shown on the map, along with an estimate of how long it should take to get there.
To see detailed directions, swipe up from the bottom of the screen.
DOWNLOAD AND UPDATE MAPS
Download a map
Save new maps to your phone before a journey, so you can browse the maps without an internet connection when traveling.
- Tap Maps >
![]() > Offline maps > SELECT YOUR OWN MAP.
> Offline maps > SELECT YOUR OWN MAP. - Select the area on the map and tap DOWNLOAD.
Update an existing map
- Tap Maps >
![]() > Offline maps and the map name.
> Offline maps and the map name. - Tap UPDATE.
Tip: You can also set your phone to update the maps automatically. Tap Maps >  > Offline maps >
  and switch Automatically update offline maps and Automatically download offline maps to On.
Delete a map
- Tap Maps >
![]() > Offline maps and the map name.
> Offline maps and the map name. - Tap DELETE.
USE LOCATION SERVICES
Use Maps to find out where you are, attach your location to the photos you take. Location info can be attached to a photo or video, if your location can be determined using satellite or network technology. If you share a photo or video that contains location info, the location info may be shown to those who view the photo or video. Some apps can use your location information to offer you a wider variety of services.
Switch on location services
Your phone shows your location on the map using a satellite positioning system, Wi-Fi, or network (Cell ID) based positioning.
The availability, accuracy, and completeness of the location information depend on your location, surroundings, third-party sources, and other factors, and may be limited. Location information may not be available inside buildings or underground, for example. For privacy info related to positioning methods, see the HMD Global Privacy Policy, available at http://www.hmd.com/privacy.
Some satellite positioning systems may require small amounts of data to be transferred over the mobile network. If you want to avoid data costs, when traveling, for example, you can switch the mobile data connection off in your phone settings.
Wi-Fi positioning improves positioning accuracy when satellite signals are not available, especially when you are indoors or between tall buildings. If you're in a place where the use of Wi-Fi is restricted, you can switch Wi-Fi off in your phone settings.
Tap Settings > Security & location, and switch Location on.
Apps and services
GOOGLE PLAY
Your Android phone can live up to its full potential with Google Play – apps, music, movies, and books are all readily available for your entertainment.
Add a Google account to your phone
- Tap Settings > Accounts > Add account > Google. If asked, confirm your device lock method.
- Type in your Google account credentials and tap Next, or, to create a new account, tap Create account.
- Follow the instructions on your phone.
Download apps
Unleash your phone's potential – there are thousands of apps waiting in the Google Play Store to help you with this.1
- Tap Play Store.
- Tap the search bar to look for apps, or select apps from your recommendations.
- In the app description, tap INSTALL to download and install the app.
To see your apps, go to the home screen and swipe up from the bottom of the screen.
Update apps
Update your Play Store apps to get all the latest features and bug fixes.
- Tap Play Store >
![]() > My apps & games to see available updates.
> My apps & games to see available updates. - Tap the app with an update available and UPDATE.
You can also update all apps at once. In My apps & games, tap UPDATE ALL.
Remove downloaded apps
Tap Play Store > > My apps & games, choose an app you want to remove, and then tap UNINSTALL.
Get music, films, or books with Google Play
With Google Play, you can gain access to songs, movies, and books.
Tap Music, Movies, or Books to learn more.
1 You need to have a Google account added to your phone to use Google Play services. Charges may apply to some of the content available in Google Play. To add a payment method, tap Play Store > Menu > Account > Payment methods. Always make sure you have permission from the bill payer when buying content from Google Play.
Software updates and backups
UPDATE YOUR PHONE SOFTWARE
Stay in step with the beat – update your phone software and apps wirelessly to get new and enhanced features for your phone. Updating the software may also improve your phone performance.
Install available updates
Tap Settings > System > Advanced > System update to check if updates are available.
When your phone notifies you that an update is available, just follow the instructions shown on the screen. If your phone is low on memory, you may need to move your photos and other stuff to the memory card.

If you install a software update, you cannot use the device, even to make emergency calls, until the installation is completed and the device is restarted.
Before starting the update, connect a charger or make sure the device battery has enough power, and connect to Wi-Fi, as the update packages may use up a lot of mobile data.
BACK UP YOUR DATA
To ensure your data is safe, use the backup feature in your phone. Your device data (such as Wi-Fi passwords and call history) and app data (such as settings and files stored by apps) will be backed up remotely.
Switch on automatic backup
Tap Settings > System > Advanced > Backup, and switch Backup on.
RESTORE ORIGINAL SETTINGS AND REMOVE PRIVATE CONTENT FROM YOUR PHONE
Accidents can happen – if your phone is not working properly, you can restore its settings. Or, if you buy a new phone, or otherwise want to dispose of or recycle your phone, here's how you can remove your personal info and content. Note that it is your responsibility to remove all private content.
Reset your phone
- Tap Settings > System > Advanced > Reset options > Erase all data (factory reset).
- Follow the instructions shown on your phone.
STORAGE
To check how much memory you have available, tap Settings > Storage.
Check available memory on your phone
If the phone memory is getting full, first check for and remove things you no longer need:
- Text, multimedia, and email messages
- Contact entries and details
- Apps
- Music, photos, or videos
Instead of removing them, you can also move the files to the memory card.
The quality of your memory card may greatly affect the performance of your phone. To get the best out of your phone, use a fast 4‑128 GB card from a well-known manufacturer.
Use only compatible memory cards approved for use with this device. Incompatible cards may damage the card and the device and corrupt data stored on the card.
To check how much memory you have available and how it's being used, tap Settings > Storage.
Remove downloaded apps
Tap Play Store > > My apps & games, choose an app you want to remove, and then tap UNINSTALL.
Disable an app
You can't delete some apps that were pre-installed on your device. But you can disable them and they will be hidden from the list of apps on your device. If you disable an app, you can add it back to your device.
- Tap Settings > Apps & notifications.
- Tap the app name.
- Tap DISABLE. You may not be able to disable all apps.
If an installed app depends on a removed app, the installed app may stop working. For details, see the user documentation of the installed app.
Re-add a disabled app
You can add a disabled app back onto the list of apps.
- Tap Settings > Apps & notifications.
- Tap the app name.
- Tap ENABLE.
Copy content between your phone and computer
You can copy photos, videos, and other content created by you between your phone and computer to show or store them.
- Connect your phone to a compatible computer with a compatible USB cable.
- On your computer, open a file manager, and browse to your phone.
- Drag and drop items from your phone to the computer or from your computer to the phone.
Make sure you put the files in the right folders on your phone or you may not be able to see them.
Product and safety information
FOR YOUR SAFETY
Read these simple guidelines. Not following them may be dangerous or against local laws and regulations. For further information, read the complete user guide.
- SWITCH OFF IN RESTRICTED AREAS
Switch the device off when mobile device use is not allowed or when it may cause interference or danger, for example, in aircraft, in hospitals, or near medical equipment, fuel, chemicals, or blasting areas. Obey all instructions in restricted areas. - ROAD SAFETY COMES FIRST
Obey all local laws. Always keep your hands free to operate the vehicle while driving. Your first consideration while driving should be road safety. - INTERFERENCE
All wireless devices may be susceptible to interference, which could affect performance. - AUTHORISED SERVICE
Only authorised personnel may install or repair this product. - BATTERIES, CHARGERS, AND OTHER ACCESSORIES
Use only batteries, chargers and other accessories approved by HMD Global Oy for use with this device. Do not connect incompatible products. - KEEP YOUR DEVICE DRY
If your device is water-resistant, see its IP rating in the device's technical specifications for more detailed guidance. - GLASS PARTS
The device and/or its screen is made of glass. This glass can break if the device is dropped on a hard surface or receives a substantial impact. If the glass breaks, do not touch the glass parts of the device or attempt to remove the broken glass from the device. Stop using the device until the glass is replaced by authorised service personnel. - PROTECT YOUR HEARING
To prevent possible hearing damage, do not listen at high volume levels for long periods. Exercise caution when holding your device near your ear while the loudspeaker is in use. - SAR
This device meets RF exposure guidelines when used either in the normal use position against the ear or when positioned at least 1.5 centimetres (5/8 inch) away from the body. The specific maximum SAR values can be found in the Certification Information (SAR) section of this user guide. For more information, see the Certification Information (SAR) section of this user guide or go to www.sar-tick.com.
NETWORK SERVICES AND COSTS
Using some features and services, or downloading content, including free items, requires a network connection. This may cause the transfer of large amounts of data, which may result in data costs. You may also need to subscribe to some features.
4G/LTE might not be supported by your network service provider or by the service provider you are using when travelling. In these cases, you may not be able to make or receive calls, send or receive messages, or use mobile data connections. To make sure your device works seamlessly when full 4G/LTE service is not available, it is recommended that you change the highest connection speed from 4G to 3G. To do this, on the home screen, tap Settings > Network & Internet > Mobile network and switch Preferred network type to 3G. For more information, contact your network service provider.
Note: Using Wi-Fi may be restricted in some countries. For example, in the EU, you are only allowed to use 5150‑5350 MHz Wi-Fi indoors, and in the USA and Canada, you are only allowed to use 5.15‑5.25 GHz Wi-Fi indoors. For more information, contact your local authorities. For more information, contact your network service provider.
EMERGENCY CALLS
Connections in all conditions cannot be guaranteed. Never rely solely on any wireless phone for essential communications like medical emergencies.
Before making the call:
- Switch the phone on.
- If the phone screen and keys are locked, unlock them.
- Move to a place with adequate signal strength.
On the home screen, tap  .
.
- Type in the official emergency number for your present location. Emergency call numbers vary by location.
- Tap
![]() .
. - Give the necessary information as accurately as possible. Do not end the call until given permission to do so.
You may also need to do the following:
- Put a SIM card in the phone. If you don't have a SIM card, on the lock screen, tap Emergency.
- If your phone asks for a PIN code, tap Emergency.
- Switch the call restrictions off in your phone, such as call barring, fixed dialling, or closed user group.
- If the mobile network is not available, you may also try making an internet call, if you can access the internet.
TAKE CARE OF YOUR DEVICE
Handle your device, battery, charger, and accessories with care. The following suggestions help you keep your device operational.
- Keep the device dry. Precipitation, humidity, and all types of liquids or moisture can contain minerals that corrode electronic circuits.
- Do not use or store the device in dusty or dirty areas.
- Do not store the device in high temperatures. High temperatures may damage the device or battery.
- Do not store the device in cold temperatures. When the device warms to its normal temperature, moisture can form inside the device and damage it.
- Do not open the device other than as instructed in the user guide.
- Unauthorised modifications may damage the device and violate regulations governing radio devices.
- Do not drop, knock, or shake the device or the battery. Rough handling can break it.
- Only use a soft, clean, dry cloth to clean the surface of the device.
- Do not paint the device. Paint can prevent proper operation.
- Keep the device away from magnets or magnetic fields.
- To keep your important data safe, store it in at least two separate places, such as your device, memory card, or computer, or write down important information.
During extended operation, the device may feel warm. In most cases, this is normal. To avoid getting too warm, the device may automatically slow down, close apps, switch off charging, and if necessary, switch itself off. If the device is not working properly, take it to the nearest authorised service facility.
BATTERY AND CHARGER INFORMATION
Battery and charger information
To check if your phone has a removable or non-removable battery, see the printed guide.
Devices with a removable battery
Only use your device with its original rechargeable battery.
The battery can be charged and discharged hundreds of times, but it will eventually wear out. When the talk and standby times are noticeably shorter than normal, replace the battery.
Devices with a non-removable battery
Do not attempt to remove the battery, as you may damage the device. The battery can be charged and discharged hundreds of times, but it will eventually wear out. When the talk and standby times are noticeably shorter than normal, take the device to the nearest authorised service facility to have the battery replaced.
Charge your device with a compatible charger. Charger plug type may vary. Charging time can vary depending on device capability.
Battery and charger safety information
Once your device is fully charged, unplug the charger from the device and electrical outlet. Please note that continuous charging should not exceed 12 hours. If left unused, a fully charged battery will lose its charge over time.
Extreme temperatures reduce the capacity and lifetime of the battery. Always keep the battery between 15°C and 25°C (59°F and 77°F) for optimal performance. A device with a hot or cold battery may not work temporarily. Note that the battery may drain quickly in cold temperatures and lose enough power to switch off the phone within minutes. When you are outdoors in cold temperatures, keep your phone warm.
Obey local regulations. Recycle when possible. Do not dispose as household waste.
Do not expose the battery to extremely low air pressure or extremely high temperature, such as disposing of it in a fire, as that may cause the battery to explode or leak flammable liquid or gas.
Do not dismantle, cut, crush, bend, puncture, or otherwise damage the battery in any way. If a battery leaks, do not let the liquid touch the skin or eyes. If this happens, immediately flush the affected areas with water or seek medical help. Do not modify, attempt to insert foreign objects into the battery, or immerse or expose it to water or other liquids. Batteries may explode if damaged.
Use the battery and charger for their intended purposes only. Improper use or use of unapproved or incompatible batteries or chargers may present a risk of fire, explosion, or other hazard, and may invalidate any approval or warranty. If you believe the battery or charger is damaged, take it to a service centre or your phone dealer before continuing to use it. Never use a damaged battery or charger. Only use the charger indoors. Do not charge your device during a lightning storm. When charger is not included in the sales pack, charge your device using the data cable (included) and a USB power adaptor (may be sold separately). You can charge your device with third-party cables and power adaptors that are compliant with USB 2.0 or later and with applicable country regulations and international and regional safety standards. Other adaptors may not meet applicable safety standards, and charging with such adaptors could pose a risk of property loss or personal injury.
To unplug a charger or an accessory, hold and pull the plug, not the cord.
Additionally, the following applies if your device has a removable battery:
- Always switch the device off and unplug the charger before removing any covers or the battery.
- Accidental short-circuiting can happen when a metallic object touches the metal strips on the battery. This may damage the battery or the other object.
SMALL CHILDREN
Your device and its accessories are not toys. They may contain small parts. Keep them out of the reach of small children.
MEDICAL DEVICES
Operation of radio transmitting equipment, including wireless phones, may interfere with inadequately shielded medical devices' function. Consult a physician or the medical device's manufacturer to determine if it is adequately shielded from external radio energy.
IMPLANTED MEDICAL DEVICES
To avoid potential interference, manufacturers of implanted medical devices (such as cardiac pacemakers, insulin pumps and neurostimulators) recommend a minimum separation of 15.3 centimetres (6 inches) between a wireless device and the medical device. Persons who have such devices should:
- Always keep the wireless device more than 15.3 centimeters (6 inches) from the medical device.
- Not carry the wireless device in a breast pocket.
- Hold the wireless device to the ear opposite the medical device.
- Switch the wireless device off if there is any reason to suspect that interference is taking place.
- Follow the manufacturer directions for the implanted medical device.
If you have any questions about using your wireless device with an implanted medical device, consult your health care provider.
HEARING
When you use the headset, your ability to hear outside sounds may be affected. Do not use the headset where it can endanger your safety.
Some wireless devices may interfere with some hearing aids.
PROTECT YOUR DEVICE FROM HARMFUL CONTENT
Your device may be exposed to viruses and other harmful content. Take the following precautions:
- Be cautious when opening messages. They may contain malicious software or otherwise be harmful to your device or computer.
- Be cautious when accepting connectivity requests, browsing the internet, or downloading content. Do not accept Bluetooth connections from sources you do not trust.
- Only install and use services and software from sources that you trust and that offer adequate security and protection.
- Install antivirus and other security software on your device and any connected computer. Only use one antivirus app at a time. Using more may affect performance and operation of the device and/or computer.
- If you access preinstalled bookmarks and links to third party internet sites, take the appropriate precautions. HMD Global does not endorse or assume liability for such sites.
VEHICLES
Radio signals may affect improperly installed or inadequately shielded electronic systems in vehicles. For more information, check with the manufacturer of your vehicle or its equipment. Only authorised personnel should install the device in a vehicle. Faulty installation may be dangerous and invalidate your warranty. Check regularly that all wireless device equipment in your vehicle is mounted and operating properly. Do not store or carry flammable or explosive materials in the same compartment as the device, its parts, or accessories. Do not place your device or accessories in the air bag deployment area.
POTENTIALLY EXPLOSIVE ENVIRONMENTS
Switch your device off in potentially explosive environments, such as near petrol or diesel pumps. Sparks may cause an explosion or fire resulting in injury or death. Note restrictions in areas with fuel, at chemical plants, or where blasting operations are in progress. Areas with a potentially explosive environment may not be clearly marked. These are usually areas where you are advised to switch your engine off, such as below deck on boats, chemical transfer or storage facilities, and where the air contains chemicals or particles. Check with the manufacturers of vehicles using liquefied petroleum gas (such as propane or butane) to see if this device can be safely used in their vicinity.
ACCESS CODES
Learn what the different codes on your phone are for.
PIN or PIN2
PINs or PIN2s have 4-8 digits.
These codes protect your SIM card against unauthorised use or are required to access some features. You can set your phone to ask for the PIN when you switch it on.
If you forget the codes or they aren't supplied with your card, contact your network service provider.
If you enter the code incorrectly 3 times in a row, you'll need to unblock the code with the PUK or PUK2 code.
PUK or PUK2 codes
PUK or PUK2 codes are required to unblock a PIN or PIN2.
If the codes are not supplied with your SIM card, contact your network service provider.
Lock code
Lock code is also known as security code or password.
The lock code helps you protect your phone against unauthorised use. You can set your phone to ask for the lock code that you define. Keep the code secret and in a safe place, separate from your phone.
If you forget the code and your phone is locked, your phone will require service. Additional charges may apply and all the personal data on your phone may be deleted. For more info, contact the nearest authorised service facility for your phone, or your phone dealer.
IMEI code
The IMEI code is used to identify phones in the network. You may also need to give the number to your authorised service facility services or phone dealer.
To view your IMEI number, dial *#06#.
Your phone's IMEI code is also printed either on your phone or on the SIM tray depending on your phone model. If your phone has a removable back cover, you can find the IMEI code under the cover.
The IMEI is also visible on the original sales box.
Locate or lock your phone
If you lose your phone, you may be able to find, lock or erase it remotely if you have signed in to a Google Account. Find My Device is on by default for phones associated with a Google Account.
To use Find My Device, your lost phone must be:
- Turned on
- Signed in to a Google Account
- Connected to mobile data or Wi-Fi
- Visible on Google Play
- Location turned on
- Find My Device turned on
When Find My Device connects with your phone, you see the phone's location and the phone gets a notification.
- Open android.com/find on a computer, tablet or phone connected to the Internet and sign in to your Google Account.
- If you have more than one phone, click the lost phone at the top of the screen.
- On the map, see about where the phone is. The location is approximate and may not be accurate.
If your device can't be found, Find My Device will show its last known location, if available. To lock or erase your phone, follow the instructions on the website.
Documents / Resources
References

Download manual
Here you can download full pdf version of manual, it may contain additional safety instructions, warranty information, FCC rules, etc.
Download Nokia 4.2, TA-1157, TA-1150, TA-1133, TA-1149, TA-1152 Manual
Advertisement


Need help?
Do you have a question about the 4.2 and is the answer not in the manual?
Questions and answers