Table of Contents
Advertisement
Quick Links
Download this manual
See also:
Service Manual
OPERATING INSTRUCTIONS
INSTRUCCIONES DE MANEJO
MODE D'EMPLOI
WARNING
TO REDUCE THE RISK OF FIRE OR
ELECTRIC SHOCK, DO NOT
EXPOSE THIS APPLIANCE TO RAIN
OR MOISTURE.
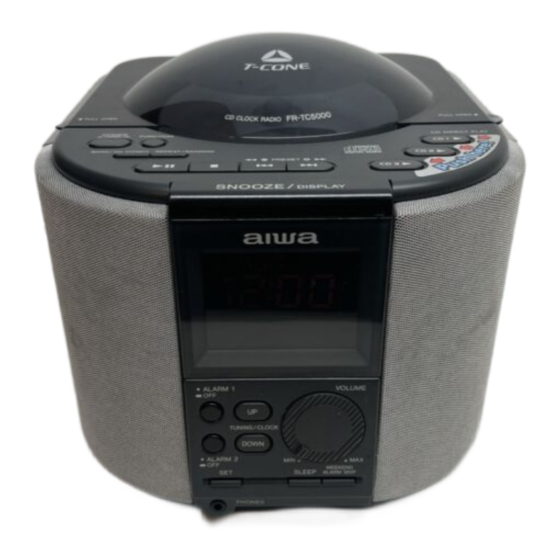
FR-TC5000
COMPACT DISC STEREO RADIO
RECEIVER
RECEPTOR DE RADIO ESTEREO CON
DISCOS COMPACTOS
OWNER'S RECORD
For your convenience, record the model number (you will find
it on the rear of the unit) and serial number (you will find it in
the battery compartment) in the space provided below.
Please refer to them when you contact your AIWA dealer in
case of difficulty.
Model No.
FR-TC5000
Serial No.
U,C
Advertisement
Table of Contents

Related Manuals for Aiwa FR-TC5000


Summary of Contents for Aiwa FR-TC5000
-
Page 1: Operating Instructions
For your convenience, record the model number (you will find it on the rear of the unit) and serial number (you will find it in the battery compartment) in the space provided below. Please refer to them when you contact your AIWA dealer in case of difficulty. Model No. -
Page 2: Important Safety Instructions
WARNING To reduce the risk of fire or electric shock, do not expose this appliance to rain or moisture. CAUTION RISK OF ELECTRIC SHOCK DO NOT OPEN “CAUTION:TO REDUCE THE RISK OF ELECTRIC SHOCK, DO NOT REMOVE COVER (OR BACK). NO USER-SERVICEABLE PARTS INSIDE. -
Page 3: Instrucciones Importantes De Seguridad
INSTRUCCIONES IMPORTANTES DE SEGURIDAD Lea cuidadosa y completamente el manual de instrucciones antes de utilizar la unidad. Asegúrese de guardar el manual de instrucciones para utilizarlo como referencia en el futuro. Todas las advertencias y precauciones del manual de instrucciones y de la unidad deberán cumplirse estrictamente, así... - Page 4 ADVERTENCIA Para reducir el riesgo de incendios o de descargas eléctricas, no exponga esta unidad a la lluvia ni a la humedad. CAUTION RISK OF ELECTRIC SHOCK DO NOT OPEN “CAUTION:TO REDUCE THE RISK OF ELECTRIC SHOCK, DO NOT REMOVE COVER (OR BACK). NO USER-SERVICEABLE PARTS INSIDE.
- Page 5 INSTRUCCIONES IMPORTANTES DE SEGURIDAD Accesorios — No coloque la unidad sobre un carrito, soporte, trípode, ménsula, ni mesa inestable. La unidad podría caerse y provocar lesiones serias a niños y adultos. Utilícela solamente sobre un carrito, soporte, trípode, ménsula, o mesa recomendada por el fabricante, o que se venda con dicha unidad.
- Page 6 ATTENTION Pour réduire les risques d’incendie ou de décharge électrique, ne pas exposer cet appareil à la pluie ou à l’humidité. CAUTION RISK OF ELECTRIC SHOCK DO NOT OPEN “CAUTION:TO REDUCE THE RISK OF ELECTRIC SHOCK, DO NOT REMOVE COVER (OR BACK). NO USER-SERVICEABLE PARTS INSIDE.
- Page 7 INSTRUCCIONES IMPORTANTES DE SEGURIDAD Energía eléctrica Fuentes de alimentación — Esta unidad solamente deberá utilizarse con la fuente de alimentación del tipo indicado en la etiqueta. Si no está seguro del tipo de fuente de alimentación de su hogar, póngase en contacto con el proveedor de unidad o con la compañía de suministro eléctrico.
- Page 8 NOTE This equipment has been tested and found to comply with the limits for a Class B digital device, pursuant to Part 15 of the FCC Rules. These limits are designed to provide reasonable protection against harmful interference in a residential installation. This equipment generates, uses, and can radiate radio frequency energy and, if not installed and used in accordance with the instructions, may cause harmful interference to radio...
- Page 9 INSTRUCCIONES IMPORTANTES DE SEGURIDAD Tormentas eléctricas Para proteger bien esta unidad contra tormentas eléctricas, o cuando no vaya a utilizarse durante mucho tiempo, desenchúfela del tomacorriente de la red, o desconecte la antena o el sistema de cable. Esto evitará que se dañe la unidad debido a rayos o a sobrecorrientes de la red.
- Page 10 REMARQUE Cet appareil a été testé et jugé conforme aux limites des appareils numériques de Classe B, conformément à la Partie 15 des Règles FCC. Ces limites sont conçues pour fournir une protection raisonnable contre les interférences néfastes dans une installation résidentielle. Cet appareil produit, utilise et peut rayonner une énergie de fréquence radio et, s’il n’est pas installé...
- Page 11 INSTRUCCIONES IMPORTANTES DE SEGURIDAD No intente reparar la unidad por usted mismo, ya que el abrirla podría exponerle a tensiones peligrosas u otros riesgos. En caso de avería, solicite los servicios de personal cualificado. Piezas de reemplazo — Cuando necesite piezas de reemplazo, cerciórese de que el técnico de reparación haya utilizado las que cumplan con las características de las originales.
-
Page 12: Table Of Contents
TABLE OF CONTENTS IMPORTANT SAFETY INSTRUCTIONS ... 2 BACKUP FUNCTION ... 14 SETTING THE CLOCK ... 16 RADIO OPERATION ... 18 Manual Tuning ... 18 For Better Reception ... 20 Preset Tuning ... 22 Presetting stations ... 22 Tuning in to preset stations ... 22 CD OPERATIONS ... - Page 13 INDICE INSTRUCCIONES IMPORTANTES DE SEGURIDAD ... 3 FUNCION DE RESPALDO ... 15 AJUSTE DEL RELOJ ... 17 FUNCIONAMIENTO DE LA RADIO ... 19 Sintonización manual ... 19 Para una mejor recepción ... 21 Sintonización de prefijados ... 23 Emisoras prefijadas ... 23 Sintonización de emisoras prefijadas ...
-
Page 14: Backup Function
BACKUP FUNCTION If the AC power supply is interrupted, the clock display goes off and the alarm setting is cancelled. To back up the clock and alarm setting, install a 6F22 battery in the battery compartment on the bottom of the unit. The backup function lasts about 80 days. -
Page 15: Funcion De Respaldo
FUNCION DE RESPALDO Si se corta la fuente de corriente alterna, se apaga la indicación del reloj y se cancela la alarma. Para hacer una copia de reserva de los ajustes del reloj y alarma, instale una pila 6F22 en el portapila en la parte inferior de la unidad. -
Page 16: Setting The Clock
SETTING THE CLOCK 1 Connect the AC power cord to a wall outlet. The clock display begins flashing. If the clock is not displayed correctly, disconnect the AC cord and remove the backup battery if inserted. Then, connect the AC cord and insert the backup battery again. -
Page 17: Ajuste Del Reloj
AJUSTE DEL RELOJ 1 Conecte el cable eléctrico en el tomacorriente de la pared. La pantalla del reloj empieza a destellar. Si no aparece el reloj correctamente, desconecte el cable eléctrico de CA y saque la pila de reserva, si está instalada. Vuelva a conectar el cable eléctrico de CA y coloque la pila de reserva. -
Page 18: Radio Operation
RADIO OPERATION Manual Tuning 1 Press POWER 6 STANDBY/ON to turn on the power. 2 Press FUNCTION repeatedly until TUNER is displayed. 3 Press BAND/FM STEREO to select the band. Each time BAND/FM STEREO is pressed, the band is changed cyclically as follows: AM b FM b FM STEREO b AM 4 Press UP or DOWN to tune in to a station. -
Page 19: Funcionamiento De La Radio
FUNCIONAMIENTO DE LA RADIO Sintonización manual 1 Presione POWER 6 STANDBY/ON para conectar el aparato. 2 Presione FUNCTION varias veces hasta que aparezca TUNER. 3 Presione BAND/FM STEREO para seleccionar la banda. Cada vez que se presiona BAND/FM STEREO, la banda cambia en el siguiente ciclo: AM b FM b FM STEREO b 4 Presione UP o DOWN para sintonizar una emisora. -
Page 20: For Better Reception
RADIO OPERATION Listening with the headphones Connect the stereo headphones (not supplied) with the stereo mini-jack to the PHONES jack. Stereo broadcasts are heard in stereo. When the headphones are connected, sound from the speaker will not be heard. When the display changes to the clock The unit is factory-set to change the display to the clock 10 seconds after the last button operation during radio reception and CD playback. -
Page 21: Para Una Mejor Recepción
FUNCIONAMIENTO DE LA RADIO Escuchando con los auriculares Conecte los auriculares estéreo (no suministrados) con la minitoma estéreo en la toma PHONES. Se escuchan en estéreo las transmisiones en estéreo. Cuando se conectan los auriculares, no se escuchará el sonido del altavoz. -
Page 22: Preset Tuning
RADIO OPERATION Preset Tuning Up to 30 stations can be preset in total, 10 stations for AM and 20 stations for FM. Preset your favorite stations and tune them in directly. Presetting stations 1 Tune in to a station, referring to “Manual Tuning” on page Preset number 2 Press SET. -
Page 23: Sintonización De Prefijados
FUNCIONAMIENTO DE LA RADIO Sintonización de prefijados Se pueden prefijar hasta 30 emisoras en total, 10 emisoras para AM y 20 emisoras para FM. Prefije sus emisoras preferidas y sintonícelas directamente. Emisoras prefijadas 1 Sintonice una emisora, refiriéndose a la “Sintonización manual”... -
Page 24: Cd Operations
CD OPERATIONS 3 discs can be loaded. Playback Loading the disc(s) Load the discs one by one, one on each tray. 1 Open the disc compartment, lifting up the disc compartment lid. 2 Press one of CD DIRECT PLAY (CD1c, CD2c, or CD3c) to select a try. -
Page 25: Funciones Del Disco Compacto
FUNCIONES DEL DISCO COMPACTO Puede colocar 3 discos. Reproducción Colocación de disco(s) Coloque el disco uno a uno, uno en cada bandeja. 1 Abra el compartimiento de discos, levantando la tapa del compartimiento del disco. 2 Presione uno de los CD DIRECT PLAY (CD1c, CD2c o CD3c) para seleccionar una bandeja. - Page 26 CD OPERATIONS Starting playback 1 Press POWER 6 STANDBY/ON to turn on the power. 2 Press FUNCTION repeatedly until displayed. 3 To play all discs, press e. → A (display) To play one desired disc, press CD DIRECT PLAY (CD1c, CD2c, or CD3c).
- Page 27 FUNCIONES DEL DISCO COMPACTO Inicio de la reproducción 1 Presione POWER 6 STANDBY/ON para conectar el aparato. 2 Presione FUNCTION varias veces hasta que aparezcan y el núemro del disco. 3 Para reproducir todos los discos, presione e. → A (indicación) Para reproducir un disco seleccionado, presione CD DIRECT PLAY (CD1c, CD2c, o CD3c).
- Page 28 CD OPERATIONS To take out the disc Open the disc compartment, and press PUSH on the pivot. The disc is released. When the display changes to the clock The unit is factory-set to change the display to the clock 10 seconds after the last button operation during radio reception and CD playback.
- Page 29 FUNCIONES DEL DISCO COMPACTO Para sacar el disco Abra el compartimiento de discos y presione PUSH en el pivote. Se suelta el disco. Cuando la indicación cambia al reloj La unidad se ajustó de fábrica para cambiar la indicación al reloj después de 10 segundos de tocar el último botón de funcionamiento, durante la recepción de la radio o reproducción de disco compacto.
-
Page 30: Repeat/Random Playback
CD OPERATIONS Repeat/Random playback Repeat playback plays one desired track on a selected disc, all the tracks on a desired disc, or all the tracks on all the discs. Random playback plays all the tracks on one desired disc or on all the discs in a random order. -
Page 31: Reproducción Repetida/Aleatoria
FUNCIONES DEL DISCO COMPACTO Reproducción repetida/aleatoria La reproducción repetida reproduce una canción deseada en un disco seleccionado, todas las canciones en un disco deseado o todas las canciones en todos los discos. La reproducción aleatoria reproduce todas las canciones en un disco deseado o en todos los discos en un orden aleatorio. -
Page 32: Program Playback
CD OPERATIONS Program playback Up to 30 tracks can be programmed and played from all the loaded discs. 1 Load the disc(s), referring to “Loading the disc(s)” on page 2 Press SET. MEMORY starts flashing. 3 Press CD DIRECT PLAY (CD1l, CD2l or CD3l) to select a disc. -
Page 33: Reproducción Programada
FUNCIONES DEL DISCO COMPACTO Reproducción programada Se pueden programar hasta 30 canciones para reproducirlas de todos los discos colocados. 1 Coloque disco(s), consultando “Colocación de disco(s)” en la página 25. 2 Presione SET. Empieza a destellar MEMORY. 3 Presione CD DIRECT PLAY (CD1l, CD2l o CD3l) para seleccionar un disco. - Page 34 CD OPERATIONS To add tracks to the program Repeat the procedure from step 3 before program play starts or while program play is stopped. The tracks are added to the end of the program. To change the programmed tracks Clear the program and program the tracks again in your desired order.
- Page 35 FUNCIONES DEL DISCO COMPACTO Para agregar canciones en el programa Repita el procedimiento del paso 3 antes de que empiece la reproducción programada o mientras se para la reproducción programada. Se agregan canciones la final del programa. Para cambiar las canciones programadas Borre el programa y vuelva a programar las canciones en su orden deseado.
-
Page 36: Timer Operation
TIMER OPERATION Alarm Timer The radio, buzzer or CD automatically sounds at the designated time every day. You can set two different alarm times, one each on ALARM 1 and ALARM 2. Before setting • Set the clock, referring to “SETTING THE CLOCK” on page 16. -
Page 37: Funcionamiento Del Temporizador
FUNCIONAMIENTO DEL TEMPORIZADOR Temporizador de alarma La radio, alarma o disco compacto suena automáticamente a la hora especificada todos los días. Se pueden ajustar dos horas de alarma diferentes, una en la ALARM 1 y otra en la ALARM 2. Antes de hacer el ajuste •... - Page 38 English TIMER OPERATION If the flashing stops during setting Repeat the procedure from step 1. To set the alarm time in ALARM 2 Press ALARM 2 in step 1. The alarm 2 indicator flashes, and go to step 2, 3 and 4. To check the alarm time Press ALARM 1 or ALARM 2.
- Page 39 FUNCIONAMIENTO DEL TEMPORIZADOR Si el destello se detiene durante el ajuste. Repita el procedimiento del paso 1. Para ajustar la hora de la alarma en ALARM 2 Presione ALARM 2 en el paso 1, Destella el indicador de alarma y vaya al paso 2, 3 y 4. Para confirmar la hora de la alarma Presione ALARM 1 o ALARM 2.
- Page 40 TIMER OPERATION To cancel the alarm setting To cancel the alarm 1 setting, press ALARM 1 once. While the alarm indicator is flashing, keep ALARM 1 pressed for more than 3 seconds. To cancel the alarm 2 setting, use the ALARM 2 button in the same way.
- Page 41 FUNCIONAMIENTO DEL TEMPORIZADOR Para cancelar el ajuste de la alarma Para cancelar el ajuste de la alarma 1, presione una vez ALARM 1. Cuando está destellando el indicador de alarma, mantenga presionado ALARM 1 durante más de 3 segundos. Para cancelar el ajuste de la alarma 2, utilice el botón ALARM 2 de la misma forma.
-
Page 42: Sleep Timer
TIMER OPERATION Sleep Timer You can use the sleep timer to turn off the radio or to stop disc playback automatically after the specified time (up to 90 minutes). Operate during radio reception or disc playback. 1 Keep SLEEP pressed for more than 2 seconds. SLEEP and 90 flash in the display. -
Page 43: Temporizador Para Dormir
FUNCIONAMIENTO DEL TEMPORIZADOR Temporizador para dormir Puede utilizar el temporizador para dormir para desconectar automáticamente la radio o parar la reproducción del disco después de la hora especificada (hasta 90 minutos). Haga funcionar durante la recepción de la radio o reproducción del disco. - Page 44 TIMER OPERATION Notes • The sleep timer cannot be activated during the timer-operated mode. • The alarm timer will not turn on at the preset time while the sleep timer is activated. English...
- Page 45 FUNCIONAMIENTO DEL TEMPORIZADOR Notas • No puede activarse el temporizador de la alarma durante el modo de funcionamiento del temporizador. • El temporizador de alarma no se conecta a la hora programada cuando se ha activado el temporizador de dormir. Español FONCTIONNEMENT DE LA MINUTERIE Remarques...
-
Page 46: Specifications
SPECIFICATIONS <Tuner section> Frequency range FM: 87.5 – 108.1 MHz (200 kHz steps) AM: 530 – 1,710 kHz (10 kHz steps) Antenna FM: Wire antenna AM: Ferrite bar antenna <CD player section> Tracking system 3-beam laser Laser pickup Semiconductor laser D/A conversion 8-times oversampling digital filter + 1-bit DAC... -
Page 47: Especificaciones
ESPECIFICACIONES <Sección del sintonizador> Gama de frecuencias FM: 87,5 – 108,1 MHz (Intervalos de 200 kHz) AM: 530 – 1.710 kHz (Intervalos de 10 kHz) Antenas FM: Antena de cable AM: Antena de barra de ferrita <Sección del tocadiscos de discos compactos> Sistema de seguimiento 3 rayos láser Receptor láser... - Page 48 8C-RD2-901-01 011116AKK-O-AL Printed in Hong Kong...