Ninja WOODFIRE Manual
- Quick start manual (81 pages) ,
- Quick start manual (30 pages)
Advertisement
- 1 Introduction
- 2 GET TO KNOW THE CONTROL PANEL
- 3 CLEANING INSTRUCTIONS
- 4 WOODFIRE TECHNOLOGY
- 5 WOODFIRE PELLETS
- 6 UNLOCK MORE COOKING & FLAVORS OUTDOORS
- 7 PIZZAS AND HIGH-HEAT COOKING
- 8 HIGH-HEAT ROASTER
- 9 MAX ROAST COOKING CHART
- 10 KICKSTARTER RECIPE CAJUN SALMON SHEET PAN MEAL
- 11 SEARED LEMON HERB STUFFED SNAPPER
- 12 SEARED NEW YORK STIP STEAK WITH CARAMELIZED ONION BUTTER
- 13 SPECIALTY ROAST COOKING CHART
- 14 KICKSTARTER RECIPE CRISPY ROASTED CHICKEN
- 15 SMOKED SHORT RIBS
- 16 MUSTARD CRUSTED ROAST BEEF
- 17 Documents / Resources
Introduction
Welcome to the Ninja Woodfire™ Outdoor Oven. From here, you're just a few pages away from how-tos and recipes that'll make for the ultimate outdoor cooking and smoking experience, without the hassle. Now let's turn up the heat and get cooking.
THE ULTIMATE SETUP
Getting the right stuff makes all the difference. Gear up with accessories for your new oven. Get yours on ninjakitchen.com/accessories.

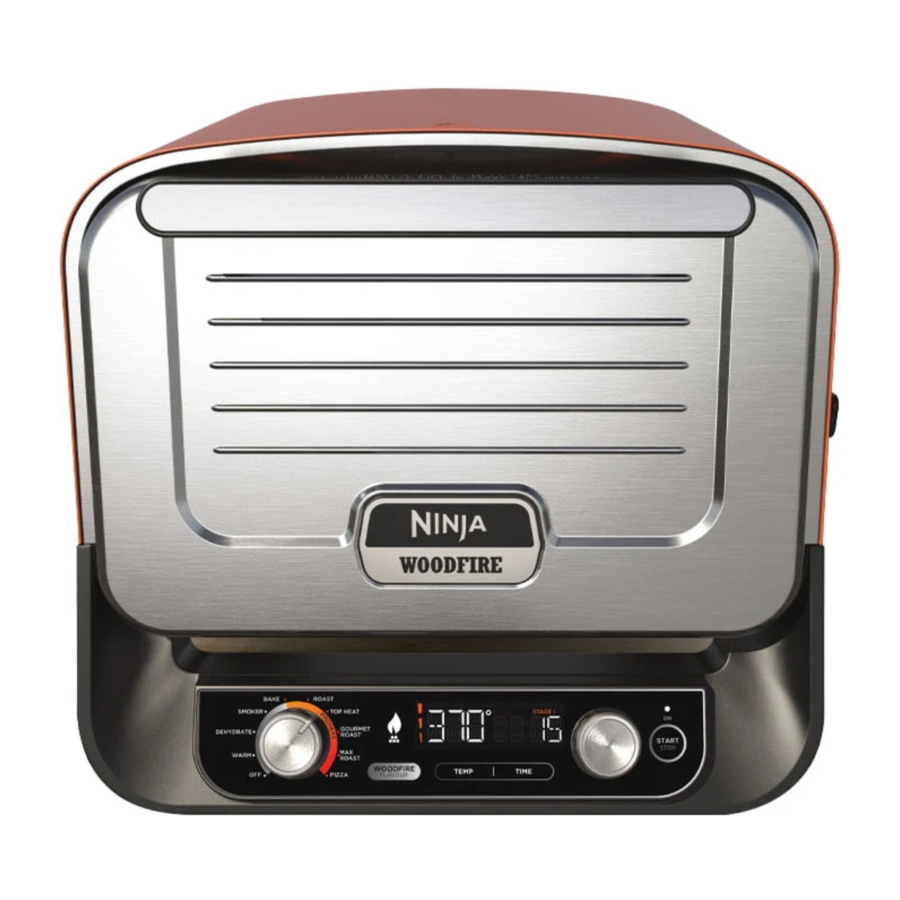
GET TO KNOW THE CONTROL PANEL

- OFF
When Unit is not in use, ensure dial is in the OFF position. - COOKING FUNCTIONS
WARM, DEHYDRATE, SMOKER, BAKE, BROIL, SPECIALTY ROAST, MAX ROAST, PIZZA
NOTE: Use the left-hand dial to select. - WOODFIRE FLAVOR
Press after selecting your cooking function to add woodfire flavor. When pressed, flame icon will illuminate on the display screen.
NOTE: Woodfire Flavor Technology cannot be used with the BROIL or WARM functions.
- PIZZA PRESETS
When selecting the PIZZA function, use the right-hand dial to scroll to the top to select the NEAPOLITAN, THIN, PAN, FROZEN, or CUSTOM preset pizza setting. - TEMP
Use the TEMP button to select the temperature; adjust it using the right-hand dial.
- TIME
Use the TIME button to select your time; adjust it using the right-hand dial. - RIGHT-HAND DIAL
Use the right-hand dial to control your TEMP and TIME or select pizza presets.
NOTE: While not recommended, preheating can be skipped by pressing and holding the dial for 4 seconds. - START/STOP
Press START/STOP button to start or stop the current cook function.
NOTE: While not recommended, preheating can be skipped by pressing and holding the right-hand dial for 4 seconds. - READY
This is an indicator in between cooks that signifies that the Pizza Stone is fully charged/at the correct temperature to begin cooking the next pizza. - ON
If the unit is running, this light will illuminate to signal the unit is ON and hot.
CLEANING INSTRUCTIONS
Cleaning Your Oven
- Allow unit and accessories to cool before moving the unit and removing any accessories.
- Wipe down inside and outside of the unit with a damp, nonabrasive cloth or paper towel. NOTE: You can also use a nylon brush with soapy water
- Place all clean, dry accessories back in their respective slots in the unit.
Cleaning Your Accessories
PIZZA STONE
DO NOT wash with soapy water, submerge in water, or put in the dishwasher.
To prevent cracks, always allow your pizza stone to cool completely before cleaning. Scrape lightly with non-metal utensils. Wipe off any remaining debris with a soft cloth.

PRO-HEAT PAN
DO NOT put in the dishwasher. Allow to cool before hand-washing. Use dish soap, warm water, and non-abrasive cleaning tools.

ROAST RACK
Allow to cool before placing in the dishwasher. If washing by hand, use non-abrasive cleaning tools.

ACCESSORY FRAME
Allow to cool before placing in the dishwasher. If washing by hand, use non-abrasive cleaning tools.

SMOKE BOX
We recommend using a wire brush to clean the box after every 10 uses.
NOTE: DO NOT use liquid cleaning solution.

WOODFIRE TECHNOLOGY
Powered by electricity and flavored by real burning wood pellets for rich, fully developed smokiness you can see and taste.
100% REAL WOODFIRE FLAVORS
Our integrated smoke box and specially designed Ninja Woodfire™ Pellets work together to create rich, fully developed woodfire flavors.
BURNS REAL WOOD PELLETS
Ninja Woodfire™ Pellets are engineered to be the ideal size and composition of premium hardwoods for adding maximum flavor—they are not used as fuel.
INTEGRATED SMOKE BOX
The self-igniting smoke box needs only / cup of pellets 1 2 to give your food authentic woodfire flavors.
ADD WOODFIRE FLAVORS AT ANY TEMP

WOODFIRE ™ PELLETS
SCAN HERE to buy Ninja Woodfire ™ Pellets

Designed specially for Ninja Woodfire™ products, our 100% real hardwood pellets are only used to create authentic woodfire flavors and are not used as fuel. That's why it's so easy to add real woodfire flavors to any dish.
WOODFIRE FLAVOR SCALE

UNLOCK MORE COOKING & FLAVORS OUTDOORS
700°F HIGH-HEAT ROASTER
Brick-oven inspired charring, blistering, and sizzling at home
ARTISAN PIZZA MAKER
No-turn, 3-minute, 12-inch pizzas* with 5 customizable pizza presets
FOOLPROOF BBQ SMOKER
Authentic BBQ bark and 100% natural woodfire flavor—without the hassle
ADD SMOKE TO ANYTHING AT ANY TEMPERATURE
Just add pellets, select a cooking function*, and press the Woodfire Flavor button. The oven will do the rest.
* EXCEPT WARM AND BROIL; WOODFIRE FLAVOR TECHNOLOGY IS AUTOMATICALLY ENABLED WITH THE SMOKER FUNCTION.
PIZZAS AND HIGH-HEAT COOKING
MAX ROAST
Get charred, crispy, caramelized results your oven can't create.
SPECIALTY ROAST
Start high and finish low for a crispy outside and juicy inside.
PIZZA
Make your favorite pizza styles and calzones at home from fresh or frozen.
BROIL
Quickly melt toppings or create beautifully browned exteriors.
BBQ SMOKING & SO MUCH MORE
SMOKER
Low and slow cooking to tenderize large cuts of meat.
BAKE
Create baked goods with crispy crusts and fluffy centers.
DEHYDRATE
Gently remove moisture for snacks like jerky and dried fruit.
WARM
Keep your meals warm and ready to eat after cooking.
HIGH-HEAT ROASTER
PRO-LEVEL TEXTURES PRO-LEVEL TEXTURES YOU CAN'T GET INDOORS YOU CAN'T GET INDOORS
Caramelized outsides usually come at the cost of overcooked insides. Not at this cookout. Get crispy, golden skins, and succulent, juicy meats with a temp range your indoor oven could only dream of.
MAX ROAST
Get a crispy, all-around char with temps up to 700°F. Quickly sear and caramelize smaller foods.
BEST FOR: Portioned proteins like salmon fillets and sliced veggies for sheet pan meals
SPECIALTY ROAST
Perfectly cooks large foods, inside and out. Automated 2-stage program starts high for an outer crisp and then goes low for juicy insides.
BEST FOR: Large proteins and platters, like a full turkey with veggies
Get a crispy, all-around char with temps up to 700°F. Quickly sear and caramelize smaller foods.
BEST FOR: Portioned proteins like salmon fillets and sliced veggies for sheet pan meals
- SET UP
![]()

- Install the Accessory Frame first, then install the Pro-Heat Pan on the frame.
![]()
Pro-Heat Pan should be installed, as it needs to preheat with the unit.
- ADD PELLETS
DON'T WANT SMOKE? Skip these steps.
- Dip the pellet scoop into the bag and fill it to the top.
NOTE: The scoop is designed to measure pellets needed for one smoke session. - Pull the smoke box open, pour pellets into the smoke box until filled to the top. Then, close the smoke box.
NOTE: Pellets will not ignite if they are not filled to the top of the smoke box.
![]()

- PROGRAM & PREHEAT
- Turn the left-hand dial to select MAX ROAST. If you added pellets, press the WOODFIRE FLAVOR button.
![]()
- Use the right-hand dial to set the temp, then press the TIME button and use the same dial to set the time.
- Press START/STOP to begin preheating.
- While the oven is preheating, start prepping your food. (Estimated preheat time can be around 25 minutes, depending on the set temperature.)

- ADD FOOD & COOK
- When unit is preheated, "ADD FOOD" "PRS START" will appear on the display.
- Pull the Accessory Frame forward, place food on the Pro- Heat Pan, and close the door.
- Press START/STOP. The timer will start counting down.
NOTE: Halfway through the cook time, the display will read "Flip." Open the door and flip your food. "Flip" will disappear from the display after 30 seconds.
- REMOVE FOOD & SERVE
- When cook time is complete, the unit will beep and "DONE" will appear on the display.
- Remove food from unit with high-heat cooking gloves or oven mitts. Let food rest for several minutes, then cut, serve, and enjoy.
FOR BEST RESULTS
- See cooking charts for inspiration, cook temps, and times.
- Use oils with a high smoke point—like canola, avocado, vegetable, or grapeseed oil— instead of olive oil.
- If using one of the above oils, brush the oil directly onto the food and do not pour/drizzle onto Pro-Heat Pan to avoid possible flare-ups.
MAX ROAST COOKING CHART
PICK YOUR PROTEIN
| PROTEIN | AMOUNT (UP TO) | TEMP | THICKNESS | TIME |
| PORK | ||||
| Boneless pork chops | 4 pieces, 8 oz each | 600°F | 1 1 / 2 inch | 8–15 min |
| Sausages | 6 pieces | 600°F | Standard | 10–15 min |
| BEEF | ||||
| Filet mingnon | 2 pieces, 6–8 oz each | 600°F | 1–1 1 / 2 inch | 10–15 min (for medium) |
| New York strip steak | 2 pieces, 15 oz each | 700°F | 1–1 1 / 2 inch | 8–10 min (for medium) |
| Porter house | 1 piece, 16 oz | 650°F– 700°F | 1–1 1 / 2 inch | 6–10 min (for medium) |
| Rib eye | 2 pieces, 10 oz each | 700°F | 1–1 1 / 2 inch | 8–12 min (for medium) |
| Steak tips | 4 pieces, 12 oz total | 700°F | 1 / 2 inch | 8–12 min (for med well) |
| FISH | ||||
| Salmon | 2 pieces, 4–6 oz each | 600°F | 1 inch | 5–10 min (for medium) |
| Sea scallops | 10 pieces | 650°F | Standard | 4–7 min |
| POULTRY | ||||
| Boneless breasts | 2 breasts, butterflied | 600°F | 1 inch | 10–15 min |

Internal doneness will vary if cuts of meat are thicker/thinner or a different weight than shown in charts. Adjust times as needed and use an external thermometer to check for doneness.
TIP
Searing is not just for proteins. Make a whole meal and MAX ROAST meat and char/crisp veggies for a complete meal.
PICK YOUR VEGETABLE
| FOOD | AMOUNT (UP TO) | TEMP | TIME |
| VEGETABLE | |||
| Baby potatoes | 12 oz, cut in quarters | 700°F | 8–12 min |
| Broccoli | one head, cut in half | 600°F | 5 min |
| Brussels sprouts | 12 oz, cut | 650°F | 8–12 min |
| Cauliflower | 1 head (12 oz), cut in florets | 700°F | 5–10 min |
| Green beans | 10 oz | 650°F | 10 min |
| Onion | 1, cut in quarters | 650°F | 4–8 min |
| Portobello mushrooms | 2 large caps | 600°F | 6–8 min |
| Shishito peppers | 10 oz | 700°F | 2–4 min |
| Zucchini | 2, cut in half | 700°F | 5–8 min |
BEST PRACTICES:
- Pro-Heat Pan must be installed on Accessory Frame (not the Pizza Stone) and be preheated in the unit before cooking.
- A meat thickness of inch or thicker is 1/ 2 recommended. Thinner meat will curl and searing will be inconsistent.
- Sugary marinades are not recommended, as they will most likely burn.
- When batch cooking, remember to empty the fat/oil from the Pro-Heat Pan to prevent spillover.
- For best results, gently press proteins down to maximize contact with the Pro-Heat Pan.
- Use oils with a high smoke point—like canola, avocado, vegetable, or grapeseed oil—instead of olive oil.
- If using one of the above oils, brush the oil directly onto the food and do not pour/drizzle onto Pro-Heat Pan to avoid possible flare-ups.
KICKSTARTER RECIPE CAJUN SALMON SHEET PAN MEAL
BEGINNER RECIPE 
FUNCTION: MAX ROAST
PREP: 10 MINUTES
PREHEAT: APPROX. 25 MINUTES
TOTAL COOK TIME: 15 MINUTES
MAKES: 3–4 SERVINGS

INGREDIENTS
1 pound baby potatoes, cut in quarters
4 tablespoons canola oil, divided
1 teaspoon chili powder
1 teaspoon minced garlic
Kosher salt, as desired
Ground black pepper, as desired
1 pound Brussels sprouts, cut in half, ends trimmed
1.5–2 pound salmon fillet, bones and skin removed
1 tablespoon Cajun seasoning
1 lemon, cut in quarters
Chopped parsley, for garnish
DIRECTIONS

Install the Accessory Frame in the bottom level of the unit, then place the Pro-Heat Pan on top. Turn dial to select MAX ROAST, set temperature to 700°F, and set time to 15 minutes. Select START/STOP to begin preheating (preheating will take approx. 25 minutes).

In a large bowl, toss potatoes with 2 tablespoons oil, chili powder, garlic, salt, and pepper. In a separate large bowl, toss Brussels sprouts with remaining 2 tablespoons oil, salt, and pepper. Evenly season top of salmon fillet with remaining 1 tablespoon oil, Cajun seasoning, salt, and pepper.

When unit is preheated and ADD FOOD and PRS START is displayed, open door and place the potatoes and Brussels sprouts on the pan. Close door, select START/STOP, and cook for 7 minutes.
SCAN HERE for a step-bystep video


After 7 minutes, open door and use silicone-tipped tongs to toss the vegetables, then move them to one side of the pan. Place the salmon fillet seasoned side down on the pan and surround with lemon quarters. Close door and cook for 6 minutes. After 6 minutes, open door and remove tray from oven.

When cooking is complete, remove salmon from tray and place on a platter seared side up. Garnish with chopped parsley and charred lemon wedges, and serve with potatoes and Brussels sprouts.
TIP
If Cajun seasoning is too spicy for you, feel free to swap in a milder seasoning of your choice. Two of our favorites are lemon pepper and garlic herb.
TIP
If you prefer the meal more well done, leave tray in oven and continue cooking for remaining 2 minutes.
SEARED LEMON HERB STUFFED SNAPPER
INTERMEDIATE RECIPE 
FUNCTION: MAX ROAST
PREP: 10 MINUTES
PREHEAT: APPROX. 25 MINUTES
TOTAL COOK TIME: 8 MINUTES
MAKES: 6–8 SERVINGS

INGREDIENTS
2 each ( 3 / 4 –1 pound) whole snapper, insides removed, cleaned, scaled
Kosher salt, as desired
Ground black pepper, as desired
/ cup canola oil 1 4
2 lemons, sliced
10 each fresh parsley sprigs
10–12 each fresh thyme sprigs
6 each fresh rosemary sprigs
DIRECTIONS
- Install the Accessory Frame in the bottom level of the unit, then place the Pro-Heat Pan on top.
- Turn dial to select MAX ROAST, set temperature to 700°F, and set time to 8 minutes. Select START/STOP to begin preheating (preheating will take approx. 25 minutes).
- Evenly coat fish with oil, salt, and pepper, then fill each cavity with sliced lemon and fresh herbs.
- When unit is preheated and ADD FOOD and PRS STRT is displayed, open door and place each fish on the pan. Close door, select START/STOP and cook for 3 to 4 minutes.
- After 3 to 4 minutes, open door, and carefully flip fish using a metal fish spatula. Be sure to get under the skin before flipping. Close door and continue cooking for the remaining time.
- When cooking is complete, open door, remove fish and carefully transfer to a serving plate.
TIP
If snapper is not your desired fish, feel free to substitute with another whole fish such as branzino or tilapia. Keep in mind, other fish may be larger than the size listed so ensure to size the fish appropriately.
TIP
Serve this dish alongside the smoked ratatouille or the Mediterranean cauliflower.
SEARED NEW YORK STIP STEAK WITH CARAMELIZED ONION BUTTER
INTERMEDIATE RECIPE 
FUNCTION: MAX ROAST
PREP: 10 MINUTES
PREHEAT: APPROX. 25 MINUTES
TOTAL COOK TIME: 15-20 MINUTES (DEPENDING ON DESIRED DONENESS)
MAKES: 2–4 SERVINGS

INGREDIENTS
1 large white onion, peeled, sliced, / -inch thick 1 2
2 New York strip steaks (12-15 ounces each), trimmed
1 stick ( / cup) salted butter, 1 2 room temperature
4 cloves garlic, peeled
/ cup chopped fresh parsley 1 4
1 teaspoon Worcestershire sauce
2 tablespoons canola oil
Kosher salt, as desired
Ground black pepper, as desired
DIRECTIONS
- Install the Accessory Frame in the bottom level of the unit, then place the Pro-Heat Pan on top.
- Turn dial to select MAX ROAST, set temperature to 700°F, and set time to 20 minutes. Select START/STOP to begin preheating (preheating will take approx. 25 minutes).
- When unit is preheated and ADD FOOD and PRS STRT is displayed, open door and place steak on the pan, pressing down to maximize contact with pan. Close door, select START/STOP and cook for 6–8 minutes, flipping the steak halfway through.
- For a medium-rare steak, cooking is complete when an instant-read thermometer reads 125°F. Open door, remove steak, cover with aluminum foil and let rest. Add onions and garlic to pan. Return pan to oven, close door and cook until deepened in color, about 6 to 7 minutes, tossing halfway through.
- When cooking is complete, open door, remove onions and garlic from oven and finely dice. Transfer to a piece of parchment paper and spread in an even layer. In a medium bowl, add softened butter, parsley, Worcestershire sauce, and the onions and garlic. Mix until fully combined and season as desired.
- Slice the steak and top with the onion butter for serving.
TIP
Don't eat steak? Swap in 4–6 boneless pork chops (6–7 ounces each) and cook as instructed, adding 1–2 minutes depending on size.
SPECIALTY ROAST
Perfectly cooks large foods, inside and out. Automated 2-stage program starts high for an outer crisp and then goes low for juicy insides.
Large proteins and platters, like a full turkey with veggies
- SET UP
![]()

- Install the Accessory Frame.
- ADD PELLETS DON'T WANT SMOKE? Skip these steps.
- Dip the pellet scoop into the bag and fill it to the top.
NOTE: The scoop is designed to measure pellets needed for one smoke session. - Pull the smoke box open, pour pellets into the smoke box until filled to the top. Then, close the smoke box.
NOTE: Pellets will not ignite if they are not filled to the top of the smoke box.
![]()

- PROGRAM & PREHEAT
- Turn the left-hand dial to select SPECIALTY ROAST. If you added pellets, press the WOODFIRE FLAVOR button.
![]()
- Stage 1 LED will illuminate, this is your high temperature setting cooking
- Use the right-hand dial to set the temp, then press the TIME button.
- Push the right-hand dial. The Stage 2 LED will illuminate. Repeat the previous step to program Stage 2, then press START/STOP. (Estimated preheat time can be around 25 minutes, depending on the set temperature.)

- ADD FOOD & COOK
- When unit is preheated, "ADD FOOD" "PRS START" will appear on the display.
- Pull the Accessory Frame forward. Place food on the Pro-Heat Pan, then place pan with food on the frame. Slide frame with pan back in the oven, and close the door.
- Press START/STOP. Stage 1 temp and time will display and the timer will begin counting down.
NOTE: The oven will automatically enter Stage 2 after Stage 1 is complete.
- REMOVE FOOD & SERVE
- When cook time is complete, the unit will beep and "DONE" will appear on the display.
- Remove food from unit with high-heat cooking gloves or oven mitts. Let food rest for several minutes, then cut, serve, and enjoy.
FOR BEST RESULTS
New to Specialty Roast cooking? When cooking a large roast, try setting Stage 1 to 700°F for 10–15 minutes to crisp up the meat and lock in the juices. Then continue cooking as you would in your indoor oven.
SCAN HERE for pellets, accessories, and how-to videos

SPECIALTY ROAST COOKING CHART
| PROTEIN | AMOUNT (UP TO) | PREP |
| POULTRY | ||
| Whole chicken | 5–7 pounds | Season with salt and pepper, as desired |
| Whole turkey | 10–15 pounds | Season with salt and pepper, as desired |
| BEEF | ||
| Beef rib roast, bone in | 3–13 pounds, trimmed | Season with salt and pepper, as desired |
| Beef rib roast, boneless | 3–13 pounds, trimmed | Season with salt and pepper, as desired |
| Top round beef | 3–7 pounds | Season with salt and pepper, as desired |
| VEGETABLES | ||
| Whole cauliflower | 1 large head, 1–2 pounds, stem and leaves removed | Season with salt and pepper, as desired |
TIP Cook times may vary depending on size of food.
| STAGE 1: TEMP & TIME | STAGE 2: TEMP & TIME |
| 600°F–700°F 10 min | 375°F 45 min–1.5 hours |
| 500°F–650°F 10 min | 375°F 1.5–3 hours |
| 700°F 10–15 min | 325°F 2–3 hours |
| 700°F 10–15 min | 325°F 2–2.5 hours |
| 600°F–650°F 10 min | 325°F 45 min–1 hour |
| 550°F–650°F 10–15 min | 350°F 20–30 min |
KICKSTARTER RECIPE CRISPY ROASTED CHICKEN
BEGINNER RECIPE 
FUNCTION: SPECIALTY ROAST
PREP: 5 MINUTES
PREHEAT: APPROX. 25 MINUTES
TOTAL COOK TIME: 1 HOUR
MAKES: 4–6 SERVINGS

INGREDIENTS
5–7 pounds roaster chicken, giblets removed, patted dry
1 tablespoon canola oil
1 teaspoon kosher salt
1 tablespoon desired seasoning (jerk, Cajun, garlic herb)
DIRECTIONS

Install the Accessory Frame in the bottom level of the unit.

Turn left-hand dial to select SPECIALTY ROAST, set STAGE 1 temperature to 700°F, and set time to 15 minutes. Push the righthand dial to set STAGE 2, then set temperature to 325°F, and set time to 2 hours. Select START/STOP to begin preheating (preheating will take approx. 25 minutes).

Rub chicken on all sides with oil and liberally season with salt and desired seasoning. Place the Roast Rack in the Pro-Heat Pan, then place the chicken on the rack.

When unit is preheated and ADD FOOD and PRS STRT is displayed, open door and place the pan in the unit. Close door, select START/STOP to begin cooking. Cooking is complete when the internal temperature reads 165°F on an instant-read thermometer.

When cooking is complete, open door, remove pan with chicken and let rest for about 5 to 10 minutes before slicing.
SCAN HERE for a step-bystep video

SMOKED SHORT RIBS
BEGINNER RECIPE 
FUNCTION: SPECIALTY ROAST
PREP: APPROX. 10 MINUTES
PREHEAT: APPROX. 20 MINUTES
TOTAL COOK TIME: 4 HOURS
MAKES: 4–8 SERVINGS

INGREDIENTS
9 each boneless short ribs
1/2 cup red wine
1/4 cup (2 ounces) tomato paste
1 cup beef stock
1/2 cup baby carrots
1 medium white onion, peeled, thinly sliced
1 teaspoon celery seed
1/4 cup canola oil
Kosher salt, as desired
Ground black pepper, as desired
Chopped parsley, for garnish
2 tablespoons cornstarch (optional)
1/4 cup water (optional)
DIRECTIONS
- Install the Accessory Frame in the bottom level of the unit. Place the Roast Rack in the Pro-Heat Pan, then place the pan in the oven. Pull open the smoke chamber. While holding the smoke box open, use the pellet scoop to pour pellets into the smoke box until filled to the top. Close the box.
- Turn left-hand dial to select SPECIALTY ROAST. Press WOODFIRE FLAVOR. Set STAGE 1 temperature to 700°F and set time to 15 minutes. Push the right-hand dial to set STAGE 2, then set temperature to 325°F, and set time to 3 hours 30 minutes. Select START/STOP to begin preheating (preheating will take approx. 20 minutes).
- Season ribs on all sides with oil, salt, and pepper. When unit is preheated and ADD FOOD and PRS STRT is displayed, open door and place the ribs on the pan. Close door, select START/STOP to begin cooking. Throughout the STAGE 1 cooking cycle, flip the ribs to sear all sides, about 4 to 5 times.
- When STAGE 2 cooking begins, open door, and remove the pan. Transfer the ribs to a 2 1/2 quart baking dish.
- Pour the wine into the Pro-Heat Pan and scape the bottom of the pan to deglaze. Then using a fine-mesh strainer, strain the wine into a large bowl. To the wine, add tomato paste, stock, carrots, onion, celery seed, salt, and pepper and whisk until evenly combined. Pour the mixture over the ribs, then cover with aluminum foil. Place the dish in the oven, close the door, and cook until fork tender, about 3 hours 30 minutes.
- When cooking is complete, open door, remove dish from oven and let rest for about 10 minutes. If a gravy is desired, remove meat from liquid, strain liquid into a pot and bring to a boil. In a small bowl, whisk together cornstarch and water to make a slurry. Then whisk slurry into boiling sauce until thickened. Place the meat and vegetables in the gravy and garnish with
MUSTARD CRUSTED ROAST BEEF
INTERMEDIATE RECIPE 
FUNCTION: SPECIALTY ROAST
PREP: 10 MINUTES
PREHEAT: APPROX. 20 MINUTES
TOTAL COOK TIME: 55 MINUTES–1 HOUR
MAKES: 6–8 SERVINGS

INGREDIENTS
5–6 pounds eye round of beef
Kosher salt, as desired
Ground black pepper, as desired
1/2 cup Dijon mustard
1 tablespoon dried rosemary
1 teaspoon paprika
1 teaspoon garlic powder
DIRECTIONS
- Install the Accessory Frame in the bottom level of the unit. Turn the left-hand dial to select SPECIALTY ROAST, set STAGE 1 temperature to 600°F, and set time to 10 minutes. Push the righthand dial to select STAGE 2, then set temperature to 325°F and time to 45 minutes. Select START/ STOP to begin preheating (preheating will take approx. 20 minutes).
- Season roast on all sides with salt and pepper. Place the Roast Rack in the Pro-Heat Pan, then place the roast on the rack.
- When unit is preheated and ADD FOOD and PRS STRT displays, open door and place the pan in the unit. Close door and select START/STOP to begin cooking.
- In a small bowl, combine the mustard, rosemary, paprika, garlic, 1 teaspoon salt, and 1/2 teaspoon pepper.
- When STAGE 2 cooking begins, open door, and transfer the pan to a heat-resistant surface. Carefully pat the roast dry, then evenly cover in the mustard mixture. Return the pan to the unit and close the door to continue cooking. For a medium-rare roast, cooking is complete when the internal temperature of the roast reads 125°F on an instant-read thermometer.
- When cooking is complete, open door, remove roast and let sit for 30 to 45 minutes before slicing and serving with desired sides.
Recipe Key

SCAN HERE for pellets and accessories

SCAN HERE for quick tips and how-to videos

Documents / ResourcesDownload manual
Here you can download full pdf version of manual, it may contain additional safety instructions, warranty information, FCC rules, etc.
Advertisement


Need help?
Do you have a question about the WOODFIRE and is the answer not in the manual?
Questions and answers