Seagate Backup Plus STEL6000100 Manual
- Quick start manual ,
- User manual (39 pages) ,
- Reviewer's manual (15 pages)
Advertisement
- 1 Introduction
- 2 LED indicator and cables
- 3 Connect Backup Plus Hub to your computer
- 4 Connect USB devices to Backup Plus Hub
- 5 Safely remove Backup Plus Hub from your computer
- 6 Back up your computer to your Backup Plus Hub
- 7 Optional Formatting and Partitioning
- 8 Hard drive tests
- 9 Frequently asked questions
- 10 Documents / Resources
Introduction
Welcome to the user manual for Seagate Backup Plus Hub, a hard drive with ample capacity to store all your important files. Connect your Backup Plus Hub to a computer that supports USB 3.0 for fast transfers of all your data. You can also use its two additional USB 3.0 ports to connect more devices to your computer or, use them to power compatible devices such as mobile phones and tablets.
Review this user manual for instructions on how to manage your Backup Plus Hub. For common questions and answers about your drive, please see Frequently asked questions.
You can get the latest tips regarding your product and updated technical information at Seagate customer support.
Box content
- Seagate Backup Plus Hub
- USB 3.0 cable for connection to a computer (Micro-B to Type A)
- Power cable
- Quick Start Guide
- Software: Seagate Dashboard (available for download)

Save your packaging. If you experience problems with your hard drive and want to exchange it, the hard drive must be returned in its original packaging.
Minimum system requirements
You can connect your Backup Plus Hub to a computer that meets the following minimum requirements:
- Windows 7 or higher
- Mac OS X 10.7 or higher
Hardware requirements
Backup Plus Hub can be connected to computers with USB 3.0 and USB 2.0 ports. However, you can reach transfer rates up to 5Gb/s when connected to a USB 3.0 port. Connecting the Backup Plus Hub to a computer with USB 2.0 limits performance to USB 2.0 speeds.
LED indicator and cables
Status light information
Your hard drive features a status light that provides general information about the product. Refer to the table below for details.
| Light color | Status |
| White | Drive is on and ready |
| Blinking white | Drive activity |
| Off | Drive is off |
USB 3.0
USB is a serial input/output technology for connecting peripheral devices to a computer. USB 3.0 is a recent implementation of this standard that provides high bandwidth for data transfers.
Transfer rates can attain up to 5Gb/s as opposed to USB 2.0's 480Mb/s. This means that USB 3.0 is theoretically up to ten times faster than its predecessor.
Make certain to use the USB 3.0 cable included with your Backup Plus Hub. It features a Micro-B connector on one end to plug into the Backup Plus Hub and a standard Type A connector for universal connectivity to all PCs and Macs.

Connect Backup Plus Hub to your computer
Your Backup Plus Hub is compatible with computers that feature a USB port.
Important info regarding USB connections: Your Seagate drive is shipped with a SuperSpeed USB 3.0 cable to ensure maximum data transfer performance when connected to a compatible USB 3.0 port. The cable also works when connected to a USB 2.0 port, but drive performance is limited to USB 2.0 transfer rates.
- Connect to a power outlet
Attach one end of the included power cable to Backup Plus Hub and the other end to a working power outlet. The LED turns on when the device receives power.
Power adapters can vary by region. Therefore, make certain to only use the power cable included with your Seagate Backup Plus Hub. Attaching third-party or other Seagate power cables with incorrect voltage can damage the Backup Plus Hub.

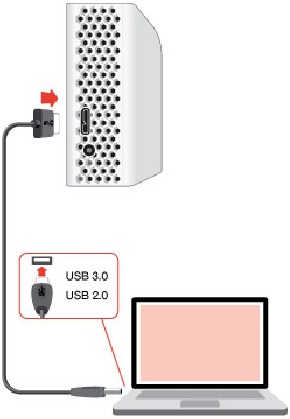
- Connect to your computer
Attach the USB Micro-B end of the included USB cable to Backup Plus Hub.
Attach the USB Type A end of the included USB cable to a compatible port on your computer.
![]()
- Registration and software
Register your Backup Plus Hub to receive the latest news regarding your device. You can register your device and install Seagate software in a few simple steps.
Software included with your Backup Plus Hub:- Dashboard–Backup software for your Windows computers, mobile devices and social media. For details, see Dashboard.

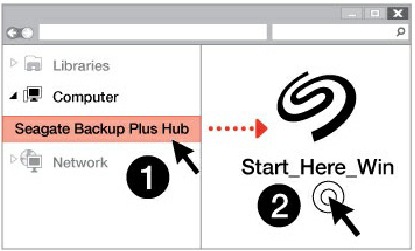
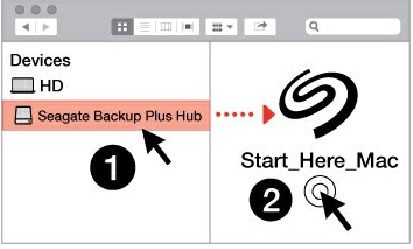
- Open the Backup Plus Hub volume in Windows Explorer or the Mac desktop.
- Launch the installer.
- Windows: double click Start_Here_Win
![]()
- Mac: double click Start_Here_Mac
![]()
- Windows: double click Start_Here_Win
- Follow the on-screen instructions to register your Backup Plus Hub and install Seagate software.
If you have questions regarding setup or would like to learn more about your hard drive, visit Seagate Backup Plus Hub support.
Formats for Mac and Windows
Seagate Backup Plus Hub is available in two models, Windows and Mac. The Windows model is formatted as NTFS while the Mac model is formatted as Mac OS Extended (Journaled), also known as HFS+. While Mac OS X can read hard drives formatted as NTFS, write access is not available. Windows cannot read or write to hard drives formatted as HFS+.
While it is highly recommended to purchase the model targeted for your computer's operating system, there are drivers for Windows and Mac that can provide compatibility with any Backup Plus Hub. To use your Backup Plus Hub with computers that have another operating system, download and install the Paragon driver. For more information, go to Paragon driver.
Connect USB devices to Backup Plus Hub
Backup Plus Hub's additional USB ports allow you to connect more devices to your computer. Simply connect compatible USB devices to the two USB Type A ports on the Backup Plus Hub. When Backup Plus Hub is connected to your computer, the devices are also available to the computer.
Backup Plus Hub uses a 3A power supply and each USB Type A port outputs up to 1.5 Amps / 5 volts. You can connect compatible devices that support charging via USB to the USB ports. Backup Plus Hub must receive power via its power cable to deliver power to compatible devices.

Seagate is not responsible for devices that experience harm, damage or malfunction when connected to Backup Plus Hub.
Safely remove Backup Plus Hub from your computer
Always eject a storage drive from your computer before physically disconnecting it. Your computer must perform filing and housekeeping operations on the drive before it is removed. Therefore, if you unplug the drive without using the operating system's software, your files can become corrupt or damaged.
Safely remove external storage from a Windows PC
Use the Safely Remove tool to eject the hard drive you want to remove.
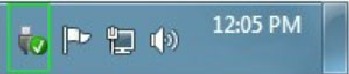
- Click the Safely Remove icon in your Windows System Tray to view the devices you can eject.
- Windows 7:
![]()
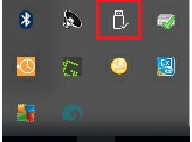
- Windows 8/Windows 10:
![]()
- Windows 7:
- If you don't see the Safely Remove Hardware icon, click the Show hidden icons arrow in the system tray to display all icons in the notification area.
- In the list of devices, choose the device you want to remove. Windows displays a notification when it is safe to remove the device.
- Disconnect the hard drive from the computer.
Safely remove external storage from a Mac
There are several ways you can eject your hard drive from a Mac. See below for two options.
Eject via Finder window
- Open a Finder window.
- In Devices on the sidebar, locate Seagate Backup Plus Hub and click the eject symbol to the right of the drive name.
- Once the drive disappears from the sidebar or, if the Finder window closes, you can disconnect the hard drive's cable from your Mac.
Eject via Desktop
- Select the desktop icon for your hard drive and drag it to the Trash.
- When the image is no longer visible on your desktop, you can physically disconnect the hard drive from your Mac.
Back up your computer to your Backup Plus Hub
Backup options
The following table shows how you can back up data from your computer to your Backup Plus Hub.
| System backup | File backup | |
| Seagate Dashboard | x (Windows only) | |
| Copy and paste | x | |
| Windows 7 Backup and Restore | x | x |
| Windows 8 File History | x | |
| Windows 10: Backup and Restore or File History | x (Backup and Restore) | x (File History) |
| Mac Time Machine | x | x |
Click the links below for further information regarding each backup solution:
Seagate Dashboard
Windows System Image Backup
Windows 7 Backup and Restore
Windows 8 and 10 File History
Mac Time Machine
When initiating a backup task, make certain that your Backup Plus Hub has sufficient capacity to hold the data you want to back up.
All of the options in the table can be automated except for copy and paste. Copying and pasting is a manual task that requires your attention with each change to a file on your computer. If you forget to manually copy files, you risk losing important data should your computer's hard drive experience problems. Automated solutions, once created, only require that you connect your Backup Plus Hub to your computer. Therefore, Seagate recommends an automated backup solution.
Optional Formatting and Partitioning
Seagate Backup Plus Hub is available in two models, Windows and Mac. The Windows model is formatted as NTFS while the Mac model is formatted as Mac OS extended (Journaled), also known as HFS+. While Mac OS X can read hard drives formatted as NTFS, write access is not available. Windows cannot read or write to hard drives formatted as Mac OS extended (Journaled).
While it is highly recommended that users purchase the model targeted for their computer operating systems, there are drivers for Windows and Mac that can provide compatibility with any Backup Plus Hub. To use your Backup Plus Hub with computers that have another operating system, download and install the Paragon driver. For more information, go to Paragon driver.
About file system formats
NTFS: since it is the native file system for Windows, volumes created in NTFS are read and write with computers running Windows. Mac OS can read and write to NTFS volumes with the help of the Paragon driver for Mac.
Mac OS Extended (HFS+): the native hard drive file system for Mac. Windows users can read and write to HFS+ (journaled) hard drives by installing the Paragon driver for Windows.
exFAT: generally compatible with Mac and Windows. exFAT is not a journaled file system which means it can be more susceptible to data corruption when errors occur or the drive is not disconnected properly from the computer.
FAT32: compatible with Mac and Windows. However, FAT32 is a legacy file system designed for low capacity hard drives and it is not recommended for modern hard drives or operating systems. A FAT32 partition can reach up to 32GB when formatted on a Windows PC.
How to choose the file system format
Use NTFS if:
...the storage device is connected to Windows PCs. Install the Paragon driver for Mac for compatibility with Macs.
Use HFS+ if:
...the storage device is connected to Macs. Install the Paragon driver for Windows for compatibility with Windows PCs.
You can use exFAT if:
...the storage device is shared between Mac and Windows computers. However, Seagate recommends installing the Paragon driver when sharing hard drives between operating systems.
Use FAT32 if:
...the storage device is connected to older Windows and Mac computers. FAT32 is not recommended for modern operating systems and computers.
Formatting instructions
The steps below help you format and partition a storage device.

Formatting erases everything on the storage device. Seagate highly recommends that you back up all data on your storage device before performing the steps below. Seagate is not responsible for any data lost due to formatting, partitioning or using a Seagate storage device.
Note: Refer to your operating system's documentation for more information on formatting and partitioning storage devices.
Windows
- Make sure the storage device is connected to and mounted on the computer.
- Go to Search and then type diskmgmt.msc. In the search results, double click Disk Management.
- From the list of storage devices in the middle of the Disk Management window, locate your Seagate device.
- The partition must be available to format. If it is currently formatted, right click on the partion and then choose Delete.
- To create a new partition, right click on the volume and select New Simple Volume. Follow the on-screen instructions when the New Simple Volume Wizard appears.
Mac
- Make sure the storage device is connected to and mounted on the computer.
- Select Go > Utilities in the Finder menu bar.
- In the Utilities folder, double-click Disk Utility. All connected storage devices, partitions or disk images are displayed in the left column.
- Select the Seagate drive in the left column.
- Click the Erase tab.
- Choose a format from the drop-down window.
- Enter a name for the volume.
- Click Erase and confirm your selection in the pop-up window.
Hard drive tests
If you experience problems with your Seagate external storage, you can run diagnostic tests on its hard drive. Windows and Mac offer utilities to test and repair hard drives and Seagate provides utlities for Windows.
Seagate diagnostic tool (Windows only)
Download Seatools for Windows and follow the steps below to help determine the health of your device. Make certain to back up data on your storage device before running the test.
- Close all open applications before running the hard drive diagnostic tests.
- Before starting the test, make certain that the computer is powered on. The computer must be plugged into its power supply and the power supply should receive power from a wall socket.
- Power management controls must be suspended during the tests. To adjust power management settings:
- Click Start or the Windows icon on the bottom left corner of your Windows desktop. Go to Control Panel.
- Choose Power Options.
- Choose Change plan settings.
- Choose Change advanced power settings Expand the Hard Disks in the window.
- Confirm that the setting is set to Never.
- Confirm that you have the correct storage device connected to your computer. Seatools for Windows can be used with Seagate, Samsung, LaCie and Maxtor storage devices. Safely remove all other hard drives.
- If you have not done so, back up data on your storage device before running the test.
- Launch Seatools and choose the tests to run from the menu:
- Fix all
- S.M.A.R.T. check
- Short Drive Self Test
- Short Generic
- Long Generic (progresses at 1% increments and can take several hours to complete)
Following the test, a log for each drive is saved to the program installation folder. To read the log, click Help>View Log File. You can also view a log in Help by clicking Pass Info or Fail Info, depending on your results.
Windows diagnostic tool
Windows includes a utility called Check Disk (ChkDsk) that can be used to repair bad sectors on the hard drive. Always back up your data before running Check Disk scans on your hard drive. If a bad sector is found, data that had been available can be inaccessible once the bad sector is reallocated.
Follow the steps below to run Check Disk:
- Launch Command Prompt. Go to the start menu or start screen to type cmd and then click Command Prompt.
- Type chkdsk X: /f. "X" is the letter for your hard drive
The length of time for the test to complete can vary and is usually longer for higher capacity storage devices.
Mac diagnostic tool
Mac OS includes Disk Utility, a tool for formatting, testing and repairing hard drives. Disk Utility's test and repair option is called First Aid.
Always back up your data before running First Aid scans on your hard drive. If a bad sector is found, data that had been available can be inaccessible once the bad sector is reallocated.
Follow the steps below to run First Aid:
- From the Finder, click Go > Utilities > Disk Utility.
- Hard drives are listed on the left of the Disk Utility window. Find your Seagate device and click it. Information about the drive is available, including the file system. Additionally, partitions are visible in the left column as a second indented row under the storage device. There may be cases in which a partition is mounted on the desktop but does not appear in Disk Utility. You can still run the test on the hard drive.
- Click a partition to select it.
- Click the First Aid tab/button.
- To check the volume:
- Mac OS 10.10 and earlier: click Verify Disk. If Disk Utility reports that the disk needs to be repaired, click Repair Disk.
- Mac OS 10.11 and later: click Run to begin the test.
- If you have additional partitions, repeat the test on each one.
Frequently asked questions
For help setting up and using your Seagate hard drive, review the frequently asked questions below. For additional support resources, go to Seagate customer support.
Q: What is the hard drive format for the Backup Plus Hub?
A: Backup Plus Hub is available in two models, Windows and Mac. The Windows model is formatted as NTFS while the Mac model is formatted as Mac OS extended (Journaled), also known as HFS+. If you are uncertain of your model, look at the color of the enclosure. The enclosure for Backup Plus Hub for Windows is black while the enclosure for Mac is white.
Q: Can I use my Seagate hard drive without backup software?
A: Yes, the hard drive does not require any special software to work. The hard drive can be used as additional storage space to compliment your computer's hard drive. For example, copy videos, photos, music and documents and then paste them to the Seagate hard drive.
Q: Does it matter which Backup Plus Hub I use with my computer?
A: Backup Plus Hub is available in two models: Windows (formatted as NTFS) and Mac (formatted as Mac OS Extended (Journaled)). While Mac OS X can read hard drives formatted as NTFS, write access is not available. Also, Windows cannot read or write to hard drives formatted as Mac OS extended (Journaled). Therefore, it is recommended that users purchase the Backup Plus Hub model targeted for their computers.
However, you can share files between Windows PCs and Macs by installing the Paragon driver. If you have a Backup Plus Hub for Windows, install the Paragon driver on your Mac. If you have Backup Plus Hub for Mac, install the Paragon driver on your Windows PC.
Q: Will my Seagate hard drive's USB 3.0 port work with my computer's USB 2.0 port?
A: Yes, the cable end that plugs into the computer (USB Type A) is compatible with both USB 3.0 and USB 2.0. However, the transfer rates are much slower with USB 2.0.
Q: Can I use my Seagate hard drive with a USB hub?
A: Yes, the hard drive can be connected to a USB hub. If you use a hub and encounter detection problems, slower than normal transfer rates, random disconnection from your computer or other unusual issues, try connecting the hard drive directly to the computer's USB port.
Some USB hubs are less than efficient with power management, which can be problematic for connected devices. In such a case, consider trying a powered USB hub that includes a power cable.
Please note that USB 2.0 hubs limit your Seagate hard drive's transfer rates to USB 2.0 speeds.
Q: Can I use my Seagate hard drive with a longer cable?
A: Yes, provided it is certified according to USB standards. However, Seagate recommends using the cable shipped with your hard drive for the best results. If you use a longer cable and experience problems with detection, transfer rates or disconnection, use the original cable included with your Seagate hard drive.
Q: Can I protect my Seagate hard drive with a password?
A: Yes, it is possible to protect the hard drive or individual folders and files with a password. There are many third-party solutions for password protection. However, Seagate cannot guarantee them since we do not test third-party applications.
Some versions of Windows have a built-in utility called Bitlocker that can protect hard drives with a password. For more information about Bitlocker, consult Microsoft's support documentation.
Q: Can I encrypt my Seagate hard drive?
A: Yes, the hard drive can be encrypted. There are many third-party solutions for encryption. However, Seagate cannot guarantee them since we do not test third-party applications.
Some versions of Windows have a built-in utility called Bitlocker that can encrypt hard drives. For more information about Bitlocker, consult Microsoft's support documentation
Documents / Resources
References
Seagate Dashboard Gebruikershandleiding - Seagate Dashboard – Inleiding | Seagate Nederland
![windows.microsoft.com]() Windows help and learning
Windows help and learningCreate and Use Backups Using the Backup and Restore Center | Microsoft Learn
Windows 8: File History explained | Microsoft Learn
https://support.apple.com/en-us/HT201250
Download manual
Here you can download full pdf version of manual, it may contain additional safety instructions, warranty information, FCC rules, etc.
Advertisement


Need help?
Do you have a question about the Backup Plus and is the answer not in the manual?
Questions and answers