Table of Contents
Advertisement
Quick Links
Advertisement
Table of Contents

Related Manuals for CleanCraft dryCAT 15


Summary of Contents for CleanCraft dryCAT 15
- Page 1 Instruction Manual Dry Vacuum Cleaner dryCAT 15 dryCAT 15 B dryCAT 15 dryCAT 15 B...
-
Page 2: Table Of Contents
Subject to technical modifications and error. 13.2 Spare parts drawings........15 13.3 Spare parts drawing dryCAT 15 ....15 13.4 Spare parts drawing dryCAT 15 B ....16 14 Electrical circuit diagram dryCAT 15 17 15 Wiring diagram dryCAT 15B ....17 16 EC Declaration of Conformity .... -
Page 3: Introduction
You have made a good choice by purchasing the even further. CLEANCRAFT dry vacuum cleaner. Read the operating instructions carefully before 1.3 Limitation of liability starting up the machine. -
Page 4: Tips And Recommendations
Safety Obligations of the operating company: If the vacuum cleaner is used for commercial purposes, the operating company of the vacuum cleaner must com- ply with the legal working safety regulations. There-fore, the safety notes in this operating manual, as well as the DANGER! safety, accident prevention and environment protection This combination of symbol and signal words indi-... -
Page 5: Requirements To Staff
Safety 2.3 Requirements to staff 2.4 Personal protective equipment The personal protective equipment serves to protect per- The different tasks described in this manual represent sons against impairments of safety and health while wor- different requirements to the qualification of the persons king. -
Page 6: Safety Instructions Battery Drycat 15B
- Never short-circuit the battery. - Do not arbitrarily store the battery in a box or drawer where it can short-circuit or be short-circuited by other Fig. 1: Safety labels dryCAT 15 (top), dryCA T 15B (bottom) metal objects. dryCAT Series | Version 1.04... -
Page 7: Intended Use
4.1 Table not be removed. Damaged safety symbols must be re- placed immediately. Model dryCAT 15 dryCAT 15 B As soon as the signs are not clearly visible and compre- Length 277 mm 277 mm hensible at first glance, the machine must be stopped until new signs have been attached. -
Page 8: Type Plate
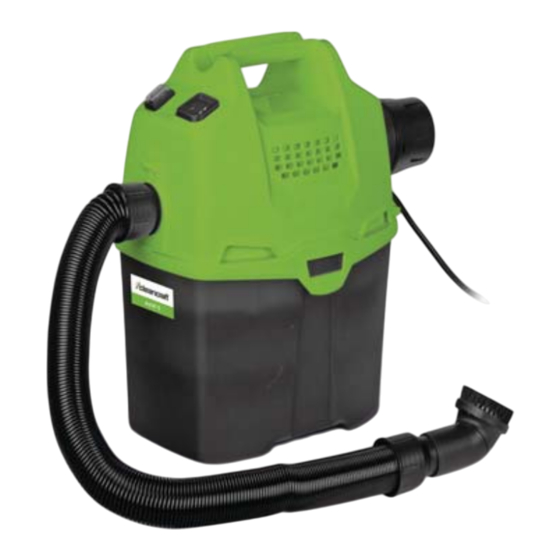
Transport, packaging, storage 4.2 Type plate Description of the device 6.1 Description dryCAT 15 Fig. 2: Type plate dryCAT 15 Transport, packaging, storage Fig. 3: Description dryCAT 15 5.1 Transport 1 On / Off switch 2 Suction hose Check the dry vacuum cleaner after delivery for visible 3 Carrying handle transport damage. -
Page 9: Scope Of Delivery And Accessories
To make the dry vacuum cleaner ready for operation, please proceed as follows: The dryCAT 15 dry vacuum cleaner is supplied with: Step 1: Remove the packaging of the dry vacuum cleaner and check that there is no damage to the dry va- - Cable 6,0 mtr. -
Page 10: Operation
Fig. 9: Mounting the floor nozzle 9.1 Switch on and off Step 7: Place the battery (dryCAT 15 B) in the battery hol- der Pos.4 (Fig.10). You can check the battery ca- Start pacity by pressing the button Pos.3 (Fig.10).. -
Page 11: Cleaning Button
Care, maintenance and repair 9.2 Cleaning button General maintenance instructions Once the suction power of the vacuum is significantly - Regularly check the seals, plastic parts, filters and weakened, block the end of the hose with one hand, switches for damage and replace them if neces- press the cleaning button with the other hand 5-10 times sary. -
Page 12: Emptying The Dirt Tank
We recommend checking the sealing hooks, the flexible suction hose and the seals for proper function at regular intervals. 10.4 Charge battery dryCAT 15 B Step 1: Remove the battery from the dry vacuum. Step 2: Insert the battery into the charger provided. -
Page 13: Troubleshooting
Troubleshooting 11 Troubleshooting DANGER! If any of the following errors occur, stop working with the machine immediately. Before you start troubleshoo- ting, switch off the machine and disconnect the power plug. Serious injury could result. All repairs or replace- ments may only be carried out by qualified and trained personnel. -
Page 14: Disposal Via Municipal Collection Points
The engine for the vacuum cleaner dryCAT 15 must be electrical and electronic equipment. By contri- ordered. The engine has the number 17 in the spare buting to the proper disposal of this product, you protect parts drawing 1. -
Page 15: Spare Parts Drawings
The following drawings should help to identify necessary spare parts in case of service. To order, send a copy of the parts drawing with the marked components to your authorized dealer. 13.3 Spare parts drawing dryCAT 15 Fig. 18: Spare parts drawing dryCAT 15 dryCAT Series | Version 1.04... -
Page 16: Spare Parts Drawing Drycat 15 B
Spare parts 13.4 Spare parts drawing dryCAT 15 B Fig. 19: Spare parts drawing dryCAT 15 B dryCAT Series | Version 1.04... -
Page 17: Electrical Circuit Diagram Drycat 15
Electrical circuit diagram dryCAT 15 14 Electrical circuit diagram dryCAT 15 Fig. 20: Electrical circuit diagram dryCAT 15 15 Wiring diagram dryCAT 15B Fig. 21: Wiring diagram dryCAT 15 B dryCAT Series | Version 1.04... -
Page 18: Ec Declaration Of Conformity
Cleancraft® Reinigungstechnik Machine type: Dry Vacuum Cleaner Designation of the device*: dryCAT 15 Item number *: 7002105 dryCAT 15 B 7002106 Serial number*: ____________________ Year of manufacture*: 20_________ *Fill in these fields according to the information on the type plate. - Page 19 Notes 17 Notes dryCAT Series | Version 1.04...
- Page 20 www.cleancraft.de...
Need help?
Do you have a question about the dryCAT 15 and is the answer not in the manual?
Questions and answers