Table of Contents
Advertisement
Quick Links
Advertisement
Table of Contents

Related Manuals for CleanCraft dryCAT 16 L - Class


Summary of Contents for CleanCraft dryCAT 16 L - Class
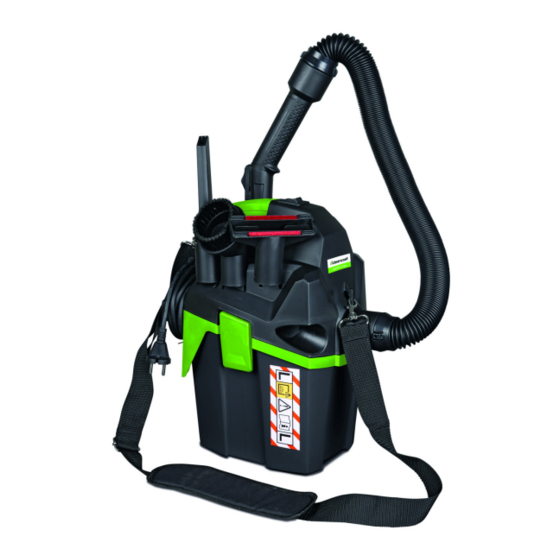
- Page 1 Instruction Manual Dry Vacuum Cleaner dryCAT 16 L - Class dryCAT 16 L - Class...
-
Page 2: Table Of Contents
Product identification 1.1 Copyright ............3 Dry Vacuum Cleaner Item number 1.2 Customer service..........3 dryCAT 16 L - Class 7002116 1.3 Limitation of liability..........3 2 Safety................3 2.1 Symbol explanation ..........3 2.2 Obligations of the operating company ....4 2.3 Requirements to staff.......... -
Page 3: Introduction
All information and notes in these operating instructions You have made a good choice by purchasing the were summarised while taking applicable standards and CLEANCRAFT dry vacuum cleaner. rules, the state-of-the-art technology and our long-term Read the operating manual thoroughly before com- knowledge and experiences into consideration. -
Page 4: Obligations Of The Operating Company
Safety - The operating company must be informed about the applying industrial safety regulations and fur- CAUTION! ther analyse hazards resulting from the special This combination of symbol and signal words indi- working conditions at the place of use of the vac- cates a potentially dangerous situation which may uum cleaner. -
Page 5: Personal Protective Equipment
Safety Only persons reliable working procedures can be ex- pected from, are allowed to perform all works. Persons Protective clothes the responsiveness of which is affected by e. g. drugs, alcohol or medication, are not allowed to work with the Protective clothes are made of a tightly fitted fabric without the protruding parts of low tear strength. -
Page 6: Safety Labels
Safety - Do not immerse the device in water and do not use water jets to clean it. DANGER! - Never pull the power plug or the suction hose. In the event of the unit tipping over, it is recommen- - Do not use compressed air to clean the dry vacuum ded to upright again before switching off. -
Page 7: Intended Use
The dry vacuum cleaner is designed exclusively for vacuu- ming dust and dirt, but not for wet vacuuming. The device is Model dryCAT 16 L - Class suitable for use in public buildings such as hotels, schools, Length 240 mm factories, offices and stores. -
Page 8: Transport, Packaging, Storage
Transport, packaging, storage Transport, packaging, storage Description of the device 5.1 Transport Illustrations in these operating instructions may dif- Check the Dry Vacuum Cleaner for visible transport da- fer from the original. mage after delivery. If you discover any damage to the Dry Vacuum Cleaner, report this immediately to the transport company or the dealer. -
Page 9: Scope Of Delivery
Assembly Scope of delivery Assembly To make the dry vacuum cleaner ready for operation, please proceed as follows: Step 1: Remove the packaging of the dry vacuum cleaner and check that there is no damage to the dry va- cuum cleaner. Remove the scope of delivery (Fig.5, Pos.C) from the container by opening the latch (Fig.5, Pos.A) on the side of the upper part of the housing (Fig.5, Pos.B). -
Page 10: Operation
Operation Operation Step 5: Connect the suction tube to the extension or floor nozzle (Fig.8) or other desired brush. The nozzle tube (fig.8,pos.14) can be removed for suction by pressing the button (fig.8,pos.A) and pulling out DANGER! the nozzle (fig.8,pos.B). Danger to life from electric shock! There is a danger to life in case of contact with live components. -
Page 11: Start And Stop
Operation 8.1 Start and Stop 8.2.2 Air regulation Start The air flow can be adjusted or regulated at the end of the hose by turning the air flow regulator. - Unwind the cable and insert the plug into a mains socket. -
Page 12: Care, Maintenance And Repair
Care, maintenance and repair Care, maintenance and repair 9.3 Replacing the filter The filter will wear out over time and need to be replaced DANGER! with a new one, or it may become severely clogged/dirty Danger of potentially fatal electric and need to be cleaned manually as the semi-automatic shock! filter cleaning is not sufficient to clean the filter. -
Page 13: Disposal, Recycling Of Used Devices
Disposal, recycling of used devices 10 Disposal, recycling of used devices 10.4 Disposal via municipal collection points Please take care in your own interest and in the interest of the environment that all component parts of the ma- Disposal of used electrical and electronic equipment (to chine are only disposed of in the intended and permitted be used in the countries of the European Union and way. -
Page 14: Troubleshooting
Troubleshooting 11 Troubleshooting NOTE! If you are unable to correct the problem with your va- cuum yourself, please contact your nearest Clean- DANGER! craft dealer. Please write down the following informa- If any of the following faults occur, immediately stop tion from the vacuum or from the operating working with the dry vacuum cleaner. -
Page 15: Spare Parts Drawing
- Type of device: dryCAT 16 L - Class - In case of any uncertainties, always contact the ma- - Item number: 7002116 nufacturer. -
Page 16: Spare Parts Drawing
Electrical circuit diagram 12.2 Spare parts drawing The following drawing should help to identify necessary spare parts in case of service. To order, send a copy of the parts drawing with the marked components to your authorized dealer. Fig. 16: Spare parts drawing 1 13 Electrical circuit diagram Fig. -
Page 17: Ec-Declaration Of Conformity
D-96103 Hallstadt hereby declares that the following product Product group : Cleancraft® Cleaning technology Type of machine: Dry Vacuum Cleaner Designation of the device: dryCAT 16 L - Class Item number: 7002116 Serial number *: ____________________ Year of manufacture *: 20_________... - Page 18 www.cleancraft.de...
Need help?
Do you have a question about the dryCAT 16 L - Class and is the answer not in the manual?
Questions and answers