
Related Manuals for KoolMore KM-OKS-BQHUB


Summary of Contents for KoolMore KM-OKS-BQHUB
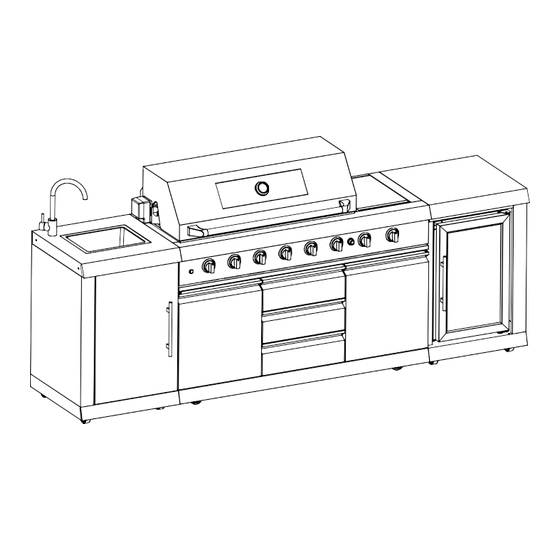
- Page 1 USER MANUAL KoolMore Outdoor Kitchen Island with sink, Storage Cabinet and outdoor wine cooler. Models: KM-OKS-BQHUB Before using, please read the operating instructions carefully to ensure proper application and achieve satisfactory results.
- Page 2 Stay informed with the latest information for your KoolMore Appliance. If you need any assistance or have questions, our customer support team is here to help.
-
Page 3: Installation
INSTALLATION WARNING: • If the instructions in this manual are not followed exactly, a fire or explosion may result, causing property damage, personal injury, or death. • Do not store or use gasoline or other flammable substances and liquids near this or any other appliance. - Page 4 Step 1 Step 2...
- Page 5 Step 3 Step 4 1.Unscrew the four screws on the back with a screwdriver 2. Then remove the refrigerator from the front 3.Take out the Styrofoam...
- Page 6 Step 5 Step 6...
- Page 7 Step 7 1. Open the refrigerator door and remove the foot pads. 2. Attach the foot pads to the refrigerator. 3. Place the refrigerator back into the electrical cabinet box. Step 8 Use a screwdriver to tighten the screws and secure them in place.
- Page 8 Step 9 Step 10...
- Page 9 Step 11 Step 12...
- Page 10 SET UP GAS REQUIREMENTS CAUTION: Gas Tank Specifications • Any L.P. gas supply cylinder used with this gas BBQ Grill must be approximately 12 inches in diameter and 18 inches high. The maximum fuel capacity is 80% and is approximately 20 pounds of propane.
- Page 11 Pre-Operation Leak Testing DANGER: Do not insert any tool into the valve outlet or safety relief valve. You may damage the valve and cause a leak. Leaking propane may result in explosion, fire, severe personal injury, or death. If a leak is detected at any time, or you cannot stop a gas leak, immediately close the tank’s shut-off valve (gas supply from LP tank to the gas BBQ Grill) and call your LP gas supplier or your fire depart- ment.
-
Page 12: Lp Gas Connection
2. Turn the tank valve off (Turn shut-off clockwise to stop). 3. Detach the regulator assembly from the tank valve by turning the quick coupling nut counterclockwise. LP Tank Removal, Transportation, and Storage • Turn off all control knobs and the LP tank valve. Turn the coupling nut counterclockwise by hand only—do not use tools to disconnect. - Page 13 • DO NOT use a wrench to tighten because it could damage the Quick Coupling Nut and result in a gas leak/fire hazard. • Open the tank valve 1/4 to 1/2 of a full turn (counterclockwise) and use a soapy water solution to check all connections for leaks before attempting to light your grill.
- Page 14 A. Locking screw B. Tank tray C. 20lb LP gas fuel tank tray Cylinder must be arranged to provide vapor withdrawal. Electrical Safety Electrical equipment provided with the outdoor cooking gas appliance shall have the following instructions: a) To protect against electric shock, do not immerse cords or plugs in water or other liquids. b) Unplug from the outlet when not in use and before cleaning.
-
Page 15: Operation
OPERATION GRILL INSTRUCTIONS The grill you have purchased may have some or all of the features listed below. The locations and appearances of the features shown here may not match what you have on your model. Control Panel A. Grill Knob Light Switch B. Front Left Tube Burner Knob C. Front Left Tube Burner Knob D. Front Left Tube Burner Knob E. - Page 16 Prepare the Gas Supply 1. Make sure control knobs are turned to OFF. The drip tray must be in place and pushed all the way to the back. Turn the Gas Supply On 1. For outdoor grills using a propane tank: Slowly open the tank valve.
- Page 17 IMPORTANT: If the burner does not light immediately, turn the burner knob to OFF and wait 5 minutes before re- lighting. If any burners do not light after attempting to light them manually, contact Customer Service. See the "Assistance" section. Warning (After use): Storage of an outdoor cooking gas appliance indoors is permissible only if the cylinder is disconnect- ed and removed from the outdoor cooking gas appliance.
- Page 18 WARNING: Do not let food sit for more than one hour before or after cooking. Doing so can result in food poison- ing or sickness. It is suggested to use protective gloves when handling particularly hot components. Parts sealed by the manufacturer must not be altered or changed by the end user.
-
Page 19: Rotisserie Chart
• ALWAYS ensure there is no blockage of the airflow through the vent space located below the face of the unit. • Keep the ventilation opening(s) of the cylinder enclosure free and clear from debris. ROTISSERIE CHART Use a portable meat thermometer to check the internal doneness of the food. Turn off the rotisserie burner when the meat thermometer reads 5°F/3°C lower than the desired internal temperature. - Page 20 • The degree of doneness is influenced by the type of meat, cut of meat (size, shape, and thick- ness), heat setting selected, and length of time on the grill. • Cooking time will be longer with an open grill cover. Cooking Methods Direct Heat Cooking by direct heat means the food is placed on grill grates directly above lighted burners.
-
Page 21: Warming Rack
When completely cool, grill racks can be removed for thorough cleaning. Clean them with a mild de- tergent and warm water. For baked-on food, prepare a solution of 1 cup (250 ml) ammonia to 1 gallon (3.75 L) water. Soak grates for 20 minutes, then rinse with water and dry completely. - Page 22 DRIP TRAY IMPORTANT: The drip tray should only be removed when the grill is completely cool. The full-width drip tray collects grease and food particles that fall through the grill. Clean often to avoid grease buildup. Cleaning Method: • Remove the tray and set it on a flat surface. •...
-
Page 23: Troubleshooting
TROUBLESHOOTING Issue Possible Cause Solution Grill will not light Is the propane tank valve Turn on the valve. turned off? Is the grill properly connected Check installation instructions. to the gas supply? Is there any gas in the propane Check the gas level before using the tank? grill. -
Page 24: Limited Warranty
At its sole discretion, Koolmore Supply Inc. may decide to replace the product. In such an event, your replace- ment appliance will carry the warranty for the remaining term of the original unit's warranty period.
Need help?
Do you have a question about the KM-OKS-BQHUB and is the answer not in the manual?
Questions and answers