
Related Manuals for KoolMore KM-OKS-WFPO


Summary of Contents for KoolMore KM-OKS-WFPO
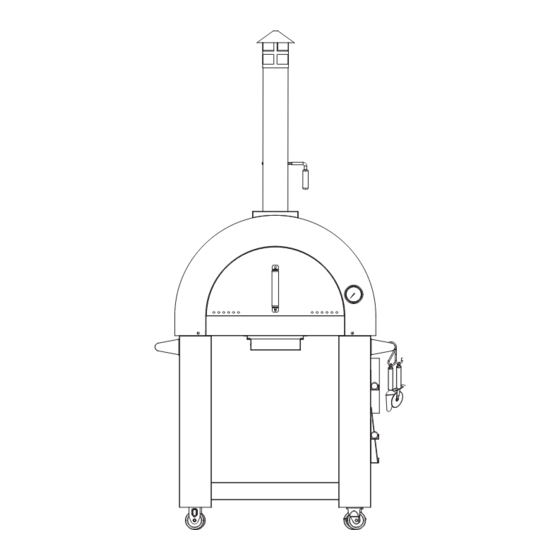
- Page 1 USER MANUAL KoolMore Outdoor Kitchen System Wood Fired Pizza Oven Model: KM-OKS-WFPO For any service-related Issues, please contact us: Phone Number: 718-576-6342 Email address: support@koolmore.com...
-
Page 2: Safety Precautions
Safety Precautions 1. Prior to Assembly and Use Please ensure you fully read and understand the provided assembly and use instructions prior to the construction and utilization of the Outdoor Wood Fired Pizza Oven. 2. Placement Position the Outdoor Oven on a surface that is non-combustible to prevent any accidental fires. The surface should be stable and level to ensure safe operation. - Page 3 Safety Precautions 9. Lighting and Re-lighting For safety reasons, do not use spirit or petrol for lighting or re-lighting your oven. 10. Child and Pet Safety Always keep children and pets at a safe distance from the Outdoor Oven. It can become very hot during operation and pose a burn risk.
- Page 4 Assembly Instructions Step 2: Attaching the Legs Step 1: Bottom Shelf Installation Start by installing the bottom shelf using Fasten the oven body to the legs using sixteen 1/4" * 0.59" (15mm) screws. twelve 1/4" * 0.59" screws. The bottom shelf provides stability and a The legs are crucial in raising the oven off the storage area for your cooking essentials.
- Page 5 Assembly Instructions Step 3: Ash Support Installation Install the ash support using four 1/4" * 0.59" screws. Detail a: Noted the position of ash support, the outside as details picture View a magnified The ash support holds the ash box, enabling easy cleanup after cooking.
- Page 6 Assembly Instructions Step 4: Installing the Ash Box Place and secure the ash box on the bottom of the oven. Oil gathering box card slots Oil gathering box around stents card buckle View a magnified View c amplification Magnified view b Ensure the ash box fits snugly and securely in its designated spot.
- Page 7 Assembly Instructions Step 5: Door Handle Installation Step 6: Chimney Cap Installation Secure the door handle with two sets of 1/4" * Attach the chimney cap using 0.59" screws, insulation mat, flat washer, spring four 5/32" * 0.39" screws. washer, and 1/4" bolts. This handle facilitates easy opening and The chimney cap plays a key role in directing closing of the oven door.
- Page 8 Assembly Instructions Step 7: Chimney Installation Step 8: Chimney Box Installation Install the chimney using four 1/4" * 0.59" screws. Secure the chimney box with four 1/4" * 1.18" screws. This handle facilitates easy opening and The chimney cap plays a key role in directing closing of the oven door.
- Page 9 Assembly Instructions Step 9: Installing Left and Right Handles Step 10: Installing Hooks Fasten the left and right handles using eight 1/4" * Fix three hooks and one pc of hook using eight 1/4" * 0.59" screws. 0.59" screws. These handles are essential for maneuvering These hooks offer convenient hanging storage and positioning the oven.
- Page 10 Assembly Instructions Step 11: Hanging 'S' Hooks Step 12: Parts Placement Attach four 'S' hooks onto the handle. Follow the diagram to position the remaining parts as indicated. Details a: hanged the hooks from side View a magnified These hooks provide additional storage space Proper placement ensures the best and easy access to your cooking utensils performance and safety of your oven.
- Page 11 Congratulations! With these steps completed, you are ready to enjoy your KoolMore Outdoor Wood Fired Pizza Oven. Please review all previous steps to confirm secure assembly, and ensure you understand the...
-
Page 12: Getting Started
Getting Started Unpack your Wood-fired Outdoor Oven with care, using two people for safe lifting. Place the oven on a non-combustible stand like the Kitchen Wood Box/Stand kit with granite top. Remove all protective film. Assemble the oven as per the included instructions. Prior to its first use, 'season' your oven by heating it to 650°F at least twice, letting the fire die down each time. -
Page 13: Cooking Guidelines
Cooking Guidelines 1. High-Temperature Cooking: Best suited for pizzas. Achieve this by heating your Cooking Stone between 620°F and 650°F. For optimal cooking, place the pizza on the Cooking Stone using the 11.5" Square Peel and rotate it during cooking with the 8.5" Round Peel. 2. -
Page 14: Warranty
At its sole discretion, Koolmore Supply Inc. may decide to replace the product. In such an event, your replacement appliance will carry the warranty for the remaining term of the original unit's warranty period.
Need help?
Do you have a question about the KM-OKS-WFPO and is the answer not in the manual?
Questions and answers