Table of Contents
Advertisement
Quick Links
Advertisement
Table of Contents

Related Manuals for EYELA CM-1000


Summary of Contents for EYELA CM-1000
- Page 1 Instruction Cute Mixer Manual CM-1000 This manual is designed to use the product efficiently and safely with keeping its best performance. Be sure to read "Safety IMPORTANT precautions" before use. Please keep this manual in a place easily accessible to every user. Tokyo Rikakikai Co., Ltd...
-
Page 2: Safety Precautions
Safety precautions 1. Signal word for warning Due to its functions and characteristics, Therefore, this manual categorizes the level of some parts of the main unit are shaken. importance and danger as below with alert mark Touching these part during operation may and signal word. Please follow the instructions and cause you physical injury. - Page 3 Vortex Sheet Micro Tubes 15ml Centrifuge Tubes 50ml Centrifuge Tubes Micro Plates speed max ×100rpm EYELA ・ CUTE MIXER CM-1000 ・ ・ ・ ・ ・ ・ ・ ・ ・ speed ・ ・ ・ timer ・...
-
Page 4: Table Of Contents
Congratulations on your purchase of a product. Introduction This instruction manual describes the procedure of installation, operations, troubleshooting, maintenance, check-up, and disposal of CM-1000, high-speed mixer. Please read this manual carefully before use. Contents 1. For safety use 2. Outline of the product 5. Operation 2 - 1 Use application 5 - 1 Preparation 2 - 2 How to use 5 - 2 Setting up options 2 - 3 Specifications 5 - 3 How to operate 2 - 4 Options 6. Troubleshooting 2 - 5 Name of each part 7. Maintenance・checkup 3. Descriptions 7 - 1 Cleaning and caring the 3 - 1 Operation panel product 3 - 2 Safety functions 7 - 2 Replacing fuse 4. Installation 7 - 3 Replacing panel frame 4 - 1 Installation evironment 7 - 4 Replacing vortex sponge 4 - 2 Installation conditions 8. Disposal of the product 4 - 3 Utility connection 9. After-sales service Items contained in your packing Please check the type and quantity of each part ... -
Page 5: For Safety Use
For safety use The shaking board of this product shakes in high speed. Use care when handling it. Do not hold the rack when carrying the product. Hold the main unit whenever carrying the product. If you hold the rack and carry the product, main unit may drop on the floor. CAUTION Do not shake the product without attaching rack or out of specified application. The instrument is designed to execute shaking smoothly in keeping with CAUTION the loading amount. If you shake the instrument without attaching rack or out of specified shaking speed, it will cause disruption of a balance, which may move the main unit or drop down the rack or vessels. Use the unit with attaching rack and within a range of specified shaking speed. Raise the shaking speed from 0 to your desired speed gradually. Turn on the power switch after setting shaking speed controller at 0 CAUTION and raise the speed gradually. If you turn on the power switch with setting the controller at high shaking speed, the main unit may move because of heavy load. Also, rack or vessel may drop down depending on the speed. -
Page 6: Outline Of The Product
Do not remodel the product. experiment of DNA and RNA, blending and Do not use the product out of dissolution of reagent and ELISA specified application. experiment. Remodeling or using the product out of specified application may cause electric shock or malfunction. 2-2 How to use Shaking speed can be set to adjusted to the For more details, please refer to 「5-3 How type of the vessel. Shaking speed and timer to operate」on page 10. can be set by turning the selector on the operation panel. 2-3 Specifications Product name High speed mixer (CUTE MIXER) Model CM-1000 Shaking system Circling 300〜1500rpm(50ml With attaching rack for centrifuge tube) 300〜1800rpm(15ml With attaching rack for centrifuge tube) Range of 300〜1800rpm(With attaching rack for micro tube) shaking speed 300〜1200rpm(With attaching rack for micro plate) 300〜2500rpm(With attaching rack for vortex) Rotation amplitude Approx. 3mm Volume setting Setting of shaking speed Fuse (1A)、Over load protection for motor Safety functions 30-minute mechanical timer for operation Ancillary function DC brushless motor (5W) Motor 0.5ml Micro tube×24、1.5ml Micro tube×24、... -
Page 7: Options
2-4 Options Rack is not supplied with this mixer. Please select your desired one from the list below. ※vessel is not supplied with each optional accessory. Name 0.5ml Rack for micro tube Model CM-R0.5 Catalogue No. 188150 0.5ml Micro tube Type of vessel Maximum setting number of vessel External measurement(mm) 143 (W)×95 (D)×24 (H) Name 1.5ml Rack for micro tube Model CM-R1.5 Catalogue No. 188160 Type of vessel 1.5ml Micro tube、2.0ml Micro tube Maximum setting number of vessel External measurement 143 (W)×95 (D)×31(H) (mm) ※CM-R0.5・R1.5 can be also used as a tube rack. Name 50ml Rack for centrifugal tube Model CM-R50 Catalogue No. 188170 Type of vessel 50ml Centrifugal tube Maximum setting number of vessel External measurement 254(W)×130(D)×140(H) -
Page 8: Name Of Each Part
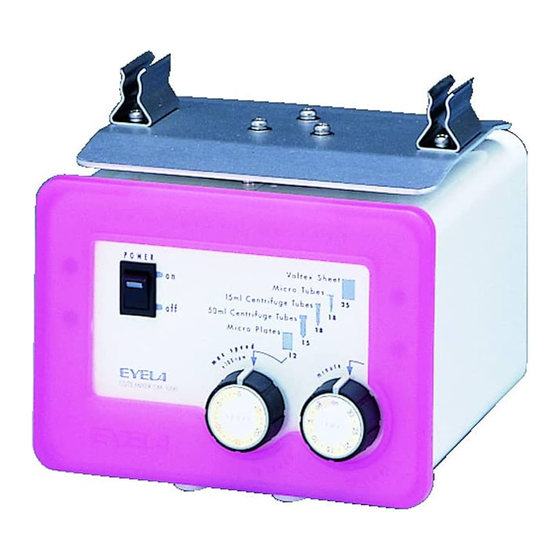
2-5 Name of each part Shaking board Holder for fixing rack Power switch Panel frame Screw for fixing panel Rubbe frame Shaking speed 30-minute timer controller Fuse (1A) Mains connector... -
Page 9: Operation Panel
Vortex Micro Sheet 15ml Centrifuge Tubes Tubes 50ml Centrifuge Tubes Micro Plates speed max ×100rpm EYELA ・ ・ ・ CUTE MIXER CM-1000 ・ ・ ・ ・ ・ ・ speed ・ ・ time ・ ・ ・ ・ ・ ・ ・ ・ ・ ・ ・ ・ ・ ・... -
Page 10: Installation
Installation 4-1 Installation environment CAUTION Install the product in a leveler, stable and solid place. This product is used for shaking and stirring the samples. If you run the product in a place where is uneven or wet with water or oil, it will fall down and be impaired, which may lead some troubles. Select the installation site that meets the following conditions. ●Leveler, stable and solid ●No inflammable or any other hazardous substance around the unit. 35℃. ●Ambient temperature must be from 5℃ to ●No dew condensation falls on the unit. ●Lesser humidity and no dripping ●Lesser dust ●No direct sun light ●Well-ventilated 4-2 Installation conditions CAUTION Keep enough space around the unit. To keep its best performance, keep the distance between the product and wall and ceiling plane longer than the length shown in the picture below. -
Page 11: Utility Connection
WARNING Check the voltage, phase and Ground the unit properly. capacity of the power source before For preventing electric shock, do not use. Wrong connection may cause a fire ground the unit to gas or water pipe. or electric shock. WARNING Do not use branching socket. Excess current may burn cable or cause a fire. Required power source (1) Check the voltage, phase and capacity of Model the power source. Voltage Capacity Required power source is as shown in the CM-1000 AC100V right table. (2)Check the outlet of the installation site. Outlet with ground terminal (Do not plug the mains connector Mains connector Grounding 3-pronged outlet yet.) (3-pronged) adapter Mains connector can be connected to Not required the outlet with ground terminal. Outlet without ground terminal 2-pronged Mains connector Grounding adapter outlet (3-pronged) In case the outlet has no ground ... -
Page 12: Operation
Operation CAUTION CAUTION Do not shake the unit without Set the vessels properly. attaching rack or out of specified If the load on the shaking board is not shaking speed. well-balanced, the unit may be overloaded If the unit is shaken without attaching rack or and cause malfunction even though the out of specified shaking speed, the unit will load amount for shaking board is disrupt a balance, which makes the unit move permissible. or drop the rack or vessels. 5-1 Preparation (1)Each rack is not supplied with the unit. Prepare the appropriate vessel before using the unit be referring to "Options" on page 3. (2)Put the sample into the vessel before running the unit. 5-2 Attaching options 1setting rack 1-1. Setting rack for micro tube (CM-R0.5・ R1.5) Put micro tube into the (1)Put sample into the micro tube and cover rack with the cap. (2)Hold the rack for micro tube and push the micro tube into it. (3)Make sure that the shaker is turned off. Turn it off if it is turned on. Setting the tubes into the holder for fixing rack (4)Push joint bar of the rack into the holder for fixing rack (set up at two points) and tighten it. Joint ... - Page 13 Check the position of the holder through observation window and 1-2. Using rack for centrifugal tube (CM-R15・R50) push the bar on the (1)Put sample into the tubes and seal them tightly front side first. with cap and put them into the holder of the rack. Joint bar ※Attach the tubes to produce a symmetric appearance. ※Number of the vessels should be even number. If you have to set odd number, prepare dummy tube and pour some water into it and attach onto the rack Centrifuga so that the number of the vessel should be even l tube number. ※Total capacity of the 50ml tubes should be within Attach the 180ml and the capacity of each tube should be less tube here than 30ml. Roll the tube when attaching it to the ※Recommended procedure of attaching tubes is holder. shown in the right picture. ※Resin coating of the holder is consumable. The life of the coating differs depending on the type of tube or arrangement of attaching tubes. Though coating is Rack for 50ml centrifugal worn out or removed, it does not affect the shaking tube ⑥ ③ capability. Centrifug (2)Make sure that the shaker is turned off. Turn it off al tube ② if it is turned on.
-
Page 14: How To Operate
points) for fixing the rack on the shaking board tightly. ※To attach the bar into the holder easier, incline the holder a little bit and push the bar into the front side first. (As for setting, please refer to "1-1 Setting holder for fixing rack" on page 8.) 5-3 How to operate 1. Continuous running power (1)Make sure that shaking speed controller points at "0 and 30-minute timer is turned before turning on power switch. ※If you set the timer at the point between on and off, the timer will not be turned on. In case that you set it at the point closer to "on", the timer will start running after EYELA several seconds. So if you would like to CUTE MIXER CM-1000 execute continuous running, set the timer at leftmost point (i.e."on"). (2)If you turn on the power switch, it will light up and the the main unit is turned on. (3)Turn the shaking speed controller and set it at the value that is suitable for your selected rack. Vortex ※Maximum speed for each rack is written on Sheet Micro 15ml Centrifuge Tubes operation panel. If you set the value that is Tubes 50ml Centrifuge out of its capacity, it disrupts a balance of Tubes Micro ... - Page 15 2. Timer operation (1)Make sure that shaking speed controller points at "0" and 30-minute timer is off before turning on power switch. (2)When turning on power switch, it will light up and the main unit is turned on. (3)Set 30-minute timer at your desired time. ※If the setting time is too short, turn the timer and set it at the time a little bit longer than your desired value and return it to your desired value again. (4)Turn the shaking speed controller and set it at the value that is suitable for your selected rack. ※Maximum speed for each rack is written on operation panel. If you set the value that is out of its capacity, it disrupts a balance of main unit, which may lead malfunction. ※If you use centrifugal tube or micro tube and the sample is not shaken very well because of its amount or viscosity, do not change the shaking speed and turn the power switch off and on. If that will not work out, reduce the Tilt the rack back and forth and lift amount of the sample. (5)Make sure that shaking speed controller points at "0" and turn off the power switch and unplug the mains connector from the outlet. 3. Detaching and replacing rack (1)When detaching the rack from the main unit, tilt it back and forth. ※If you use the rack for micro plate (CM-RP), detach micro plate first before detaching the rack. (2)When replacing the old rack with new one, please refer to "5-2 Attaching options".and follow the instructions.
-
Page 16: Troubleshooting
Troubleshooting If you face the trouble that is not addressed in this manual, please contact your local dealer or closest customer service center. Countermeasure Trouble Cause of trouble Turn off the power switch Mains connector is not plugged or not and plug the mains plugged completely. connector into outlet. Turn on the breaker of The instrument Power is not supplied. distribution board. can not be turned on even though Stop running the unit and Power switch is impaired. the power switch call your local dealer or Fuse blows because of excess current. is on. closest customer service (short-circuited) center. Turn the timer on or set the 30-minute timer is turned off. timer at your desired time. Set the shaking speed within a Overload protection for motor The instrument range of its capacity. worked. does not shake. Stop running the unit and call Motor or speed controller is your local dealer or closest impaired. customer service center. Stop running the unit and call ... -
Page 17: Cleaning And Caring The Product
Maintenance・checking-up 7-1 Cleaning and caring the product CAUTION WARNING Do not disassemble the Use designated fuse. product. If you use undesignated fuse, it will not Since some parts inside the unit are under blow when excess current flows, which electric pressure or subject to high may cause a fire or other accidents. temperature, disassembling the product may cause electric shock or physical injury. CAUTION Use appropriate products for 、 cleaning and caring the product in proper way. When cleaning and caring the product, do not pour the water on the exterior or interior part directly. Also, do not use cleanser (polish) , thinner, oil, lamp oil, acid and related products. These product may cause electric shock or damage the product. (1)Make sure that shaking speed controller sets at "0 and turn off the power switch, and unplug the mains connector from the outlet. (2)Clean the unit with soft wet cloth after wringing water tightly. For greasy dirt, use mild detergent and wipe the dirt off with cloth. 7-2 Replacing fuse (1) Turn off the power switch and unplug the mains connector from outlet. (2) Turn the cap of fuse holder counter clockwise with flat-blade screw driver and remove it, and remove the blown fuse from the holder. -
Page 18: Replacing Panel Frame
7-3 Replacing the panel frame (1)Make sure that shaking speed controller points at "2" and turn off the power switch, and unplug the mains connector from the outlet. Panel frame (2)Turn two screws for fixing panel frame as shown in the right picture and loosen them. Panel frame can be removed without removing the screws completely. To loosen the screws, turn them in this Screws for direction. fixing panel frame (3)To remove the frame, pull the bottom of the frame to the front side and lift it. Pull the bottom of panel frame to the front side Lift to remove (4)Push the protrusion of the control panel into the slot situated inside the top surface of Slot the panel frame and attach them tightly by following the completely opposite procedure of above-mentioend description. Protrusion Panel ※Tighten the screws for fixing panel frame. frame If the unit is shaken without tightening them, noise may be generated from the screws. Control panel... -
Page 19: Replacing Vortex Sponge
(1)Remove 6 screws from the bottom of Rack the rack with using cross slot screw driver and remove the used-up sponge rubber. (2)Replace the old sponge rubber with new one and attach it to the rack tightly with screws. Part name Catalogue number 188610 Vortex sponge Disposal of the product When disposing the product or parts, please follow the instructions as below. Main components and instruction for disposal How to dispose Component Specifications CM-1000 Total Approx.4.5kg weight Main Please contact waste disposer. External measurement unit 160 (W)× 170 (D)× 155 (H) mm ※Please dispose packing material by separating each type of material. -
Page 20: After-Sales Service
After-sales service 1.In case of malfunction, please refer to the section of troubleshooting to check how that trouble case is. 2. If that failure mode still remains, please contact your local dealer or the closest customer service center mentioned in this manual.
Need help?
Do you have a question about the CM-1000 and is the answer not in the manual?
Questions and answers