Electrolux Pure C9 Manual
- Instruction book (60 pages) ,
- Instruction manual (60 pages) ,
- Instruction book (29 pages)
Advertisement
- 1 INTRODUCTION
- 2 BEFORE STARTING
- 3 DESCRIPTION OF PURE C9 VACUUM CLEANER
- 4 HOW TO USE THE VACUUM CLEANER
- 5 3IN1 ACCESSORY TOOL
- 6 CHANGING THE BATTERIES
- 7 START/STOP THE VACUUM CLEANER AND ADJUST SUCTION POWER
- 8 VACUUMING WITH THE UNIVERSAL NOZZLE (V*, W*)
- 9 PARKING POSITIONS, MOVING THE VACUUM CLEANER
- 10 EMPTYING THE DUST COMPARTMENT
- 11 REPLACING THE FILTERS
- 12 CLEANING THE UNIVERSAL NOZZLE (V*, W**) AND THE TURBO NOZZLE (X*)
- 13 TIPS ON HOW TO GET THE BEST RESULTS
- 14 TROUBLESHOOTING
- 15 SYSTEM CHECK
- 16 SAFETY PRECAUTIONS
- 17 Documents / Resources
INTRODUCTION
Always use original accessories and spare parts to get the best results. This product is designed with the environment in mind. All plastic parts are marked for recycling purposes.
BEFORE STARTING
- Read this manual carefully.
- Check that all parts described are included.
- Pay special attention to the safety precautions!
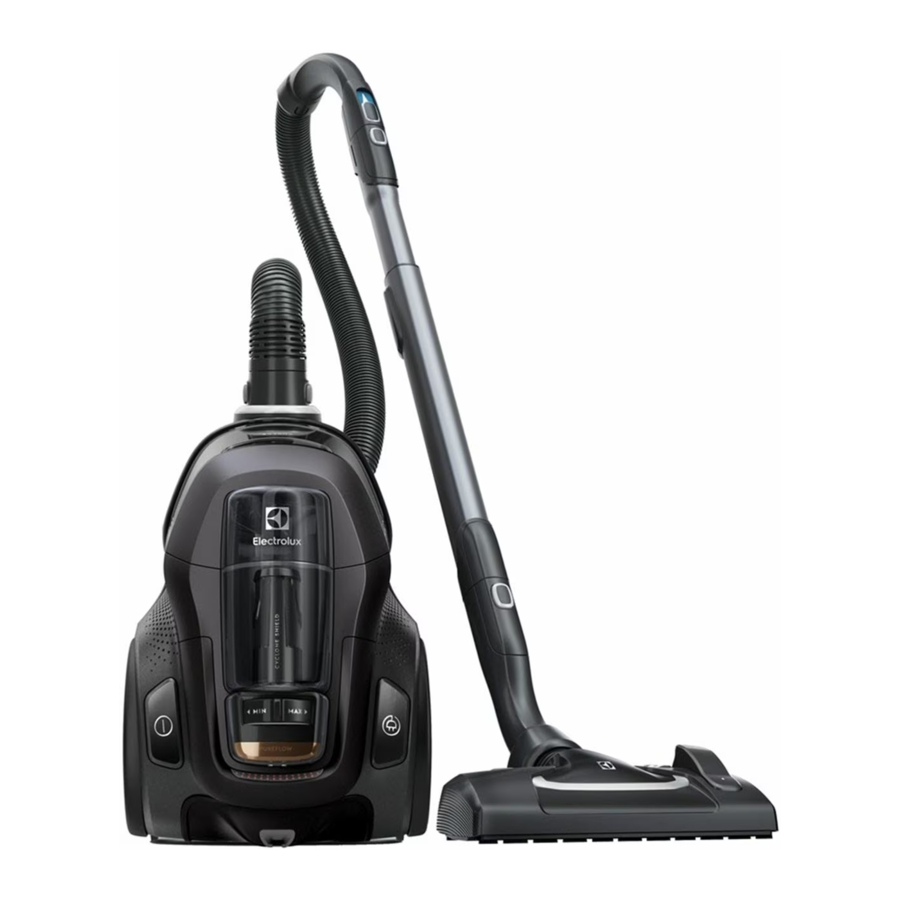
DESCRIPTION OF PURE C9 VACUUM CLEANER

- Display (see versions later)
- Filters lid
- Fine dust filter
- Pre-motor filter
- Parking slots
- Power cord
- Carry handle
- Cyclone compartment and nose cone filter
- Air channel
- Dust compartment
- AeroPro 3in1 tool
- AeroPro hose
- AeroPro handle (see versions later)
- AeroPro telescopic tube
- Parking clip
- Display for models with rotary knob manual control*
- Display for models with remote control*
- AeroPro Classic handle*
- AeroPro Ergo handle*
- AeroPro Remote Control handle*
- FlowMotion nozzle*
- FlowMotion LED nozzle* (with front lights)*
- AeroPro Turbo nozzle*
- AeroPro Mini Turbo nozzle*
- ParkettoPro nozzle*
- AeroPro FlexProPlus nozzle* AA. AeroPro Long crevice nozzle*
* Certain models only
HOW TO USE THE VACUUM CLEANER
- Check that all filters are properly placed before using the vacuum cleaner.

- Insert the hose into the cleaner (to remove it, press the lock buttons and pull). Insert the hose into the hose handle until the lock button clicks (to release it, press the lock button and pull).

- Attach the telescopic tube to the nozzle. Attach the telescopic tube to the hose handle (to remove it, press the lock button and pull).

- Adjust the telescopic tube by holding the lock with one hand and pulling the handle with the other hand.
![]()


3IN1 ACCESSORY TOOL
- You can fasten the clip-on holder and 3in1 tool under the handle to have it easily accessible. The tool has 3 functions, see pictures on next page.
![]()

CHANGING THE BATTERIES
- Nozzle with front lights*: Before first use, remove the protective film (on top of the batteries). Change batteries when front lights start blinking fast. Use 2 AA batteries.

- Handle with remote control*: Change battery when light indicator turns red or is not responding when pressing any button. Use only batteries type LITHIUM CR1632.
NB: Remove the batteries from the product before scrapping. Follow your country's rules for collection of batteries and electrical products.
![]()


START/STOP THE VACUUM CLEANER AND ADJUST SUCTION POWER
- Pull out the power cord and plug it into the mains. Press the ON/OFF button to turn the cleaner on/off. Models with remote control can also be operated by the ON/OFF button on the handle.*

- After cleaning, push the REWIND button to rewind the cable.

- Adjust suction power (manual control models): Turn the rotary knob on the cleaner or use the air valve on the handle.*
Adjust suction power (remote control models): Press +/- button on the handle. MIN/MAX and symbols indicators on display will show level of power.*


VACUUMING WITH THE UNIVERSAL NOZZLE (V*, W*)
- Change nozzle setting with the pedal. Icon illustrates recommended floor type (hard floor or carpet).
FlowMotion LED nozzle*: Move the nozzle forward. The front light turns on automatically after a few seconds. When the nozzle is not used, the light turns off automatically after a few seconds.


PARKING POSITIONS, MOVING THE VACUUM CLEANER
- Use parking position (1), at the back of the vacuum cleaner, when you pause while vacuuming.
Use parking position (2), underneath the vacuum cleaner, to carry and store the vacuum cleaner.

- The vacuum cleaner has two carrying handles.


EMPTYING THE DUST COMPARTMENT
- Empty the dust compartment when the level of dust has reached the maximum limit ("MAX"-mark).
Press the release button and pull to remove the dust compartment. Hold the dust compartment over a dust bin. Press the unlock button underneath the lid, open the lid by swinging it outwards. Empty dust into the dustbin. Refit in reverse order.


REPLACING THE FILTERS
- Pull the FILTER button to open the filter lid.
Clean the fine dust filter after six months of use. Pull the tab on the frame to remove the fine dust filter. Rinse the filter under running water.
NB: Do not use cleaning agents. Let the filter dry completely (min. 24 h in room temperature) before putting back!

- Press and slide the lock mechanism to the right to release the premotor filter. Remove the filter by pulling the filter frame tab.
Clean the pre-motor filter after twelve months of use.
Only use original s-filter PureAdvantage, ref: EFSXXX. Rinse the inside (dirty side) in lukewarm tap water. Tap the filter frame to remove the water. Repeat the process four times.
NB: Do not use cleaning agents. Avoid touching the filter surface. Let the filter dry completely (min. 24 h in room temperature) before putting back! Change the washable filter at least once a year or when it is very dirty or damaged.
After replacing the filters, close the filter lid until it is clicked back into place.

- Cleaning the nose cone filter: the nose cone filter is located inside the cyclone compartment. Clean the nose cone filter if dust has entered.
Pull the nose cone filter to remove. Remove dust with your hand.
Clean under running water if heavily soiled. Refit in reverse order.
NB: Do not use cleaning agents. Let the filter dry completely (min. 24 h in room temperature) before putting back!


CLEANING THE UNIVERSAL NOZZLE (V*, W**) AND THE TURBO NOZZLE (X*)
- Disconnect the universal nozzle from the tube. Clean with the hose handle.
Disconnect the turbo nozzle from the tube and remove entangled threads etc by snipping them away with scissors. Use the hose handle to clean the nozzle. *


Enjoy a great cleaning experience with Pure C9!
Electrolux reserves the right to change products, information and specifications without notice.
TIPS ON HOW TO GET THE BEST RESULTS
| NOZZLE/ACCESSORY | USE FOR: | NOZZLE/ACCESSORY | USE FOR: |
| 3 tools in 1:
| 
| Universal nozzle:
|
| Carpet nozzle:
|
| Upholstery nozzle:
|
| Hard floor nozzle:
|
| Hardfloor nozzle:
|
AA. Long crevice nozzle* | Extra long tool:
|


Models with manual power regulation – follow graphics on cleaner for optimal performance.
TROUBLESHOOTING
| PROBLEM | SOLUTION |
The vacuum cleaner does not start |
|
The cleaner stops | The cleaner might be overheated: disconnect it from the mains; check if the nozzle, tube, hose or filters are blocked. Let the cleaner cool down for 120 minutes before plugging it in again. If the cleaner still does not work, contact an authorized Electrolux service centre. |
Reduction of suction capacity versus normal |
|
Water has been sucked into the vacuum cleaner | It will be necessary to replace the motor at an authorized Electrolux service centre. Damage to the motor caused by the penetration of water is not covered by the warranty. |
| For any further problems, contact an authorized Electrolux service centre. | |
SYSTEM CHECK

SAFETY PRECAUTIONS
This appliance can be used by children aged from 8 years and above and persons with reduced physical, sensory or mental capabilities or lack of experience and knowledge if they have been given supervision or instruction concerning use of the appliance in a safe way and understand the hazards involved.
Children shall not play with the appliance.
Cleaning and maintenance shall not be done by children without supervision.

Turbo nozzles* have a rotating brush where parts can get entrapped. Please use them with caution and only on intended surfaces. Please turn the vacuum cleaner off before removing entrapped parts or cleaning the brush.
Batteries must be removed from the remote control in the handle* / LED lighted nozzle* before scrapping the product**.
*Certain models only.
**see Information on how to remove the battery.
Always disconnect the plug from the mains before cleaning or maintaining the appliance or when removing the battery. The battery is to be disposed of safely.
If the cord is damaged, it must be replaced only by an authorized Electrolux service centre in order to avoid a hazard.
Pure C9 should only be used for normal vacuuming indoors and in a domestic environment. Make sure the vacuum cleaner is stored in a dry place. All service or repairs must be carried out by an authorized Electrolux service centre.
Packaging material, e.g. plastic bags should not be accessible to children to avoid suffocation.
Never use the vacuum cleaner:
In wet areas.
Close to flammable gases, etc.
When the product shows visible signs of damage.
On sharp objects or fluids.
When the floor nozzle shows visible signs of a damages.
On hot or cold cinders, lighted cigarette butts, etc.
On fine dust, for instance from plaster, concrete, flour, hot or cold ashes. Do not leave the vacuum cleaner in direct sunlight.
Avoid exposing the vacuum cleaner to strong heat or freezing temperatures.
Never use the vacuum cleaner without its filters.
Do not try to touch the brush roll while the cleaner is switched on and the brush roll is turning.
When the wheels are blocked.
Do not use your vacuum cleaner if the filters are injured or broken.
Power cord precautions
Check the plug and cord regularly. Never use the vacuum cleaner if the plug or cord is damaged.
Damage to the vacuum cleaner's cord is not covered by the warranty. Never pull or lift the vacuum cleaner by the cord.
Using the vacuum cleaner in the above circumstances may cause serious personal injury or damage to the product. Such injury or damage is not covered by the warranty or by Electrolux.
Documents / ResourcesDownload manual
Here you can download full pdf version of manual, it may contain additional safety instructions, warranty information, FCC rules, etc.
Advertisement


Need help?
Do you have a question about the Pure C9 and is the answer not in the manual?
Questions and answers