
Acer K202HQL, K242HQL Manual
- User manual (28 pages) ,
- User manual (31 pages) ,
- User manual (30 pages)
Advertisement

Unpacking
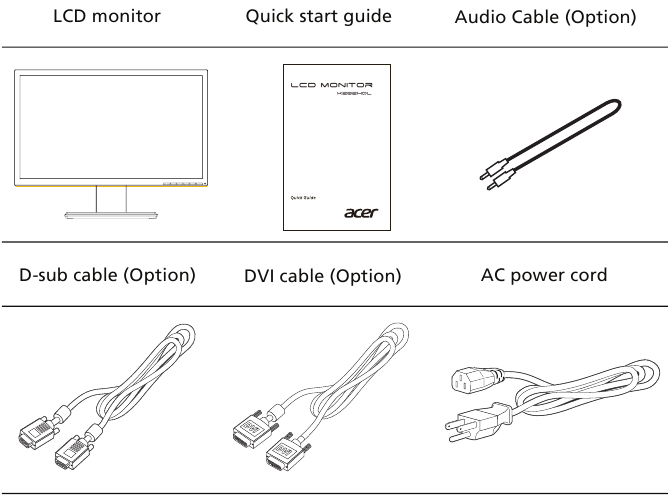
Please check that the following items are present when you unpack the box, and save the packing materials in case you need to ship or transport the monitor in the future.
Attaching the Base
Note: Remove the monitor and monitor base from its packaging. Carefully place the monitor face-down on a stable surface - use a cloth to avoid scratching the screen.
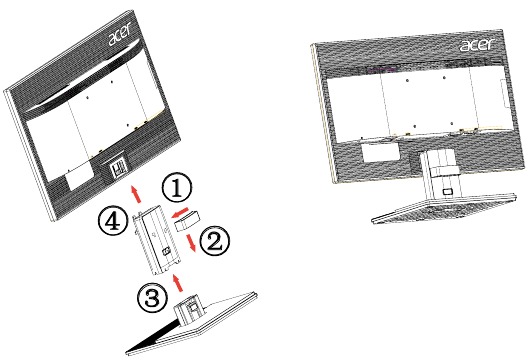
Remove: Reverse the steps to remove the base.
Screen position adjustment
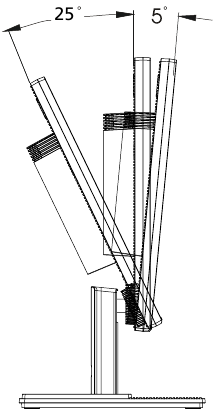
To optimize the viewing position, you can adjust the monitor tilt by using both of your hands to hold the edges of the monitor as shown below.
The monitor can be adjusted to 25 degrees up or 5 degrees down.
Connecting the power cord
- Check first to make sure that the power cord you use is the correct type required for your area.
- The monitor has a universal power supply that allows operation in either 100/120 V AC or 220/240 V AC voltage area. No user-adjustment is required.
- Plug one end of the power cord to the AC inlet, and plug the other end into an AC outlet.
- For units using 120 V AC:
Use a UL-listed cord set, type SVT wire and plug rated 10 A/125 V. - For units using 220/240 V AC:
Use a cord set consisting of H05VV-F cord and plug rated 10 A/250 V. The cord set should have the appropriate safety approvals for the country in which the equipment will be installed.
Power saving
The monitor will be switched to "power saving" mode by the control signal from the display controller, as indicated by the amber-colored power LED.
| Mode | LED light |
| On | Blue |
| Power saving | Amber |
The power saving mode will be kept until a control signal has been detected or the keyboard or mouse is activated. The recovery time from "power saving" mode back to "on" is around 3 seconds.
Display Data Channel (DDC)
To make installation easier, so long as your system supports the DDC protocol, the monitor is able to plug-and-play. The DDC is a communication protocol through which the monitor automatically informs the host system about its capabilities; for example, supported resolutions and corresponding timing. The monitor supports the DDC2B standard.
Connector pin assignment
15-pin color display signal cable
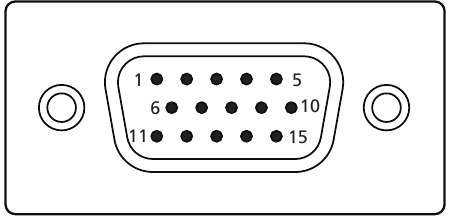
| PIN No. | Description |
| 1 | Red |
| 2 | Green |
| 3 | Blue |
| 4 | Monitor ground |
| 5 | DDC-return |
| 6 | R-ground |
| 7 | G-ground |
| 8 | B-ground |
| 9 | +5 V |
| 10 | Logic ground |
| 11 | Monitor ground |
| 12 | DDC-serial data |
| 13 | H-sync |
| 14 | V-sync |
| 15 | DDC-serial clock |
24-pin color display signal cable*
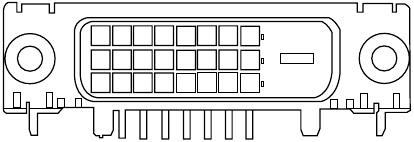
| PIN No. | Description |
| 1 | TMDS data 2- |
| 2 | TMDS data 2+ |
| 3 | TMDS data 2/4 shield |
| 4 | NC |
| 5 | NC |
| 6 | DDC clock |
| 7 | DDC data |
| 8 | NC |
| 9 | TMDS data 1- |
| 10 | TMDS data 1+ |
| 11 | TMDS data 1/3 shield |
| 12 | NC |
| 13 | NC |
| 14 | +5 V power |
| 15 | GND (return for +5 V hsync.vsync) |
| 16 | Hot-plug detection |
| 17 | TMDS data 0- |
| 18 | TMDS data 0+ |
| 19 | TMDS data 0/5 shield |
| 20 | NC |
| 21 | NC |
| 22 | TMDS clock shield |
| 23 | TMDS clock+ |
| 24 | DDC TMDS clock- |
Standard timing table
| Mode | Resolution | |||
| 1 | VGA | 640 x 480 | 60 | Hz |
| 2 | VGA | 640 x 480 | 72 | Hz |
| 3 | VGA | 640 x 480 | 75 | Hz |
| 4 | MAC | 640 x 480 | 66.66 | Hz |
| 5 | VESA | 720 x 400 | 70 | Hz |
| 6 | SVGA | 800 x 600 | 56 | Hz |
| 7 | SVGA | 800 x 600 | 60 | Hz |
| 8 | SVGA | 800 x 600 | 72 | Hz |
| 9 | SVGA | 800 x 600 | 75 | Hz |
| 10 | MAC | 832 x 624 | 74.55 | Hz |
| 11 | XGA | 1024 x 768 | 60 | Hz |
| 12 | XGA | 1024 x 768 | 70 | Hz |
| 13 | XGA | 1024 x 768 | 75 | Hz |
| 14 | VESA | 1280 x 720 | 60 | Hz |
| 15 | WXGA | 1280 x 800 | 60 | Hz |
| 16 | WXGA | 1366 x 768 | 60 | Hz |
Installation
To install the monitor on your host system, please follow the steps below:
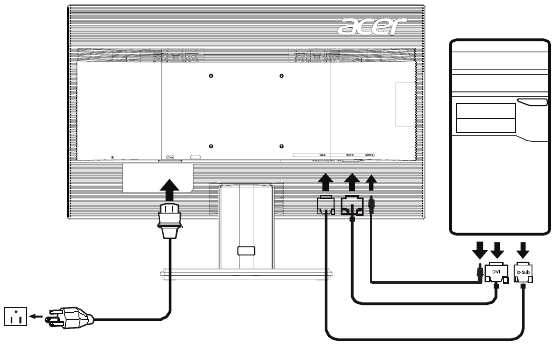
Steps:
- Connect the video cable
- Make sure both the monitor and computer are switched off.
- Connect the VGA video cable to the computer.
- Connect the digital cable (only for dual-input models).
- Make sure both the monitor and computer are switched off.
- Connect one end of the 24-pin DVI cable to the back of the monitor and the other end to the computer's port.
- Connect the power cord
Connect the power cord to the monitor, then to a properly grounded AC outlet. - Optional: Connect the audio input socket(AUDIO IN) of the LCD monitor and the line-out port on the computer with the audio cable.
- Turn on the monitor and computer
Turn on the monitor first, then the computer. This sequence is very important. - If the monitor does not function properly, please refer to the troubleshooting section to diagnose the problem.
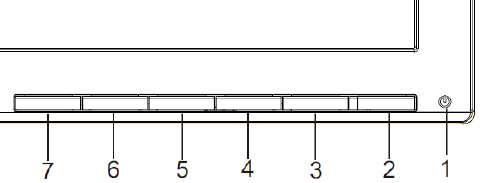
USER CONTROLS
![]()
Power Switch/Power LED:
To turn the monitor ON or OFF.
Lights up to indicate the power is turned ON.
Using the Shortcut Menu

Press the function button to open the shortcut menu. The shortcut menu lets you quickly select the most commonly accessed settings.

Empowering:
Press the Empowering Key to open the Acer eColor Management OSD and access the scenario modes.

Auto Adjust:
Press this button to activate the Auto Adjustment function. The Auto Adjustment function is used to set the HPos, VPos, Clock and Focus.

OSD functions
Press this botton to activate the OSD menu.

Input Key
Use Input key to select from different video sources that may be connected to your monitor.
- VGA input
- DVI input
As you cycle through the sources you will see the following messages on right top side of screen to indicate currently selected input source. It may take 1 or 2 seconds for the image to appear.
VGA or DVI
If either VGA or DVI input is selected, but the VGA and DVI cables are not connected, a floating dialog box indicates:
"No Cable Connect" or "No Signal"
How to adjust a setting
Acer eColor Management
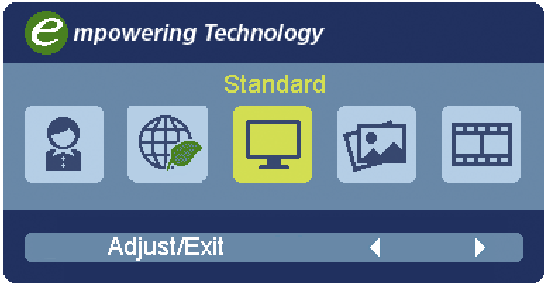
Operation instructions
- Press "
![]() " Key to open the Acer eColor Management OSD and access the scenario modes
" Key to open the Acer eColor Management OSD and access the scenario modes - Press "
![]() " or "
" or " ![]() " to select the mode
" to select the mode - Press " AUTO " Key to confirm the mode and exit the eColor menu.
Features and Benefits
| Main Menu icon | Sub Menu icon | Sub Menu item | Description |
 | N/A | User mode | User defined. Settings can be fine-tuned to suit any situation |
 | N/A | ECO mode | Adjusts the settings to reduce power consumption. |
 | N/A | Standard mode | Default Setting. Reflects native display capability |
 | N/A | Grahpic mode | Enhances colors and emphasize fine detail. Pictures and photographs appear in vibrant colors with sharp detail. |
 | N/A | Movie mode | Displays scenes in clearest detail. Presents great visuals, even in unsuitably-lit environments. |
Adjusting the OSD settings
Note: The following content is for general reference only. Actual product specifications may vary.
The OSD can be used for adjusting the settings of your LCD Monitor. Press the MENU key to open the OSD. You can use the OSD to adjust the picture quality, OSD position and general settings. For advanced settings, please refer to following page:
Adjusting the picture quality
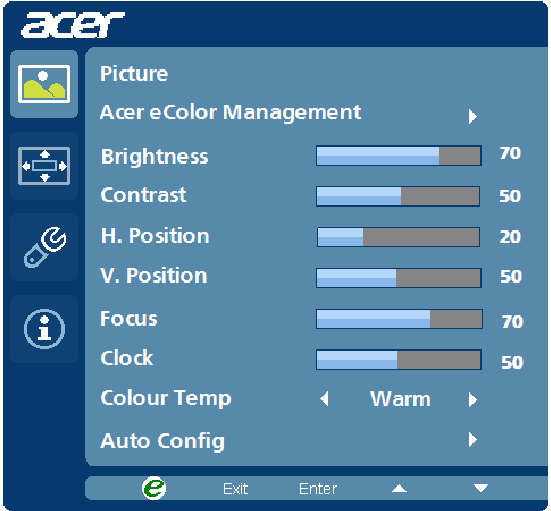
- Press the MENU key to bring up the OSD.
- Using the
![]() keys, select
keys, select ![]() Picture from the OSD. Then navigate to the picture element you wish to adjust.
Picture from the OSD. Then navigate to the picture element you wish to adjust. - Use the
![]() keys to adjust the sliding scales.
keys to adjust the sliding scales. - The Picture menu can be used to adjust the current Brightness, Contrast, Colour Temp, Auto Config and other image-related qualities.
Adjusting the OSD position
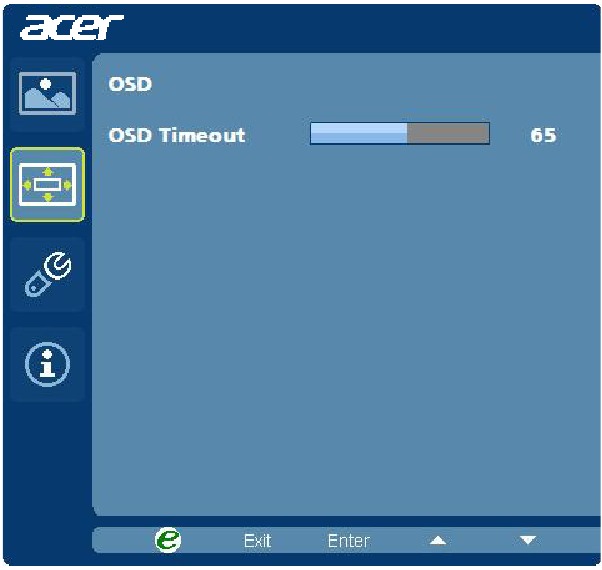
- Press the MENU key to bring up the OSD.
- Using the directional keys, select
![]() OSD from the on screen display. Then navigate to the feature you wish to adjust.
OSD from the on screen display. Then navigate to the feature you wish to adjust.
Adjusting the setting
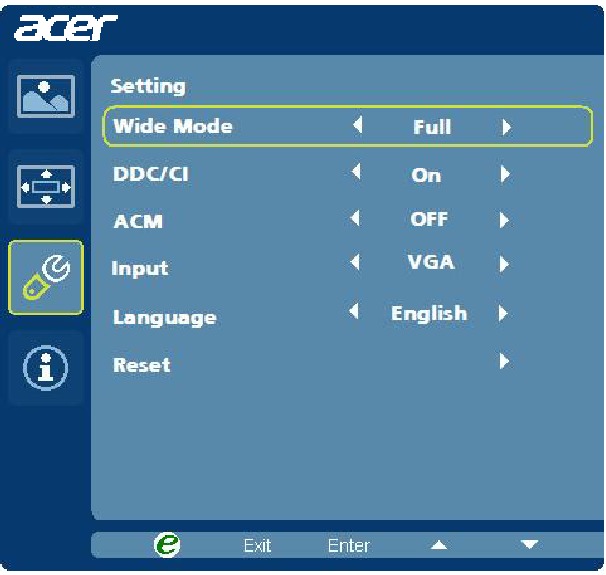
- Press the MENU key to bring up the OSD.
- Using the
![]() keys, select
keys, select ![]() Setting from the OSD. Then navigate to the feature you wish to adjust.
Setting from the OSD. Then navigate to the feature you wish to adjust. - The Setting menu can be used to adjust the screen Menu Language and other important settings.
Product information
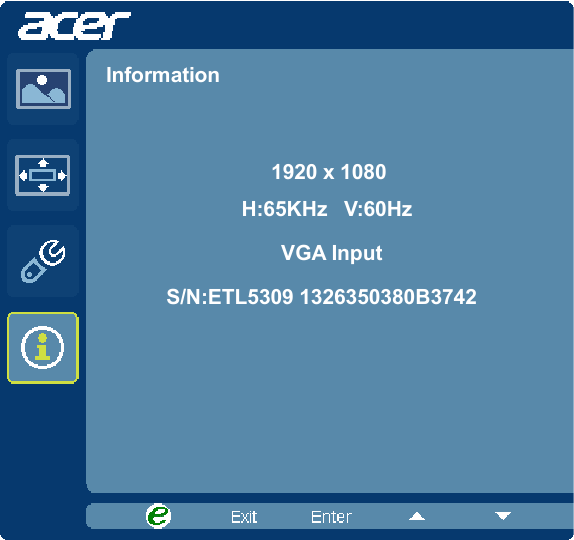
- Press the MENU key to bring up the OSD.
- Using the
![]() keys, select
keys, select ![]() Information from the OSD. Then the basic information of LCD monitor will show up for current input.
Information from the OSD. Then the basic information of LCD monitor will show up for current input.
Troubleshooting
Before sending your LCD monitor for servicing, please check the troubleshooting list below to see if you can self-diagnose the problem.
VGA mode
| Problem | LED status | Remedy |
| No picture visible | Blue | Using the OSD, adjust brightness and contrast to maximum or reset to their default settings. |
| Off | Check the power switch. Check if the power cord is properly connected to the monitor. | |
| Amber | Check if the video signal cable is properly connected at the back of monitor. Check if the computer system is switched on and in power saving/ standby mode. | |
| Unstable picture | Check if the specification of graphics adapter and monitor is in compliance which may be causing the input signal frequency mismatch. | |
| Abnormal picture | Image is missing, off-center, too large or too small on the screen. | Using the OSD, adjust focus, clock, H- position and V-position with nonstandard signals. Check the display setting on your system. In case of a missing image, please select another resolution or vertical refresh rate. Wait for a few seconds after adjusting the size of the image before changing or disconnecting the signal cable or switching off the monitor. |
DVI mode
| Problem | LED status | Remedy |
| No picture visible | Blue | Using the OSD, adjust brightness and contrast to maximum or reset to their default settings. |
| Off | Check the power switch. Check if the AC power cord is properly connected to the monitor. | |
| Amber | Check if the video signal cable is properly connected at the back of monitor. Check that the computer system is switched on and in power saving/ standby mode. |
Special notes on LCD monitors
The following are normal with the LCD monitor and do not indicate a problem.
- Due to the nature of the fluorescent light, the screen may flicker during initial use. Turn off the power switch and then turn it on again to make sure the flicker disappears.
- You may find slightly uneven brightness on the screen depending on the desktop pattern you use.
- The LCD screen has 99.99% or more effective pixels. It may include blemishes of 0.01% or less such as a missing pixel or a pixel lit all the time.
- Due to the nature of the LCD screen, an afterimage of the previous screen may remain after switching the image, when the same image is displayed for hours. In this case, the screen is recovered slowly by changing the image or turning off the power switch for a few hours.
- Acer monitor is purposed for video and visual display of information obtained from electronic devices.
Information for your safety and comfort
Safety instructions
Read these instructions carefully. Keep this document for future reference. Follow all warnings and instructions marked on the product.
Cleaning your monitor
Please carefully follow these guidelines when cleaning the monitor:
- Always unplug the monitor before cleaning.
- Use a soft cloth to wipe the screen and cabinet front and sides.
Connecting/disconnecting the device
Observe the following guidelines when connecting and disconnecting power from the LCD monitor:
- Make sure the monitor is attached to its base before connecting the power cord to the AC power outlet.
- Make sure both the LCD monitor and the computer are turned off before connecting any cable or unplugging the power cord.
- If the system has multiple sources of power, disconnect power from the system by unplugging all power cords from the power supplies.
Accessibility
Be sure that the power outlet you plug the power cord into is easily accessible and located as close to the equipment operator as possible. When you need to disconnect power from the equipment, be sure to unplug the power cord from the electrical outlet.
Safe listening
To protect your hearing, follow these instructions.
- Gradually increase the volume until you can hear it clearly and comfortably and without distortion.
- After setting the volume level, do not increase it after your ears have adjusted.
- Limit the amount of time listening to music at high volume.
- Avoid turning up the volume to block out noisy surroundings.
- Turn the volume down if you can't hear people speaking near you.
- Do not use this product near water.
- Do not place this product on an unstable cart, stand or table. If the product falls, it could be seriously damaged.
- Slots and openings are provided for ventilation to ensure reliable operation of the product and to protect it from overheating. These openings must not be blocked or covered. The openings should never be blocked by placing the product on a bed, sofa, rug or other similar surface. This product should never be placed near or over a radiator or heat register, or in a built-in installation unless proper ventilation is provided.
- Never push objects of any kind into this product through cabinet slots as they may touch dangerous voltage points or short-out parts that could result in a fire or electric shock. Never spill liquid of any kind onto or into the product.
- To avoid damage of internal components and to prevent battery leakage, do not place the product on a vibrating surface.
- Never use it under sporting, exercising, or any vibrating environment which will probably cause unexpected short current or damage internal devices.
Using electrical power
- This product should be operated from the type of power indicated on the marking label. If you are not sure of the type of power available, consult your dealer or local power company.
- Do not allow anything to rest on the power cord. Do not locate this product where people will walk on the cord.
- If an extension cord is used with this product, make sure that the total ampere rating of the equipment plugged into the extension cord does not exceed the extension cord ampere rating. Also, make sure that the total rating of all products plugged into the wall outlet does not exceed the fuse rating.
- Do not overload a power outlet, strip or receptacle by plugging in too many devices. The overall system load must not exceed 80% of the branch circuit rating. If power strips are used, the load should not exceed 80% of the power strip's input rating.
- This product's power cord is equipped with a three-wire grounded plug. The plug only fits in a grounded power outlet. Make sure the power outlet is properly grounded before inserting the power cord plug. Do not insert the plug into a non-grounded power outlet. Contact your electrician for details.
The grounding pin is a safety feature. Using a power outlet that is not properly grounded may result in electric shock and/or injury.
Note: The grounding pin also provides good protection from unexpected noise produced by other nearby electrical devices that may interfere with the performance of this product.
- Use the product only with the supplied power supply cord set. If you need to replace the power cord set, make sure that the new power cord meets the following requirements: detachable type, UL listed/CSA certified, type SPT-2, rated 7 A 125 V minimum, VDE approved or its equivalent, 4.5 meters (15 feet) maximum length.
Product servicing
Do not attempt to service this product yourself, as opening or removing covers may expose you to dangerous voltage points or other risks. Refer all servicing to qualified service personnel.
Unplug this product from the wall outlet and refer servicing to qualified service personnel when:
- the power cord or plug is damaged, cut or frayed
- liquid was spilled into the product
- the product was exposed to rain or water
- the product has been dropped or the case has been damaged
- the product exhibits a distinct change in performance, indicating a need for service
- the product does not operate normally after following the operating instructions
Note: Adjust only those controls that are covered by the operating instructions, since improper adjustment of other controls may result in damage and will often require extensive work by a qualified technician to restore the product to normal condition.
LCD pixel statement
The LCD unit is produced with high-precision manufacturing techniques. Nevertheless, some pixels may occasionally misfire or appear as black or red dots. This has no effect on the recorded image and does not constitute a malfunction.
This product has been shipped enabled for power management:
- Activate the Display Sleep mode within 5 minutes of user inactivity.
- Wake the monitor when it is in Active Off mode, move the mouse or press any keyboard key.
Tips and information for comfortable use
Computer users may complain of eyestrain and headaches after prolonged use. Users are also at risk of physical injury after long hours of working in front of a computer. Long work periods, bad posture, poor work habits, stress, inadequate working conditions, personal health and other factors greatly increase the risk of physical injury.
Incorrect computer usage may lead to carpal tunnel syndrome, tendonitis, tenosynovitis or other musculoskeletal disorders. The following symptoms may appear in the hands, wrists, arms, shoulders, neck or back:
- numbness, or a burning or tingling sensation
- aching, soreness or tenderness
- pain, swelling or throbbing
- stiffness or tightness
- coldness or weakness
If you have these symptoms, or any other recurring or persistent discomfort and/or pain related to computer use, consult a physician immediately and inform your company's health and safety department.
The following section provides tips for more comfortable computer use.
Finding your comfort zone
Find your comfort zone by adjusting the viewing angle of the monitor, using a footrest, or raising your sitting height to achieve maximum comfort. Observe the following tips:
- refrain from staying too long in one fixed posture
- avoid slouching forward and/or leaning backward
- stand up and walk around regularly to remove the strain on your leg muscles
Taking care of your vision
Long viewing hours, wearing incorrect glasses or contact lenses, glare, excessive room lighting, poorly focused screens, very small typefaces and low-contrast displays could stress your eyes. The following sections provide suggestions on how to reduce eyestrain.
Eyes
- Rest your eyes frequently.
- Give your eyes regular breaks by looking away from the monitor and focusing on a distant point.
- Blink frequently to keep your eyes from drying out.
Display
- Keep your display clean.
- Keep your head at a higher level than the top edge of the display so your eyes point downward when looking at the middle of the display.
- Adjust the display brightness and/or contrast to a comfortable level for enhanced text readability and graphics clarity.
- Eliminate glare and reflections by:
- placing your display in such a way that the side faces the window or any light source
- minimizing room light by using drapes, shades or blinds
- using a task light
- changing the display's viewing angle
- using a glare-reduction filter
- using a display visor, such as a piece of cardboard extended from the display's top front edge
- Avoid adjusting your display to an awkward viewing angle.
- Avoid looking at bright light sources, such as open windows, for extended periods of time.
Developing good work habits
Develop the following work habits to make your computer use more relaxing and productive:
- Take short breaks regularly and often.
- Perform some stretching exercises.
- Breathe fresh air as often as possible.
- Exercise regularly and maintain a healthy body.
Acer America Corporation
333 West San Carlos St., Suite 1500
San Jose, CA 95110, U. S. A.
Tel : 254-298-4000
Fax : 254-298-4147
www.acer.com
Documents / Resources
References
Download manual
Here you can download full pdf version of manual, it may contain additional safety instructions, warranty information, FCC rules, etc.
Advertisement
 keys, select


Need help?
Do you have a question about the K202HQL and is the answer not in the manual?
Questions and answers