Mammut BARRYVOX Manual
- User manual (260 pages) ,
- Reference manual (40 pages) ,
- User manual (29 pages)
Advertisement
- 1 HANDLING THE BARRYVOX
- 2 INITIAL SETUP
- 3 DEVICE TO DEVICE UPDATE
- 4 SELF- AND BATTERY TEST
- 5 CARRYING POSITIONS
- 6 COCKPIT – OVERVIEW OF FUNCTIONS
- 7 GROUP CHECK
- 8 SEND
-
9
SEARCH
- 9.1 Elementary understanding of transceiver search
- 9.2 Search Phases
- 9.3 Automatic Revert to SEND
- 9.4 Leaving SEARCH Mode
- 9.5 Multiple Burials
- 9.6 In Complex Situations Slow Down The Search
- 9.7 Search for Multiple Buried Subjects
- 9.8 Boundaries of Automatic Signal Detection and Alternative Search Systems
- 9.9 Search With Multiple Rescuers
- 10 ADDITIONAL INFORMATION
- 11 Maintenance and Repair
- 12 Technical Data
- 13 COMPANION RESCUE
- 14 Documents / Resources
![]()
Register your Barryvox® and get a 3 year warranty extension!
Register your Barryvox® today at www.Barryvox.com, to get important information such as announcements about the availability of software updates.
After a successful registration your device is covered for 5 years by warranty.
HANDLING THE BARRYVOX®
Like all transceivers, the Barryvox® contains shock sensitive ferrite antennas. Therefore, you should handle it with utmost care!
Store the device and the carrying system in a dry spot that is protected from extreme cold or heat and direct sunshine. Always check the result of the self- and battery test, pay attention to alert messages and carry out the group check. It is your responsibility to frequently check your Barryvox® for mechanical damage of the casing, proper function of the main switch, battery compartment cover as well as cleanliness and mechanical integrity of the battery contacts. To ensure the proper performance of the transceiver, it is highly recommended that you send your device to an official Barryvox® service center once every three years for a functional test. The recommended date of the next check can be viewed under «Maintenance» in the shut down sequence of the device. (See "Periodic check by a Barryvox® Service Center" in chapter "Additional Information".)
Interferences
Always avoid having other electronic devices (e.g. mobile phones, radios, headlamps, cameras), metal objects (pocket knives, magnetic buttons), or other transceivers close to (20 cm in SEND; 50 cm in SEARCH) your running avalanche transceiver.
You should not wear clothing with magnetic buttons! Users of pacemakers are advised to carry the device in a secure pants pocket (no vital data detection). Consult the manufacturer's instructions with regard to the impact on pacemakers.
 BarryTip: When searching, hold the device at a minimum of 50cm away from these objects and turn off any electronic devices, if possible. It is highly recommended to turn OFF mobile phones!
INITIAL SETUP
Batteries
Only use alkaline (LR03/AAA) batteries of the same type. Always insert 3 new batteries of the same type. In case these batteries need to be removed, the same 3 batteries or 3 new batteries must be reinserted. Never use rechargeable batteries and always replace all the batteries at the same time. Make sure the lid is properly closed and that the device and the batteries stay dry.

Use a fingernail or the leash clip to slide battery door to the left, and it will swing open.
Periodically inspect the battery compartment. Clean or dry it, if needed, since moisture can cause corrosion.
Avoid touching the contacts with your hands, use a clean cloth. A reliable power supply is crucial for safe operation.
When storing or not using the transceiver for an extended period of time (summer, travelling, shipping), remove alkaline batteries. The warranty becomes void if batteries have leaked!

Risk of damage if you use batteries of the wrong type.
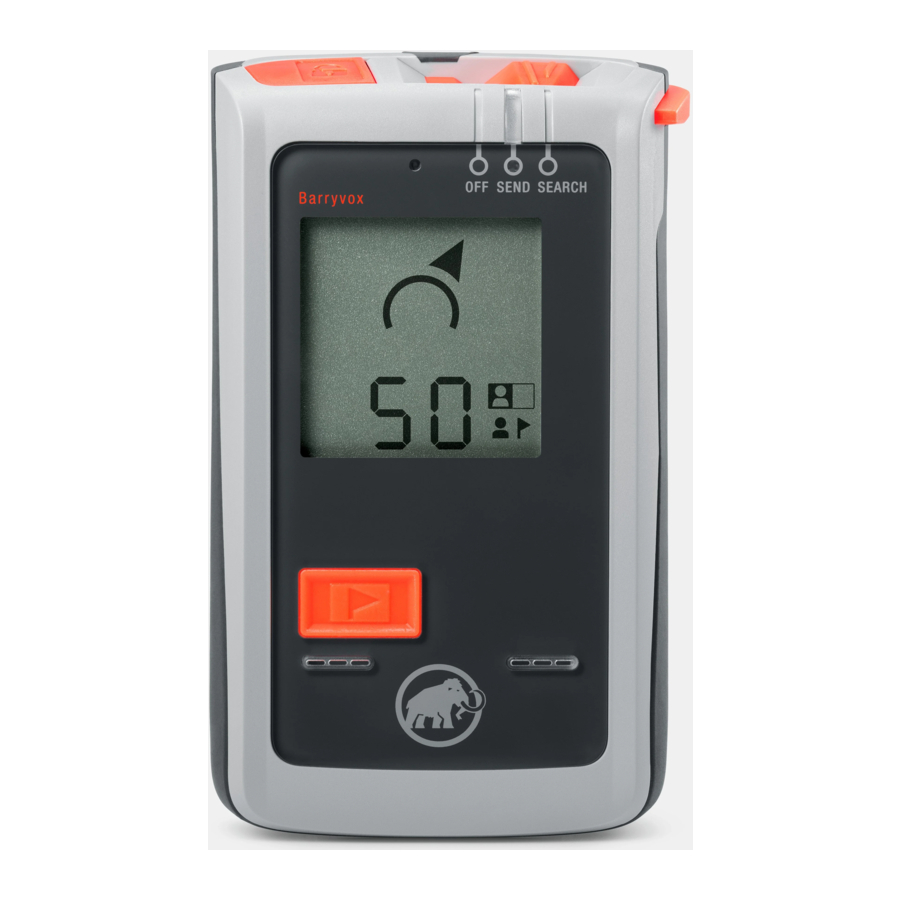
Main Switch OFF / SEND / SEARCH
The main switch is located on the top side of the device. In the left position OFF, the device is turned off, in the center position SEND the device is in SEND mode and in the right position SEARCH, the device is in SEARCH mode. For safety reasons, it is required to press the hinged unlock button to leave the SEND mode. To return from SEARCH to SEND, simply push the main switch sideways.
Always make sure that the switch locks into position mechanically to avoid an undesired change of mode.

User Interface and Use of Buttons
The use of the Barryvox® is easy and straightforward. All user interaction is done with the ![]() button on the front side. To confirm your selection, use the orange
button on the front side. To confirm your selection, use the orange ![]() button. The action triggered by pressing the
button. The action triggered by pressing the ![]() button is shown at the bottom left of the screen.
button is shown at the bottom left of the screen.
Samples: Press the ![]() button to... ...activate the group check.
button to... ...activate the group check.

DEVICE TO DEVICE UPDATE
Thanks to the device-to-device update you may share the new functions of your firmware with older Barryvox® devices.
Requirements for the device-to-device update:
- Battery charge in both devices greater 30%.
- Only one upgrade can be done at a time in the same building or within 50m radius.
- Only devices of the same w-link region (no device-to-device upgrade for devices purchased in Japan).
- Follow the instructions on the screen.
- Turn both devices OFF
- Press and hold the
![]() button on the device with the newer firmware and simultaneously slide the main switch from OFF to SEND. Keep the
button on the device with the newer firmware and simultaneously slide the main switch from OFF to SEND. Keep the ![]() button pressed until this screen appears:
button pressed until this screen appears:
![]()
- The device is now ready to transmit the update. Press the
![]() button in case you do not want to perform the update.
button in case you do not want to perform the update. - Press and hold the
![]() button on the device which needs to be updated and slide the main switch simultaneously from OFF to SEND. Release the
button on the device which needs to be updated and slide the main switch simultaneously from OFF to SEND. Release the ![]() button after 2 seconds.
button after 2 seconds.
![]()
- The firmware is being installed on the device. The progress is shown in percentage in the top left corner
![]()


SELF- AND BATTERY TEST
Start-Up / Self- and Battery Test

While starting, the device conducts a self test. The result of the self-test is shown the first time the device enters a SEND mode.
If the battery power falls below 30% (alkaline) or the battery icon is displayed, the batteries must be replaced as soon as possible!
Battery Test and Battery Level Indicator
The following table gives you average values for the battery levels. The remaining battery level can only be displayed correctly if batteries are used according to the chapter «Batteries». Low temperatures, age, and brand can have a negative impact on the battery life and the accuracy of the battery level indication.
BarryTip: As the risk of a battery failure increases towards end of the battery life, we recommend to replace the batteries already 10% before reaching the emergency reserve of the normative requirement. Please replace batteries at 40%.
100%:
Normative requirement (=minimum requirement):
min 200hrs SEND at 10°C followed by 1hr SEARCH at -10°C Typical values for the Barryvox®with alkaline batteries: 300hrs SEND at 10°C (measured with PULS Power).
less than: 30% / 0%
/ 0%
The batteries must be replaced as soon as possible!
Emergency reserve at 30%:
Max. 20 hrs in SEND mode at 10°C and max. 1 hr in SEARCH mode at -10°C left.
The transceiver sounds a warning if the battery level is running on emergency reserve at startup.
CARRYING POSITIONS
Adjust the BarryMount to fit your body. Regardless of the carrying position, the display should always face your body!

BarryMount (Recommended Carrying Position)
The BarryMount should be put on over your innermost layer of clothing prior to beginning the trip (see illustration) and must be worn on your body for the duration of the trip. The transceiver must always remain covered by one layer of clothing. The device itself is inserted into the BarryMount according to the illustration. It should always remain attached to the holster using the clip of the BarryLeash.
")
Carrying the Transceiver in a Pocket
If you carry the Barryvox® in a pants pocket, the zipper must remain closed for the duration of the trip. Always use a secured pocket (see illustration). The wrist loop should be secured to your pants or around your belt.

COCKPIT – OVERVIEW OF FUNCTIONS
Turning the Device ON and OFF

Group Check

SEND

GROUP CHECK
Single Group Check

Before a party takes off, the transceivers of all party members each participant's transceiver within the range indicated on the must be checked. The participants switch their device to SEND mode.
The group leader activates the group check by switching his device from OFF to SEND and presses the ![]() button within the first seconds.
button within the first seconds.
The test is successful if you can clearly hear beep sounds from each participant's transceiver within the range indicated on the display.
The members of the party must be spread out appropriately to avoid mutual interference.

The indicated test distance must not be shortened, or the group check becomes very unreliable.

Once all the participant's devices are tested, the group check is concluded. The group leader's transceiver must be switched to the SEND mode.
If no tone is heard within the indicated range, the device must not be used.
Further procedure:
- Check if the device is switched to SEND.
- Replace the batteries.
- Have the device checked by the manufacturer.
Chapter «Maintenance and Repair».
If your Barryvox® detects that the transmit frequency of the tested device is out of tolerance, a warning message will be shown. Such devices must be checked by the manufacturer.

SEND Confirmation

In case a regular group check is impossible due to limited space, it is possible to perform a basic verification if the transceivers of all participants are turned on.
The leader holds his transceiver in group check as close as possible to the transceiver of each participant.
By doing so, the distance indication must decrease to the point where it is impossible to mix-up the result due to close proximity presence of other participants.
As the test distance is too short for a regular group check, there is no affirmative confirmation. Apply a regular group check the next time you check your group to confirm the proper function of the transceivers of the participants.
In case the indicated distance in immediate proximity to the transceiver of a participant does not decrease to a value which excludes with certainty the possibility to mix-up the result with the one of other participants in close proximity, the proper function of the device must be checked by a regular group check.
Double Group Check

We recommend to perform a double group check once a week and in general when a new group gets together. The double group check individually tests the SEND and SEARCH function of all devices. The members of the party activate the group check on their transceivers or set them to a low receive volume. The leader switches his or her transceiver to the SEND mode and ensures that all party members can receive.
Subsequently, the party members switch their transceivers to SEND, and the leader activates the group check or sets the transceiver to a low receive volume. The SEND mode of all transceivers is checked, and ultimately the leader switches his or her transceiver to SEND.
SEND
The SEND mode is the normal operating mode outdoors or in all other situations in which there is a risk of avalanches.
Each time the SEND mode is activated, this is confirmed by an ascending triple beep sound.

Each individual signal pulse is tested. If the test is successful, this is confirmed by a blink of the red SEND-Control LED.
If the device detects that the SEND function is compromised, the red SEND-Control LED stops flashing and screen shows an alert message.

To save battery power, the LCD screen is automatically deactivated in the SEND mode, but can be activated any time by pressing the button ![]() .
.
SEARCH
Although the avalanche transceiver is easy to use, its effective use requires proper training. We recommend that you practice transceiver searches regularly.
Be aware that electronic devices including mobile phones used by other rescuers may disturb the search. Therefore it is highly recommended to switch off phones which are not absolutely required!
At the beginning and during the search, pay close attention that the rescuer's transceivers are not transmitting and do not switch to SEND unintentionally. It does not make sense to remove your backpack and assemble the shovel and probe at the edge of the avalanche debris. Keep your backpack with all the equipment on you! The assembled shovel and probe is only a hindrance during signal and course search. Only remove your pack to assemble probe and shovel once you have successfully concluded the fine search.
Elementary understanding of transceiver search
The 457kHz transmitter of the transceiver has a kidney shaped transmit distribution, which is visualized with field lines in the illustration below. The searching transceiver's arrow leads the rescuer along the field lines and therefore usually in a curved line to the buried subject.
Search Along the Field Line: Flux Line Search

Search Phases


- Signal Search
![]()

- BarryTip: Move swiftly.
- Emergency plan, search strategies and search strip widths: please see back side of device.
- Search avalanche surface systematically.
- During signal search, the rescuer has his visual focus on the surface of the debris in order to look for visual clues on the snow surface. The first signal is indicated by a distinct double beep sound.
From the start of the search until you clearly hear the first tone, you are in signal search.

The avalanche surface is searched systematically until you pick up a signal. During the acoustic signal search, the rescuer has the visual focus on the surface of the debris in order to be able to see body parts or objects protruding the snow surface.
If your Barryvox® detects that the signal search strip width needs to be reduced due to interference or due to a device transmitting outside the standard frequency, the reduced search strip width will be indicated.
Reduced signal search strip width due to interference.

Reduced signal search strip width due to a device transmitting outside the standard frequency.

Regardless of the operating mode, the following search strategies apply:
Search strategy if the last seen point is known. The signal search strip extends downhill from the last seen point in the direction of the slide.

Search strategy if the last seen point is unknown.
Last seen point unknown, one rescuer.

Last seen point unknown, multiple rescuers.

- Coarse Search
- BarryTip: Move swiftly, move in the direction of the arrow.
![]()
- Hold the transceiver with the extended arm horizontally in front of you.
- If the distance increases, then you are moving away from the victim. Continue the search in the opposite direction.
![]()


Distance below 10
- BarryTip: Reduce search speed, precisely follow the arrow.
![]()

- Fine Search
- BarryTip: Follow the arrow! Step slowly forward and backwards until you have found the point of lowest distance indication. Hold the device at knee height.
![]()

During this search phase hold the transceiver at knee height! The Barryvox® indicates you the first axis of the fine search, refered to as the "runway" in the "Airport Approach" teaching model.
For novice companion rescuers, it is usually faster to proceed with the probe once they have found to lowest distance indication on the first axis.
For intermediate and advanced users, it is advised to apply a classic grid search pattern.
Searching in a strictly perpendicular cross shortens the search time and increases the search precision, thus always try to keep the device and your body in the same orientation during fine search.
The greater the remaining distance to the buried subject (burial depth), the more repetitions of fine search crosses may be required to reach sufficient search-precision. Systematically fine search until you have found the point with the lowest distance indication.
Immediately place an indicator, i.e. a ski pole at this spot as an important reference when applying the probing spiral. Open your backpack now and assemble probe and shovel. It is recommended to put your backpack immediately back on your shoulders, in particular if you use a back pack with an airbag. In the unusual case of a secondary avalanche, this allows you to take advantage of the safety gear. By strictly keeping the equipment (i.e. first aid kit, radio or mobile phone) with you in your back pack, you will always have it available when you need it while rescuing the subsequent buried subjects.
- Pinpointing
- BarryTip: Place a visual reference at the point where you have found the lowest distance indication. The visual reference is important to probe in a systematic pattern.
![]()
- If the buried subject is hit with the probe, leave the probe in the snow.

Stash the device in search mode on your body (i.e. pocket) in order to have both hands available to probe. Begin probing in a spiral at a 90° angle to the snow surface. In particular if the debris is hard, guide the probe with two hands, one pushing from the top, the other guiding the probe closer to the snow surface in order to avoid bending the probe. Keep in mind that the remaining distance shown on the screen indicates the maximum possible distance to the buried subject. I.e. if you see 1.1 on the screen, the buried subject must be within 1.1m probing depth and spiral probe radius. In case there is no probe hit within this area, you have missed the buried subject. Repeat probing with a slightly offset probing pattern (chapter «Pinpointing with Transceiver and Probe Pole»).
Mark
Mark the buried subject as «found» by pushing the  button after you have successfully located it with a probe strike!
Automatic Revert to SEND
For the safety of the rescuers, the device automatically switches into SEND mode after 4 minutes without user interaction or motion.
Leaving SEARCH Mode
After 4 seconds the device automatically switches into SEND mode.

Multiple Burials
The marking feature allows to continue the search for further buried subjects by marking the previously located ones as found. Excavate the buried subjects already found while the search continues, unless the burial depth is particularly deep.

In Complex Situations Slow Down The Search
If the signal of the buried subject you are currently searching for temporarily overlaps with another signal, the device tries to guide you along the optimal search path. If the signals overlap for a long period of time, reliable guidance is limited. The device indicates this with a flashing distance indication. Radically slow the search until the distance indication stops flashing, indicating the signal overlap has cleared.

Search for Multiple Buried Subjects
The transceiver attempts to analyze all the detectable signals and to determine the number of buried subjects. This is possible because the signals from each transmitter have characteristics which are distinguishable from the signals of other transmitters. The more unique the signal characteristics are, the more accurately the signals can be distinguished and separated (pattern recognition). By automatically associating the signals with their respective sources, multiple burial situations can be solved without applying special search tactics. Transceivers which also transmit W-Link information can be detected particularly fast and reliably. The W-Link information includes a unique identification as well as the trasmit pattern.
List of Buried Subjects
The buried subjects whose transmit patterns can be identified are inserted in the list of buried subjects based on their signal strength, usually corresponding with distance. The closest buried subject on the avalanche is shown at the bottom, the furthest at the top of the list. The list of buried subjects can show no more than 3 buried subjects at the time. In case the amount of recognized buried subjects is greater, arrow symbols indicate that the list contains further down or further up in the list additional entries. Usually, the device guides you so that the list is processed from bottom to top. The lower, already hidden part of the list of buried subjects ![]() . contains therefore the buried subjects which have already been marked as found, and the upper, not yet visible part of the list
. contains therefore the buried subjects which have already been marked as found, and the upper, not yet visible part of the list  , the buried subjects which are not found yet and still ahead of you on the avalanche.
Independently of the position of a buried subject in the list, the device will always try to guide you as quickly as possible until all recognized buried subjects are found.
Procedure for Multiple Burials

- The device favors the closest subject first. Locate the various buried subjects using the transceiver and probe pole.
![]()
- As soon as you mark an individual subject, the transceiver takes you to the next closest, unmarked buried subject.
![]()
- Continue this procedure until all subjects are located and marked.
![]()
- The rescuer now searches for additional buried subjects while the display shows the symbol for the signal search phase to indicate that the rest of the avalanche surface must be searched (Chapter «Signal Search»).
![]()


Boundaries of Automatic Signal Detection and Alternative Search Systems
A large number of buried subjects or interference leads into complex search scenarios:
- The more signals there are, the longer the signal overlaps can last.
- Interferences may cover up weak signals from buried subjects, or may be interpreted as signals of an avalanche transceiver.
In case of complex search scenarios, the capability to automatically detect and isolate signals in the list of buried subjects may therefore be limited.
In case of complex search scenarios caused by signal overlap or interference, a proximity-based alternate search method must be used. In this case the searcher should attempt to find the remaining buried subjects by applying alternative search systems such as the micro search strips or the 3 circle method. Even though the Barryvox® device is optimized for searching using the digital search mode, narrowing the search strip width and lowering the search speed will lead to an increase in probability of detection.
Search With Multiple Rescuers
When the search is conducted with multiple rescuers searching at the same time, avoid searching for the same buried subject as another rescuer.
Situation 1:

- Two rescuers receive two buried subjects.
- One rescuer continues the search for the buried subject closest to him,
- the other rescuer should directly search for the second buried subject, without having to mark the first one. The search is therefore continued on the current signal search pattern
- until the transceiver obviously leads to a different buried subject.
Situation 2:

- The two rescuers only receive one buried subject.
- One rescuer continues the search for the buried subject closest to him,
- the other rescuer should search the remaining of the avalanche for more buried subjects. The search is therefore continued on the current signal search pattern -
- even with increasing distance indications -
- until the transceiver obviously leads to a different buried subject.
ADDITIONAL INFORMATION
Use in the Dark
If you use the transceiver in the dark, the display is automatically backlit.
W-Link Regions

- EU Europe and neighboring countries
(W-Link Region A) [= light grey] - US US, Canadian, New Zealand and Australian Version
(W-Link Region B) [= dark grey] - no Countries without W-Link [= black]
- Countries with unknown region allocation [= white]
Frequency regulations do not allow that the user modifies the frequency setting. To enable the user to take his Barryvox® with him when travelling into another region, it is possible to switch the W-Link off and on again when returning home.
Please note that the W-Link setting has no effect on the signal which is used to locate a buried subject.
Press the ![]() key to access the device and maintenance info while the device is shutting down.
key to access the device and maintenance info while the device is shutting down.
As soon as the "Maintenance" screen is shown, press and hold the ![]() key to switch the w-link on or off. If the setting is "no", the w-link is switched off, in the activated state the pre-programmed W-Link region is shown.
key to switch the w-link on or off. If the setting is "no", the w-link is switched off, in the activated state the pre-programmed W-Link region is shown.

Problem Solving
Transceiver doesn't turn on
No self-test at startup
- Check and replace batteries.
- If this doesn't help, have the device checked by the manufacturer.
Alert Messages
Batteries are weak!
The batteries must be replaced as soon as possible. Refer to the instruction in the chapters «Batteries» and «Battery Test and Battery Level Indicator».

Sensor failure!
- Turn the transceiver off and turn it back on after it has properly shut down.
![]()
- If this doesn't help, have the device checked by the manufacturer.

Alert «Check SEND»!
SEND LED doesn't blink
- This alert message is usually triggered by external interference. Make sure that no metal objects or electronic devices are close to the transmitter.
![]()
- Check and replace batteries.
- Turn the transceiver off and turn it back on after it has properly shut down.
- If this doesn't help, have the device checked by the manufacturer.

Alert «Check Search»!
- Make sure that no metal objects or electronic devices are close to the transmitter.
![]()
- Turn the transceiver off and turn it back on after it has properly shut down.
- If this doesn' t help, have the device checked by the manufacturer. In case of emergency, try to search anyway, but with reduced search strip width.
![]()


Maintenance and Repair
Barryvox® transceivers, which do not function correctly, despite full and properly inserted batteries (e.g. no signal during the group check, mechanical defects) must be sent to a service center listed at the beginning of this manual.
Maintenance
The year of the next check can be viewed under «Info» in the shut down sequence of the device.
Use in combination with the Barryvox® Maintenance Software
The Barryvox® Maintenance Software allows to efficiently manage and maintenance transceiver fleets with a computer. The Barryvox® automatically connects to a service device (Barryvox® tester, W-Link Adapter/Stick) with in w-link range (approx. 50m). While in service mode, the SEND mode is deactivated and the red SEND-control LED is double flashing.

Periodic check by a Barryvox® Service Center
To check the proper function of the device it is highly recommended that the device be sent to a Barryvox® service center every 3 years, or when reaching 3000 hours of operation or have it checked by a Barryvox® service point (service charge will apply). The functional test is much more comprehensive and precise than the self and group check. As part of this service the electronics and the mechanical components such as the case, the main switch and the lateral key, the battery contacts, the battery compartment and cover as well as the wrist strap will be checked. In case the check shows abnormal wear and tear due to incorrect or long, very intense use, the service center may recommend that you replace the device.
We recommend that you have your device checked during the summer months so that your Barryvox® is tested and ready to use at the start of the next winter season. The year of the next check can be viewed under «Info» in the shut down sequence of the device.
Technical Data
Device: Digital three antenna device.
Transmit frequency
Transceiver: 457 kHz (International Standard).
W-Link Region A: 869.85MHz (Europe)
W-Link Region B: 915... 926 MHz (North America)
Field strength / Transmitting power
Transceiver: max. 7 dBμA/m (2,23 μA/m) at a distance of 10m
W-Link Region A: max. 5mW / E.R.P.
W-Link Region B: max. 5mW / E.R.P.
Power supply: 3 x LR03 1.5 V Alkaline (AAA)
Battery life: typical 300 h SEND, min 200 h in SEND mode followed by 1 h in SEARCH mode.
Maximum range: up to 70 m
Search strip width: 70 m.
Operating temperature range: –25° to +45°C.
Dimensions (L x W x H): 115 x 67 x 27 mm.
Weight: 210 g (incl. batteries).
COMPANION RESCUE
Companion rescue means that buried subjects are located and excavated by members of their party immediately after the avalanche slide. Avalanche rescue is a race against time! While most buried subjects can be rescued within the first 18 minutes, the chances of survival decrease rapidly afterwards. Companion rescue, therefore, provides the greatest chances of survival for a buried subject.
If an Avalanche Occurs
As a Victim:
- Escape to the side
- Discard skis, snowboards, and poles
- anchor effect
- Try to stay on top
- Close your mouth; place your hands in front of your face
- clear airway when the avalanche stops
Separate instructions apply for the use of specialized safety equipment, such as the highly efficient avalanche airbag.
As a Witness:
- Memorize the last seen point as well as the direction of the avalanche
- signal search strip (See chapter «Signal Search»).
Personal Rescue Equipment
Carrying the proper personal safety equipment is critical for effective companion rescue. A transceiver, a shovel, and a probe pole are necessary to localize and excavate a buried subject quickly and efficiently.
Mammut offers a variety of suitable probe poles and shovels. The use of an airbag system (flotation device) significantly reduces the risk of complete burial and therefore leads to considerably higher survival chances.

The use of the transceiver precedes the use of the probe pole and the use of the probe pole precedes the use of the shovel. Carrying a radio or a mobile phone to call for help is highly recommended.
Emergency Plan

CALL FOR HELP
- Scene assessment
- If possible, use the snow sport equipment until you reach fine search. Keep your backpack with gear with you at all times.
- I am searching with my transceiver: SEARCH
I am not searching: OFF - At least one rescuer immediately starts transceiver SEARCH, while looking and listening at the same time
- Assemble probe and shovel only when the fine search is concluded
- Transceiver search finished: all transceivers to SEND
- Excavate – First Aid
The emergency plan shows the elementary steps for a successful companion rescue.
Depending on the situation at hand, the procedure must be adapted.
No Probe Hit
If the buried subject cannot be found by the probe, place the probe approx. 1.5 meter above the point with the lowest distance indication. While digging, enough space is now made available to allow a further fine and pinpoint search within the excavation site.
Excavating the Buried Subject
The first rescuer positions him/herself directly at the probe. The first two rescuers position themselves in a distance of one shovel lengths, all other rescuers are two shovel lenghts apart of each other.
The rescuer at the tip of the conveyor belt digs directly following the probe to the buried subject, thus avoiding any chance to miss it.
- BarryTip: in hard snow, cut blocks with the shovel. In case of multiple burials, switch off the transceiver of the buried subjects as soon as possible.

North America:
Mammut Sports Group Inc.
458 Hurricane Lane
Williston, US-VT05495
Phone +1 800 451 5127
info@mammutusa.com
Europe:
Mammut Sports Group GmbH
Mammut Basecamp 1
DE-87787 Wolfertschwenden
Phone +49 (0)8334 3620 0
germany@mammut.com
Switzerland (Head Office):
Mammut Sports Group AG
Birren 5
CH-5703 Seon
Phone +41 (0)62 769 81 81
info@mammut.com
Documents / Resources
References
Download manual
Here you can download full pdf version of manual, it may contain additional safety instructions, warranty information, FCC rules, etc.
Advertisement


Need help?
Do you have a question about the BARRYVOX and is the answer not in the manual?
Questions and answers