Advertisement
- 1 Unpacking Instructions
- 2 Package Contents
- 3 Features & Benefits
- 4 SETUP
- 5 Display Setup
- 6 Set the Time, Date & Units
- 7 Display Backlight Settings
- 8 Placement for Maximum Accuracy
- 9 Important Placement Guidelines
- 10 5-in-1 Sensor Installation Guidelines
- 11 Basic Setup is Complete
- 12 OPERATION
- 13 PC Connect
- 14 Download the Software
- 15 Rainfall Tracking
- 16 Weather Ticker
- 17 Troubleshooting
- 18 Care & Maintenance
- 19 Calibration
- 20 Calibrate the Rain Gauge
- 21 Specifications
- 22 Customer Support
- 23 Documents / Resources
Unpacking Instructions
To ensure the best possible product performance, please read this manual in its entirety and retain it for future reference.
Remove the protective film that is applied to the LCD screen prior to using this product. Locate the tab and peel off to remove.
Package Contents
- Display with Tabletop Stand
- 5-in-1 Sensor
- Sensor Mounting Bracket
- Mounting Hardware
- Power Adapter
- USB cable
- Instruction Manual
 PRODUCT MUST BE REGISTERED TO RECEIVE WARRANTY SERVICE |
| PRODUCT REGISTRATION Register online to receive 1 year warranty protection www.AcuRite.com |
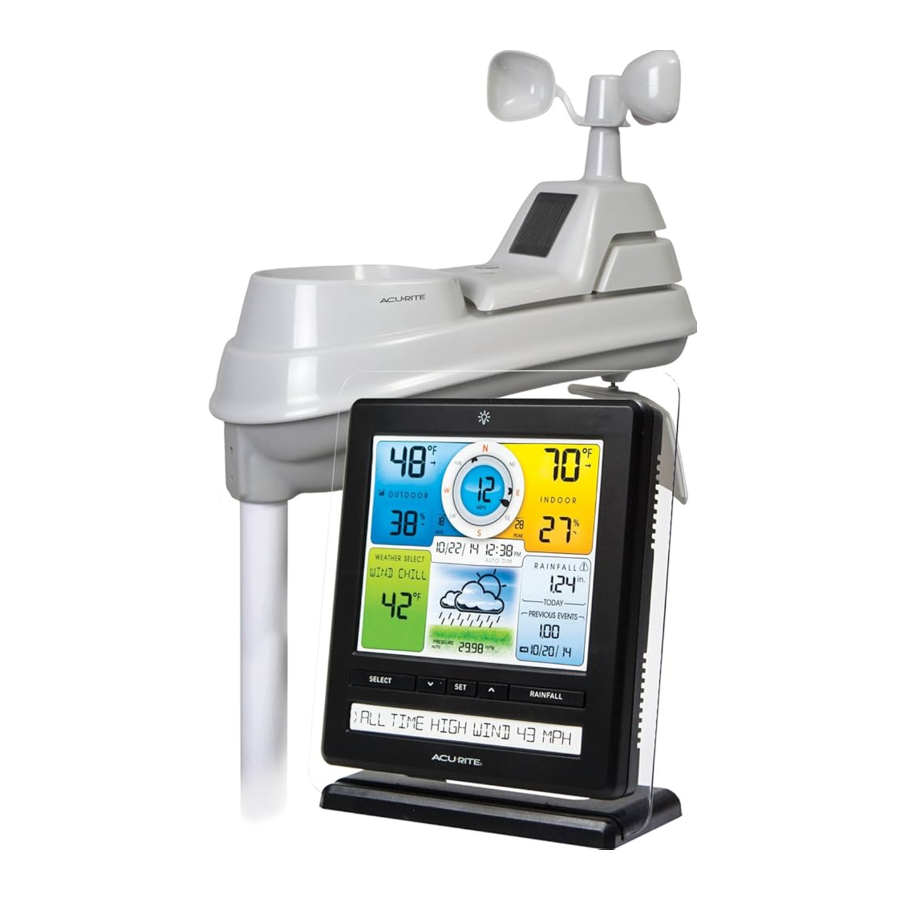
Features & Benefits

5-in-1 SENSOR
- Rainfall Collector Funnel
- Solar Cell Panel
Converts sunlight into power to run internal aspirating fan. Internal Aspirating Fan (not shown)
Draws ambient air into sensor to reduce solar radiation heating, resulting in more accurate temperature measurement. - A-B-C Switch ID code that must match display's A-B-C switch to ensure units synchronize.
- Battery Compartment
- Temperature & Humidity Sensors (internal)
- Mounting Point
- Wind Speed Anemometer
- Wind Direction Vane
- Mounting Bracket
- Mounting Hardware
Includes 5 anchors & the following screws:Qty Diameter Length 5 #4 3/4" 1 #4 1/2" 1 #6 1/2"
- Debris Filter
Pre-installed to prevent debris from entering the rain gauge.
Display

- Previous 2 Wind Directions
- Backlight Button
For momentary backlight and dimmer settings. - Current Wind Speed
- Current Wind Direction
- Current Indoor Temperature
Arrow icon indicates direction temperature is trending. - Display Low Battery Indicator
- Peak Wind Speed
Highest speed from the last 60 minutes. - Current Indoor Humidity
Arrow icon indicates direction humidity is trending. - Wind Speed Alert Indicator
Activates when wind speed is over 50 mph. - Clock
- Heavy Rainfall Warning Icon
Activated when over 1 inch of rainfall is recorded in 2 hours or less. - AUTO DIM Indicator
Indicates display is in auto-dimming brightness mode. - Current Rainfall
Rainfall recorded since 12:00am. - 12 to 24 Hour Weather Forecast
Self-Calibrating Forecasting pulls data from your 5-in-1 sensor to generate your personal forecast. - Storm Alert Indicator
Activates when barometric pressure drops. - Month/Year/All-Time Rainfall
- Current Barometric Pressure
Arrow icon indicates direction pressure is trending. - RAINFALL Button
Press to change the RAINFALL data being displayed (Month, Year, All-Time).
![]() Button
Button
For setup preferences.- SET Button
For setup preferences. ![]() Button
Button
For setup preferences.- SELECT Button Press to change the WEATHER SELECT category data being displayed.
- Weather Ticker TM
- Heat Index/ Wind Chill Alert Indicator
Activates when heat index rises over 90ºF (32ºC) or when wind chill drops below -17ºF (-27ºC). - Learning Mode Icon
Disappears after weather forecast self-calibration is complete. - WEATHER SELECT
Displays heat index, dew point, wind chill, feels like, days with rain this month, and days since last recorded rainfall. - Date
- Current Outdoor Humidity
Arrow icon indicates direction humidity is trending. - Average Wind Speed
Average of all speeds over the past 2 minutes. - 5-in-1 Sensor Signal Strength
- Sensor Low Battery Indicator
- Current Outdoor Temperature
Arrow icon indicates direction temperature is trending. - Calibration Indicator
Appears next to calibrated values.
 Button
 Button
Back of Display

DISPLAY BACK
- Plug-in for Power Adapter
- Plug-in for USB Cable
- Integrated Hang Hole For easy wall mounting.
- Device ID
12 digit unique ID required for online connectivity functions. - Battery Compartment
- A-B-C Switch
ID code that must match 5-in-1 sensor's A-B-C switch to ensure units synchronize.
- Reset Button
Press and release to clear data recorded since 12:00 am. Press and HOLD for full reset to factory defaults. - Power Adapter
- USB Cable for PC Connection
- Battery Compartment Cover (not shown)
SETUP
5-in-1 Sensor Setup

- Set the A-B-C Switch
Locate the A-B-C switch inside the battery compartment. Set the A-B-C switch to A, B or C. You must select the same letter choices for both the sensor and the display in order for the units to synchronize. - Install or Replace Batteries
Batteries MUST be installed for this product to operate. AcuRite recommends high quality alkaline or lithium batteries for the best product performance. Heavy duty or rechargeable batteries are not recommended.
The 5-in-1 sensor requires lithium batteries in low temperature conditions.
Cold temperatures can cause alkaline batteries to function improperly. Use lithium batteries in the 5-in-1 sensor for temperatures below -4ºF / -20ºC.- Slide off the battery compartment cover.
- Insert 4 x AA batteries into the battery compartment, as shown. Follow the polarity (+/-) diagram in the battery compartment.
- Replace the battery cover.
- Remove Rain Gauge Stabilizer
Locate and remove the rain gauge stabilizer (plastic tab) taped into the bottom of the sensor. The rain gauge will not function until this is removed.
Display Setup

- Set the A-B-C Switch
The A-B-C switch is located inside the battery compartment. It can be set to A, B or C. However, you must select the same letter choices for both the sensor and the display in order for the units to synchronize. - Plug Power Adapter into Electric Outlet

- Write Down the DEVICE ID 12 digit unique ID needed for online connectivity functions.
24 C8 6E - Install or Replace Backup Batteries (optional) Insert 3 x AA alkaline batteries into the battery compartment, as shown. Follow the polarity (+/-) diagram in the battery compartment.

Batteries are a backup power source to preserve records in the event of a power outage. Power adapter is the recommended primary power source to enjoy the full functionality of this product.

PLEASE DISPOSE OF OLD OR DEFECTIVE BATTERIES IN AN ENVIRONMENTALLY SAFE WAY AND IN ACCORDANCE WITH YOUR LOCAL LAWS AND REGULATIONS.
be used for an extended period of time. Follow the polarity (+/-) diagram in the battery compartment. Promptly remove dead batteries from the device. Dispose of used batteries properly. Only batteries of the same or equivalent type as recommended are to be used. DO NOT incinerate used batteries. DO NOT dispose of batteries in fire, as batteries may explode or leak. DO NOT mix old and new batteries or types of batteries (alkaline/standard). DO NOT use rechargeable batteries. DO NOT recharge non-rechargeable batteries. DO NOT short-circuit the supply terminals.
Set the Time, Date & Units
Press the "SET" button, located on the front of the display, to enter SET MODE. Once in set mode, the preference you are currently setting will blink on the display.
To adjust the currently selected (flashing) item, press and release the  or
or  buttons (press and HOLD to fast adjust).
To save your adjustments, press and release the "SET" button again to adjust the next preference. The preference set order is as follows:
TOP DISPLAY:
CLOCK HOUR
CLOCK MINUTE
CALENDAR MONTH
CALENDAR DATE
CALENDAR YEAR
TEMPERATURE UNITS (ºF or ºC)
WIND SPEED UNITS (MPH, KPH, Knots)
RAINFALL UNITS (in or mm) PRESSURE UNITS (inHg or hPa)
TICKER DISPLAY:
LANGUAGE (English or French)
WEATHER TICKER SPEED (SLOW, MEDIUM, FAST) PC CONNECT MODE (1, 2, 3, 4)
You will automatically exit SET MODE if no buttons are pressed for 20 seconds. Enter setup mode at any time by pressing the "SET" button.
Display Backlight Settings
This weather station's color display features three different lighting settings:
High (100%) brightness, Medium (60%) brightness and Low (30%) brightness. When display is powered with the power adapter, backlight remains on at 100% brightness. Press the "![]() " button once to dim to 60% brightness; press again to dim to 30%, press a 3rd time to enter AUTO DIM mode.
" button once to dim to 60% brightness; press again to dim to 30%, press a 3rd time to enter AUTO DIM mode.
"AUTO DIM" will appear below the clock.
| AUTO DIM MODE: Automatically adjusts display brightness based on time of day & year. | |
| MARCH 11- NOVEMBER 4 | 6:00 a.m. - 9:00 p.m. = 100% brightness |
| 9:01 p.m. - 5:59 a.m.= 30% brightness | |
| NOVEMBER 5 - MARCH 10 | 7:30 a.m. - 7:00 p.m.= 100% brightness |
| 7:01 p.m. - 7:29 a.m. = 30% brightness | |
Placement for Maximum Accuracy
AcuRite sensors are sensitive to surrounding environmental conditions. Proper placement of both the display and the sensor are critical to the accuracy and performance of this product.
Display Placement

Place the display in a dry area free of dirt and dust. To ensure accurate temperature measurement, place out of direct sunlight and away from heat sources or vents. Display stands upright for tabletop use or is wall-mountable.
5-in-1 Sensor Placement

The 5-in-1 sensor is designed to remain outdoors all year long. Choose an open location with no obstructions above or around the sensor for the most accurate measurements.
Important Placement Guidelines
Display and sensor must be within 330 ft (100 meters) of each other.
MAXIMIZE WIRELESS RANGE
Place units away from large metallic items, thick walls, metal surfaces, or other objects that may limit wireless communication.
PREVENT WIRELESS INTERFERENCE
Place both units at least 3 ft (0.9 meters) away from electronic devices (TV, computer, microwave, radio, etc.).
LOCATE AWAY FROM HEAT SOURCES
Position sensor away from heaters, air conditioners, chimneys, exhaust vents, asphalt and concrete (surfaces that radiate heat).
LOCATE AWAY FROM HUMIDITY SOURCES
Avoid installing the sensor near pools, spas, or other bodies of water. Water sources may impact humidity accuracy.
LOCATE AWAY FROM SPRINKLER HEADS
DO NOT install the sensor where it will be sprayed by a sprinkler system. This may force water inside the sensor.
LOCATE AWAY FROM WIND & RAIN OBSTRUCTIONS
DO NOT mount the sensor with obstructions around it. Consider a location that is a wide open area, with few structures around to ensure accurate wind measurement.

View Video
Visit us online to view installation photos and video, or learn more about AcuRite technology: www.AcuRite.com/5in1
5-in-1 Sensor Installation Guidelines
INSTALLATION HEIGHT
Mount the sensor at a minimum height of 5 feet (1.5 meters) off the ground, in an open area. Higher is better for wind measurements - the National Weather Service recommends 33 feet (10 meters) high!
MOUNTING OPTIONS
The included mounting bracket is designed to screw directly onto wooden posts or surfaces that are 2"x 4" or larger. The sensor can also be mounted directly to 3/4" steel pipe (available at hardware stores and home centers).
SOLAR CELL INSTALLATION
Install the sensor with the solar cell facing SOUTH. This ensures the cell receives as much sun as possible and orients wind direction.
5-in-1 Sensor Installation

- Fasten mounting base (included) to a post or pole (not included) using the 4 longer screws included in the hardware bag.
- Insert the mounting base into the hole onthe bottom of the sensor.
- Make sure the arrows on the top of the sensor are pointed in the proper direction and the bubble level is centered. The solar cell should be facing south to properly orient the wind direction.
- Fasten the sensor into the mounting base using the 2 shorter screws included in the hardware bag.
The 5-in-1 sensor is now ready to use.
Clear Data Collected During Installation
When installation is complete, clear erroneous data from the display by pressing and HOLDING the "Reset" button on the back of the display inside the battery compartment. This button will clear all records.
Basic Setup is Complete
The 5-in-1 sensor will now synchronize with the display. It may take a few minutes for synchronization to complete. If both or one of the units appear to be functioning improperly, please refer to the troubleshooting section.
OPERATION
Using the Professional Weather Center Learning Mode
Self-Calibrating Forecasting use a unique algorithm to analyze changes in pressure over a time period (called Learning Mode) to determine your altitude. After 14 days, the Learning Mode icon disappears from the display screen. At this point, the self-calibrated pressure is tuned in to your location and the unit is ready for superior weather prediction.
Weather Forecast
AcuRite's patented Self-Calibrating Forecasting provides your personal forecast of weather conditions for the next 12 to 24 hours by collecting data from the sensor in your backyard. It generates a forecast with pinpoint accuracy - personalized for your exact location.
STORMY & WINDY (flashing=stormy) | SNOW LIKELY | SNOW / RAIN MIX LIKELY | RAIN LIKELY | MOSTLY CLOUDY |
View the complete list of icons at www.AcuRite.com/acurite-icons
Barometric Pressure
Subtle variations in barometric pressure greatly affect the weather. This weather center displays the current pressure with an arrow icon to indicate the direction the pressure is trending (FALLING, STEADY, or RISING).
PC Connect
PC Connect works with PCs to provide access to your Weather Center data in the following ways:
- Data File: The display logs (or stores) data so that you can download it to a CSV (comma separated values) data file on your PC.
- Web Browser or Smartphone: Monitor sensor data remotely using AcuRite's free AcuRite online software, or from a mobile device using the free AcuRite app, available from the iOS App Store or Google Play Store.
- Weather Underground: This weather station is compatible for streaming data to the Weather Underground Personal Weather Station Network. For more information, navigate to: www.acurite.com > Support > Downloads
Download the Software
The PC Connect software is available online as a free download. A manual (PDF) is included with the software download.
Before setting up the PC Connect software, verify that the display is ON with the power adapter plugged in. Next, connect the mini-USB (small end of the cable) into the USB port on the display, located inside the battery compartment.

- Download PC Connect software to your computer by visiting: www.acurite.com > Support > Downloads
- Open the file that was downloaded in step 1 and follow the on-screen instructions to install the software.
- After PC Connect is installed on the computer, the initial begin automatically. Select where to save weather data the display. By default, this will create a folder named "Acu n" in the Documents folder.
- When prompted by the software to plug in the display, connect the USB (larger end of the cable) into a USB port on the computer.
PC Connect is installed and ready for use.
Follow the instructions within the PC Connect app to complete setup and begin using the software.
![]()

Rainfall Tracking
This weather station features enhanced tracking of historical rainfall data. Rain accumulation data is recorded for today, over all-time, by year, by month, and by rainfall event.
Press the "RAINFALL" button to review rainfall records. The ![]() icon is shown on the display while historical data is being viewed.
icon is shown on the display while historical data is being viewed.
Records are shown in the following order:
PREVIOUS RAINFALL #1*
PREVIOUS RAINFALL #2*
PREVIOUS RAINFALL #3*
CURRENT MONTH TOTAL RAINFALL
PREVIOUS MONTH TOTAL RAINFALL
2 MONTHS AGO TOTAL RAINFALL
CURRENT YEAR TOTAL RAINFALL
PREVIOUS YEAR TOTAL RAINFALL
ALL-TIME TOTAL RAINFALL (date shown is start date of the all-time total; the date the display was powered on)
![]()
*Previous rainfall is the amount of rain recorded from 12:00am to 11:59pm on the date shown.
Weather Ticker™
The Weather Ticker automatically flashes your real-time weather information and alerts as text in the lower part of the display screen. The  and
and  buttons can be used to scroll through available ticker messages when the display is in normal viewing mode (NOT during setup). The possible WEATHER TICKER messages are as follows:
HEAT INDEX-XX
WINDCHILL-XX
DEW POINT-XX
IT FEELS LIKE XX OUTSIDE
7 DAY HIGH TEMP. XX- MM/DD
7 DAY LOW TEMP. XX- MM/DD
30 DAY HIGH TEMP. XX- MM/DD
30 DAY LOW TEMP. XX- MM/DD
ALL TIME HIGH TEMP. XXX...RECORDED MM/DD/YY ALL TIME LOW TEMP. XXX...RECORDED MM/DD/YY
24 HOUR TEMP. CHANGE +XX
ALL TIME HIGH WIND XX MPH...RECORDED MM/DD/YY
7 DAY AVERAGE WIND XX MPH
TODAY'S AVERAGE WIND XX MPH
MOON- NEW
MOON- WAXING CRESCENT
MOON- FIRST QUARTER
MOON- WAXING GIBBOUS
MOON- FULL
MOON- WANING GIBBOUS
MOON- LAST QUARTER
MOON- WANING CRESCENT
INDOOR HUMIDITY OK
INDOOR HUMIDITY HIGH
INDOOR HUMIDITY LOW
NEW LOW TEMP. RECORD XX
NEW HIGH TEMP. RECORD XX
NEW WIND RECORD TODAY XX CURRENT RAINFALL X.XX/HR.
RAIN EVENT STARTED XX HRS. AGO
SENSOR BATTERIES LOW
DISPLAY BATTERIES LOW
SENSOR SIGNAL LOST...CHECK BATTERIES AND PLACEMENT
CAUTION- HEAT INDEX IS XXX
CAUTION- WIND CHILL IS XXX
CALIBRATION
DATA LOGGER FULL...CONNECT TO PC TO TRANSFER
Troubleshooting
| Problem | Possible Solution |
No outdoor sensor reception no bars no bars |
|
Outdoor temperature is flashing or showing dashes | Flashing of the outdoor temperature is generally an indication of wireless interference.
|
Inaccurate forecast |
|
Inaccurate temperature or humidity |
|
No rainfall |
|
Inaccurate wind readings |
|
Display screen not working |
|
| Cannot access data online or on the AcuRite mobile app |
|
No data received from indoor display |
|
If your AcuRite product does not operate properly after trying the troubleshooting steps, visit www.AcuRite.com or call (877) 221-1252 for assistance.
Care & Maintenance
Display Care
Clean with a soft, damp cloth. Do not use caustic cleaners or abrasives. Keep away from dust, dirt and moisture. Clean ventilation ports regularly with a gentle puff of air.
5-in-1 Sensor Care
Clean the Sensor
Clean with a soft damp cloth. Do not use caustic cleaners or abrasives that will mar the polished surfaces of the rain collection funnel or the solar cell. Scratches will result in decreased performance and reliability.
Insect Prevention
Insects may cause obstructions and interrupt data by nesting in or on the 5-in-1 sensor. To limit this problem, spray sensor with a household insect repellent. Consult the insect repellent instructions prior to use.
Snow & Freezing Weather
The 5-in-1 sensor will not be damaged by freezing conditions. NOTE: If the rain collector cup fills with snow and then melts, it will register as rain on the display.
Clean the Rain Collector Cup
Remove and empty rain collector debris filter. The debris filter is located in the rain collector funnel. Remove from the top by gently squeezing and pulling out.
Clean the Wind Vane & Anemometer
Remove foreign matter from the outside of the sensor for free movement of the wind vane and anemometer. If needed, use a small amount of spray lubricant, clear silicone or graphite powder on the anemometer for improved movement.
Calibration
The indoor / outdoor temperature and humidity readings, and barometric pressure can be calibrated on the display to improve accuracy. Calibration can improve accuracy when sensor placement or environmental factors impact the data accuracy.
- To access calibration mode, press AND HOLD the "
![]() ", "SET", and "
", "SET", and "![]() " buttons simultaneously for at least 5 seconds.
" buttons simultaneously for at least 5 seconds. - To adjust the currently selected (flashing) item, press and release the "
![]() " or "
" or "![]() " buttons to calibrate the data value higher or lower from the actual reading.
" buttons to calibrate the data value higher or lower from the actual reading. - To save your adjustments, press and release the "SET" button to adjust the next preference. The "
![]() " icon will remain illuminated next to calibrated values.
" icon will remain illuminated next to calibrated values.
The preference set order is as follows:
OUTDOOR TEMPERATURE
OUTDOOR HUMIDITY
INDOOR TEMPERATURE
INDOOR HUMIDITY
BAROMETRIC PRESSURE (must be set to MANUAL mode to calibrate)*
*To change from AUTO to MANUAL pressure mode and vice versa, press AND HOLD the "SET" button for at least 10 seconds. The display indicates the current pressure mode selected,"AUTO" or "MANUAL".
 " buttons simultaneously for at least 5 seconds.
After 20 seconds of inactivity, the display will save the adjustments and exit calibration mode. Note: Calibrations will be erased if the display is reset or if batteries are removed and the power adapter is unplugged.
Calibrate the Rain Gauge
The rain gauge on the 5-in-1 sensor can be calibrated to improve accuracy.
Items Needed: 5-in-1 sensor, display, plastic cup, pin, screw driver
- First, ensure 5-in-1 sensor is perfectly level using built-in bubble level.
- Place display close so you can monitor it during calibration.
- Make a pin hole in the bottom of a plastic cup. Hold the cup over the rain gauge and fill it with exactly 8oz (236 ml) of water, allowing the water to drip into the rain gauge. You should hear the internal buckets tip and see water drain through the rain gauge.
- A few seconds after each bucket tip, the display displays rainfall in approximately 0.01" (.254 mm) or more increments.
- The cup of water should take more than 20 minutes to empty; a quicker period will result in inaccurate calibration. Try to simulate a normal steady rainfall. When cup is empty of water, display should register 1.06" (26.92 mm).
Tips
- There should be nearly an equal number of water drops (about 25 water drops) between bucket tips. If not, adjust the calibration screws on the bottom of the 5-in-1 sensor until an equal number of water drops are tipping the buckets. Then, restart the calibration procedure.
- If you don't hear the buckets tipping and see water dripping alternately out of each drain, there may be an issue with the rain gauge or it's adjustment. See Troubleshooting.
Adjustment
If the rain gauge doesn't register close to 1.06" (26.92 mm), make an EQUAL adjustment to the two calibration screws on the bottom of the 5-in-1 sensor. Turning screws clockwise increases rainfall; counter clockwise decreases rainfall.
- To adjust the rainfall reading by 2% turn both screws 1/8 of a turn.
- To adjust the rainfall reading by 4% turn both screws 1/4 of a turn.
- To adjust the rainfall reading by 8% turn both screws 1/2 of a turn.
Watch the video at www.acurite.com/5n1
Specifications
| TEMPERATURE RANGE | Outdoor: -40ºF to 158ºF; -40ºC to 70ºC |
| Indoor: 32ºF to 122ºF; 0ºC to 50ºC | |
| HUMIDITY RANGE | Outdoor: 1% to 99% |
| Indoor: 1% to 99% | |
| WIND SPEED | 0 to 99 mph; 0 to 159 kph |
| WIND DIRECTION INDICATORS | 16 points |
| RAINFALL | 0.01 inches (0.25 mm) and up |
| WIRELESS RANGE | 330ft / 100m depending on home construction materials |
| OPERATING FREQUENCY | 433 MHz |
| POWER | Display: 5V 250mA AC Adapter 3 x AA alkaline batteries (optional) |
| Sensor: 4 x AA alkaline or lithium batteries | |
| DATA REPORTING | Wind Speed: 18 second updates; Direction: 36 seconds Outdoor temperature & humidity: 36 second updates Indoor temperature & humidity: 60 second updates PC Connect CSV Data Logging: 12 minute intervals PC Connect to AcuRite Software/App: 18 seconds |
| DISPLAY MEMORY | 512 kilobytes (not expandable) |
| PC CONNECT SYSTEM REQUIREMENTS | Mac OSX 10.9 (Mavericks) or higher |
| Windows 10 / 8.1 / 8 / 7; 1 GHz or faster processor; 1 GB (32-bit) or 2 GB (64-bit) of RAM; available USB 2.0 port | |
| High speed internet is required for some advanced features of PC Connect, such as Weather Underground Rapid Fire Updates. |
Customer Support
AcuRite customer support is committed to providing you with best-inclass service. For assistance, please have the model number of this product available and contact us in any of the following ways:
 (877) 221-1252
Visit us at www.AcuRite.com
PRODUCT MUST BE REGISTERED TO RECEIVE WARRANTY SERVICE
PRODUCT REGISTRATION
Register online to receive 1 year warranty protection
www.AcuRite.com
Documents / Resources
References
Acurite GDPR Notice
Acurite GDPR Notice
Acurite GDPR Notice
![www.myacurite.com]() http://www.myacurite.com
http://www.myacurite.comAcurite GDPR Notice
Download manual
Here you can download full pdf version of manual, it may contain additional safety instructions, warranty information, FCC rules, etc.
Advertisement


Need help?
Do you have a question about the 2032 and is the answer not in the manual?
Questions and answers