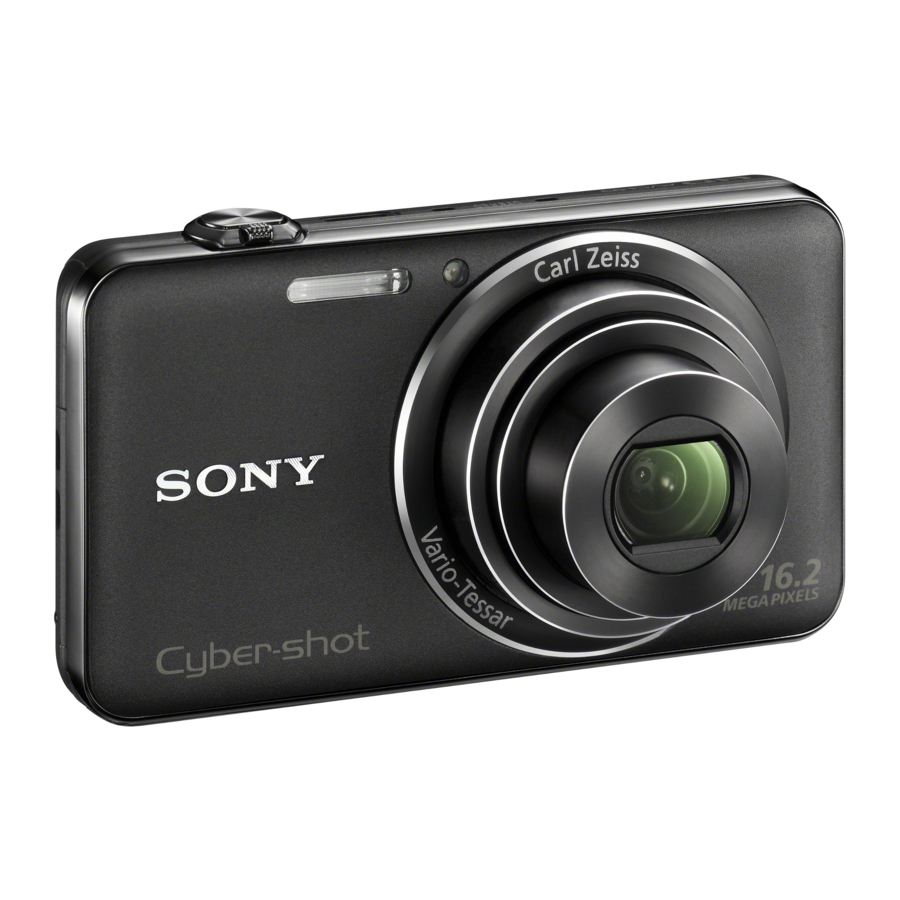
Sony Cyber-shot DSC-WX50 - Camera Manual
- Instruction manual (563 pages) ,
- User manual (256 pages) ,
- Service manual (29 pages)
Advertisement
- 1 Checking the supplied items
- 2 Identifying parts
- 3 Inserting the battery pack
- 4 Charging the battery pack
- 5 Inserting a memory card (sold separately)
- 6 Setting the clock
- 7 Shooting still images/movies
- 8 Viewing images
- 9 In-Camera Guide
- 10 Introduction of other functions
- 11 Install PC application (Windows)
- 12 Number of still images and recordable time of movies
- 13 Notes on using the camera
- 14 Specifications
- 15 IMPORTANT SAFETY INSTRUCTIONS
- 16 Documents / Resources
Checking the supplied items
The number in parentheses indicates the number of pieces.
- Camera (1)
- Rechargeable battery pack NP-BN (1)
(This rechargeable battery pack cannot be used with Cyber-shot that are supplied with the NP-BN1 battery pack.) - Micro USB cable (1)
- AC Adaptor AC-UB10/UB10B (1)
- Power cord (mains lead) (not supplied in the USA and Canada) (1)
- Wrist strap (1)
- Instruction Manual (this manual) (1)
Owner's Record
The model and serial numbers are located on the bottom. Record the serial number in the space provided below. Refer to these numbers whenever you call your Sony dealer regarding this product.
Model No. DSC-WX50
Serial No.
Model No. AC-UB10/UB10B
Serial No.
Identifying parts

- Shutter button
- For shooting: W/T (Zoom) lever
For viewing:![]() (Playback zoom) lever/
(Playback zoom) lever/![]() (Index) lever
(Index) lever - Flash
- Self-timer lamp/Smile Shutter lamp/AF illuminator
- ON/OFF (Power) button
- Power/Charge lamp
- Microphone
- Lens
 (Playback zoom) lever/
 (Index) lever
- LCD screen
- Mode switch
![]() (Still Image)/
(Still Image)/ ![]() (Sweep Panorama)/
(Sweep Panorama)/ ![]() (Movie)
(Movie) - MOVIE (Movie) button
- HDMI mini jack
- Hook for wrist strap
- Control wheel
![]() (Playback) button
(Playback) button![]() (In-Camera Guide/Delete) button
(In-Camera Guide/Delete) button- MENU button
![]() (TransferJet™) mark
(TransferJet™) mark- Battery insertion slot
- Tripod receptacle
- Use a tripod with a screw less than 5.5 mm (7/32 inches) long. Otherwise, you cannot firmly secure the camera, and damage to the camera may occur.
- Speaker
- Battery eject lever
- Access lamp
- Memory card slot
- Micro USB connector
- Battery/memory card cover
 (Still Image)/
  (Sweep Panorama)/
  (Movie)
 (Playback) button
 (In-Camera Guide/Delete) button
 (TransferJet™) mark
Inserting the battery pack

- Open the cover.
- Insert the battery pack.
- While pressing the battery eject lever, insert the battery pack as illustrated. Make sure that the battery eject lever locks after insertion.
- Closing the cover with the battery inserted incorrectly may damage the camera.
Charging the battery pack

- Connect the camera to the AC Adaptor (supplied), using the micro USB cable (supplied).
- Connect the AC Adaptor to the wall outlet (wall socket).
The Power/Charge lamp lights orange, and charging starts.- Turn off the camera while charging the battery.
- You can charge the battery pack even when it is partially charged.
- When the Power/Charge lamp flashes and charging is not finished, remove and re-insert the battery pack.
Notes
- If the Power/Charge lamp on the camera flashes when the AC Adaptor is connected to the wall outlet (wall socket), this indicates that charging is temporarily stopped because the temperature is outside the recommended range. When the temperature gets back within the appropriate range, the charging resumes. We recommend charging the battery pack in an ambient temperature of between 10°C to 30°C (50ºF to 86ºF).
- The battery pack may not be effectively charged if the terminal section of the battery is dirty. In this case, wipe any dust off lightly using a soft cloth or a cotton GB swab to clean the terminal section of the battery.
- Connect the AC Adaptor (supplied) to the nearest wall outlet (wall socket). If malfunctions occur while using the AC Adaptor, disconnect the plug from the wall outlet (wall socket) immediately to disconnect from the power source.
- When charging is finished, disconnect the AC Adaptor from the wall outlet (wall socket).
- Be sure to use only genuine Sony brand battery packs, micro USB cable (supplied) and AC Adaptor (supplied).
- BC-TRN2 battery charger (sold separately) is able to quick-charge the NP-BN rechargeable battery pack supplied with this model. BC-TRN battery charger (sold separately) is not able to quick-charge the NP-BN rechargeable battery pack supplied with this model.
Charging time (Full charge)
The charging time is approximately 115 min. using the AC Adaptor (supplied).
Note
- The above charging time applies when charging a fully depleted battery pack at a temperature of 25°C (77°F). Charging may take longer depending on conditions of use and circumstances.
Charging by connecting to a computer
The battery pack can be charged by connecting the camera to a computer using a micro USB cable.

Note
- Note the following points when charging via a computer:
- If the camera is connected to a laptop computer that is not connected to a power source, the laptop battery level decreases. Do not charge for an extended period of time.
- Do not turn on/off or restart the computer, or wake the computer to resume from sleep mode when a USB connection has been established between the computer and the camera. The camera may cause a malfunction. Before turning on/off, or restarting the computer or waking the computer from sleep mode, disconnect the camera and the computer.
- No guarantees are made for charging using a custom-built computer or a modified computer.
Battery life and number of images that can be recorded and played back
| Battery life | Number of images | |
| Shooting (still images) | Approx. 120 min. | Approx. 240 images |
| Viewing (still images) | Approx. 180 min. | Approx. 3600 images |
| Shooting (movies) | Approx. 60 min. | — |
Notes
- The above number of images applies when the battery pack is fully charged. The number of images may decrease depending on the conditions of use.
- The number of images that can be recorded is for shooting under the following conditions:
- Using Sony "Memory Stick PRO Duo" (Mark2) media (sold separately)
- The battery pack is used at an ambient temperature of 25°C (77°F).
- The number for "Shooting (still images)" is based on the CIPA standard, and is for shooting under the following conditions: (CIPA: Camera & Imaging Products Association)
- DISP (Display Setting) is set to [ON].
- Shooting once every 30 seconds.
- The zoom is switched alternately between the W and T ends.
- The flash strobes once every two times.
- The power turns on and off once every ten times.
- The battery life for movies applies shooting under the following conditions:
- Movie quality: AVC HD HQ
- When continuous shooting ends because of set limits, press the MOVIE (Movie) button again and continue shooting. Shooting functions such as the zoom do not operate.
Supplying power
The camera can be supplied with power from the wall outlet (wall socket) by connecting to the AC Adaptor, using the micro USB cable (supplied). You can import images to a computer without worrying about draining the battery pack by connecting the camera to a computer using the micro USB cable.
In addition, you can use the AC Adaptor AC-UD10 (sold separately) for shooting to supply power when shooting.
Notes
- Power cannot be supplied when the battery pack is not inserted in the camera.
- When the camera is connected directly to a computer or to a power outlet using the supplied AC Adaptor AC-UB10/UB10B, power supply is available only in playback mode. If the camera is in shooting mode or while you are changing the settings of the camera, power is not supplied even if you make a USB connection using the micro USB cable.
- If you connect the camera and a computer using the micro USB cable while the camera is in playback mode, the display on the camera will change from the playback screen to the USB connection screen. Press
![]() (Playback) button to switch to the playback screen.
(Playback) button to switch to the playback screen.
Inserting a memory card (sold separately)
")
- Open the cover.
- Insert the memory card (sold separately).
- With the notched corner facing as illustrated, insert the memory card until it clicks into place.
- Close the cover.
Memory cards that can be used
| Memory card | For still images | For movies | |
| A | Memory Stick PRO Duo |  | (Mark2 only) |
| Memory Stick PRO-HG Duo | | | |
| Memory Stick Duo | | — | |
| B | SD memory card | | (Class 4 or faster) |
| SDHC memory card | | (Class 4 or faster) | |
| SDXC memory card | | (Class 4 or faster) |
- In this manual, products in A are collectively referred to as "Memory Stick Duo" media, and products in B are collectively referred to as SD card.
To remove the memory card/battery pack
Memory card: Push the memory card in once to eject the memory card.
Battery pack: Slide the battery eject lever. Be sure not to drop the battery pack.
Note
- Never remove the memory card/battery pack when the access lamp is lit. This may cause damage to data in the memory card/internal memory.
Setting the clock

- Press the ON/OFF (Power) button.
Date & Time setting is displayed when you turn on the camera for the first time.- It may take time for the power to turn on and allow operation.
- Select a desired language.
- Select a desired geographic location by following the on-screen instructions, then press
![]() .
. - Set [Date & Time Format], [Daylight Savings] or [Summer Time] and [Date & Time], then select [OK]
![]() [OK].
[OK]. - Midnight is indicated as 12:00 AM, and noon as 12:00 PM.
- Select the desired display color, following the instructions on the screen.
- When an [In-Camera Guide] introductory message is appeared on the screen, select [OK].
 .
. [OK].
[OK]. Shooting still images/movies

Shooting still images
- Press the shutter button halfway down to focus.
When the image is in focus, a beep sounds and the![]() indicator lights.
indicator lights. - Press the shutter button fully down to shoot an image.
Shooting movies
- Press the MOVIE (Movie) button to start recording.
- Use the W/T (zoom) lever to change the zoom scale.
- Press the shutter button to shoot still images while continuing to record the movie. 2 Press the MOVIE button again to stop recording.
Note
- The sound of the lens and lever operating will be recorded when the zoom function operates while shooting a movie. The sound of the MOVIE button operating may also be recorded when movie recording is finished.
- Continuous shooting is possible for approximately 29 minutes at one time at the camera's default settings and when the temperature is approximately 25°C (77°F). When movie recording is finished, you can restart recording by pressing the MOVIE button again. Recording may stop to protect the camera depending on the ambient temperature.
Viewing images

- Press the
![]() (Playback) button.
(Playback) button. - When images on a memory card recorded with other cameras are played back on this camera, the registration screen for the data file appears.
Selecting next/previous image
Select an image by pressing  (next)/
  (previous) on the control wheel or by turning the control wheel. Press
  in the center of the control wheel to view movies.
Deleting an image
- Press
![]() (Delete) button.
(Delete) button. - Select [This Image] with
![]() on the control wheel, then press
on the control wheel, then press ![]() .
.
 on the control wheel, then press
 Returning to shooting images
Press the shutter button halfway down.
In-Camera Guide
This camera is equipped with a built-in instruction guide. This allows you to search the camera's functions according to your needs.
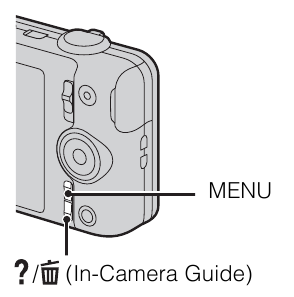
- Press the MENU button.
- Select the desired MENU item, then press the
![]() (InCamera Guide) button.
(InCamera Guide) button.
The operation guide for the selected item is displayed.- If you press the
![]() (In-Camera Guide) button when the MENU screen is not displayed, you can search the guide using keywords or icons.
(In-Camera Guide) button when the MENU screen is not displayed, you can search the guide using keywords or icons.
- If you press the
Introduction of other functions
Other functions used when shooting or playing back can be operated using the control wheel or MENU button on the camera. This camera is equipped with a Function Guide that allows you to easily select from the functions. While displaying the guide, you can use various functions.

Control wheel
DISP (Display Setting): Allows you to change the screen display.
 (Self-Timer): Allows you to use the self-timer.
 (Cont. Shooting Settings): Allows you to use the burst shooting mode.
 (Flash): Allows you to select a flash mode for still images.
Center button (Tracking focus): The camera tracks the subject and adjusts focus automatically even when the subject is moving.
Menu Items
Shooting
| REC Mode | Select still image recording mode. |
| Movie shooting scene | Select movie recording mode. |
| Panorama Shooting Scene | Select recording mode when shooting panoramic images. |
| Picture Effect | Shoot a still image with an original texture according to the desired effect. |
| Scene Selection | Select pre-set settings to match various scene conditions. |
| Easy Mode | Shoot still images using minimal functions. |
| Defocus Effect | Set the level of background defocus effect when shooting in Background Defocus mode. |
| Still Image Size(Dual Rec) | Set the still image size shot while recording a movie. |
| Still Image Size/ Panorama Image Size/Movie Size/ Movie Quality | Select the image size and the quality for still images, panoramic images or movie files. |
| HDR Painting effect | When [HDR Painting] is selected in Picture Effect, sets the effect level. |
| Area of emphasis | When [Miniature] is selected in Picture Effect, sets the part to focus on. |
| Color hue | When [Toy camera] is selected in Picture Effect, sets the color hue. |
| Extracted Color | When [Partial Color] is selected in Picture Effect, selects the color to extract. |
| Watercolor Effect | When [Watercolor] is selected in Picture Effect, sets the effect level. |
| Illustration Effect | When [Illustration] is selected in Picture Effect, sets the effect level. |
| EV | Adjust the exposure manually. |
| ISO | Adjust the luminous sensitivity. |
| White Balance | Adjust color tones of an image. |
| Underwater White Balance | Adjust color tones when shooting underwater. |
| Focus | Select the focus method. |
| Metering Mode | Select the metering mode that sets which part of the subject to measure to determine the exposure. |
| Cont. Shooting Interval | Select the number of images taken per second for Burst shooting. |
| Scene Recognition | Set to automatically detect shooting conditions. |
| Soft Skin Effect | Set the Soft Skin Effect and the effect level. |
| Smile Shutter | Set to automatically release the shutter when a smile is detected. |
| Smile Detection Sensitivity | Set the Smile Shutter function sensitivity for detecting smiles. |
| Face Detection | Select to detect faces and adjust various settings automatically. |
| Anti Blink | Set to automatically shoot two images and select image in which the eyes are not blinking. |
| Movie SteadyShot | Set the strength of SteadyShot in movie mode. |
| In-Camera Guide | Search the camera's functions according to your needs. |
Viewing
| Easy Mode | Increase the text size on the screen for ease of use. |
| Slideshow | Select a method of continuous playback. |
| Send by TransferJet | Transfer data by closely aligning two products equipped with TransferJet. |
| Delete | Delete an image. |
| Retouch | Retouch an image using various effects. |
| Picture Effect | Add various texture on images. |
| 3D Viewing | Set to play back images shot in 3D mode on a 3D TV. |
| View Mode | Select the display format for images. |
| Display Cont. Shooting Group | Select to display burst images in groups or display all images during playback. |
| Protect | Protect the images. |
| Print (DPOF) | Add a print order mark to a still image. |
| Rotate | Rotate a still image to the left. |
| In-Camera Guide | Search the camera's functions according to your needs. |
![]() Setting items
Setting items
If you press the MENU button while shooting or during playback,
![]() (Settings) is provided as a final selection. You can change the default settings on the
(Settings) is provided as a final selection. You can change the default settings on the ![]() (Settings) screen.
(Settings) screen.
 Shooting Settings | Movie format/AF Illuminator/Grid Line/Clear Image Zoom/Digital Zoom/Wind Noise Reduct./Red Eye Reduction/Blink Alert/Write Date |
 Main Settings | Beep/Panel Brightness/Language Setting/Display color/ Demo Mode/Initialize/Function Guide/CTRL FOR HDMI/Eco Mode/USB Connect Setting/USB Power Supply/LUN Setting/Download Music/Empty Music/ TransferJet/Eye-Fi/Drop Sensor/Version |
 Memory Card Tool* | Format/Create REC.Folder/Change REC.Folder/Delete REC.Folder/Copy/File Number |
 Clock Settings | Area Setting/Date & Time Setting |
* If a memory card is not inserted, ![]() (Internal Memory Tool) will be displayed and only [Format] can be selected.
(Internal Memory Tool) will be displayed and only [Format] can be selected.
Install PC application (Windows)
"PlayMemories Home" allows you to import images shot with the camera to a computer for display.
- Connect the camera to a computer.
- Windows 7: [Computer]
![]() Double-click camera icon
Double-click camera icon ![]() [PMHOME.EXE]
[PMHOME.EXE]
Windows XP/Vista: [Computer] (in Windows XP, [My Computer])![]() [PMHOME]
[PMHOME] ![]() Double-click [PMHOME.EXE]
Double-click [PMHOME.EXE] - Follow the instructions on the screen to complete the installation.
Note
- "PlayMemories Home" is not compatible to Mac OS. If you play back images on a Mac, use the applications that are installed on your Mac. For details, see http://www.sony.co.jp/imsoft/Mac/
Features of "PlayMemories Home"
Below are examples of the functions available when you use "PlayMemories Home". To take advantage of the various "PlayMemories Home" functions, connect to the Internet and install the "Expanded Feature".
- You can import images shot with the camera to a computer and display them.
- You can display images stored on a computer by shooting date in a calendar display.
- You can correct (Red Eye Correction, etc.) still images, print the images, send images by e-mail, and change the shooting date and time.
- You can save and print images with the date.
- You can create a disc from AVCHD movies imported to a computer.
(Expanded Feature)
Number of still images and recordable time of movies
The number of still images and recordable time may vary depending on the shooting conditions and the memory card.
Still images
(Units: Images)
| Size/Capacity | Internal memory | Memory card |
| Approx. 19 MB | 2 GB | |
| 16M | 3 | 320 |
| VGA | 65 | 6400 |
| 16:9(12M) | 3 | 330 |
Movies
The table below shows the approximate maximum recording times. These are the total times for all movie files. Continuous shooting is possible for approximately 29 minutes. The maximum size of an MP4-format movie file is up to approximately 2 GB.
(h (hour), m (minute))
| Size \ Capacity | Internal memory | Memory card |
| Approx. 19 MB | 2 GB | |
| AVC HD 24M (FX) | — | 10 m (10 m) |
| AVC HD 9M (HQ) | — | 25 m (15 m) |
| MP4 12M | — | 15 m |
| MP4 3M | — | 1 h 10 m |
The number in ( ) is the minimum recordable time.
- The recordable time of movies varies because the camera is equipped with VBR (Variable Bit Rate), which automatically adjusts image quality depending on the shooting scene. When you record a fast-moving subject, the image is clearer but the recordable time is shorter because more memory is required for recording. The recordable time also varies depending on the shooting conditions, the subject or the image quality/size settings.
Notes on using the camera
Functions built into this camera
- This manual describes each of the functions of TransferJet compatible/incompatible devices, 1080 60i-compatible devices and 1080 50i-compatible devices.
To check if your camera supports the TransferJet function, and whether it is a 1080 60i-compatible device or 1080 50i-compatible device, check for the following marks on the bottom of the camera.
TransferJet-compatible device:![]() (TransferJet)
(TransferJet)
1080 60i-compatible device: 60i
1080 50i-compatible device: 50i - Do not watch 3D images shot with this camera for extended periods of time on 3D-compatible monitors.
- When you view 3D images shot with this camera on a 3D-compatible monitors, you may experience discomfort in the form of eye strain, fatigue, or nausea. To prevent these symptoms, we recommend that you take regular breaks. However, you need to determine for yourself the length and frequency of breaks you require, as they vary according to the individual. If you experience any type of discomfort, stop viewing the 3D images until you feel better, and consult a physician as necessary. Also refer to the operating instructions supplied with the device or software you have connected or are using with this camera. Note that a child's eyesight is still at the development stage (particularly children below the age of 6). Consult a pediatrician or ophthalmologist before letting your child view 3D images, and make sure he/she observes the above precautions when viewing such images.
On use and care
Avoid rough handling, disassembling, modifying, physical shock, or impact such as hammering, dropping, or stepping on the product. Be particularly careful of the lens.
Notes on recording/playback
- Before you start recording, make a trial recording to make sure that the camera is working correctly.
- The camera is neither dust-proof, nor splash-proof, nor water-proof.
- Avoid exposing the camera to water. If water enters inside the camera, a malfunction may occur. In some cases, the camera cannot be repaired.
- Do not aim the camera at the sun or other bright light. It may cause the malfunction of the camera.
- If moisture condensation occurs, remove it before using the camera.
- Do not shake or strike the camera. It may cause a malfunction and you may not be able to record images. Furthermore, the recording media may become unusable or image data may be damaged.
Do not use/store the camera in the following places
- In an extremely hot, cold or humid place
In places such as in a car parked in the sun, the camera body may become deformed and this may cause a malfunction. - Under direct sunlight or near a heater
The camera body may become discolored or deformed, and this may cause a malfunction. - In a location subject to rocking vibration
- Near a location that generates strong radio waves, emits radiation or is strongly GB magnetic place. Otherwise, the camera may not properly record or play back images.
- In sandy or dusty places
Be careful not to let sand or dust get into the camera. This may cause the camera to malfunction, and in some cases this malfunction cannot be repaired.
On carrying
Do not sit down in a chair or other place with the camera in the back pocket of your trousers or skirt, as this may cause malfunction or damage the camera.
Carl Zeiss lens
The camera is equipped with a Carl Zeiss lens which is capable of reproducing sharp images with excellent contrast. The lens for the camera has been produced under a quality assurance system certified by Carl Zeiss in accordance with the quality standards of Carl Zeiss in Germany.
Notes on the screen and lens
The screen is manufactured using extremely high-precision technology so over 99.99% of the pixels are operational for effective use. However, some tiny black and/or bright dots (white, red, blue or green) may appear on the screen. These dots are a normal result of the manufacturing process, and do not affect the recording.
On camera's temperature
Your camera and battery may get hot due to continuous use, but it is not a malfunction.
On the overheat protection
Depending on the camera and battery temperature, you may be unable to record movies or the power may turn off automatically to protect the camera.
A message will be displayed on the screen before the power turns off or you can no longer record movies. In this case, leave the power off and wait until the camera and battery temperature goes down. If you turn on the power without letting the camera and battery cool enough, the power may turn off again or you may be unable to record movies.
On charging the battery
If you charge a battery that has not been used for a long time, you may be unable to charge it to the proper capacity.
This is due to the battery characteristics, and is not a malfunction. Charge the battery again.
Warning on copyright
Television programs, films, videotapes, and other materials may be copyrighted. Unauthorized recording of such materials may be contrary to the provisions of the copyright laws.
No compensation for damaged content or recording failure
Sony cannot compensate for failure to record or loss or damage of recorded content due to a malfunction of the camera or recording media, etc.
Cleaning the camera surface
Clean the camera surface with a soft cloth slightly moistened with water, then wipe the surface with a dry cloth. To prevent damage to the finish or casing:
- Do not expose the camera to chemical products such as thinner, benzine, alcohol, disposable cloths, insect repellent, sunscreen or insecticide.
Specifications
Camera
[System]
Image device: 7.77 mm (1/2.3 type)
Exmor R CMOS sensor
Total pixel number of camera:
Approx. 16.8 Megapixels
Effective pixel number of camera:
Approx. 16.2 Megapixels
Lens: Carl Zeiss Vario-Tessar 5× zoom lens f = 4.5 mm – 22.5 mm (25 mm – 125 mm (35 mm film equivalent))
F2.6 (W) – F6.3 (T) While shooting movies (16:9):
29 mm – 145 mm*
While shooting movies (4:3):
35 mm – 175 mm*
* When [Movie SteadyShot] is set to [Standard]
SteadyShot: Optical
Exposure control: Automatic exposure,
Scene Selection (15 modes)
White balance: Automatic, Daylight,
Cloudy, Fluorescent 1/2/3,
Incandescent, Flash, One Push
Underwater White balance: Automatic, Underwater 1/2, One Push Signal format: For 1080 50i: PAL color, CCIR standards HDTV 1080/50i specification For 1080 60i: NTSC color, EIA standards HDTV 1080/60i specification
File format:
Still images: JPEG (DCF Ver. 2.0, Exif Ver. 2.3, MPF Baseline) compliant, DPOF compatible 3D still images: MPO (MPF Extended (Disparity Image)) compliant
Movies (AVCHD format): AVCHD format Ver. 2.0 compatible
Video: MPEG-4 AVC/H.264
Audio: Dolby Digital 2ch, equipped with Dolby Digital Stereo Creator
Movies (MP4 format):
Video: MPEG-4 AVC/H.264
Audio: MPEG-4 AAC-LC 2ch
Recording media: Internal Memory
(Approx. 19 MB), "Memory Stick
Duo" media, SD cards
Flash: Flash range (ISO sensitivity (Recommended Exposure Index) set to Auto):
Approx. 0.2 m to 5.3 m
(7 7/8 inches to 17 feet
4 3/4 inches) (W)
Approx. 1.0 m to 2.2 m
(3 feet 3 3/8 inches to 7 feet
2 5/8 inches) (T)
[Input and Output connectors]
HDMI connector: HDMI mini jack Micro USB connector:
USB communication
USB communication: Hi-Speed USB
(USB 2.0)
[Screen]
LCD screen:
6.75 cm (2.7 type) TFT drive Total number of dots:
460 800 (960 × 480) dots
[Power, general]
Power: Rechargeable battery pack
NP-BN, 3.6 V
AC Adaptor AC-UB10/UB10B, 5 V
Power consumption (during shooting): 1.0 W
Operating temperature: 0°C to 40°C (32°F to 104°F)
Storage temperature: –20°C to +60°C
(–4°F to +140°F) Dimensions (CIPA compliant):
92.2 mm × 52.0 mm × 19.1 mm
(3 3/4 inches × 2 1/8 inches × 25/32 inches) (W/H/D)
Mass (CIPA compliant) (including NPBN battery pack, "Memory Stick Duo" media):
Approx. 117 g (4.1 oz)
Microphone: Stereo
Speaker: Monaural
Exif Print: Compatible PRINT Image Matching III: Compatible
AC Adaptor AC-UB10/UB10B
Power requirements: AC 100 V to 240 V, 50 Hz/60 Hz, 70 mA
Output voltage: DC 5 V, 0.5 A
Operating temperature: 0°C to 40°C (32°F to 104°F)
Storage temperature: –20°C to +60°C (–4°F to +140°F)
Dimensions:
Approx. 50 mm × 22 mm × 54 mm
(2 inches × 7/8 inches × 2 1/4 inches) (W/H/D)
Mass:
For the USA and Canada: Approx. 48 g (1.7 oz)
For countries or regions other than the USA and Canada: Approx. 43 g (1.5 oz)
Rechargeable battery pack NP-BN
Used battery: Lithium-ion battery
Maximum voltage: DC 4.2 V
Nominal voltage: DC 3.6 V
Maximum charge voltage: DC 4.2 V
Maximum charge current: 0.9 A
Capacity:
typical: 2.3 Wh (630 mAh) minimum: 2.2 Wh (600 mAh)
Design and specifications are subject to change without notice.
IMPORTANT SAFETY INSTRUCTIONS

To reduce fire or shock hazard, do not expose the unit to rain or moisture.
-SAVE THESE INSTRUCTIONS

TO REDUCE THE RISK OF FIRE OR ELECTRIC SHOCK, CAREFULLY FOLLOW THESE INSTRUCTIONS
If the shape of the plug does not fit the power outlet, use an attachment plug adaptor of the proper configuration for the power outlet.

Battery pack
If the battery pack is mishandled, the battery pack can burst, cause a fire or even chemical burns. Observe the following cautions.
- Do not disassemble.
- Do not crush and do not expose the battery pack to any shock or force such as hammering, dropping or stepping on it.
- Do not short circuit and do not allow metal objects to come into contact with the battery terminals.
- Do not expose to high temperature above 60°C (140°F) such as in direct sunlight or in a car parked in the sun.
- Do not incinerate or dispose of in fire.
- Do not handle damaged or leaking lithium ion batteries.
- Be sure to charge the battery pack using a genuine Sony battery charger or a device that can charge the battery pack.
- Keep the battery pack out of the reach of small children.
- Keep the battery pack dry.
- Replace only with the same or equivalent type recommended by Sony.
- Dispose of used battery packs promptly as described in the instructions.
AC Adaptor
Connect the AC Adaptor to the nearest wall outlet (wall socket).
If some trouble occurs while using the AC Adaptor, immediately shut off the power by disconnecting the plug from the wall outlet (wall socket).
The power cord (mains lead), if supplied, is designed specifically for use with this camera only, and should not be used with other electrical equipment.
Documents / Resources
References
Download manual
Here you can download full pdf version of manual, it may contain additional safety instructions, warranty information, FCC rules, etc.
Advertisement


Need help?
Do you have a question about the Cyber-shot DSC-WX50 and is the answer not in the manual?
Questions and answers