Advertisement
INTRODUCTION
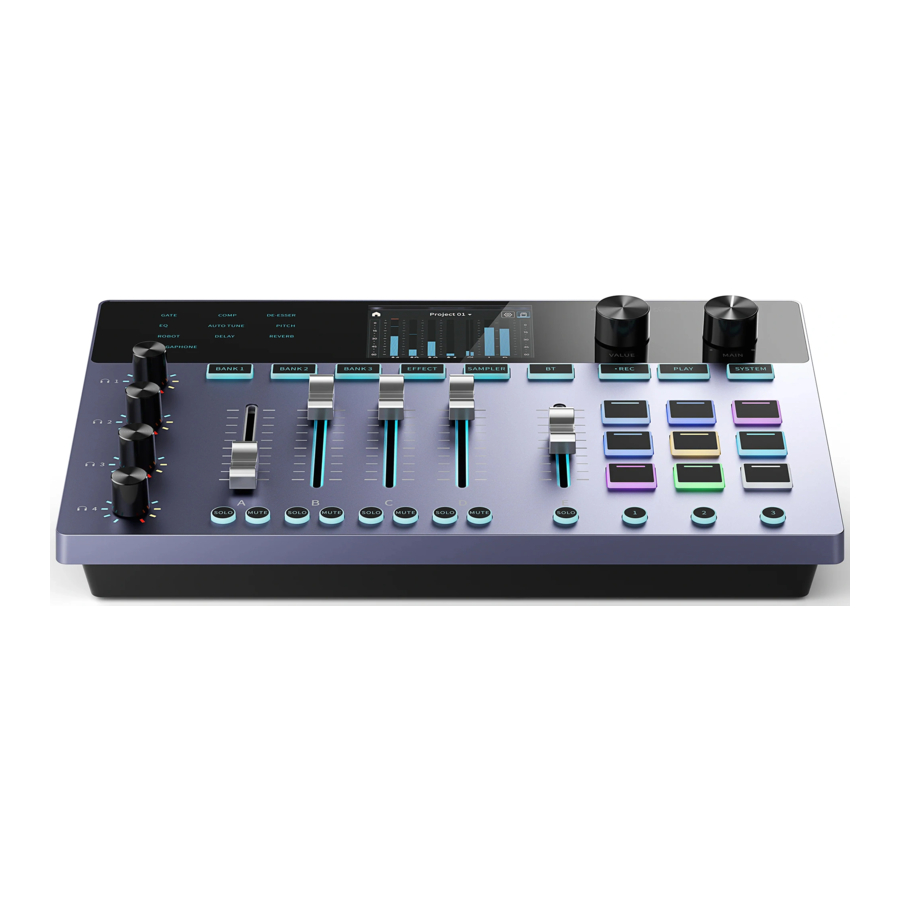
The PC-02 is an all-in-one podcast workstation designed for live streaming & content creators. With the innovative exclusive algorithm and 4 XLR Combo inputs, it supports up to four podcasters to record the program at the same time. Combined with the available motor faders and independently monitors for a better podcast experience. It also comes with 9 customized programmable pads for instant playback of sound effects and samples, which get more fun. Furthermore, a quick connection to the phone, USB, and Bluetooth sources is provided. Podcasts can be recorded directly to a micro SD card or a PC/MAC via USB. A more professional podcast workstation is assured and suited to create multiple application scenarios: Live streaming, band performances, talk shows, gaming, and music shows.
FEATURES

- Integrated all-in-one podcast solution.
- Come with motor faders that can record multiple groups of parameters, one step to switch.
- Dynamic microphone/instrument/audio Inputs come with XLR combo connectors and a built-in Preamp with 60dB gain.
- Condenser microphone/instrument/audio Inputs come with XLR combo connectors and a built-in Preamp with 50dB gain and phantom power (+48V).
- Stereo high-quality headphone outputs with four 6.35mm jacks and recommend 16-64Q headphones.
- Stereo balanced Main output can be connected to a professional monitor speaker.
- Industry leading Audio Interface solution: sampling rate 102dB,signal-to-noise ratio 101dB,providing first-class sound quality.
- Adopted Donner's exclusive algorithm and built-in 10 effect modules, parameters can be customized to meet your imagination of the sound.
- Equipped with four individual microphone/instrument inputs to meet the needs of professional singing, performance, and speech.
- Come with 27 (9 x 3 Groups) customized programmable pads, illuminated pads that can be triggered during a podcast production, and flexibly assigned new samples when you want to add content.
- Support the customized function, while can use the specified default effects or customize effects according to your need.
- Support multi-track recording (MicroSD card inserted) that allows meeting the needs of the interview, dubbing, band recording, and so on.
INCLUDED ITEMS
Donner PC-02 x 1
Power Adapter x 1
USB-C to USB-A Cable x 1
32GB MicroSD Card x 1
User Manual x 1
Quick Start Guide x 1
PRODUCT LAYOUT
FRONT PANEL

- MONITOR CONTROL KNOB 1-4
- Adjust the output levels of headphones.
- Press the knob to select the headphone channel and balance the volume of each channel.
- MOTOR FADER A-D
- Adjust the volume of each channel.
- The fader will display the volume of the main output in the mixer mode
- The fader will display the volume of the headphone sending volume of each channel in the monitor mode.
- SOLO/MUTE BUTTON
- Press to solo/mute the signal input on that channel.
- MOTOR FADER E AND SOLO BUTTON
- The E channel will display the volume of the sampler by default. Press it can mute all channels except the sampler.
- SAMPLE PAD
- Press to trigger the preset sound effects.
- Users can flexibly record new samples according to the requirements.
- SAMPLE GROUP SELECT
- Press to switch the sample group, a total of 27 pads.
- EFFECT INDICATOR
- Displays the effector type currently loaded in the main channel.
- DISPLAY SCREEN
- Display input level, main output level, and status parameter of each channel.
- MIXER BUTTON (BANK 1)
- Press to enter the primary channel setting of the mixer.
- MIXER BUTTON (BANK 2)
- Press to enter the secondary channel setting of the mixer.
- MIXER BUTTON (BANK 3)
- Press to enter the virtual channel setting of the mixer.
- EFFECT BUTTON
- Press to enter select effects. Use the Value knob to select or turn on/off the effect units. The effect name will be lighted if the effect is turned on.
- SAMPLER BUTTON
- Press to enter the sampler setting.
- BT BUTTON
- Press to turn on/off the BT.Pressand hold for pairing devices.
- Bluetooth name: Donner PC-02
- REC BUTTON
- Press to start recording. Once press it again to pause/start recording, press and hold to stop recording.
- PLAY BUTTON
- Press to play the recorded audio. Once press it again to pause/start playback, press and hold to stop playing audio.
- SYSTEM BUTTON
- Press to enter the system setting.
- MAIN KNOB
- Adjust the output levels of the main out
- VALUE KNOB
- Rotate for selecting the menu and adjusting the parameters.
- Press for confirming the selection.
REAR PANEL

- POWER SUPPLY AND POWER BUTTON
- Short press to power on. Long press to power off.
- Please always use the power button to power off, to avoid user data loss.
- MICROSD SLOT
- MicroSD slot for direct recording Maximum support 128GB.
- GAME OPTICAL PORT
- Optical port for connecting the PS4/Xbox devices.
- USB-C PORT
- Use this to connect the PC/MAC/lOS/Android devices.
- MAIN OUT FOR HEADPHONE
- Headphone volume output. The monitor knobs will control the output volume of these outputs.
- MAIN OUT FOR TRS BALANCED L/R
- Main volume output for connecting the monitor speakers or audio interface. The main knob will control the output volume of this output.
- LINE OUTLINE IN
- Mini-jack output and mini-jack input for inputting music from other devices or outputting the main signal to the streaming device without main volume knob control.
- Connect a media player or other audio device here.
- XLR/TS/TRS INPUT 3-4 JACKS
- Combo input interfaces, which are designed for connecting condenser mics, are compatible including XLR, TS, and TRS with input detection.
- XLR/TS/TRS INPUT 1-2 JACKS
- Combo input interfaces, which are designed for connecting dynamic mics, are compatible including XLR, TS, and TRS with input detection.
CONNECTION OPERATION AND SETUP
CONNECTION DIAGRAM

- Connect your dynamic microphone to the XLR Input 1 or 2 jacks on the back panel.
- Connect your condenser microphone to the XLR Input 3 or 4 jacks on the back panel.
- Connect your monitor headset to the 6.35mm port or connect your monitor speaker to the 6.35 balanced output.
- Connect your Windows/MAC/iOS/Android to the USB-C jack on the back using a USB C-USB A cable (supplied), USB C-USB C cable (not supplied), or lightning cable (not supplied).
- Press the BT button to turn on/off the BT function, then press and hold for pairing devices. Turn on the BT of your device and select "Donner PC-02" to connect.
- 1nsert the supplied MicroSD card into the SD card slot.
- Use the included AC adapter (12V/2A) to connect a power supply to the unit. Always connect the included AC adapter, which is specified for use with this unit. Use of a different adapter could cause malfunction, fire, or electric shock.
- Turn on the power and play it!
 Note: Specifications are subject to change without prior notice. The schematic diagrams are only for reference. Please see the real product for detailed information.
INPUT SETUP


- Press the
![]() to enter input settings and select the channel y ou want to use.
to enter input settings and select the channel y ou want to use. - Please adjust knobs and faders (OdB)on this unit to a minimum before connecting audio equipment. Failure to do may cause sudden loud noises from monitoring equipment, and this could damage the equipment or harm hearing.
- Select your input to the microphone, instrument, or audio.
- After selecting the input, set your basic Gain according to the level display to make the level change range from -15 dB to -6dB.
- Set your PAN value to distribute the input signal throughout the left and right channels of a stereo field.
- 1fyou want to use the USB channel to input audio, you can turn the LOOPBACKon/off to determine whether the sound is loopback.
 to enter input settings and select the channel y ou want to use.
SYSTEM SETUP

- Press the SYSTEM button to enter the system setting.
- You can adjust the display's brightness and color, manage the BT and TF card, reset the system, and other operations.
- Rotate the Value knob to adjust the settings you want and press the Value knob to confirm.
All the modified parameters will be saved after the next manual power-off operation. Please press the power button to power off the unit to avoid data loss caused by power failure.
START YOUR LIVESTREAM
MULTIFUNCTION MIXER

During live broadcasting, you need to balance the input audio signals of various voices, instruments, or different software to make you and your audience hear the most appropriate sound, therefore, the mixer must be able to control up to 10 input channels with attenuation ratio.
Featuring multi-channel smart motor faders, the PC-02 lets you efficiently and accurately manage the Main output (including monitor headphone/Line OUT/USB) and 4 Main outs for headphones, a total of 5 groups of balanced outputs. In other words, each set of outputs contains 12 input channels (4 primary channels +3 secondary channels +4 virtual channels +sampler), which means a total of 60 faders positions can be recorded. One step can quickly switch all channels according to your demand, allowing you and your partner, as well as the audience, to hear their own wonderful sound.
- Press the BANK 1 button to enter the primary channel setting of the mixer, now you can use Fader A-D to adjust the input of the primary channel of Input 1-4.
- Press the BANK 2 button to enter the secondary channel setting of the mixer, now you can use Fader A-C to adjust the input of the secondary channel of Line, Bluetooth, and optical.
- Press the BANK 3 button to enter the virtual channel setting of the mixer, now you can use Fader A-D to adjust the four virtual channels of System/Game/Music/Chat from USB Input.
- Fader (E) of the Sample is an individual and not affected by the channel group.
- Press one of the monitor control knobs 1-4 can switch between the Monitor Mixer and the Main Out Mixer. And all the input faders will also switch to the current state and be automatically saved after adjustment.
- When the volume indicator of the monitor control knob and the backlight are of the same, it indicates that is monitoring for Monitor OUT; When the volume indicator of the monitor control knob and the backlight are in white, it indicates that is monitoring for Main OUT, turning this knob will only affect the volume of the headphone, not Main OUT.
- Press the SOLO button and MUTE button to solo/mute the signal input on that channel.
- AII of the operations mentioned above are also available in the "Donner Control" (for PC/MAC)
- Tip: All faders control the Input, and all volume knobs control the Output.
After all preparations are completed, please open the live streaming app, and slowly turn up the Main output knob to enjoy the Livestream!
USING EFFECT AND SAMPLER
EFFECT SETTING
Donner's Multi-effector allows you to process the primary channel (INPUT 1-4), which supports up to 10 effects, like noise gate, compress, de-esser, EQ, auto-tune, pitch, megaphone, robot talk, decay, and reverb, greatly optimizing your voice or instrument effects and getting great performance.

- Press the EFFECT button to enter the effect setting.
- Effect Modules are divided into 3 categories
- Four independent groups of processors for eachchannel (Input 1-4): Each channel includes: Noise Gate/Compress/ De-esser/EQ.
- Reverb/DeIay is a global/common effect. Send uses for assigning proportions for global effect (Reverb/DeIay).
- Electron (FX)is only enabled in a single channel, which includes Auto Tune/Pitch/Megaphone/Robot Talk
- Rotate the Value knob to select the channel (IN1/2/3/4) you want to adjust, press it to confirm.
- Donner provides 10 tailored default presets that fit different microphones and voices. To access these, tap the drop-down menu to select. your own presets, please select USER 1-10 in the drop-down menu.
- Understanding the Processors
| Noise Gate | Use this to help reduce background noise in your recording. You can set a specified threshold value, which can eliminate noise beyond the threshold. |
| Compress | Use this to make your voice or other audio source sound balanced (built-in 5 presets). This is done by lowering the loudest peaks in the signal while raising quieter parts so that it is more balanced. |
| De-esser | Use this to reduce excess sibilance and make our vocals sound smoother and more pleasant. |
| EQ | Use this to adjust the volume level of a frequency (or range of frequencies) within a sound and fine-tune our sound. |
| Note: Based on the current preset parameters, you can monitor while fine-tuning specific parameters for each effect preset to get a satisfactory sound. | |
- After setting, the current parameters will be saved as your preset for the next use, and you can reset your setting by clicking "
![]() "
" - On the EFFECT home page, you can also directly set the global effects: Reverb and Delay. Each EFFECT has 5 built-in presets, which can be directly used or fine-tuned to the parameters you need.
- In the Send module, you can assign the output of Reverb and Delay in the four channels to suit different instruments and voice roles.
- In the ELECTRON module, there are 4 special effects for selection.
 "
"| Auto-Tune | Uses a proprietary device to measure and alter pitch in vocal and instrumental music recordings, allowing vocal tracks to be perfectly tuned. |
| Pitch | Change the pitch of a human voice to higher or lower. |
| Megaphone | Sound change effects that simulate megaphone distortion. |
| Robot Talk | Sound change effects that simulate robot talk. |
| Note: Based on the current preset parameters, you can monitor while fine-tuning specific parameters for each effect preset to get a satisfactory sound. | |
- If Quick Effect is enabled, you can turn on the effect anytime from the Sampler's Custom Pad.
- The effect name will be lighted (upper left corner of the unit) if the effect is turned on.
- All of the controls mentioned above are also available in the "Donner Control" (for PC/MAC).
All parameters set by the user will be saved after the next manual power-off operation. Please press the power button to manually power off the unit to avoid data loss caused by power failure.
SAMPLER OPERATION
With 27 sample pads (9x3groups) on the Donner's PC-02, you can play the preset sound and flexibly record new samples you like during a podcast. convenient for players to use and especially adds fun to the podcast.

- This machine has 9 preset sound effects that have been saved by default in Group 1. Press the corresponding PAD to use it directly.
- Select the sample group you need by pressing the group 1/2/3 selection button, and slowly push up/down the fader of the E channel to adjust the level.
- The sample pads can be played at the same time or paused manually. The sample pads can also be used as shortcuts to access parameters in the sound effect, such as effect switch, mute, vocal remover, etc.
SAMPLER SETTING
The sampler programmable function of Donner's PC-02 allows you to realize your creation during a broadcast by playing unique sound effects or other shortcut functions.


- Press the SAMPLER button to enter the sampler setting.
- Select and press one of the pads on the PC-02 that you want to edit.
- Rotate and press the Value knob to customize your favorite color, then record the sound you need. Or you can customize the pad as the switch of the effect.
- 0n the REC home page, any signal input at this time can be recorded into Sample, which can take up to 5 minutes.
- SampIe's trigger modes: once, loop, fade.
- Customize the Pad as a Quick Effect button, you can select one of the effects that you have set and enabled (Quick Effect) as the control button.
- Up to customize 4 Pads for quickly controlling AutoTune/Pitch/Megaphone/Robot Talk.
- Supports up to 27 programmable pads by pressing the group 1/2/3 selection button.
- All of the controls mentioned above are also available in the "Donner Control" (for PC/MAC).
All parameters set by the user will be saved after the next manual power-off operation. Please press the power button to manually power off the unit to avoid data loss caused by power failure.
RECORDING OPERATION

PC-02 can also record your personal singing, band performance, interview programs, and others as mixed audio files (WAVformat) to an SD card, convenient for editing and post-production.
- Press the REC button to start recording when the SD card is inserted. The REC button will light red when the recording starts.
- Once press the REC button again to pause the recording, the REC button will flash red, and press it again to continue the record. Press and hold the REC button to stop the recording.
- Then press the PLAY button to play the audio just recorded, the PLAY button will light green.
- Once press the PLAY button again to pause the audio, the PLAY button will flash green, and press it again to continue the playback. Press and hold the PLAY button to stop playback.
- All of the controls mentioned above are also available in the "Donner Control" (for PC/MAC).
SOFTWARE OVERVIEW
- The PC-02has a specified default driver, which allows you to use your common live streaming or music production software directly.
- If you are a Windows user and require more advanced functions such as virtual channels, please visit our official website https://www.donnermusic.com to download and install an audio driver for ensuring the best recording.
DONNER CONTROL APP
- Donner Control is a multi-purpose audio control software compatible with Windows and Mac operating systems, supporting the operation of all Donner digital mixers, effectors, and audio interfaces. By clicking the mouse, you can easily and intuitively adjust various effects parameters, assign samples and set personalized options on the computer to effectively improve your work efficiency. For more functions and detailed operations, please download Donner Control App for experience.
- If need to upgrade the firmware, please install the Donner Control on the computer to operate.
![]()

SPECIFICATIONS
| CONNECTIONS | |
| Input | XLR x 4, balanced / TS x 4, unbalanced |
| Line In | Stereo, 1/8" TRS |
| Line Out | Stereo, 1/8" TRS |
| Phones | Stereo, 4 x 1/4" TRS |
| Main Out | Stereo, 1/4" Balanced TRS |
| PC/MAC/Android/iOS Game Console | USB-C Optical |
| ELECTRICAL SPECIFICATION | |
| Gain Range | 0-60dB |
| Headphone Output Power | 125mW @ 320 |
| Frequency Response | 20Hz-20kHz @ -3dB |
| Input Impedance | 600 ohm (XLR)/IM (TS) |
| Dynamic Range | 102dB |
| S/'N Ratio | 101dB |
| Bit Depth | 24bit |
| Sample Rates | 48kHz |
| Power Input | 12V DC,2A |
| Faders | Motor Faders x 5 |
| LEDS | RGB x 244pcs |
TROUBLESHOOTING
| The power will not turn on | Confirm that the power plug and other connectors are inserted completely. |
| The SD card is not recognized |
|
| No sound is output |
|
| No mic signal output | Confirm the condenser microphone or dynamic microphone is plugged into the correct jacks. |
| The recording is not possible | Confirm that the SD card has enough open space. |
| Fader is not work |
|
| Heard a voice echo during the live broadcast | Disable the monitor function of the live broadcast. |
| The user heard his voice echo during the live broadcast | Disable the monitor function of the live broadcast software and ensure that the Chat output channel is selected. |
| There is noise |
|
| A computer/smartphone does not recognize the unit when connected by USB |
|
IMPORTANT SAFETY INSTRUCTIONS

TO REDUCE THE RISK OF FIRE OR ELECTRIC SHOCK, DO NOT EXPOSE THIS EQUIPMENT TO RAIN OR MOISTURE.
TO REDUCE THE RISK OF FIRE, ELECTRIC SHOCK AND ANNOYING INTERFERENCE,PLEASE USE ONLY THE RECOMMENDED ACCESSORIES FOR UNINTERRUPTED SERVICE OF THIS DEVICE!
*DESIGN AND SPECIFICATIONS MAY CHANGE WITHOUT NOTICE.

ELECTRIC SHOCK HAZARD DO NOT OPEN
EXPLANATION OF GRAPHICAL SYMBOLS
 The lightning flash with arrowhead symbol within an equilateral triangle is intended to alert the user to the presence Of uninsulated "dangerous voltage" within the product' s enclosure that may be Of sufficient magnitude to constitute a risk Of electric shock to persons.
 The exclamation point within an equilateral triangle is intended to alert the user to the presence of important operating and maintenance (servicing) instructions in the literature accompanying the product.
Do not disconnect the power adapter during use, which may cause user data loss and machine damage.
- Read these instructions. All the safety and operating instructions should be read before operating the product.
- Keep these instructions. These safety instructions and the product owner' s manual should be retained for future reference.
- Heed all warnings. All warnings on the product and in the user manual should be adhered to.
- FoIIow all Instructions. All operating and use instructions should be followed.
- Do not use the product near water.
- Cleaning Unplug the product from the computer and clean only with a dry cloth. Do not use liquid or aerosol cleaners
- Ventilation - Do not block any ventilation openings. Install in accordance with the manufacturer' s instructions.
- Heat Do not install the product near any heat sources such as radiators, heat registers, stoves, or another apparatus (including an amplifier) that produces heat.
- 0verIoading - Do not overload wall outlets and extension cords as this can result in a risk of fire or electrical shock.
- Disconnect The main plug is considered to be the disconnect device for the product and shall remain readily operable.
- Accessories - Only use attachments/accessories specified by the manufacturer.
- Placement Use only with the cart, stand, tripod, bracket or table specified by the manufacturer, or sold with the product. When a cart is used, use caution when moving the cart/apparatus combination to avoid injury from tip-over.
- Surge protection Unplug the product during lightning storms or when unused for long periods of time.
- Servicing Refer all servicing to qualified service personnel. Servicing is required when the product has been damaged in anyway, such as when a power-sup ply cord or plug is damaged, liquid has been spilled or objects have fallen into the product, the product has been exposed to rain or moisture, does not operate normally, or has been dropped.
- Power Sources- Refer to the manufacturer' s operating instructions for power requirements. Be advised that different operating voltages may require the use of a different line cord and/or attachment plug.
- Installation - Do not install the product in an unventilated rack, or directly above heat-producing equipment such as power amplifiers. Observe the maximum ambient operating temperature listed below.
- Power amplifiers - Never attach audio power amplifier outputs directly to any of the unit' s connectors.
- Replacement Parts - When replacement parts are required, be sure the service technician has used replacement parts specified by the manufacturer or have the same characteristics as the original part. Unauthorized substitutions may result in fire, electric shock, or other hazards.
- Safety Check - Upon completion of any service or repairs to this DONNER product, ask the service technician to perform safety checks to determine that the product is in safe operating conditions.
Donner is not responsible for damage caused by improper use or modifications to the device.
Email: service @donnermusic.com
Website: www.donnermusic.com
SERVICE LANGUAGE ENGLISH
UNITED KINGDOM Tel: 0044 2080 895 663
CANADA Tel: 001 613 4168166
AUSTRALIA Tel: 0061 384004871
Get in touch with our customer service at local time (hotline hours are listed on the Donner official website)
Documents / Resources
References
Download manual
Here you can download full pdf version of manual, it may contain additional safety instructions, warranty information, FCC rules, etc.
Advertisement


Need help?
Do you have a question about the PC-02 and is the answer not in the manual?
Questions and answers