Advertisement
FEATURES
- The 4-channel home cinema amplifier receiver system supports 4 groups of 8 speakers (110W x 4)
- USB/SD memory card readers, MP3 format play, and support Bluetooth wireless connection
- Supports FM stereo radio and 2 Microphone Input
- DVD/CD/AUX(L/R) Audio Input/LINE Out
- With Echo, bass, and treble control, adjust the sound effect as you like
- High-performance LED display showing all functions
- Remote control function for controlling conveniently
IMPORTANT NOTES
Do Not Tear Down
- This product does not contain user-serviceable parts. Do not attempt to disassemble or modify the internal parts in any way
Placement
- Do not place the product in an unstable position or a location with excessive vibration, where it might accidentally fall over and cause injury
- Do not use the product in a confined and poorly ventilated location
Installation
- Do not cover this product with any cloth
- Do not install this product on a carpet or rug
- Make sure the top surface faces up rather than installed on its sides or upside down
- Before moving the product, please remove all connected cables
Abnormality
If any of the following problems occur, immediately turn off the power of your amplifier and disconnect the electric plug from the outlet.
- Unusual smells or smoke is emitted
- There is a sudden loss of sound during the use of the product
- Cracks or other visible damage appear on the product
Handling and Maintenance
- Do not place vinyl, plastic, or rubber objects on the product, since this might cause alteration or discoloration of the panel
- When cleaning the product, use a dry and soft cloth. Do not use paint thinners, solvents, cleaning fluids, or chemically impregnated wiping cloths since this might cause alteration or discoloration
Notes: Donner cannot be held responsible for damage caused by improper use or modifications to the device.
PACKAGE INCLUDES
For US and Japan Standard:
Power Amplifier MAMP5 x1
FM antenna x1
Remote Control x1
User Manual x1
For UK and EU Standard:
Power Amplifier MAMP5 x1
FM antenna x1
UK Power Supply Cord x1
EU Power Supply Cord x1
Remote Control x1
User Manual x1
CONTROL AND FUNCTION
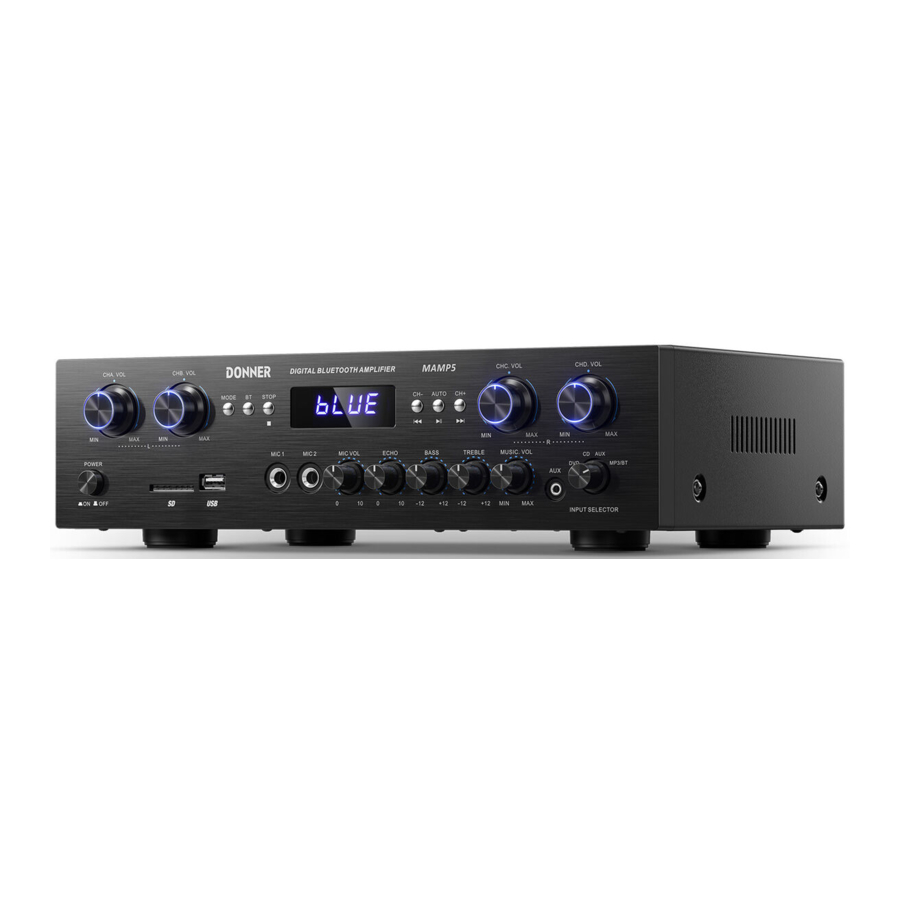
Front Panel

- Power Switch: Press this button to turn the power onloff
- USB/SD: Card input (The maximum storage size cannot exceed 32GB)
- MIC 1: Connect the microphone to this jack
- MIC 2: Connect the microphone to this jack
- MIC VOL Knob: Turn the knob to adjust microphone volume +/-
- ECHO Knob: Turn the knob to adjust the reverb of the microphone tone
- BASS Knob: Rotate the knob to adjust the bass output level of the main sound channel
- TREBLE Knob: Turn the knob to adjust the treble output level of the main sound channel
- MUSIC VOLUME Knob: Turn the knob to adjust the musical source volume +/-
- AUX Input Jack: Connect the AUX audio output jack to this jack
- INPUT SELECTOR: For selecting the input source: DVD / CD / AUX / MP3, Bluetooth
- VOL Knob for L CHANNEL A: Turn the knob to adjust the volume +/- of L channel A
- VOL Knob for L CHANNEL B: Turn the knob to adjust the volume +/- of L channel B
- MODE Button: Used to select the input source MP3 / Bluetooth/ FM
- BT Button: Press to select Bluetooth mode
- STOP Button: Press to stop playback in MP3 and Bluetooth mode
- LED Display: Display functional menu
- PREV Button: USB/SD input is used to select the last song while FM input is used to select the last station saved in the system
- PLAY/PAUSE Button: Play/Pause button for songs on USB/SD card and search station for FM input
- NEXT Button: USB/SD input is used to select the next song while FM input is used to select the next station saved in the system
- VOL Knob for R CHANNEL C: Tum the knob to adjust the volume +/- of R channel C
- VOL Knob for R CHANNEL D: Turn the knob to adjust the volume +/- of R channel D
Rear Panel

Note: This unit has two different types of voltage selectors. Make sure that the AC-power supply is connected to the correct voltage level according to the local market.

- AUDIO INPUT Jack for DVD: Connect the audio output jack of the DVD to this jack. To play a signal connected to this input make sure the DVD input is selected on the front panel.
- AUDIO INPUT Jack for CD: Connect the audio output jack of the CD to this jack. To play a signal connected to this input make sure the CD input is selected on the front panel.
- LINE AUDIO OUT Jack: Connect another amplifier input jack to the LINE OUT jack
- Tuner Antenna: Connect to FM antenna
- Channel D Speaker Output Terminals: Connect your speaker system to these terminals, be careful not to reverse the "+" and "-" before connecting
- Channel C Speaker Output Terminals: Connect your speaker system to these terminals, be careful not to reverse the "+" and "-" before connecting
- Channel B Speaker Output Terminals: Connect your speaker system to these terminals, be careful not to reverse the "+" and "-" before connecting
- Channel A Speaker Output Terminals: Connect your speaker system to these terminals, be careful not to reverse the "+" and "-" before connecting
- Voltage Selector: Used to set to your local main voltage. Push this button to switch the 115V or 230V according to the local supply voltage applied
- Power Cable: Connect to AC 115V/60Hz or 230V/50Hz
Remote Control

 Using the remote control
- The remote control function will work when the "Input Selector" is adjusted to BT/FM/USB/SD mode
![]()
- The remote control can be used within a range of about 6m from the remote sensor and within angles of up to about 30 degrees
![]()
- Make sure there are no other machines between the remote control and the receiver.
- Please note that the operating distance may vary depending on the brightness of the room
- The remote control can only control the functions in MP3/BT/FM mode. It can't control the external source input of the RCA jack/Treble and Bass adjustment/Microphone.


DISPLAY SCREEN


CONNECTION

- Make sure to unplug the power cord before making any connections.
- Turn the power off to all components before making connections.
- Unplug the power cord from the outlet if the unit will not be in use for a prolonged period of time.
Connecting the microphone
Do not use the microphone toward the speaker as it may cause feedback (howling)

Connecting the speaker
- To avoid damage to your amplifier/receiver, please make sure that power is switched off before making or changing any connections
- The quality of the cables and the connections influence sound reproduction. Choose a speaker cable (not supplied) that suits your equipment.
- Please use the same type of speaker and make sure that the speakers you are using have the same power and impedance.
- Always connect the (+) speaker cable to the amplifier's (+) terminal and the (-) speaker cable to the amplifier's (-) terminal. If the cables are reserved, the sound will be unnatural and lack bass.


Methods of speaker connection
- First, the copper wire of the speaker cable shall be reserved at least 6 mm long
![]()
- Then insert all the copper wires into the amplifier's terminal
![]()
![]()
Avoid short-circuiting the speakers! Make sure the bare wire of each speaker cord does not touch another speaker terminal or the bare wire of another speaker cable.


- Rotate and loosen the speaker knob.
![]()
- Insert the bare wire (Remove approx. 10 mm insulation from the speaker wires.)

- Then tighten the knob and secure the wire
or
![]()
- Banana Plug connections are also available. Simply insert the Banana Plug connector into the corresponding terminal


System setup suggestions
The sound effect of the system will be slightly affected by the listening environment. If you want to produce a good sound effect, you should consider properly your current location environment before the actual installation.
Connecting the audio input/output
Before connecting the sources, please turn off the power for all machines.

- Connect a CD/DVD to the AUDIO INPUT jacks by using an audio cable (not supplied). Be sure to match the audio cord to the appropriate jacks.
- Connect a pre-amplifier to the LINE OUTPUT jacks by using an audio cable (not supplied) . Be sure to match the audio cord to the appropriate jacks.
Connecting the FM Antenna
- Connect the supplied FM antenna for listening to the radio.

- Be sure to fully extend the FM wire antenna
- If you want to change the new antenna, the antenna port must be the same as this unit

Turning on the Device
 Before connecting the power cord make sure you set the Voltage Selector of this unit according to your local voltage. Improper setting of Voltage Selector may cause fire and damage to this unit.
- Connect the power cord to a wall outlet

- Press the [Power] button to turn it on.


BASIC OPERATION
Input Selector
Please rotate the Input Selector to the corresponding position before selecting an input mode (DVD / CD / AUX / MP3 / Bluetooth / FM)
- Rotate
![]() to is the "DVD" input mode of the RCA jack
to is the "DVD" input mode of the RCA jack - Rotate
![]() to is the "CD" input mode of the RCA jack.
to is the "CD" input mode of the RCA jack. - Rotate
![]() to is the "AUX" input mode.
to is the "AUX" input mode. - Rotate
![]() to is the BT/FM/USB/SD input mode
to is the BT/FM/USB/SD input mode
 to is the "DVD" input mode of the RCA jack
  to is the "CD" input mode of the RCA jack.
  to is the "AUX" input mode.
  to is the BT/FM/USB/SD input mode
 - "MP3/BT" input mode and then press the BT button on the front panel
- "MP3/BT" input mode and then press the MODE button on the front panel to switch to FM mode
- "MP3/BT" input mode and then press the MODE button on the front panel to switch to USB mode
Bluetooth Mode
- Rotate the Input Selector to the BT/FWUSB/SD input mode
![]()
- Press the BT button on the panel, or press
![]() of remote control to select BT mode.
of remote control to select BT mode.

- Set your Bluetooth device to search and connect to "DONNER MAMP5"
![]()
- Press the Play/Pause button or Prev/Next button to control


 of remote control to select BT mode.


FM Mode
- Rotate the Input Selector to the BT/FM/USB/SD input mode.
![]()
- Press the MODE button on the panel, or press
![]() of remote control to select FM mode.
of remote control to select FM mode.

- Press the Play/Pause button on the panel or the remote control to automatically search the channel

- Press the Prev/Next button to control the channel


 of remote control to select FM mode.


USB/SD Mode
- Rotate the Input Selector to the BT/FWUSB/SD input mode.
![]()
- Press the MODE button on the panel, or press
![]() of remote control to select USB/SD mode.
of remote control to select USB/SD mode.

- Insert the USB disk or SD card you are using (there must be songs in the USB or SD) and the amplifier will automatically play the songs
![]()
- Press the Play/Pause button or Prev/Next button to control


TROUBLESHOOTING
| Problem | Solution |
No power |
|
No sound |
|
No sound from the main speaker |
|
The sound quality is poor |
|
No sound from the microphone |
|
Severe hum or noise is heard |
|
SPECIFICATIONS
| Peak Power | 110W x 4 |
| RMS Output Power | 25W+25W+25W+25W |
| Output Port | 8 pair wire clips |
| Mode | Analog Class AB |
| Bluetooth | Version: 5.0 |
| Frequency: 2.4 GHz | |
| Supported formats: MP3, WMA, WAV, FLAC, APE | |
| FM Radio Station | Radio Station: 50 channels |
| Frequency: 76-108M Hz | |
| Maximum USB/SD Card Support Capacity | Up to 32GB |
| Mic Input | 2 Input |
| Sensitivity: 62mV | |
| Impedance 470Ω, Dynamic | |
| Frequency Response | 20Hz-20KHz (+/- 2dB) |
| Signal-to-noise Ratio | 83dB |
| T.H.D. | <1% |
| Aux in Sensitivity | 680mV |
| RCA Input Sensitivity | 680mV |
| LED Display | Digital Tube |
| Reverb levels adjustment | 7 times |
| Treble and Bass Control | 100Hz, ±11 dB 10KHz, ±11 dB |
| LINE Input Sensitivity | 400mV, microphone 6mV |
| Power Input | 115V/60Hz or 230V/50Hz, Switchable |
IMPORTANT SAFETY INSTRUCTIONS
- Read and heed these instructions.
- Do not use this product near water.
- Clean only with a dry cloth.
- Check the voltage of your local mains supply
- Do not block any ventilation openings. Install under the manufacturer's instructions.
- Do not install near any heat sources such as radiators, heat registers, stoves, or other apparatus (including amplifiers) that produce heat.
- Only use attached merits/accessories specified by the manufacturer.
- Unplug this product during lightning storms and long-time disuse.
- Refer all servicing to qualified service personnel

Use only with the cart, stand, tripod, bracket, or table specified by the manufacturer, or sold with the product. Use carefully to avoid injury from tip-over when moving the cart/apparatus..
Documents / ResourcesDownload manual
Here you can download full pdf version of manual, it may contain additional safety instructions, warranty information, FCC rules, etc.
Advertisement


Need help?
Do you have a question about the MAMP5 and is the answer not in the manual?
Questions and answers