Advertisement
OVERVIEW
Thank you for purchasing the DONNER Livejack Lite 2 In 2 Out Audio Interface, one of the Livejack Series of DONNER professional computer audio interfaces incorporating high quality DYNA microphone preamps. This is a simple and compact solution for routing high quality audio to and from your computer.
DONNER has designed the Livejack Lite utilizing high-grade components to ensure optimum performance that will last a lifetime. It provides the means for connecting a microphone and an instrument or line level audio signal to a computer running Mac OS or Windows. The signals at the physical inputs can be routed to your audio recording software/digital audio workstation. Loaded with high-headroom, Class A microphone preamplifier; high definition 24-bit, 192kHz AD-DA converters. You can also plug a guitar or bass straight into the dedicated instrument input. The balanced outputs mean when you connect them to monitors or an amplifier with balanced inputs, your audio will be protected from any humor interference. All you need is a computer with a USB-C or USB-A connection, a few microphones and cables, powered speakers, and your instruments.
The Livejack Lite are class compliant on macOS: this means they are plug-and- play, so no need to install a driver if you area Mac user. If you are WIN user, please enter the website: www.donnerdeal.com/pages/download to download the DONNER Livejack ASIO USB Audio Drive.
- 2 in 2 out USB-C audio interface with a high-headroom, ClassA DYNA microphone preamplifier, giving your vocal recordings a brighter and more open sound.
- Instrument/Line input switch for plug in most kind of instruments and play.
- Direct Monitoring feature lets you hear what you are playing in "real-time", without the effects of computer latency.
- Studio-grade converters for 24-bit/192 kHz recording and playback.
- Built in headphone amplifier for loud, detailed, low-noise monitoring.
- TRS balanced output for high quality audio output without humor interference.
- Uncompromising analog design, superior components, and premium build quality.
- No external power required, just plug and play.
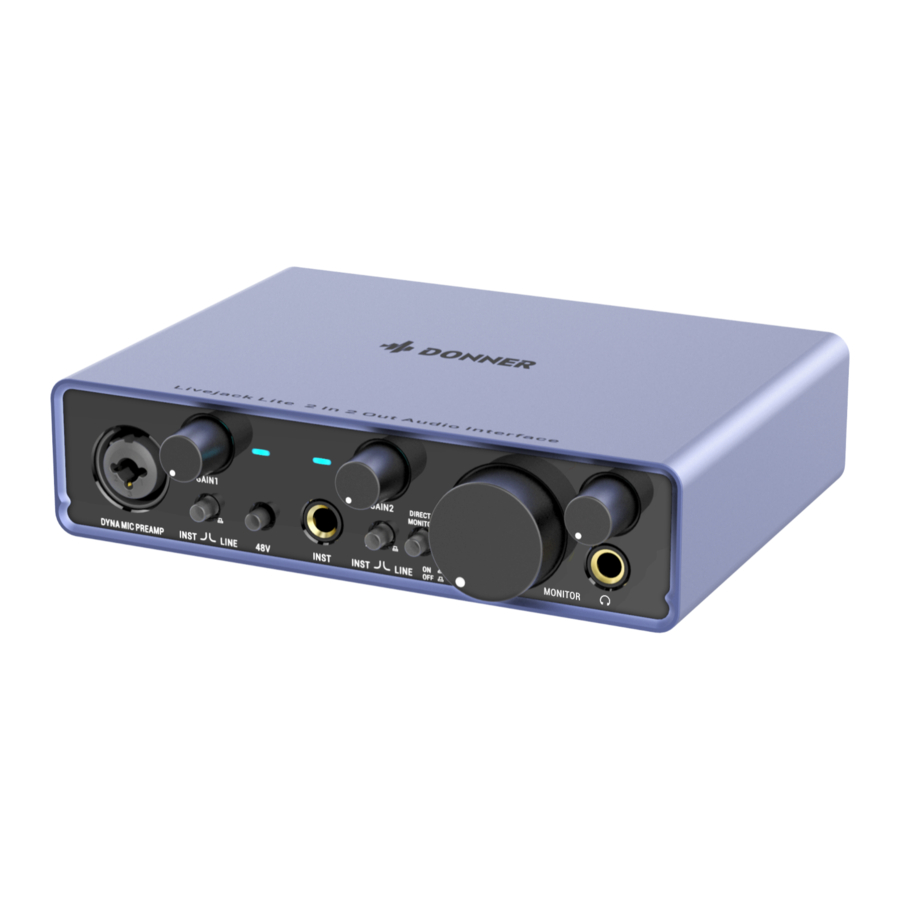
PANEL LAYOUT

- lnput1: XLR/ 1/4" TRS Combo input socket with DYNA mic preamp, for connecting microphones, instruments or line level signal via XLR or 1/4" jacks as appropriate.
- Gain1: Adjust the input gain for input signal on input1. The gain controls have the LED indicator: green indicates that the input1 signal is in normal level without clipping, red indicates that the input1 signal is distorted and reaches 0dB.
- Inst/Line Switch: Instrument/Line levels witches for input1, switches input impedance to suit instrument or line level signals.
- LED1: LED1 indicator shows green or red to indicate the input1 signal level. Green indicates that the input1 signal is in normal level without clipping, red indicates that the input1 signal is distorted and reaches 0dB.
- 48V Switch: Phantom power switch for mic inputs, enables 48V phantom power at XLR contacts of XLR connectors.
Notes: Only use XLR to XLR cable can enables 48V phantom power. - Input2: 1/4" TS jack for connecting instruments or line level sources(Unbalanced).
- LED2: LED2 indicator shows green or red to indicate the input2 signal level. Green indicates that the input2 signal is in normal level without clipping, red indicates that the input2 signal is distorted and reaches 0dB.
- Gain2: Adjust the input gain for input signal on input2. The gain controls have the LED indicator: green indicates that the input2 signal is in normal level without clipping, red indicates that the input2 signal is distorted and reaches 0dB.
- Inst/Line Switch: Instrument/Line level switches for input2, switches input impedance to suit instrument or line level signals.
- Direct Monitor Switch: Selects monitoring of input signals(mixed with the DAW output) to bedirectly from inputs (ON) or via the DAW(OFF).
Notes:
- Direct Monitor enables you to hear yourself with zero latency along with the computer playback. Your inputs will be summed to mono, so both mic and instrument will appear in the centre of the stereo image. Note that the input signals to your computer are not affected in any way by the use of Direct Monitor.
- When Direct Monitoring is set to ON, ensure that your recording software is not set to route its input (what you are currently recording) to its output. If it is, you will hear yourself "twice", with one signal audibly delayed as an echo.
- Monitor Knob: Main monitor output levels control, sets the output level of the TRS balanced outputs.
- Headphone Knob: Adjusts the output level of the stereo headphone output.
- Headphone Output: 1/4" TRS output jack for connecting your stereo headphones.
- Output: 2x1/4" TRS balanced output jack for connecting the active speakers or amplifiers. Either 1/4" TRS (balanced connection) or TS (unbalanced connection) jack plugs can be used.
- USB-C: USB2.0 Type C connector for connecting to your computer with cable supplied.
SYSTEM REQUIREMENTS
- MacOS 10.12, 10.13, 10.14or 10.15 (latest update),Intel Core i5, 4 GB RAM (6 GB recommended).
- Windows10 (latest Service Pack),Intel Core i5 or equivalent CPU, 4 GB RAM (6 GB recommended).
- USB 2.0 or higher (cable provided).
- Graphics Card which supports Open GL 2.1 or higher.
GETTING STARTED
- The Livejack Lite has a single USB2.0 Type C port (on the rear panel):connect it to your computer using the USB cable provided. Note that LivejackLite is a USB 2.0 device, and thus the USB connection requires a USB2.0+ compliant port on your computer.
- Livejack Lite gets its power from your computer via the USB connection: there is no need for a separate power supply. We recommend that when using it with a laptop, the laptop should be powered using its AC adaptor, as otherwise the battery will run down faster than when powering the laptop alone.
Mac Users
- Connect the Livejack Lite to your computer using the USB cable provided.

- Your OS should automatically switch the computer's default audio inputs and outputs to the Donner Livejack Usb Audio. To verify this, go to System Preferences > Sound, and ensure that the input and output are set to Livejack Lite. For more detailed setup options on a Mac, open Applications > Utilities > Audio MIDl Setup.


Win Users
- Click www.donnerdeal.com/pages/download or Scan the QR code to download the Donner Livejack ASIO USB Audio Drive.

- Follow the instruction to setup the ASIO Drive, the installer will take you through each step of the installation process.
Notes: It is recommended that you temporarily disable or turn off any anti-virus programs you have running to prevent installation issues. - After installed, connect the Livejack Lite to your computer using the USB cable provided.

- Your OS should automatically switch the computer's default audio inputs and outputs to be the Livejack Lite. To verify this, right click on the Sound icon on the taskbar and select Sound Settings, and set the Livejack Audio Interface as the Input and Output Device.
- When ASIO Drive is launched, you will see the Launch window. From this window, you can manage all the ASIO driver settings.


Sample Rate: Changes the sample rate. You can set the sample rate to 44100, 48000, 88200, 96000, 176400, or 19200 kHz. A higher sample rate will increase the file size and the amount of system resources necessary to process the audio.
Buffer: Adjusts the buffer size. From this menu, you can set the buffer size. Lowering the buffer size will lower latency. This will also increase performance demands on your computer. In general, you will want to set the buffer size as low as your system can safely support. If you begin to hear pops, clicks, or distortion in your audio path, try raising the buffer size.
IN1&IN2: Adjusts the input volume in digital audio stream.
OUTPUT: Adjusts the output volume in digital audio stream.
AUDIO SETUP IN DAW
After following the procedure described above, you can start using your Livejack Lite with the DAW of your choice. Operating instructions for DAW are beyond the scope of this User Guide, but most kind of DAW applications include a full set of Helpfiles.
Please note - your DAW may not automatically select the Livejack as its default I/O device. In this case, you must manually select Donner Livejack Usb Audio as the driver on your DAW's Audio Setup page. Please refer to your DAW's documentation if you are unsure where to select the ASIO or Core Audio driver. The example below shows the correct configuration in the Logic Pro X Preferences panel.

Once the Livejack Lite is set as the preferred Audio Device in your DAW, its inputs and outputs will appear in your DAW's Audio I/O preferences. Depending on your DAW, you may need to enable certain inputs or outputs before use. The two examples below show two Inputs and two outputs enabled in the Logic Pro X Audio Preferences.

Note: The speed of your processor, amount of RAM,and capacity, size, and speed of your hard drives will greatly affect the overall performance of your recording system. A faster processor and more RAM can reduce signal latency (delay) and improve overall performance.
SETUP

Connection
This setup illustrates a typical configuration for recording using DAW software on your Mac or PC.In this case, you would record vocals through Input 1 and guitar through Input 2 into your recording application, while monitoring the playback via headphones. Livejack Lite inputs are on the front panel: Input 1 uses a standard 3-pin XLR socket, and is configured to work with microphones of most types; you will probably have a male XLR connector on the end of your mic cable.
If you are using a "studio" condenser (capacitor) microphone designed to operate on 48-volt phantom power, press the 48V button. Input2 uses a1/4" (6.35mm) jack socket which is 2-pole when in instrument mode and 3-pole when used as a mono line input. It can accept signals from an electric or electro acoustic guitar or bass, a keyboard, and most other types of audio equipment. Set the INST switch ON if you are connecting a musical instrument, e.g.,a guitar in the example, using an ordinary 2-pole (TS) guitar jack. Set the INST switch to OFF if you are connecting a line level source such as a keyboard, synthesizer or the balanced output of an external audio mixer via a 3-pole (TRS) jack. Note the jack socket accepts both TRS and TS types of jack plug.
Monitoring
You will frequently hear the term "latency' used in connection with digital audio systems. In the case of the simple DAW recording application described above, latency will bethe time it takesfor your input signals to pass through your computer and audio software. Latency can be a problem for a performer who wishes to record while monitoring their input signals.
With a "Direct Monitoring" option, it can overcome this problem. Setting the front panel DIRECT MONITOR switch to ON will route your input signals directly to the LivejackLite's headphone and main monitor outputs. This enables you to hear yourself with zero latency. Your inputs will be summed to mono. Note that the input signals to your computer are not affected in any way by the use of Direct Monitor.
When Direct Monitoring is set to ON, ensure that your recording software is not set to route its input (what you are currently recording) to its output. If it is, you will hear yourself "twice", with one signal audibly delayed as an echo.
Monitoring with DIRECT MONITOR set to OFF can be useful when using an FX plug-in to your DAW to create a stereo effect which contributes to the live performance. In this way, you will be able to hear exactly what is being recorded, complete with the FX. However, some latency may result, the amount depending on the DAW's buffer size and processing power of the computer.
SPECIFICATION
| Channel1 Mic Input | |
| Dynamic Range | 103dB 'A'-weighted |
| THD+N | 0.003% (at-1 dBFS, 1 kHz, with 20 Hz-22 kHz flter) |
| Signal-to-Noise ratio | 93dB 'A'-weighted |
| Frequency Response | 20 Hz-20kHz 0.1 dB |
| Gain Range | +50dB |
| Input impedance | 22 KΩ |
| Channel1 Line Input | |
| Dynamic Range | 103dB 'A'-weighted |
| THD+N | 0.004% (at-1 dBFS, 1 kHz, with 20hz - 22 kHz flter) |
| Signal-to-Noise ratio | 95dB 'A'-weighted |
| Frequency Response | 20Hz - 20 kHz 0.1 dB |
| Gain Range | +45dB |
| Input impedance | 10 KQ |
| Channel1 Instrument Input | |
| Dynamic Range | 103dB 'A'-weighted |
| THD+N | 0.004% (at-1 dBFS, 1 kHz, with 20 Hz-22 kHz flter) |
| Signal-to-Noise ratio | 95dB 'A'-weighted |
| Frequency Response | 20Hz - 20kHz 0.1 dB |
| Gain Range | +45dB |
| Input impedance | 100 KΩ |
| Channel2 Line Input | |
| Dynamic Range | 103dB 'A'-weighted |
| THD+N | 0.002% (at-1 dBFS, 1 kHz, with 20Hz-22 kHz flter) |
| Signal-to-Noise ratio | 102dB 'A'-weighted |
| Frequency Response | 20Hz - 20 kHz 0.1 dB |
| Gain Range | +45dB |
| Input impedance | 10 KΩ |
| Channel2 Instrument Input | |
| Dynamic Range | 103dB 'A'-weighted |
| THD+N | 0.002% (at-1 dBFS, 1 kHz, with 20 Hz - 22 kHz flter) |
| Signal-to-Noise ratio | 102dB 'A'-weighted |
| Frequency Response | 20Hz - 20kHz 0.1 dB |
| Gain Range | +45dB |
| Input impedance | 400 KΩ |
| Line Outputs (Balanced) | |
| Dynamic Range | 103dB 'A'-weighted |
| THD+N | 0.002% (at-1 dBFS, 1 kHz, with 20 Hz - 22 kHz flter) |
| Maximum Output Level (0 dBFS) | +20 dBu at minimum gain; balanced outputs |
| Output impedance | 200 Ω |
| Headphone Output | |
| Dynamic Range | 104dB 'A'-weighted |
| THD+N | 0.002% (at-1 dBFS, 1 kHz, with 20Hz - 22 kHz flter) |
| Maximum Output Level | +7 dBu |
| Output impedance | <1 Ω |
| Characteristics | |
| Input | Input1: XLR/ 1/4" TRS Combo input; |
| Input2: 1/4" TS jack | |
| Output | 1/4" TRS Balanced jacks X 2 |
| Switch | 48V Phantom Power Switch; Inst/Line Switch X 2 Direct Monitor Switch |
| USB | USB 2.0 Type C Connector |
| Dimensions | 170mm X 42mm X 121.5mm |
| Weight | 720g |
TROUBLESHOOTING
| Question | Answer |
Could not turn on the unit |
|
No mic or instrument signal output |
|
Could not edit the Sample rate or Buffer size | For Mac user, edit the Sample rate and Buffer size in DAW's Audio Setup (According to your DAW). For Win user, download the ASIO drive from www.donnerdeal.com/pages/download and edit the Sample rate and Buffer size in Donner Livejack ASIO USB Audio Drive interface. |
More troubleshooting, please enter www.donnerdeal.com
Explanation of Graphical Symbols
 | The lightning flash with arrowhead symbol within an equilateral triangle is intended to alert the user to the presence of uninsulated "dangerous voltage" within the product's enclosure that maybe of sufficient magnitude to constitute a risk of electric shock to persons. |
 | The exclamation point within an equilateral triangle is intended to alert the user to the presence of important operating and maintenance (servicing) instructions in the literature accompanying the product. |
Safety Precautions And Electrical Requirements
 |  Read this safety guide before you begin installation or operation. Failure to comply with safety instructions could result in bodily injury or equipment damage. |
|
|


Important Safety Instructions

RISK OF ELECTRIC SHOCK
DO NOT OPEN
The above warning is located on the rear of the unit.
- Read these instructions. All the safety and operating instructions should be read before operating the product.
- Keep these instructions. These safety instructions and the product owner's manual should be retained for future reference.
- Heed all warnings. All warnings on the product and in the owner's manual should be adhered to.
- Follow all Instructions. All operating and use instructions should be followed.
- Do not use the product near water.
- Cleaning - Unplug the product from the computer and clean only with a dry cloth. Do not use liquid or aerosol cleaners.
- Ventilation - Do not block any ventilation openings. Install in accordance with the manufacturer's instructions.
- Heat - Do not install the product near any heat sources such as radiators, heat registers, stoves, or another apparatus (including an amplifier) that produces heat.
![burn hazard]()
![shock hazard]()
Overloading - Do not overload wall outlets and extension cords as this can result in a risk of fire or electrical shock.- Disconnect - The main plug is considered to be the disconnect device for the product and shall remain readily operable.
- Accessories - Only use attachments/accessories specified by the manufacturer.
- Placement - Use only with the cart, stand, tripod, bracket or table specified by the manufacturer, or sold with the product. When a cart is used, use caution when moving the cart/apparatus combination to avoid injury from tip-over.
- Surge protection - Unplug the product during lightning storms or when unused for long periods of time.
- Servicing - Refer all servicing to qualified service personnel. Servicing is required when the product has been damaged in anyway, such as when a power-supply cord or plug is damaged, liquid has been spilled or objects have fallen into the product, the product has been exposed to rain or moisture, does not operate normally, or has been dropped.
- Power Sources - Refer to the manufacturer's operating instructions for power requirements. Be advised that different operating voltages may require the use of a different line cord and/or attachment plug.
- Installation - Do not install the product in an unventilated rack, or directly above heat-producing equipment such as power amplifiers.
Observe the maximum ambient operating temperature listed below. - Power amplifiers - Never attach audio power amplifier outputs directly to anyof the unit's connectors.
![burn hazard]()
![shock hazard]()
Replacement Parts - When replacement parts are required, be sure the service technician has used replacement parts specified by the manufacturer or have the same characteristics as the original part. Unauthorized substitutions may result in fire, electric shock or other hazards.- Safety Check- Upon completion of any service or repairs to this DONNER product, ask the service technician to perform safety checks to determine that the product is in safe operating conditions.
Environment, heat and ventilation
Operating Temperature: 10°C to 40°C (50°F to 104°F). The product should be situated away from heat sources or other equipment that produces heat. When installing the product in a rack or any other location, be sure there is adequate space around the product to ensure proper ventilation. Improper ventilation will cause overheating and can damage the unit.

To reduce the risk of electrical shock or fire
Do not handle the power cord with wet hands. Do not expose this apparatus to rain or moisture. Do not place objects containing liquids on it.
NOTES: DONNER cannot beheld responsible for damage caused by improper use or modifications to the device.

Documents / Resources
References
![www.donnerdeal.com]() Download - Donner Musical instrument
Download - Donner Musical instrument![www.donnerdeal.com]() Donner® Music US | Find Your Music Gears at Better Price - Free Shipping & Tax
Donner® Music US | Find Your Music Gears at Better Price - Free Shipping & Tax
Download manual
Here you can download full pdf version of manual, it may contain additional safety instructions, warranty information, FCC rules, etc.
Advertisement


Need help?
Do you have a question about the Livejack Lite and is the answer not in the manual?
Questions and answers