Numark Mixtrack II - 2-Channel DJ Controller Manual
- User manual (33 pages)
Advertisement
BOX CONTENTS
- Mixtrack II
- USB Cable
- Software CD
- User Guide
- Safety & Warranty Manual
REGISTRATION
Please go to www.numark.com to register your Mixtrack II. Registering your product ensures that we can keep you up-to-date with any new product developments and provide you with world-class technical support, should you run into any problems.
FEATURES
- 16 backlit rubber drum pads with Loop Mode, Sample Mode, and Hot Cue Mode
- Touch-activated illuminated platters for precise scratching and control
- Complete mixer section with a crossfader, 3-band EQ, and music library navigation controls
- 16 dedicated effects controls to add and manipulate flanger, phaser, echo, and more
- Pitch and Sync controls for seamless and easy mixing
- VirtualDJ LE software included
- Standard MIDI for use with most popular DJ software
- Class-compliant with both Mac and PC; no driver required
- USB-powered; no power adapter required
CONNECTION DIAGRAM

* not included
DEVICE SETUP
- Place Mixtrack II on a flat, stable surface.
- Power on your computer.
- Once the computer has fully booted up, connect Mixtrack II to your computer with the included USB cable.
- Open your software program and load music to the decks.
- Turn on your computer speakers and adjust their volume.
- Start DJ'ing!
DEVICE AND VIRTUALDJ LE SETUP
WINDOWS
Before you can begin using Mixtrack II with your computer, install the VirtualDJ LE software:
- Insert the installation disc into your computer's CD-ROM drive. (Free updates to the VirtualDJ LE software are available online atwww.virtualdj.com. We recommend checking the website for the latest version of VirtualDJ LE before installing it on your computer.)
- Open the CD to view its contents.
- Open the folder titled "PC."
- Double-click "Install Virtual DJ LE v7.3 PC.msi."
- Select your preferred language and when done press "OK."
- Read the information screen then press "Next."
- Read the User Agreement, select "I accept the agreement," then click "Next."
- You will be asked to choose a location to install. (We recommend using the default location for most users.) Once you have selected the location, click "Next."
- The installation procedure will begin. Follow the on-screen instructions.
- Once the installation is complete, click "Finish."
To start using Mixtrack II:
- Connect Mixtrack II to an available USB port on your computer. (If possible, use a USB port on the rear panel of your computer.)
- Open VirtualDJ LE by double-clicking the icon on your computer's Desktop (if you created a Desktop shortcut) or by going to Start
![]() All Programs
All Programs ![]() VirtualDJ.
VirtualDJ.
 All Programs
 For more information on how to use VirtualDJ LE, please visit www.virtualdj.com.
MAC
Before you can begin using Mixtrack II with your computer, install the VirtualDJ LE software:
- Insert the installation disc into your computer's CD-ROM drive. (Free updates to the VirtualDJ LE software are available online atwww.virtualdj.com. We recommend checking the website for the latest version of VirtualDJ LE before installing it on your computer.)
- Open the CD to view its contents.
- Open the folder titled "Mac."
- Double-click "Install Virtual DJ LE v7.3 Mac.pkg."
- Once you see the installer welcome screen, click "Continue."
- Read the User Agreement, select "I accept the agreement," then click "Continue," then "Agree."
- You will be asked to choose a location to install. By default, your hard disk will be selected. (We recommend using this for most users.) Once you have selected the location, click "Install" to begin the installation.
- Enter your password and click "OK."
- Once the installation is complete, click "Close."
To start using Mixtrack II:
- Connect Mixtrack II to an available USB port on your computer. (If possible, use a USB port on the rear panel of your computer.)
- Open VirtualDJ LE by going to Applications
![]() VirtualDJ.
VirtualDJ.
For more information on how to use VirtualDJ LE, please visit www.virtualdj.com.
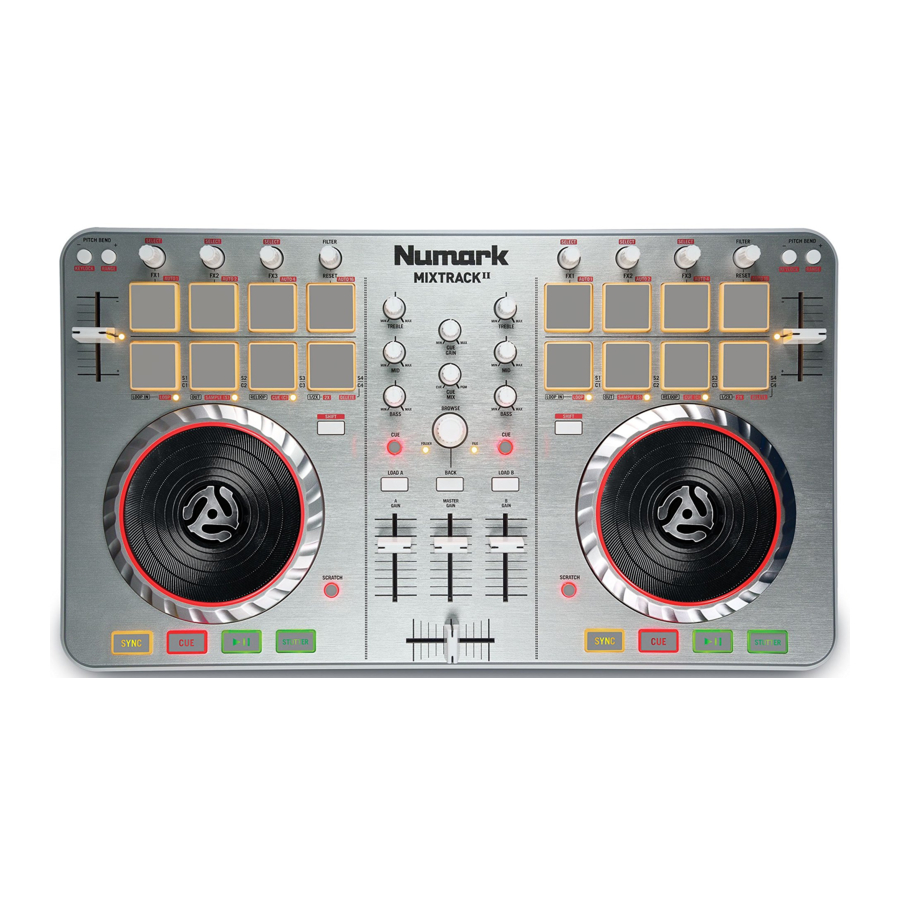
TOP PANEL

- Browser Knob – Rotate the knob to cycle through folders and tracks. When a folder is selected, press the knob to enter it. (Press BACK to move up to the previous level.)
- Load – Press one of these buttons while a track is selected to assign it to Deck 1 or 2, respectively, in the software.
- Back – Cycles between the file structure and the music library in the software.
- Shift – Allows multiple control commands to be triggered when pressed and held first along with other buttons.
- Play/Pause – Starts and suspends playback.
- Headphone Cue – Sends pre-fader audio to the Cue Channel for headphone monitoring through your computer.
- Cue (Transport Control) – Sets and recalls the main Cue point in the current track. Hold down the CUE button for temporary play of the cue point. The track will play for as long as the button is held down and return to the cue point once it is released.
- Platter/Jog Wheel – This capacitive, touch-sensitive jog wheel controls the audio when the wheel is touched and moved. When the Scratch button is not active, use the wheel to bend the pitch of the track. When the Scratch button is active, use the wheel to grab and move the audio, "scratching" the track as you would with a vinyl record. You can also grab the non-touch-sensitive outer wheel to bend the pitch of the track.
- Scratch – Controls the behavior of the platters. When not active, the platter will function as Pitch Bend. When active, the platter will have the ability to scratch.
- Pitch Fader – Controls the tempo (speed) of the individual decks.
- Pitch Bend - – Press and hold to momentarily reduce the speed of the track.
- Pitch Bend + – Press and hold to momentarily increase the speed of the track.
- Sync – Enables BPM syncing between decks for the software tracks. To manually adjust BPM and exit Sync mode move the pitch fader of the deck you wish to adjust.
- Effect Control – Adjusts the effect parameter in the software of the last activated effect. Hold Shift + FX Control to select the effect.
- Filter – This knob will adjust the amount of Filter. Turning the knob left and right will produce a Low Pass Filter or High Pass Filter.
- Loop In – Press this pad to set the beginning of a loop when in Looping Mode. After a Loop Out point is set and this button is pressed again, it will return the playback marker to the Loop In point. Pressing Shift + Loop In will set the current Pad Mode as "Looping Mode". See the PAD MODE COMMANDS section for information on this pad's additional functions.
- Loop Out – Press this pad to set the end of a loop when in Looping Mode. When this button is pressed again after a Loop Out point has been set, it will exit out of the loop. Pressing Shift + Loop Out will set the current pad mode to "Sample (S)" Mode. See the PAD MODE COMMANDS section for information on this pad's additional functions.
- Reloop – When this is pressed inside a Loop, this will turn the loop off. If a loop has not been set, this button will create a loop from the start of the song or where Loop In was pressed.
Pressing Shift + Reloop will set the current pad mode to "Hot Cue Mode". See the PAD MODE COMMANDS section for information on this pad's additional functions. - Loop x1/2 – Press this pad to reduce the currently playing loop length by half when in Looping Mode. If a loop is not playing, this will set the autoloop length. Hold Shift + Loop 1/2 to double the loop length. See the PAD MODE COMMANDS section for information on this pad's additional functions.
- FX 1 On/Off – Turns FX 1 on and off per deck. Hold Shift + FX 1 to set and start playback of a 1-beat autoloop.
- FX 2 On/Off – Turns FX 2 on and off per deck. Hold Shift + FX 2 to set and start playback of a 2-beat autoloop.
- FX 3 On/Off – Turns FX 3 on and off per deck. Hold Shift + FX 3 to set and start playback of a 4-beat autoloop.
- Reset – Press this pad to reset the filter. Hold Shift + Reset to set and start playback of a 16-beat autoloop.
- Channel Volume – Adjusts the volume of the individual channels in the software.
- Master Volume – Adjusts the volume of the master mix coming from the software.
- Crossfader – Controls the blend between the two decks.
- High EQ – Controls the treble frequencies for the individual channels
- Mid EQ – Controls the mid range frequencies for the individual channels.
- Low EQ – Controls the bass frequencies for the individual channels
- Cue Gain – Adjusts the volume for headphone cueing in the software
- Cue Mix – Adjusts the software's audio output to the headphones, mixing between the cue output and the master mix output.
- Stutter – Press this button while the music is playing to jump back to the last set cue point, creating a "stutter" effect.
PAD MODE COMMANDS
The lower row of pads has different functions depending on their mode: Looping Mode, Sample Mode, or Hot Cue Mode. To select a mode, hold down the SHIFT button and press one of the lower pads. A LED under the pad section indicates the currently selected mode.
Looping Mode: Press Shift + Loop In to assign the lower 4 pads to the functions listed below:
- Loop In – Sets the beginning of a loop. After a Loop Out point is set and this button is pressed again, it will return the playback marker to the Loop In point.
- Loop Out – Sets the end point for the loop. When this button is pressed again after a Loop Out point has been set, it will exit out of the loop.
- Reloop – If a loop has not been set, this button will create a loop from the start of the song or where Loop In was pressed. Please note that when pressing Reloop without first setting a loop point will create a loop that has a loop length of the auto loop length.
- Loop x1/2 – Cuts the currently playing loop in half. Press Shift + Loop x1/2 to double the length of the currently playing loop.
Sample Mode: Press Shift + Loop Out to assign the lower 4 pads to the functions listed below:
- Sample 1 (S1) – Plays the sample assigned to Sample Pad 1.
- Sample 2 (S2) – Plays the sample assigned to Sample Pad 2.
- Sample 3 (S3) – Plays the sample assigned to Sample Pad 3.
- Sample 4 (S4) – Plays the sample assigned to Sample Pad 4.
Hot Cue Mode: Press Shift + Reloop to assign the lower 4 pads to the functions listed below:
- Cue 1 (C1) – If a cue point has not already been set for the loaded track, this control will mark Cue Point 1. If a cue point has already been set, this control will jump to Cue Point 1.
- Cue 2 (C2) – If a cue point has not already been placed on the loaded track, this control will mark Cue Point 2. If a cue point has already been set, this control will jump to Cue Point 2.
- Cue 3 (C3) – If a cue point has not already been placed on the loaded track, this control will mark Cue Point 3. If a cue point has already been set, this control will jump to Cue Point 3.
- Cue 4 (C4) – If a cue point has not already been placed on the loaded track, this control will mark Cue Point 4. If a cue point has already been set, this control will jump to Cue Point 4. Shift + Cue 4 will set "Cue Delete Mode". Pads with cue points set will flash, and when pressed the cue point will be removed. Exit Cue Delete Mode by pressing Shift + Cue 4 again.
COMBINATION KEYS
Shift + Pitch Bend - = Allows you to change the tempo of the track without changing the original key of the song (0% pitch).
Shift + Pitch Bend + = Adjusts the range of the pitch fader in the software.
Shift + FX Control = Selects the effect.
Shift + FX 1 = Sets and starts playback of a 1-beat autoloop.
Shift + FX 2 = Sets and starts playback of a 2-beat autoloop.
Shift + FX 3 = Sets and starts playback of a 4-beat autoloop.
Shift + Tap = Sets and starts playback of a 16-beat autoloop.
REAR PANEL
- USB – Sends USB MIDI data to control various software parameters.
![]()

BEATMIXING WITH THE UNIT AND VIRTUALDJ LE
Below is an example of how to mix tracks using Mixtrack II and VirtualDJ LE:
- Load tracks onto Decks 1 and 2 of VirtualDJ LE by using the Load A and Load B buttons on Mixtrack II.
![]()
- Move the crossfader all the way to the left on Mixtrack II.
![]()
- Turn the Cue Mix knob all the way to the right to 'PGM'.
![]()
- Play the track that is loaded on Deck 1.
![]()
- Play the track that is loaded on Deck 2 and match it's BPM to Deck 1's track. To match the BPM, press Deck 2's Sync button on Mixtrack II.
![]()
- Once the BPM is matched, move the crossfader on Mixtrack II to fade between Deck 1 to Deck 2.
![]()


BEATMIXING TRACKS IN OTHER PROGRAMS
If you are using Mixtrack II with another software program that does not support BPM syncing between decks, follow the traditional example below to sync tracks. You can match the tempo by ear and adjust the pitch by monitoring the music from both decks in your software.
- Play the track on Deck 1.
- Play the track on Deck 2.
- Listen to Deck 2 in your headphones. If the beat of Deck 2 is faster than Deck 1, move the pitch fader to the ( - ) side. (see Figure 1.)
![]()
- If the beat of Deck 2 is slower than the beat of Deck 1, move the pitch fader to the ( + ) side. (see Figure 2.)
![]()


Note: This procedure can be done on either Deck.
Documents / Resources
References
Download manual
Here you can download full pdf version of manual, it may contain additional safety instructions, warranty information, FCC rules, etc.
Download Numark Mixtrack II - 2-Channel DJ Controller Manual
Advertisement


Need help?
Do you have a question about the Mixtrack II and is the answer not in the manual?
Questions and answers