Teac TN-100 - Analog Turntable Manual
- Owner's manual (24 pages) ,
- Owner's manual (72 pages)
Advertisement
Before use
Included items
Check to be sure the box includes all the supplied accessories shown below. Please contact the store where you purchased this unit if any of these accessories are missing or have been damaged during transportation.
Rubber mat × 1
45 RPM adapter × 1
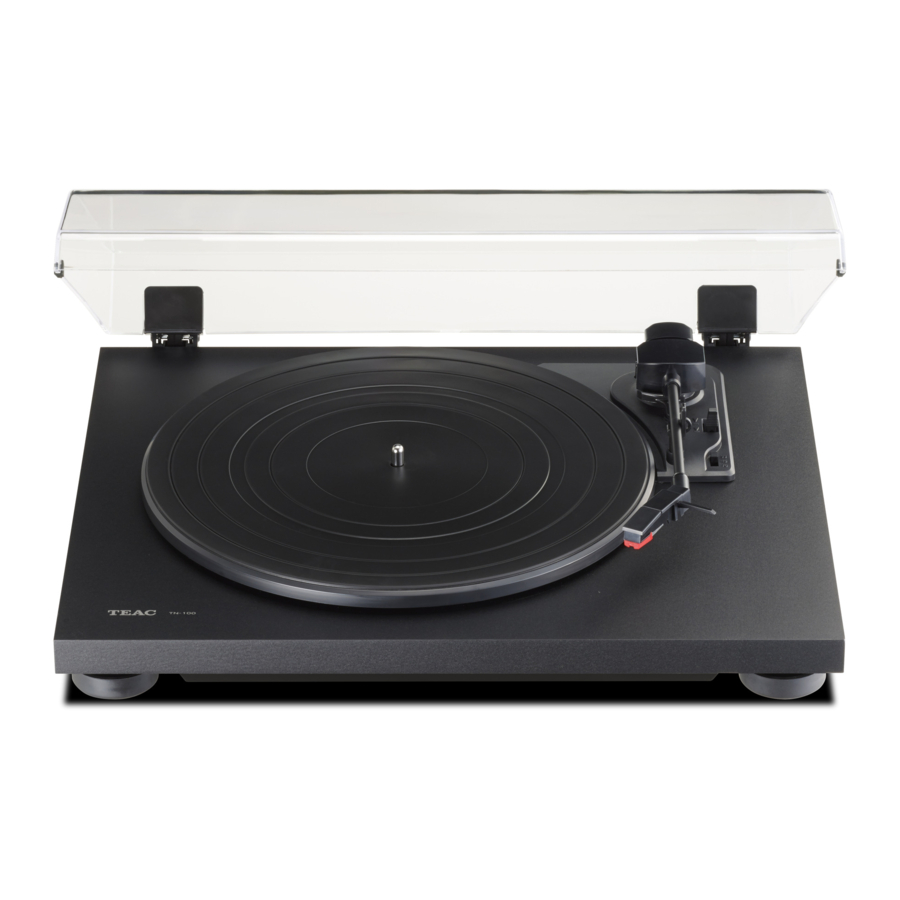
Turntable × 1
Turntable cover × 1
Hinges × 2
Audio cable × 1
AC adapter × 1:
Model for USA/Canada: GPE053A-120050-1
Model for Europe: GPE053A-120050-Z
Owner's manual (this document) × 1
Precautions for use
- Do not place anything on the turntable cover. Objects on the cover might cause noise due to vibrations or fall off, especially during playback.
- Avoid placing the unit in direct sunlight, close to a source of heat or in other similar conditions. Do not place the unit on top of an amplifier or other equipment that might generate heat that exceeds the operating temperature range of this unit. Doing so could cause discoloration, deformation or malfunction.
- As the unit could become warm during operation, always leave sufficient space around it for ventilation. When installing this unit, leave a little space (at least 20 cm (8")) between it and other devices and walls to allow good heat dissipation. When placing it in a rack, for example, leave at least 35 cm (13 3/4") open above it and 10 cm (4") open behind it. Failure to provide these gaps could cause heat to build up inside and result in fire.
- DO NOT MOVE THE UNIT DURING PLAYBACK. During playback, the record rotates. Do not lift or move the unit during playback. Doing so may damage the record, the stylus, the cartridge or the unit.
- Always remove the record before relocating or moving this unit. Moving the unit with a record on the turntable could damage the record, the stylus and the cartridge or could cause a malfunction.
- The voltage supplied to the unit should match the voltage as printed on the rear panel. If you are in any doubt regarding this matter, consult an electrician.
Maintenance
If the surface of the unit gets dirty, wipe it with a soft cloth or use diluted mild liquid soap. Allow the surface of the unit to dry completely before using.
- Do not use chemical cleaning cloths, thinner or similar substances as they could damage the surface of the unit.

For safety, disconnect the power cord from the socket before cleaning.
Notes about record styluses
- Record styluses are precision parts, so handle them carefully to avoid bending or damaging their tips. If a stylus becomes bent or damaged, it might not be able to follow the audio groove precisely and could damage records or cause other malfunction.
- If a stylus becomes dirty, use a commercially available stylus cleaner or similar product to clean it.
-
Do not rub the stylus tip forcefully with anything hard. Do not wipe the stylus with thinner or other chemicals. Doing so could harm it.
Replacing the stylus
A record stylus will become worn down after it has been used for about 500 hours. This will worsen the sound quality and could damage records. Replace the stylus with one that we recommend before this occurs.
- Since loud noises could suddenly occur, put the unit into standby before changing the stylus.
- Be careful not to hurt your hand or the equipment.
- Be careful not to allow small children to accidentally swallow styluses.
When detaching a record stylus (the red part), hold the cartridge and pull the record stylus in the A direction to remove it.

When installing a new stylus, insert it in the B direction, pushing it in so that its clasp is aligned with the cartridge.

Replacement stylus (sold separately): STL-122 diamond stylus (includes 2)
For stylus replacements, contact your dealer or TEAC listed on the back of this Owner's manual.
Connections

When PHONO EQ is ON Connect to audio input jacks of amplifier, etc.
When PHONO EQ is THRU Connect to PHONO inputs of amplifier, etc.
 Precautions when making connections
- Do not plug the unit in until after making all connections.
- Carefully read the manuals of the devices that you are connecting and follow their instructions when making connections.
- Analog audio output jacks (L/R)
These output analog audio signals.
The PHONO EQ switch setting changes the type of output signal.
Use the included audio cable (or commercially available ones) to connect other equipment to the output jacks of this unit.
![]()
- PHONO EQ (audio output setting) switch
ON
Signals that have been amplified by the built-in equalizer amp are output from the analog audio output jacks (L/R).
THRU
The MM cartridge signal is output directly through the analog audio output jacks (L/R).
Use this when connecting to equipment that has PHONO inputs.- When shipped new from the factory, this is set to ON.
![]()
When set to ON, if connected to the PHONO inputs of an amplifier, for example, the output from speakers and headphones will be very loud, which could damage equipment or harm hearing.
- When shipped new from the factory, this is set to ON.

- USB port (USB B type)
Connect this to the USB port of a computer to convert the audio signal from this unit to digital and output it to the computer. - DC input connector
After completing all other connections, connect the included AC adapter to this jack. Confirm that the power plug of the AC adapter is plugged into a power outlet.- Unplug the power cord from the outlet when you are not planning to use the unit for an extended period of time.
- Do not use any AC adapter other than the one included.
![warning]() Be sure to connect the power cord to an AC outlet that supplies the correct voltage. Connection to an outlet that supplies incorrect voltage could cause fire or electric shock. Hold the power plug when plugging it into an outlet or unplugging it. Never pull or yank on the power cord. Unplug the power cord from the outlet when you are not planning to use the unit for an extended period of time.
Be sure to connect the power cord to an AC outlet that supplies the correct voltage. Connection to an outlet that supplies incorrect voltage could cause fire or electric shock. Hold the power plug when plugging it into an outlet or unplugging it. Never pull or yank on the power cord. Unplug the power cord from the outlet when you are not planning to use the unit for an extended period of time.
- STANDBY/ON button
Press the STANDBY/ON button to turn the unit on or put it in standby.
Names and functions of parts

- Turntable
Place records centered on the turntable. - Cue lever
Use this lever to lift the tone arm and to lower it to the record. - Rotation speed setting switch
Set the rotation speed (RPM) suitable for the record. - Tone arm holder
This is a rest for the tone arm. Gently push the clasp output signal.to the right to release the tone arm before playing a record. - Tone arm
- Headshell
Turntable cover
Attaching the turntable cover

- Insert the hinges completely into the hinge holders at the left and right ends of the back of the main unit.
- Align the tops of the hinges with the turntable cover hinge holders and insert them.
Removing the turntable cover
Hold both edges of the turntable cover and lift it slowly to remove it along with the hinges from the unit. Then, remove the hinges from the turntable cover.
Opening and closing the turntable cover

Opening
Hold the front edge of the turntable cover and gently lift it open completely until it stops. The turntable cover will stay open in this position.
Closing
Gently lower the turntable cover until it is closed.
Be careful not to pinch your hand, for example, when opening and closing the turntable cover.
Handling records
Holding records
When holding a record or removing it from its sleeve, avoid touching the grooves by holding the record by its label and edge with one hand or by holding it by its edge with both hands.

Cleaning
- Fingerprints and dust on a record can cause noise and the sound to skip, as well as damage the record itself and the stylus. Use a commercially available record cleaner to clean records. Do not use thinner or anything other than a record cleaner. Such chemicals could harm the surface of the record.
- When using a record cleaner, wipe the surface of the record in a circular motion, following the grooves.
![]()

Precautions
- Do not leave records in places that are exposed to direct sunlight or are very hot or very humid. Leaving a record in such a condition for a long time could result in warping or other damage.
- Do not stack multiple records or place heavy objects on top of them. Do not leave records at an angle for long amounts of time either. Doing so could result in warping or other damage.
- Do not allow hard objects to directly touch the audio grooves. Doing so could cause scratches.
- After you finish playing a record, always put it back into its sleeve for storage. Leaving a record unprotected could result in warping or scratching.
- Do not use cracked records.
Basic operation
Playing records
- Press the STANDBY/ON button on the back of the unit to turn it on.
![]()
- Open the turntable cover slowly.
![]()
![warning]() Be careful not to pinch your hand, for example, when opening and closing the turntable cover.
Be careful not to pinch your hand, for example, when opening and closing the turntable cover. - Place a record on the turntable.
When playing a 45 RPM large-hole single record, use the included adapter.
![]()


- Set according to the rotation speed (RPM) of the record.
The rotation speed can be set to 33 1/3, 45 or 78 RPM.

- Move the tone arm clasp to the right to release the tone arm.
![]()
- Lift the cue lever.

- You can also leave the cue lever down and move the raised tone arm over the record and then lower the tone arm slowly to start playback.


- Move the tone arm to the edge of the record or the track where you want to start playback.
![]()
- Lower the cue lever.
Lower the tone arm slowly until the stylus touches the record and playback begins. o We recommend that you close the turntable cover during record playback to avoid dust.

Do not place anything on the turntable cover. Objects on the cover might cause noise due to vibrations or fall off, especially during playback.
- During playback, do not touch the tone arm or the rotating record.
- Do not stop turntable rotation during playback.
During record playback, feedback could occur if the volume is too loud. If this happens, lower the volume of the amplifier.
When playback finishes
When playback finishes, the tone arm automatically returns to the tone arm holder and the rotation stops.
To stop playback manually, slightly lift the cue lever or the headshell hook and return the tone arm to its resting position.

- The tone arm may not return to the tone arm holder automatically depending on the record. In that case, move the tone arm back to the tone arm holder manually.
Recording with a computer
Connect this record player to a computer using a commercially-available USB cable to convert audio signals from a record to digital data and send them to the computer.
Supported operating systems
Computers running the following operating systems can be connected by USB to this unit (as of September 2015).
Windows OS
Windows 7 (32-bit, 64-bit)
Windows 8 (32-bit, 64-bit)
Windows 8.1 (32-bit, 64-bit)
Windows 10 (32-bit, 64-bit)
Mac OS X
OS X Lion 10.7
OS X Mountain Lion 10.8
OS X Mavericks 10.9
OS X Yosemite 10.10
Use with operating systems other than these is not guaranteed.
- This unit will run with the standard OS driver, so there is no need to install a special driver.
Connecting with a computer
- Turn the computer on.
Confirm that the operating system is working correctly. - Use the USB cable to connect the computer and this unit.
![]()

- Use a USB cable with a ferrite core when connecting the unit to a computer.
- Press this unit's STANDBY/ON button to turn it on.
When they are connected, the computer will automatically detect this unit's USB port and identify it as "USB Audio CODEC".- To record audio from this record player using a computer, you must first install software that can be used for audio recording on the computer. You may purchase the audio recording software that you prefer separately or download free software, such as Audacity (http://audacity.sourceforge.net/), from the Internet. As free software, Audacity is not supported by TEAC.
- When connected to a computer by USB and recording audio, do not do any of the following. Doing so could cause the computer to malfunction. Always quit the computer recording software before doing the following.
- Disconnect the USB cable
- Put the unit into standby
Computer settings
The following example explains the settings to make using Windows 7.
- From the Start menu, select Control Panel.
- Click "Sound".
- Click the "Recording" tab, and confirm that "USB Audio CODEC" is set as the "Default Device".
- Select "Microphone USB Audio CODEC", and click the Properties button.
- Click the "Advanced" tab.
- From the "Default Format" pull-down menu, select the audio quality (format) that you want to use for recording.
![warning]() NOTE
NOTE
"2 channel, 16 bit, 48000 Hz (DVD quality)" provides high audio quality but also requires more file space.
Recording with a lower sampling frequency reduces the audio quality but also uses less file space. - Click "OK".
Troubleshooting
If you experience a problem with this unit, please check the following items before requesting service. Something other than this unit could also be the cause of the problem. Please also check that the connected devices are also being used properly.
If it still does not operate correctly, contact the retailer where you purchased the unit.
No power.
- Confirm that the AC adapter is plugged into an outlet. Then, press the STANDBY/ON button to turn the unit on.
There is no sound.
- When connecting this unit's analog audio output jacks to the audio input jacks of an amplifier or other equipment, set the PHONO EQ (audio output setting) switch to ON.
Playback is not possible; there is noise.
- Confirm that the stylus cover (made of white plastic) has been removed.
- Clean the stylus.
- If the stylus is worn-out, replace it.
- Place the unit as far away as possible from TVs, microwave ovens and other devices that emit electromagnetic waves.
The pitch is wrong.
- Set the rotation speed (RPM) to match the record.
The sound is skipping.
- Vibrations will cause skipping. Place this unit in a stable location.
- If the record is dirty, wipe it clean.
- Do not use scratched records.
Specifications
Turntable
Drive system: Belt drive
Motor: DC motor
Rotation speed: 3 1/3 rpm, 45 rpm, 78 rpm
Rotation speed variation: ±2%
Wow and flutter: 0.25%
SN ratio: 64 dB or higher (A-weighted, 20 kHz LPF)
Turntable:
Plastic platter
29cm (11 1/2") diameter
Tone arm
Arm type: Static-balanced straight-pipe tone arm
Effective arm length: 200 mm
Cartridge
Type: MM
Output voltage: 2.4 mV ±3 dB
Output voltage
PHONO EQ THRU: 2.4 mV ±3 dB
PHONO EQ ON: 149 mV (−16.5 dBV)
Output jacks: RCA
USB port
USB port that can receive power from computer USB buses (Full Speed): USB connector type B
USB bus power support: 5 V, 500 mA
- Use a commercially-available USB cable to connect the unit to a computer to receive power from it.
Sampling frequency:
8 kHz, 11.025 kHz, 16 kHz, 22.05 kHz, 32 kHz,
44.1 kHz, 48 kHz
Quantization bit depth: 16-bit
General
AC adapter power
Input: AC 100 V–AC 240 V, 50-60 Hz
Output: 12 V, 500 mA
Power consumption
Standby.: 0.5 W or less
On (START): 1.5 W or less
Weight: 4.9 kg (10 7/8 lb)
Operating temperature range: 5°C to 35°C
Dimensions (W × H × D) (including protrusions): 420 × 105 × 356 mm (16 5/8" × 4 1/4" × 14 1/8")
- Performance data is specified at 20°C.
Included accessories
Rubber mat × 1
45 RPM adapter × 1
Turntable × 1
Turntable cover × 1
Hinges × 2
Audio cable × 1
AC adapter × 1
Model for USA/Canada: GPE053A-120050-1
Model for Europe: GPE053A-120050-Z
Owner's manual (this document) × 1
Warranty card × 1 (for customers in the USA and Canada only)
- Specifications and appearance are subject to change without notice.
- Weight and dimensions are approximate.
- Illustrations in this owner's manual might differ slightly from production models.
IMPORTANT SAFETY INSTRUCTIONS

RISK OF ELECTRIC SHOCK
DO NOT OPEN
TO REDUCE THE RISK OF ELECTRIC SHOCK, DO NOT REMOVE COVER (OR BACK). NO USER-SERVICEABLE PARTS INSIDE. REFER SERVICING TO QUALIFIED SERVICE PERSONNEL.
The lightning flash with arrowhead in an equilateral triangle is intended to alert the user to the presence of uninsulated "dangerous voltage" within the product's enclosure that could be of sufficient magnitude to constitute a risk of electric shock to persons.
The exclamation point in an equilateral triangle is intended to alert the user to the presence of important operating and maintenance (servicing) instructions in the literature accompanying the appliance.

TO PREVENT FIRE OR SHOCK HAZARD, DO NOT EXPOSE THIS APPLIANCE TO RAIN OR MOISTURE.
- DO NOT REMOVE THE EXTERNAL CASES OR CABINETS TO EXPOSE THE ELECTRONICS. NO USER SERVICEABLE PARTS ARE INSIDE.
- IF YOU ARE EXPERIENCING PROBLEMS WITH THIS PRODUCT, CONTACT THE STORE WHERE YOU PURCHASED THE UNIT FOR A SERVICE REFERRAL. DO NOT USE THE PRODUCT UNTIL IT HAS BEEN REPAIRED.
- USE OF CONTROLS OR ADJUSTMENTS OR PERFORMANCE OF PROCEDURES OTHER THAN THOSE SPECIFIED HEREIN MAY RESULT IN HAZARDOUS RADIATION EXPOSURE.
- Read these instructions.
- Keep these instructions.
- Heed all warnings.
- Follow all instructions.
- Do not use this apparatus near water.
- Clean only with dry cloth.
- Do not block any ventilation openings. Install in accordance with the manufacturer's instructions.
- Do not install near any heat sources such as radiators, heat registers, stoves, or other apparatus (including amplifiers) that produce heat.
- Do not defeat the safety purpose of the polarized or grounding-type plug. A polarized plug has two blades with one wider than the other. A grounding type plug has two blades and a third grounding prong. The wide blade or the third prong are provided for your safety. If the provided plug does not fit into your outlet, consult an electrician for replacement of the obsolete outlet.
- Protect the power cord from being walked on or pinched particularly at plugs, convenience receptacles, and the point where they exit from the apparatus.
- Only use attachments/accessories specified by the manufacturer.
![]()
Use only with the cart, stand, tripod, bracket, or table specified by the manufacturer, or sold with the apparatus. When a cart is used, use caution when moving the cart/apparatus combination to avoid injury from tip-over.- Unplug this apparatus during lightning storms or when unused for long periods of time.
- Refer all servicing to qualified service personnel. Servicing is required when the apparatus has been damaged in any way, such as power-supply cord or plug is damaged, liquid has been spilled or objects have fallen into the apparatus, the apparatus has been exposed to rain or moisture, does not operate normally, or has been dropped.

- The apparatus draws nominal non-operating power from the AC outlet with its POWER or STANDBY/ON switch not in the ON position.
- The mains plug is used as the disconnect device, the disconnect device shall remain readily operable.
- Caution should be taken when using earphones or headphones with the product because excessive sound pressure (volume) from earphones or headphones can cause hearing loss.
- Do not expose this apparatus to drips or splashes.
- Do not place any objects filled with liquids, such as vases, on the apparatus.
- Do not install this apparatus in a confined space such as a book case or similar unit.
- The apparatus should be located close enough to the AC outlet so that you can easily reach the power cord plug at any time.
IN USA/CANADA, USE ONLY ON 120 V SUPPLY.
Product registration
Customers in the USA, please visit the following TEAC website to register your TEAC product online. http://audio.teac.com/support/registration/
Using the TEAC Global Site
You can download updates for this unit from the TEAC Global Site:
http://teac-global.com/
- Open the TEAC Global Site.
- In the TEAC Downloads section, click the desired language to open the Downloads website page for that language.
![warning]() NOTE
NOTE
If the desired language does not appear, click Other Languages. - Click the "Search by Model Name" section to open the Downloads page for that product. (Users in Europe should click the product name in the "Products" section instead.)
- Select and download any updates that are needed.
Documents / Resources
References
Download manual
Here you can download full pdf version of manual, it may contain additional safety instructions, warranty information, FCC rules, etc.
Advertisement


Need help?
Do you have a question about the TN-100 and is the answer not in the manual?
Questions and answers