Advertisement
BOX CONTENTS
WHAT'S IN THE BOX

- Oakcastle Vision DVD Player
- Remote Control
- Instructions Guide
- RCA AV cable
CONTROLS & FUNCTIONS
REMOTE CONTROL

- On/Off
- OSD
- Step: Press to turn play picture by picture on/off.
- Press to switch between DVD/USB.
- Mute/Unmute
- Title
- Left (<)
- Setup: Press for setup menu
- L/R: Use for VCD or CD discs. Press to select left or right channel, or stereo
- Previous (I<<): In DVD mode, press to go to previous chapter. With SVCD, VCD, CD, MP3 discs, press to go to previous track.
- Volume down (-)
- Next (>>I): In DVD mode, press to go to next chapter. With SVCD, VCD, CD, MP3 discs, press to go to next track.
- Play/Pause
- Video: Switch to video output mode (cvbs.yuv.rgb)
- Programme
- Repeat: Press repeatedly in DVD mode to scroll through: repeat a title, chapter, track or go to the beginning. In SVCD, VCD or CD mode: track repeat, all repeat or repeat cancel.
- PBC: Playback control
- Language: Press to select on-screen display language options
- Subtitle: Press to turn subtitles on
- Open/Close DVD Tray
- 0-9/10+: While playing DVD/VCD/CD/ MP3 discs, use key to select desired track/chapter in menu selection.
- Time: Press to manually set up the time on the DVD player display unit
- Return to main DVD title menu
- Navigate up
- Right (>)
- Enter/Confirm
- Zoom: Press to zoom in, press again to zoom out. Use arrow keys to move picture.
- Navigate down
- N/P: Press to switch the TV system between NTSC and PAL.
- Rewind (<<)
- Volume up (+)
- Fast Forward (>>)
- Stop
- A-B: Press to repeat certain sections. Press button on start point (A) and the end point (B) to select section. Cancel by pressing button a third time.
- Clear: Press to clear input selections
- Slow: Press to select slow speed playing.
- Return: Return to VCD menu.
- Reset: Reset DVD player settings
- Angle: Change angle in DVD mode
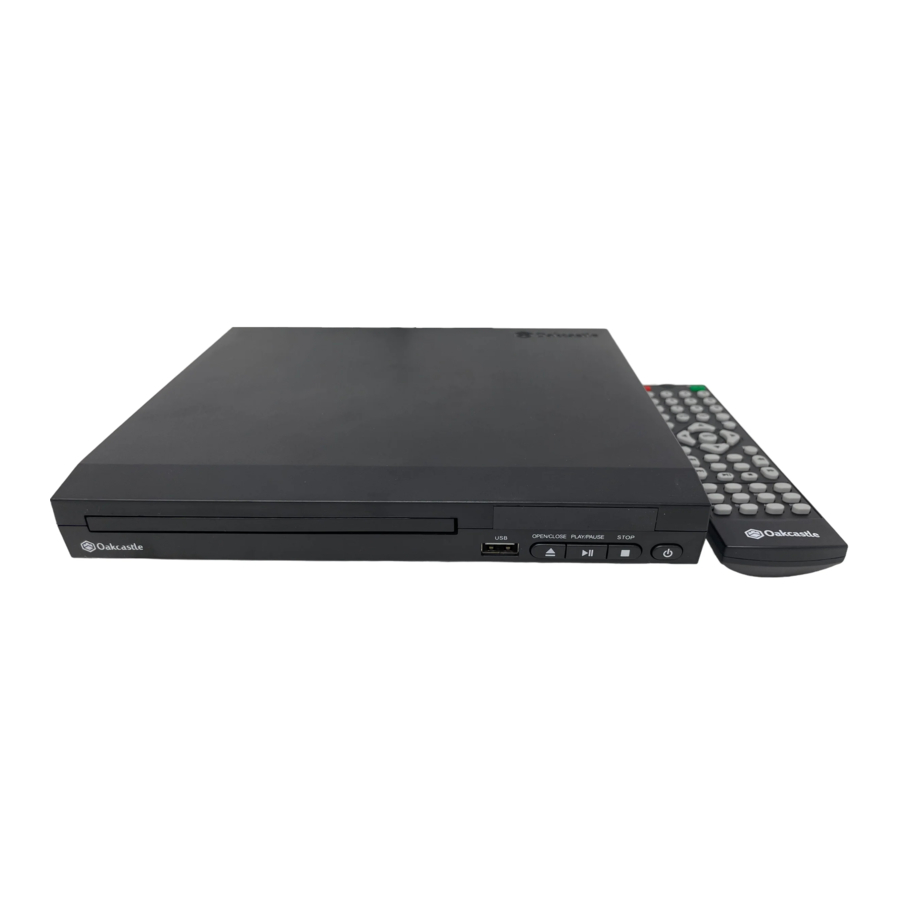
CONTROL BUTTONS

- DVD Tray
- Remote Sensor
- Display
- USB Port
- Open/Close
- Play/Pause
- Stop
- Power On/Off
- (Y.Pb/Cb. Pr/Cr) Output
- Power Cable Outlet
- HDMI Output
- 2 x Audio Output ports
- Video Output
GETTING STARTED
Setting Up
Connect the DVD player power plug to a wall outlet. The power indicator and timer on the front panel will illuminate.
Follow one of the steps below for connecting your DVD player:
Connecting Via RCA Cable
Connect a RCA cable between the 2 channel Audio Output port and the RCA input on your TV.
Connecting via HDMI
Connect a HDMI cable between the HDMI Output on the back panel of the DVD player (Ref.50) to the HDMI input on your TV.
Connecting via Component (Y Pb/Cb Pr/Cr) Cable
Connect a (Y Pb/Cb Pr/Cr) cable via the (Y/Cb/Pb Cr/Pr) Output of the DVD player (Ref.48) to your TV (R/L/Video port and cable).
Programme Button
If the disc has two or more tracks, chapters, or titles, you can set up playing order preference. Press the button to then input the number of the track, title or chapter. If the programmed tracks are over 10, press 'Next' to go on programming. Use the up/down/left/right key to move the cursor to 'Start'. Press 'Enter' to start programmed play. With MP3 discs, press the button to enter 'Directory-Play' mode.
Press 'Programme' again to enter file-list mode.
DVD OPERATION
The following DVD formats can be played: DVD, DVD-R-RW, CD Video, Mpeg4.
- Ensure that your TV is set to the correct mode for DVD playback.
- Plug in the DVD player and press the 'Power' button to turn the unit on. You can do this on the unit (Ref.47) or via the remote (Ref.1).
When the machine is switched on, pressing the POWER button on the remote control will make it go into standby mode. Press the button again and the machine will switch on.
![]()
If the product will not be used for an extended period of time, it is advisable to unplug it for safety. - Press the Open/Close button on the front panel (Ref.44) or on the remote control (Ref.20) and place a DVD disc on the disc tray. Press the Open/Close button again to close the tray.
- The DVD player will read the DVD disc and begin playing. You can control the playback and settings via the remote control.

USB OPERATION
This device has a USB port in the front interface for MP3/Movie playback. Insert a USB device into the USB port (Ref.43).
Press the DVD/USB button on the remote control (Ref.4) and select 'USB' to switch the source to USB. The DVD player will read and display the file list from the USB drive.
Browse through the file list by pressing the  buttons (Ref 7, 24, 25, 28) on the remote control. Select a file by pressing the Enter button (Ref.26) of the remote control.
Playing MP3 Discs
The following formats can be played: Mp3, WMA, CD Audio, CD-R-RW, CD Whilst a MP3 disc is playing, a menu screen will display on the TV. Press the  buttons (Ref.24)/(Ref.28) to scroll through tracks or folders. Press the ENTER button to select the track or folder.
Press the PROG button in file play mode. The screen will then display the total track number and the current track playing. Use the digit buttons (Ref.21) to key in and select the track or use the  buttons to shift to the track and press the ENTER button (Ref.26) to play the track.
PLAYING JPEG/PICTURE CD & MP3 DISCS
The following formats can be played: Jpg, Jpeg, CD Photo
Press the STOP button and 12 small pictures will show on the TV screen.
Press the buttons to select the desired picture to view. (Ref.7), (Ref.24), (Ref.25), (Ref.28).
To access the instructions menu, use the buttons to navigate and then press the ENTER button to confirm. The following options will display:
- PROG - Select to change picture transform mode
- STOP - Entering picture preview mode
- PREV - Previous picture
- NEXT - Next picture
- PLAY - Play picture
- UP - Mirror image in vertical
- DOWN - Mirror image in horizontal
- LEFT - Rotate 90 degrees anticlockwise
- RIGHT - Rotate 90 degrees clockwise
- ZOOM - Change zoom mode
- FAST FORWARD - Zoom in the picture
- FAST REWIND - Zoom out the picture
![]() - Move zoom focus for picture.
- Move zoom focus for picture.
SYSTEM SET-UP
MENU OPERATION
Press the SET-UP button (Ref.8) on the remote control and the SET-UP menu will display.
The menu options are as follows:
Menu 1: System Setup
Menu 2: Language Setup
Menu 3: Audio Setup
Menu 4: Video Setup
Menu 5: Speaker Setup
Menu 6: Dolby Digital Setup
After accessing the SET-UP menu, press the buttons (Ref.7), (Ref.24), (Ref.25), (Ref.28) to access your chosen sub-menu. Press the ENTER button to confirm your selection.
To end the set-up, press the SET-UP button again.
Follow the guidance on the next pages for editing these settings.
MENU 1: SYSTEM SETUP
TV System (NTSC/PAL 60/PAL/AUTO): This unit is suitable for all makes for TV's.
You can select PAL or NTSC if necessary. PAL must be selected for use in Europe.
Auto Play: Turn Auto Play On/Off.
Video: Select between Interlace-YUV and P-Scan YPBPR video output.
Resolution: Select resolution levels from the HDMI output: 480 I/576I, 480P/576P, 720P, 1080I, 1080P
TV Type: Different values will be displayed here depending on your TV set. In most cases you will be able to select from 4:3/PS (Pan and Scan), 4:3/LB (Letterbox), and 16:9 (best for widescreen TV sets).
Password: The initial factory password is 0000. You can change the password here.
Rating: Select to control parental control settings. Any disc with a parental level higher than the set level will not be played.
Resume (Off/On): If the last memory is set when the unit is on and the unit is switched off, the last position on the DVD player will be memorised.
Default: Select to revert to original factory set up on this unit.
Next Page: Navigate to next page of settings
Prev Page: Navigate to previous page of settings
Exit Setup: Exit Setup screen. Alternatively, press the 'Setup' button on the remote.
MENU 2: LANGUAGE SETUP
Osd Language
Select a language for the on-screen display language (English, German, Spanish, French, Portuguese, Italian).
Audio Language
Select a language for the audio (English, French, Spanish, Portuguese, German, Italian, Japan, Latin).
Subtitle Language
Select a language for the subtitles (English, French, Spanish, Portuguese, German, Italian, Japan, or Off).
Menu Language
Select a language for the menu (English, French, Spanish, Portuguese, German, Italian, Japan, Latin).
MENU 3: AUDIO SETUP
Audio Out
SPDIF/OFF: Turn off the Optical/Coaxial audio signal.
SPDIF/RAW: Use with Dolby Digital/DBS enabled speaker systems or TVs
SPDIF/PCM: Use with any other type of speaker system or TV. PCM is the simplest digital audio signal, with no special effects.
Key
Adjust the left/right audio pitch. Positive numbers increase audio pitch, negative numbers decrease audio pitch.
MENU 4: VIDEO SETUP
Change settings for Brightness, Contrast, Hue, and Saturation.
MENU 5: SPEAKER SETUP
Downmix: Mixing audio Channels
Choose between the following audio mix settings:
LT/RT (Left total/Right total)
Stereo: Select to play the audio via the two front speakers of the TV. VSS (Virtual Surround Sound): Select to play simulated surround sound via the speakers.
MENU 6: DOLBY DIGITAL SETUP
OP Mode
Select to choose between Line Out/RF Remod settings.
Dynamic Range
Select to change the bass and treble settings, to create a fine detailed sound. This mode is recommended for reduced sound to avoid disturbance for night time viewing.
Dual Mono
Select to change between the following audio settings:
Stereo: stereo output
Mono L: mono-left channel
Mono R: mono-right channel
Mix Mono: mix mono channel
TROUBLESHOOTING
| Symptoms | Solutions |
No power/function | Check that the power is switched on at the wall. Check that the power adaptor is properly connected to power outlet. |
No video | Make sure that the video cables are connected correctly. Reset the settings of the DVD player. Check that the input setting on the TV is correct. |
No audio | Make sure that the audio cables are connected correctly. Make sure that the coaxial connected stereo is powered on. Reset the settings of the DVD player. |
Distorted video | Clean DVD disc of dust/dirt The playback is on rewind/fast forward mode. |
Unable to play | Place a DVD disc in the disc tray. Place the disc in on the correct side up. Clean DVD disc of dust/dirt. Close the setup of the DVD player. Check that the file is compatible with the unit. |
Remote Control does not work | Aim the Remote Control towards the front panel of the DVD player. Use the Remote Control closer to the DVD player. Check the battery level of the batteries. |
SUPPORT
If you require further assistance with your new DVD player, please contact our support team on the Oakcastle website: www.oakcastle.co.uk
SPECIFICATIONS
| Power Supply | AC 100-240V 0.5A |
| Frequency Response | ~ 50/60Hz |
| Power Consumption | <15W |
| Compatible Connections | HDMI A/V RCA Output USB Input (Y Pb/Cb Pr/Cr) R/L/Video |
| Compatible Formats | DVD: DVD, DVD-R-RW, CD Video, Mpeg4 AUDIO: Mp3, WMA, CD Audio, CD-R-RW, CD PHOTO: Jpg, Jpeg, CD Photo |
| Dimension (WxHxD) | 22.5 x 19 x 4.5 cm 742g |
SAFETY INFORMATION
- Read these instructions
- Keep these instructions. Instructions are also available for download atwww.oakcastle.co.uk
- Heed all Warnings
- Follow all instructions
- Do not clean the apparatus near or with water
- Do not block any ventilation openings. Install in accordance with the manufacturer's instructions
- Do not install near any heat sources such as radiators, heat registers, stoves, or other apparatus (including amplifiers) that produce heat.
- Protect the power from being walked on or pinched particularly at plugs, convenience receptacles, and the point where they exit from the apparatus.
- Only use attachments/accessories specified by the manufacturer.
- Unplug this apparatus during light storms or when unused for long periods of time.
- Refer all servicing to qualified service personnel. Servicing is required when the apparatus has been damaged in a way, such as power-supply cord or plug is damaged, liquid has been spilled or objects have fallen into the apparatus, the apparatus has been exposed to the rain or moisture, does not operate normally or has been dropped.
- No naked flame sources, such as lit candles, should be placed on the apparatus.
- Dispose of used electrical products and batteries safely according to your local authority and regulations.
 ADDITIONAL WARNINGS
The apparatus shall not be exposed to dripping or splashing and no objects filled with liquid, such as vases, shall be places on the apparatus. Main plug is used to disconnect device and it should remain readily operable during intended use. In order to disconnect the apparatus from the main mains completely, the mains plug should be disconnected from the main socket outlet completely. Battery shall not be exposed to excessive heat such as sunshine, fire or the like.

Please read all instructions carefully before use and keep for future reference.
 Risk of electric shock. Do not open
Read all instructions carefully before use and keep for future reference
![]() When servicing, use only identical replacement parts
When servicing, use only identical replacement parts

RISK OF ELECTRIC SHOCK DO NOT OPEN
Please read all instructions carefully before use and keep for future reference
Documents / Resources
References
Download manual
Here you can download full pdf version of manual, it may contain additional safety instructions, warranty information, FCC rules, etc.
Advertisement


Need help?
Do you have a question about the OAKCASTLE Vision and is the answer not in the manual?
Questions and answers