MAJORITY Robinson 2DAB - DAB+ Adapter Manual
- Instruction manual (32 pages) ,
- User manual (96 pages)
Advertisement
- 1 Controls And Functions
- 2 What's In the Box
- 3 Instructions Guide
- 4 Hints and Tips
- 5 Specifications
- 6 Support
- 7 Safety Information
- 8 Documents / Resources
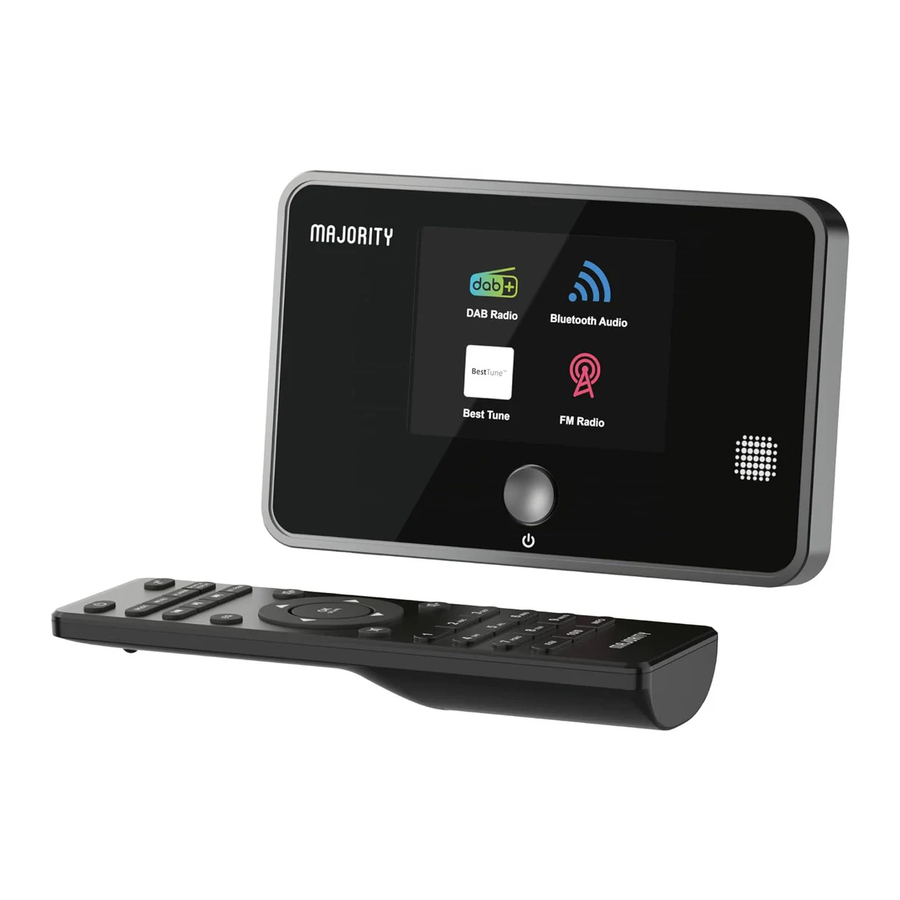
Controls And Functions
Front view

- DISPLAY
![]() Button
Button- REMOTE CONTROL SENSOR
 Button
Rear view

- DC IN SOCKET
- LINE OUT SOCKET (RCA Jack)
- OPTICAL OUT CONNECTION
- ANTENNA
Remote control

- STANDBY
![]() Button
Button - SLEEP Button
- CLOCK Button
- DAB Button
- FM Button
- MODE Button
![]() Button
Button ![]() Button
Button - SELECT Button
- EQ Button
- VOLUME + / – Buttons
- Number Buttons
- MONO/ST. Button
- SNOOZE Button
- ALARM Button
- SCAN Button
- BT Button
- Bluetooth Button
- INFO Button
![]() Button
Button ![]() Button
Button - PRESET Button
- MENU Button
- PRESET
![]() Buttons
Buttons - Pair Button
- MUTE Button
 Button
  Button
  Button
  Button
  Button
  Buttons
 What's In the Box


- Main Unit
- Instruction Manual
- ANTENNA
- Mains Adapter
- Remote
Instructions Guide
BATTERY REPLACEMENT FOR THE REMOTE CONTROL
- Press down the battery cover at "
![]() " and push the battery cover outwards in the direction of the arrow.
" and push the battery cover outwards in the direction of the arrow.
![]()
- Insert 2 x AAA 1.5V alkaline batteries (not included). Make sure to match the (+) and ( - ) ends of the battery with the (+) and ( - ) ends indicated in the battery compartment.
![]()
- Close the cover.
 " and push the battery cover outwards in the direction of the arrow.

 Handling the Battery
![burn hazard]() Improper or incorrect use of batteries may cause corrosion or battery leakage, which could cause fire, personal injury or damage to property.
Improper or incorrect use of batteries may cause corrosion or battery leakage, which could cause fire, personal injury or damage to property.- Only use the battery type indicated in this manual.
- Do not dispose of the used battery as domestic waste. Dispose of it in accordance with local regulations.
![burn hazard]() Remove the battery from the remote control when not in use for a long period of time, as corrosion or battery leakage may occur and result in physical injury, and/or property damage, and/or fire.
Remove the battery from the remote control when not in use for a long period of time, as corrosion or battery leakage may occur and result in physical injury, and/or property damage, and/or fire.
 Improper or incorrect use of batteries may cause corrosion or battery leakage, which could cause fire, personal injury or damage to property.
REMOTE CONTROL OPERATION RANGE
The remote control sensor on the front unit is sensitive to the remote control's commands up to a maximum of 4 metres away and within a maximum of 60° arc.
Note that the operating distance may vary depending on the brightness of the room.

CONNECTION
- The audio output (analogue) and optical out (digital) are available on the back of the unit to connect A/V amplifier or HiFi system.
- Connect the antenna included in the supply to the antenna connection and unwind it to the desired length.
- Unwind the mains adapter cable to its full length. Connect the end of the cable to the DC IN Socket at the rear of the unit and then connect the mains adapter to the mains socket. Make sure the mains adapter is firmly inserted into the mains socket. The unit is now ready to use.
Connecting the unit to any other power source may damage the unit.
- To switch the unit off completely, unplug the mains adapter from the mains socket.
GETTING STARTED
 This instruction manual explains the basic instruction for operating this unit. Unless otherwise stated, all operations described are based on remote control use.
Powering ON/OFF
- Press
![]() STANDBY button on unit or remote control to switch the unit on.
STANDBY button on unit or remote control to switch the unit on. - Press
![]() STANDBY button on unit or remote control to switch the unit back to standby on mode.
STANDBY button on unit or remote control to switch the unit back to standby on mode.
 STANDBY button on unit or remote control to switch the unit on.
 When the unit is idle for approximately 15 minutes in BestTune, DAB+ or Bluetooth mode (with external unit disconnected), it will automatically switch to Standby mode.
To switch the unit off completely, remove the mains plug from the main socket.
Please turn the unit off completely to save energy when not in use.
BestTune
Congratulation, your new radio contains BestTune
The BestTune feature presents DAB+ and FM stations into a single list. The selected station will automatically be played on DAB+ or FM, based on which has the best reception.
You will see a single list of radio stations after the initial scan and will no longer have to choose between FM and DAB+ modes.
Turning ON/OFF the BestTune
- Press MENU button to access menu.
- Press
![]() buttons to select System Settings, and then press SELECT button to confirm.
buttons to select System Settings, and then press SELECT button to confirm. - Press
![]() buttons to select BestTune, and then press SELECT button to confirm.
buttons to select BestTune, and then press SELECT button to confirm. - Press
![]() buttons to select [On] for turning on BestTune mode; Or select [Off] for turning off. Then press SELECT button to confirm selection.
buttons to select [On] for turning on BestTune mode; Or select [Off] for turning off. Then press SELECT button to confirm selection.
DAB+ and FM modes will be presented separately when BestTune mode is turned off.
Selecting Modes
Press MODE button repeatedly to switch between following modes.
| BestTune mode | Modes |
| ON | BestTune and Bluetooth modes |
| OFF | DAB+, FM and Bluetooth modes |
Adjusting the Volume
Press VOLUME +/- buttons to adjust the volume level.
To temporarily mute the sound, press MUTE button.
To resume normal listening, press MUTE button again, or press VOLUME +/– buttons.
Navigating the Menu
- Press MENU button to access menu.
- Press
![]() buttons to move the selection.
buttons to move the selection. - Press SELECT button to confirm selection.
 buttons to move the selection.
BESTTUNE MODE OPERATION
To switch the unit to BestTune mode, press MODE button repeatedly.
When turning on unit for the first time, or you have just performed a factory reset, the unit will automatically enter into BestTune mode and perform initial scan.
While scanning, the display will show "Scanning..." and a progress bar which indicates the scan progress and the amount of found stations.
After the scan has completed, all the found DAB+ and FM stations will show in BestTune Station List. The first station will be selected automatically.
Station List
The Station List will show all the found DAB+ and FM radio stations after scanning.
- To explore Station List, press MENU button to access menu.
- Press
![]() buttons to select Station List, and then press SELECT button to confirm.
buttons to select Station List, and then press SELECT button to confirm. - Press
![]() buttons to select a station, and then press SELECT button to confirm selection.
buttons to select a station, and then press SELECT button to confirm selection.
BestTune Scan
The BestTune scan will search for the entire DAB and FM channels.
- To perform BestTune scan, press MENU button to access menu.
- Press
![]() buttons to select BestTune Scan, and then press SELECT button to confirm. The display will show "Scanning..." and a progressing slide bar.
buttons to select BestTune Scan, and then press SELECT button to confirm. The display will show "Scanning..." and a progressing slide bar. - All the found stations will show in Station List. To explore and listen to the found stations, press
![]() buttons to select a station, and then press SELECT button to confirm selection.
buttons to select a station, and then press SELECT button to confirm selection.
Station Information
The Station Information will show further information that is being broadcast.
- To view Station Information, press INFO button.
- The following information will be shown on display:
| Service | Station service title |
| Sources | Source (DAB+ / FM) that is being broadcast If more than one source is available:
|
| PTY | Programme type that is being broadcast |
| Freq | FM frequency or DAB channel dependent on source |
| Bitrate | Bitrate for a digital source ("0kbps" displayed for FM source) |
| Signal | Signal strength expressed as a percentage |
Prune Invalid
This function allows you to delete all the stations which are invalid or in very poor reception in Station List.
- To perform pruning invalid stations, press MENU button to access menu.
- Press
![]() buttons to select Prune Invalid, then press SELECT button to confirm.
buttons to select Prune Invalid, then press SELECT button to confirm. - Press the
![]() buttons to select [Yes] for deleting invalid stations; Or select [No] to cancel. Then press SELECT button to confirm selection.
buttons to select [Yes] for deleting invalid stations; Or select [No] to cancel. Then press SELECT button to confirm selection.
 buttons to select [Yes] for deleting invalid stations; Or select [No] to cancel. Then press SELECT button to confirm selection.
Presetting Stations
You can access your favorite stations quickly and easily by storing up to 30 stations into Preset Station List.
Storing Preset Station
- Listen to the station that you would like to store into Preset Station List.
- Press and hold PRESET button to access Preset Station List.
- Press
![]() buttons to select the preset station number to save, then press SELECT button to confirm selection.
buttons to select the preset station number to save, then press SELECT button to confirm selection. - The words "Preset # saved" will show on display.
To store a preset, you must first be listening to the station that you would like to save.
Recalling Preset Station
- Press PRESET button to access Preset Station List.
- Press
![]() buttons to select the desired preset station number, then press SELECT button to confirm selection.
buttons to select the desired preset station number, then press SELECT button to confirm selection.
If you choose a preset station number that has not been allocated a station, the display will show "Preset Empty".
Preset Station Lists are independent under BestTune, DAB and FM mode.
You can only access BestTune Preset Station List under BestTune mode.
Please switch to DAB mode if you want to access DAB Preset Station List; or switch to FM mode if you want to access FM Preset Station List.
DAB+ MODE OPERATION
To switch the unit to DAB+ mode, press MODE button repeatedly.
When you switch to DAB+ mode for the first time, the unit will automatically perform initial scan.
While scanning, the display will show "Scanning..." and a progress bar which indicates the scan progress and the amount of found stations.
After the scan has completed, all the found DAB+ stations will show in DAB+ Station List. The first station will be selected automatically.
DAB+ mode is available only when BestTune set OFF. Please refer to BestTune section for setup.
Station List
- Press MENU button to access menu.
- Press
![]() buttons to select Station List, then press SELECT button to confirm.
buttons to select Station List, then press SELECT button to confirm. - A list of DAB stations will show on the display.
DAB Scan
The DAB Scan will search for the entire DAB+ Band III channels.
- To perform DAB Scan, press SCAN button.
Alternatively:
- Press MENU button to access menu.
- Press
![]() buttons to select DAB Scan, then press SELECT button to confirm.
buttons to select DAB Scan, then press SELECT button to confirm.
- The display will show "Scanning..." and a progress slide bar.
- All the stations that have been found will be stored automatically. To explore and listen to the found stations, press
![]() buttons to select and then press SELECT button to confirm selection.
buttons to select and then press SELECT button to confirm selection.
Station Information
The Station Information will show further information that is being broadcast.
- To view Station Information, press INFO button.
- The following information will be shown on display:
| Service | Station service title |
| Sources | Source that is being broadcast ("DAB".displayed for DAB source) |
| PTY | Programme type that is being broadcast |
| Freq | DAB channel |
| Bitrate | The bitrate for a digital source. |
| Signal | Signal strength expressed as a percentage. |
Manual Tuning
As well as the normal method of DAB Scan, you can also manual tune to a particular channel. This can be useful for adjusting your antenna to achieve the best possible reception and scanning a particular channel to update the Station List.
- To perform manual tune, press MENU button to access menu.
- Press
![]() buttons to select Manual Tune, then press SELECT button to confirm.
buttons to select Manual Tune, then press SELECT button to confirm. - Press
![]() buttons to select the DAB+ channels (5A - 13F), than press SELECT button to confirm selection.
buttons to select the DAB+ channels (5A - 13F), than press SELECT button to confirm selection. - To listen to any stations found, return to the now playing screen and press
![]() buttons to select the required station from the Station List.
buttons to select the required station from the Station List.
Presetting Stations
Please refer to the "Presetting Stations" in BestTune operation section.
Preset Station Lists are independent under BestTune, DAB and FM mode.
You can only access DAB Preset Station List under DAB mode.
Please switch to BestTune mode if you want to access BestTune Preset Station List; or switch to FM mode if you want to access FM Preset Station List.
Prune Invalid
Please refer to the "Prune Invalid" in BestTune operation section.
FM MODE OPERATION
To switch the unit to FM mode, press MODE button repeatedly. The display will show the frequency or station name and any further "RadioText" information if available.
Manual Tuning
As well as the normal method of Auto Scan, you can also manual tune to a particular frequency.
To search for FM stations manually, press  buttons repeatedly until your desired frequency is reached.
It may be necessary to fine tune the frequency for each station.
(Press buttons repeatedly to adjust 0.05 MHz.)
If the reception is poor, adjust the position of aerial or try moving the unit to another location.
Station Information
The Station Information will show further information that is being broadcast.
To view further information broadcast by the station, press INFO button, the display will show the following information:
| Service | Station service title |
| PTY | This describes the programme type that is being broadcast. |
| Freq | FM frequency. |
| Signal | Signal strength expressed as a percentage. |
Scan Setting
This function allows you to scan all stations, or stations with strong signal only.
- To perform Scan Setting, press MENU button to access menu.
- Press
![]() buttons to select Scan Setting, then press SELECT button to confirm.
buttons to select Scan Setting, then press SELECT button to confirm. - Press
![]() buttons to select [Strong Stations Only] or [All Stations], than press SELECT button to confirm selection
buttons to select [Strong Stations Only] or [All Stations], than press SELECT button to confirm selection
Audio Setting
This function allows you to search for stereo or mono stations.
- Press MONO/ST. button to switch between Mono or Mono/Stereo playing.
Alternatively:
- Press MENU button to access menu.
- Press
![]() buttons to select Audio Setting, then press SELECT button to confirm.
buttons to select Audio Setting, then press SELECT button to confirm. - Press
![]() buttons to select [Stereo Allowed] or [Forced Mono], then press SELECT button to confirm selection.
buttons to select [Stereo Allowed] or [Forced Mono], then press SELECT button to confirm selection.
The unit will automatically switch between stereo and mono when <Stereo allowed> is selected depending on the signal strength, but you can override this and switch this function manually. This is helpful when receiving poor signal reception.
Presetting Stations
Please refer to the "Presetting Stations" in BestTune operation section.
Preset Station Lists are independent under BestTune, DAB and FM mode.
You can only access FM Preset Station List under FM mode.
Please switch to BestTune mode if you want to access BestTune Preset Station List; or switch to DAB mode if you want to access DAB Preset Station List.
BLUETOOTH AUDIO MODE OPERATION
This unit has Bluetooth function, you can pair the unit with other Bluetooth devices to play music.
- To switch the unit to Bluetooth Audio mode, press MODE button repeatedly. Alternatively, press BT button to enter Bluetooth Audio mode.
- If this unit is not paired with any Bluetooth device, the display will show "Please connect the device with: Majority Robinson 2DAB".
- Activate your Bluetooth device and select the search mode.
- "Majority Robinson 2DAB" will appear on your Bluetooth device list.
- Select "Majority Robinson 2DAB" and enter "0000" for the password if necessary.
- When playback a soundtrack, press
![]() button to pause the playback, and press
button to pause the playback, and press ![]() button again to resume playback.
button again to resume playback. - Press
![]() button to skip backward to the beginning of the track, or press and hold
button to skip backward to the beginning of the track, or press and hold ![]() button to skip backward to previous track.
button to skip backward to previous track. - Press
![]() button to skip forward to next track.
button to skip forward to next track. - To disconnect the Bluetooth pairing, press and hold PAIR button, or switch the unit to another mode or disable the function from your Bluetooth device.
 button to pause the playback, and press
  button to skip backward to the beginning of the track, or press and hold
  button to skip forward to next track.
- The operational range between unit and device is approximately 8 meters.
- If the signal strength is weak, your Bluetooth receiver may disconnect, but it will re-enter pairing mode automatically.
- For better signal reception, remove any obstacles between the unit and the Bluetooth device.
- Compatibility with all devices and media types is not guaranteed.
- Some mobile phones with the Bluetooth function may connect and disconnect as you make and end calls. This is not an indication of a problem with your unit.
ALARM AND SNOOZE
As well as a clock/calendar, there are two wake-up alarms with snooze facility. The alarm sound for each alarm can use a Buzzer, Digital Radio or FM.
Alarm
- Press ALARM button to access Alarm menu, the display will show "Alarm (1 or 2): (On or Off) [hh: mm]".
- Press
![]() buttons to select [alarm 1] or [alarm 2], then press SELECT button to confirm selection
buttons to select [alarm 1] or [alarm 2], then press SELECT button to confirm selection - Press
![]() buttons to select, then press SELECT button to confirm the following parameters:
buttons to select, then press SELECT button to confirm the following parameters:
| Alarm | Alarm On / Off |
| Frequency | Daily / Once / Weekends / Weekdays |
| Wake Up time | (Alarm On time) |
| Source | When BestTune turn ON: Buzzer / DAB+ / FM |
| When BestTune turn OFF: Buzzer / DAB/FM | |
| Duration | 15 / 30 / 45 / 60 / 90 / 120 minutes |
| Volume | 0-31 |
In Standby mode, active alarms are indicated by displaying the relevant Alarm 1 and/or Alarm 2 icons.
At the set time, the alarm will sound quietly at first, then gradually building up to the set volume.
To cancel a sounding alarm and switch the unit to Standby mode, press  STANDBY button.
Snooze
To temporarily switch off alarm, press SNOOZE button.
You can change the snooze period by pressing SNOOZE button repeatedly. Snooze periods are 5, 10, 15 and 30 minutes.
The unit returns to Standby mode for the set time period with a snooze countdown displayed. When the countdown reaches 0 (zero), the alarm will trigger again.
Press  STANDBY button to fully cancel a sounding alarm and switch the unit to Standby mode.
SLEEP SETTING
This function allows you to program the unit to turn to standby mode by itself after a set period of time.
- To activate Sleep function, press SLEEP button repeatedly. The sleep time will change in below sequence:
Sleep OFF![]() 10 minutes
10 minutes ![]() 20 minutes
20 minutes ![]() 30 minutes
30 minutes ![]() 60 minutes
60 minutes ![]() 70 minutes
70 minutes ![]() 80 minutes
80 minutes ![]() 90 minutes
90 minutes - When your desired sleep time appears on display, stop pressing the SLEEP button, the Sleep timer will activate in 2 seconds.
- When the Sleep timer counts down to zero, the unit will turn to Standby mode.
- To turn off the Sleep function, press SLEEP button repeatedly to select [SLEEP OFF].
 10 minutes
 SYSTEM SETTINGS
Press MENU button to access menu. Press  buttons to select System Settings, and then press SELECT button to confirm.
Equaliser
This system supports a variety of equalizers and sound effects.
Press EQ button to access Equaliser menu.
Alternatively:
During System Settings, press  buttons to select Equaliser, and then press SELECT button to confirm.
- The display will show: Normal, Classic, Jazz, Pop, Rock, My EQ and My EQ Setup.
- Press
![]() buttons to select, and then pressSELECT button to confirm selection.
buttons to select, and then pressSELECT button to confirm selection. - For My EQ, please go to My EQ Setup for custom setting before use.
- During My EQ Setup, press
![]() buttons to select [Treble/Bass], and then press SELECT button to confirm. Press
buttons to select [Treble/Bass], and then press SELECT button to confirm. Press ![]() buttons to select desired level, and then press SELECT button to confirm selection.
buttons to select desired level, and then press SELECT button to confirm selection. - Press MENU button to exit Equaliser menu.
Time/Date
The Time/Date can be automatically set once it has been connected to the, DAB or FM radio station with time/date information. You may also adjust the Time/Date manually.
To set the time and date, press CLOCK button to access Time/Date setting menu.
Alternatively:
- During System Settings, press
![]() buttons to select Time/Date, and then press SELECT button to confirm.
buttons to select Time/Date, and then press SELECT button to confirm. - Press
![]() buttons to select, and then press SELECT button to confirm below option:
buttons to select, and then press SELECT button to confirm below option:
| Set Time/Date | Press buttons to adjust the time and date, then press SELECT button to confirm selection. |
| Auto update | Update from Any / Digital Radio / FM / No Update |
| Set Format | 12 Hour / 24 Hour |
| Set Date Format | DD-MM-YYYY / MM-DD-YYYY |
| Clock Style | Normal Digital / Big Digital / Classic Analog / Modern Analog |
The default auto time update setting is [Update from Any]. If you would like to manually set the time, it is recommended to turn the Auto update function off.
Language
- During System Settings, press
![]() buttons to select Language, and then press SELECT button to confirm.
buttons to select Language, and then press SELECT button to confirm. - Press
![]() buttons to select your preferred language, then press SELECT button to confirm selection.
buttons to select your preferred language, then press SELECT button to confirm selection.
Factory Reset
There may be times when you need to reset your unit back to the factory settings especially when you have moved house. If you have reception problems, you may want to reset and try again. If you move to another part of the country and pick up the local and national DAB stations in that area, your previously tuned channels may no longer be available.
- During System Settings, press
![]() buttons to select Factory Reset, and then press SELECT button to confirm.
buttons to select Factory Reset, and then press SELECT button to confirm. - Press
![]() buttons to select [Yes] for factory reset; Or select [No] to cancel. Then press SELECT button to confirm selection.
buttons to select [Yes] for factory reset; Or select [No] to cancel. Then press SELECT button to confirm selection.
 buttons to select [Yes] for factory reset; Or select [No] to cancel. Then press SELECT button to confirm selection.
 After factory reset, all the tuned DAB / FM stations, and DAB / FM preset stations will be erased.
Software Version
- During System Settings, press
![]() buttons to select Software Version, and then press SELECT button to confirm.
buttons to select Software Version, and then press SELECT button to confirm. - The software version will show on display.
Backlight
Press DIMMER button to change the backlight in High / Medium / Low / Off level.
MAINTENANCE
Cleaning the Unit
Ensure the unit is fully unplugged from the mains socket before cleaning.
- To clean the unit, wipe the case with a slightly moist, lint-free cloth.
- Do not use any cleaning fluids containing alcohol, ammonia or abrasives.
- Do not spray aerosol at or near the unit.
Hints and Tips
If a problem does occur, it may often be due to something very minor. The following table contains troubleshooting.
| General | |
| Problem | Solution |
No power |
|
No sound from the unit | Please try either one of the solutions below:
|
The unit does not respond when pressing any buttons |
|
| Radio DAB/FM | |
Poor radio reception |
|
Desired station not found |
|
| Bluetooth | |
| I cannot find "Majority Robinson 2DAB" on my Bluetooth device |
|
Can't hear the music |
|
If any functional abnormality is encountered, unplug the unit from the mains socket and reconnect it again
Specifications
| Brand | Majority | |
| Model | Robinson 2DAB | |
| System Section | ||
| Power Supply | Input: 100-240V ~ 50-60Hz 0.2A max. Output: 5.9V/1.0A | |
| Power Consumption | 5.9 W | |
| Working Environment - Temperature | 0 ~ 35°C | |
| Net Weight | Main unit: app. 185g Adapter: app. 80g | |
| Unit Dimension (W) × (D) × (H) | 140 x 57 x 91mm | |
| Radio Frequency | FM 87.50 – 108.00MHz DAB 174 - 240MHz | |
| Radio Frequency | FM 87.50 – 108.00 MHz DAB 174 - 240MHz | |
| Bluetooth version | Version | V4.2(only support BR+EDR) |
| Maximum transmitted power | 5 dBm | |
| Frequency band | 2402 - 2480 MHz | |
| Power Adapter information | ||
| Manufacturer's name and address: DONGGUAN DONGNIU ELECTRONIC TECHNOLOGY CO.,LTD 3th floor, NO.8, HengLing Street, HengJiao Industrial Park, ShiJie Town, Dongguan City, Guangdong, P.R. China | ||
| Model Number: | DNS051-0591000-AV (EU VDE Plug) DNS051-0591000-AB (UK BS Plug) | |
| Input Voltage and Frequency: | 100-240V ~ 50-60Hz 0.2A max. | |
| Output Voltage: | DC 5.9V | |
| Output Current: | 1.0A | |
| Output Power: | 5.9W | |
| Average Active Efficiency: | 75.0% | |
| Eifficiency at low load(10%) | N/A% | |
| No-Load Power Consumption: | 0.09W | |
Note:
- When the unit is idle for approximately 15 minutes in BestTune, DAB+ and Bluetooth mode (with external unit disconnected), it will automatically switch to Standby mode.
- FM is exceptional, it is inappropriate for the intended use of equipment if the device didn't receive radio signal on FM mode.
Features and specifications are subject to change without prior notice.
Support
Thank you for purchasing the Majority Robinson 2DAB.
Please follow the guidance of the manual to set up your device and enjoy its fantastic features.
If you require further assistance with your new device, please contact our support team on the Majority website:
https://www.majority.co.uk/support
Safety Information
- Read all the instructions carefully before using the unit and keep them for future reference.
- Check that the voltage marked on the rating label matches your mains voltage.
- The unit must be placed on a flat stable surface and should not be subjected to vibrations.
- Do not place the unit on sloped or unstable surfaces as the unit may fall off or tip over.
- The mains socket must be located near the unit and should be easily accessible.
- Avoid extreme degrees of temperature, either hot or cold. Place the unit well away from heat sources such as radiators or gas/electric fires. Avoid exposure to direct sunlight and other sources of heat.
- Never place any type of candle or naked flame on the top of or near the unit.
![burn hazard]()
![shock hazard]()
To reduce the risk of fire, electric shock or product damage, do not expose this unit to rain, moisture, dripping or splashing. No objects filled with liquids, such as vases, should be placed on the unit.- If you spill any liquid into the unit, it can cause serious damage. Switch it off at the mains immediately. Withdraw the mains plug and consult your dealer.
![burn hazard]()
![shock hazard]()
To prevent the risk of electric shock or fire hazard due to overheating, ensure that curtains and other materials do not obstruct the ventilation vents.- Do not install or place this unit in a bookcase, built-in cabinet or in another confined space. Ensure that a minimum of 10cm should be kept around the apparatus for ventilation.
Safety
- Always disconnect the unit from the mains supply before connecting/ disconnecting other devices or moving the unit.
- Unplug the unit from the mains socket during a lightning storm.
- This unit will become warm when used for a long period of time. This is normal and does not indicate a problem with the unit.

RISK OF ELECTRIC SHOCK
DO NOT OPEN
 The lightning flash with arrowhead symbol, within an equilateral triangle, is intended to alert the user to the presence of uninsulated "dangerous voltage" within the unit's enclosure that may be of sufficient magnitude to constitute a risk of electric shock.
The exclamation point within an equilateral triangle is intended to alert the user to the presence of important operating and maintenance (servicing) instructions in the manual accompanying the unit.
Mains Adapter
- Make sure the unit is not resting on top of the mains adapter cable, as the weight of the unit may damage the cable and create a safety hazard.
- If the mains adapter is damaged it must be replaced by the manufacturer, its service agent, or similarly qualified persons in order to avoid a hazard.
Interference
- Do not place the unit on or near appliances which may cause electromagnetic interference. If you do, it may adversely affect the operating performance of the unit, and cause a distorted sound.
Supervision
- Children should be supervised to ensure that they do not play with the unit.
![shock hazard]() Never let anyone especially children push anything into the holes, slots or any other openings in the case - this could result in a fatal electric shock.
Never let anyone especially children push anything into the holes, slots or any other openings in the case - this could result in a fatal electric shock.
Service/Maintenance
![shock hazard]() To reduce the risk of electric shock, do not remove screws. The unit does not contain any user serviceable parts. Please leave all maintenance work to qualified personnel.
To reduce the risk of electric shock, do not remove screws. The unit does not contain any user serviceable parts. Please leave all maintenance work to qualified personnel.- Do not open any fixed covers as this may expose dangerous voltages.
- Ensure to unplug the unit from the mains socket before cleaning.
- Do not use any type of abrasive pad or abrasive cleaning solutions as these may damage the unit's surface.
- Do not use liquids to clean the unit.
 | The symbol indicates DC voltage |
 | The symbol indicates polarity of d.c. power connector |
 | The symbol indicates AC voltage |
 | The symbol indicates class II equipment |
 | For indoor use only |
- The mains plug of power adapter is used as the disconnect device, The socketoutlet shall be installed near the equipment and shall be easily accessible.
![]()
Risk of explosion if battery is replaced by an incorrect type![]()
To avoid replacement of a battery with an incorrect type
Don't disposal of a battery into fire or a hot oven, or mechanically crushing or cutting of a Battery.
Don't leaving a battery in an extremely high temperature surrounding environment
To avoid battery subjected to extremely low air pressure.


Under the environment with radio-frequency disturbance, the product may malfunction and could self-recover when the interference disappear.

Please read all instructions carefully before use and keep for future reference
Register your product online for a FREE 3 year extended warranty at: www.majority.co.uk
Documents / Resources
References
Download manual
Here you can download full pdf version of manual, it may contain additional safety instructions, warranty information, FCC rules, etc.
Advertisement


Need help?
Do you have a question about the Robinson 2DAB and is the answer not in the manual?
Questions and answers