Advertisement
- 1 PANEL INTRODUCTION
- 2 SETTING OCTAVE
- 3 SETTING TEMPO
- 4 KEYBOARD MODE
- 5 CREATING A PATTERN
- 6 SAVING PATTERN
- 7 IMPORTING PATTERN
- 8 PLAYBACK PATTERN (SEQUENCER)
- 9 STEP EDIT MODE
- 10 ARPEGGIATOR
- 11 MIDI DEVICE CONNECTIONS
- 12 MIDI-RELATED SETTINGS
- 13 SYNC IN/OUT
- 14 SYNC IN/OUT RELATED SETTINGS
- 15 POWER ON COMMANDS
- 16 APP
- 17 SYSTEM EXCLUSIVE DATA
- 18 PRODUCT SPECIFICATION
- 19 Documents / Resources
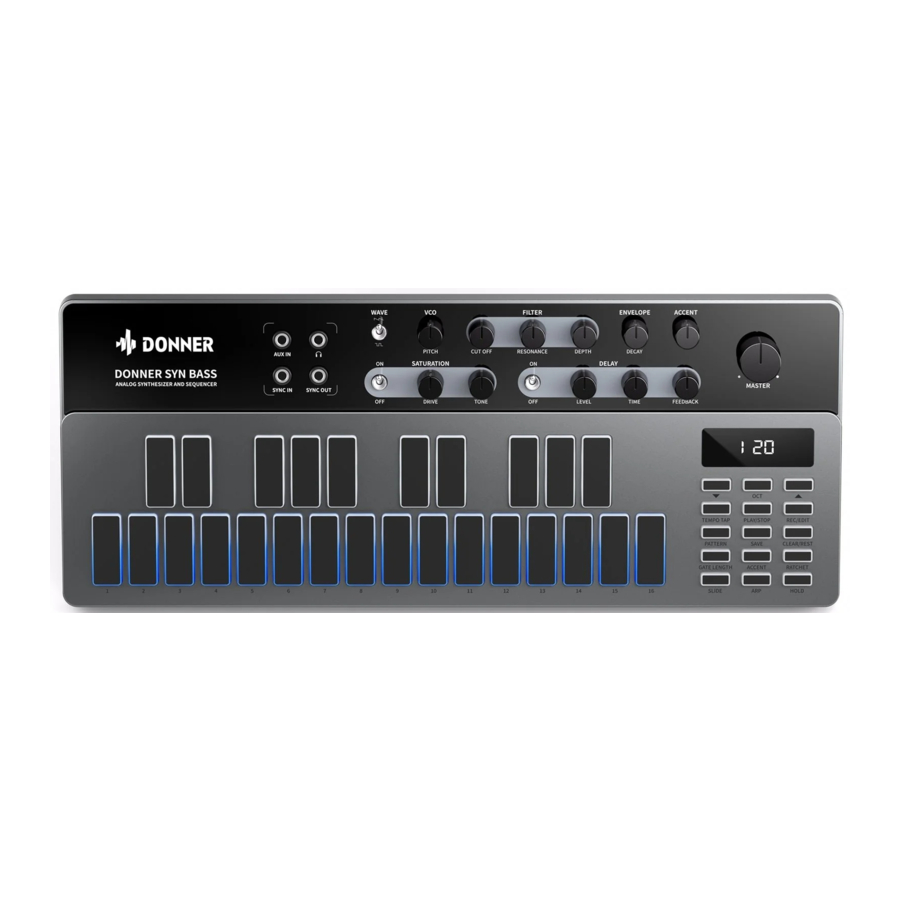
PANEL INTRODUCTION

- MAIN OUT: 1/4" TS mono output connector that outputs overall signal and is controlled by Master knob.
- MIDI IN: MIDI input connector that inputs MIDI messages and can support the use of external MIDI devices.
- MIDI OUT: MIDI output connector that allows you to output the MIDI signal from this unit to control other MIDI devices.
- USB-C: Type-C connector that connects to the host computer for firmware updates and USB MIDI data transmission.
- POWER INPUT: DC9V power input
- POWER SWITCH: Power on/off.

- AUX IN connector: 1/8" TS audio signal connector that used for connecting other audio signals and outputting mixed signal with the sound of B1 through MAIN OUT jack and PHONES jack.
- Headphone output interface: 1/8" audio signal interface that used for connecting the headphones output. Turn Master knob can control the volume.
- Sync In interface: connecting an external clock to start or stop signal.
- Sync Out interface: connect and send internal clock to external device.
- Wave switch: shifting between saw wave and square wave on the currently used oscillator.
- Pitch knob: potentiometer with a detent at the center that controls oscillator frequency, with a range of fifth intervals lower on the left half and fifth intervals higher on the right half.
- Cutoff knob: controlling the cutoff frequency of low-pass VCF filter, the larger the value of the knob the higher the cutoff frequency.
- Resonance knob: controlling the signal amplitude at the cutoff frequency point, the larger the knob value the stronger the gain.
- Depth knob: controlling the modulation depth applied by the envelope to the VCF cutoff frequency, the larger the knob value the greater the depth.
- Decay knob: controlling the amount of time of the envelope to decay from the current signal level to the minimum level, the larger the knob value the longer the time.
- Accent knob: adjusting the amount of Accent effect, the larger the value of the knob the more obvious the Accent effect. (Only have an effect when notes programmed with an accent.)
- Saturation switch: controlling the distortion effect.
- Drive knob: controlling the level of distortion gain, the larger the value of the knob the greater the gain.
- Tone knob: controlling the brightness of the distortion tone, the larger the value of the knob the brighter the tone.
- Delay switch: controlling the delay effect.
- Level knob: controlling the volume of the delay effect sound, the higher the value of the knob the higher the volume of the effect sound.
- Time knob: controlling the delay time of the delay effect, the larger the knob value the longer the delay time.
- Feedback knob: controlling the number of feedback of delay effect, the feedback number is 1 when the knob value is minimum, the greater the knob value the greater the number of feedbacks.
- Master knob: controlling the total output volume of the unit, the higher the value of the knob the louder the volume.
SETTING OCTAVE
In octave setting mode, adjust the higher and lower octaves of the range.
- Press OCT to enter octave adjustment mode. The OCT button indicator flashes and the display shows the current octave value.
- Press ▲ or ▼ to adjust the octave value, the screen will display the upper and lower octaves value.
- The octave adjustment mode is automatically exited when no operation is performed for an extended period of time, and the octave adjustment mode can be exited by pressing OCT again.
SETTING TEMPO
There are two ways to adjust the Tempo value.
- The first way is Tap Tempo. You can change the Tempo by pressing the TEMPO TAP button 2 to 4 times in a row.
- If you need to adjust the Tempo value precisely, please refer to the second way below.
- Press the TEMPO TAP button once to enter tempo adjustment mode, the TEMPO TAP button indicator flashes and the display shows the currently set speed.
- Press ▲ or ▼ to adjust the Tempo value, which ranges from 40 BPM to 240 BPM.
If you press and hold ▲ or ▼, the Tempo value will change rapidly in succession. - The Tempo adjustment mode is automatically exited when no operation is performed for an extended period of time, and the Tempo adjustment mode can be exited by pressing and hold TEMPO TAP for approximately 2 seconds.
KEYBOARD MODE
- In the keyboard mode (default mode), you can directly press the keys on the keyboard to play.
- Follow the steps below can set equipment parameters.
| Accent |
|
| Hold |
|
In addition, you can also use the "APP" or "Power On Commands" to set parameters such as Multi-trigger, key priority, etc. For details, please refer to the "APP" and "Power On Commands" sections.
CREATING A PATTERN
- Activate the record function
- Short press REC/EDIT once, the REC/EDIT button indicator will turn on which indicate the record function is active while the step LED 1 will flash. (The current being step LED will keep blink during the record function).
- Initialize the current pattern
- Press and hold the CLEAR/REST about 2 seconds to initialize the current pattern. (This operation will not change the stored pattern)
- Enter a note to step 1
- Refer to the "Setting OCTAVE" section to set the keyboard octave range, then press the button on the keyboard and enter note.
- Set the gate length
- Press the GATE LENGTH button to activate gate length setting mode.
- Press ▲ or ▼ to adjust the gate length value to 4.
- Press the GATE LENGTH button to exit gate length setting mode.
- Add an accent to step 1
- Press the ACCENT button to add a brief volume and brightness emphasis to any step. In this case it is on Step 1. The ACCEENT button indicator is on to indicate that an Accent has been added to this step.
- Enter a note to step 2
- Refer to the "Setting OCTAVE" section to set a different keyboard octave range, then press the button on the keyboard and enter note.
- Step LED 2 is now flashing, indicating that it is being edited. In the meantime, Step LED 1 is stop flashing which indicate its values have been entered into the active pattern. This is called "Step-Write" behavior and means that any time you play a note or enter a Rest, the step is automatically advanced.
- TIE step 2 to step 3
- Press the GATE LENGTH button to activate gate length setting mode.
- Press ▲ or ▼ to adjust the gate length value to 8 (equivalent to "TIE").
- Press the GATE LENGTH button to exit gate length setting mode.
- If the note value of Step 3 is the same as Step 2, then the note is held through the step transition.
- If the note value of Step 3 is different from Step 2, the note is still held through the transition, but the effect is a legato phrase.
- Enter a note to step 3
- Enter a new note that is different from Step 2. Step LED 3 is blinking, and the previous Step LEDs are stop flashing.
- Set the gate length
- Press the GATE LENGTH button to activate gate length setting mode.
- Press ▲ or ▼ to adjust the gate length value to 1.
- Press the GATE LENGTH button to exit gate length setting mode.
- Enter a note to step 4
- Enter a new note that is different from Step 3. Step LED 4 is blinking, and the previous Step LEDs are stop flashing.
- NOTE: When you enter a note, the Gate Length is updated from the previous step. This is useful if you are entering a pattern with steps that all have the same Gate Length. In that case you would only need to set the Gate Length when first entering a pattern.
- Enter a rest for step 5
- Press CLEAR/REST. Step LED 5 is blinking, and the previous Step LEDs are stop flashing.
- Enter a note to step 6
- Refer to the "Setting OCTAVE" section to set a different keyboard octave range. Then press the button on the keyboard and enter note. Step LED 6 is blinking and the previous Step LEDs are stop flashing.
- Add a ratchet to step 6
- Press the RATCHET button to activate ratchet setting mode.
- Press ▲ or ▼ to select a ratchet value of 2, which will produce 2 notes during the step (up to 4 can be selected)
- Press the RATCHET button to exit ratchet setting mode.
- Enter a note to step 7
- Then press the button on the keyboard and enter note. Step LED 7 is blinking and the previous Step LEDs are stop flashing.
- Step 7 slide to step 8
- Press the SLIDE button, the SLIDE button indicator is on to indicate that the Slide of step 7 was turned on. Step 8 is the target value of the slide in this case.
- Enter a note to step 8
- Refer to the "Setting OCTAVE" section to set a different keyboard octave range. Then press the button on the keyboard and enter note. Step LED 8 is blinking and the previous Step LEDs are stop flashing.
- Exit the record function
- When you have completed your pattern, press REC/EDIT again to exit the Record function.
- Run the pattern
- Refer to the " SETTING TEMPO " section to set the speed you want, and press PLAY/STOP.
Please see the following table for setting the params during the record function.
| Set Gate length (note duration) |
|
| Set accent |
|
| Set slide |
|
| Set rachet (repeats) |
Ratchet is individually adjustable for each step The ratchet effect is more pronounced when the gate length value is small (but > 0). When slide enable or gate length is 8 (tie), ratchet does not work. |
Note:
By default (when not editing step parameters or Octave), press ▲ or ▼ can switch to previous/next step.
SAVING PATTERN
If the pattern saving operation is not performed, any changes to the pattern may be discarded. Please refer to the following steps to save the edited pattern if necessary.
- Press the SAVE button once to enter the save mode, the PATTERN button indicator and SAVE button indicator will flash and the display will show the current pattern position.
- To save to the current position, please press the SAVE button once again. The PATTERN button indicator, the SAVE button indicator and the display flash rapidly several times at the same time to indicate a successful saving.
- To save to another location, please press ▲ or ▼ to select a new pattern location (1 - 128), then follow step 2 to confirm the saving.
Note:
* Failure to operate after a timeout will automatically exit save mode and discard saving.
* Pressing and holding the SAVE button for about 2 seconds can exit the save mode and discard saving.
IMPORTING PATTERN
The last pattern used is imported by default for each time the device is turned on, or you can select another pattern to play by following the steps below. There are 128 patterns to choose from.
- When the PATTERN button indicator is on or flashing slowly, it indicates that it is currently in pattern selection mode, otherwise press the PATTERN button once to enter pattern selection mode and the display shows the current pattern value.
- Press ▲ or ▼ to adjust the pattern value, the pattern value range is from 1 to 128. If pressing and holding ▲ or ▲, the pattern value will be adjusted rapidly in succession.
- After selecting the desired pattern, release ▲ and ▼, and the device will automatically import the selected pattern.
Note:
* Press and hold the PATTERN button for about two seconds to quickly re-import the current PATTERN.
- *If the current pattern is playing, the default is to wait for the current pattern to finish playing before playing the new imported pattern.
- *If you need to play the newly imported pattern immediately, please change the pattern waiting setting in the APP.
PLAYBACK PATTERN (SEQUENCER)
- Refer to the "SETTING TEMPO" section to set the tempo value, then press PLAY/STOP to start playback and the PLAY/STOP button indicator will light up.
- The sequencer will play each step of the pattern in turn, and when it reaches the last step it will return to the first step and continue playing.
- The step LED corresponding to the step currently being played will flash. If you want to stop playback, simply press the PLAY/STOP button once.
The following operations on the sequencer can be performed during the sequencer playback.
| Live transpose |
|
| Hold |
|
| Live accent |
|
| Live slide |
|
| Live ratchet |
|
| Live gate length |
|
| Live mute (rest) |
|
| REST Flip (Toggle rest) |
|
STEP EDIT MODE
Whether the sequencer is playing or not, you can enter the step edit mode and edit the parameters of the specified step.
- Press and hold the REC/EDIT button, then press any step button (1-16), the corresponding step LED will flash slowly to indicate the step editing mode is on. Then release the REC/EDIT button.
- At this point, you can refer to the "Creating Pattern" section and edit parameters like note, gate length and accent, slide on/off, ratchet, etc.
- Press the REC/EDIT button to exit step editing mode. You can also continue to edit other steps by following steps 1 and 2.
ARPEGGIATOR
- Press the ARP button and the ARP button indicator will light up to indicate arpeggiator mode.
- Refer to the "Setting TEMPO" section to set the tempo value.
- Refer to the "Setting OCTAVE" section to set the octave value.
Note: Press one or more buttons on the keyboard, the arpeggiator will repeat the pressed notes in the set order. If hold mode is not enabled, the arpeggiator stops playing when the button is released.
| Arpeggiator Options |
|
| Hold |
|
| Gate Length |
|
| Accent |
|
Press the ARP button again, the ARP button indicator goes out, indicating that arpeggiator mode is exited.
MIDI DEVICE CONNECTIONS
B1 supports the universal MIDI standard protocol, which allows you to control external MIDI devices with the B1 and to control the B1 with external MIDI devices.

- B1 connected to the computer via USB
- B1 supports the standard USB MIDI protocol and you can connect the USB port of the B1 to the USB port of your computer with a USB cable.
- You will see the B1 in the list of MIDI devices on your computer when connected, without the need of installing any drivers.
- Use external MIDI devices to control B1
- If you want to control the B1 with an external MIDI keyboard, sequencer, or other MIDI devices, please use a MIDI cable to connect the MIDI OUT port of the external MIDI device to the MIDI IN port of B1.
- Use B1 to control external MIDI devices
- If you want to use B1 keyboard, B1 sequencer or B1 arpeggiator to play sounds or control an external MIDI device, please use a MIDI cable to connect the MIDI IN port of the external MIDI device to the MIDI OUT port of B1.
MIDI-RELATED SETTINGS
You can set some MIDI-related parameters on the "APP" or the "Power on Commands", please refer to "APP" and " Power on Commands" sections for details.
MIDI CHANNEL
- When exchanging data with an external MIDI device, you must ensure that the unit's MIDI channel setting is the same as the MIDI channel setting of the external MIDI device, so as to exchange data correctly.
"LOCAL" OPTION
- The Echo Back setting of some external devices or computer DAW systems allows notes or other MIDI messages from the B1 to be quickly and easily transferred to other MIDI devices. However, when you play a note on the B1, the Echo back function of the external device may send the note message from the B1 back to the B1, which may cause the B1 to be triggered a second time. To avoid this problem, you can disconnect the LOCAL connection between the B1 and the external MIDI device via the "LOCAL" setting.
- In addition, you can turn off the local connection with keyboard and local devices via the "LOCAL" setting, so that pressing a button on the local keyboard will only output MIDI messages, while no sound will be played locally. This allows you to use the B1 as a MIDI keyboard without affecting the B1 itself. All "LOCAL" settings can be changed on the APP, please refer to the "APP" section for details.
MIDI IN TRANSPOSE
- The transpose setting allows you to transpose inputting note messages, and you can change this setting on the APP. For details, refer to the "APP" section.
ACCENT VELOCITY THRESHOLD
- When the velocity of the inputting MIDI note message is greater than the value set, the accent effect is automatically turned on. This setting can be changed on the APP. Refer to the "APP" section for details.
MIDI SOFT THROUGH
- The B1's MIDI soft through function can forward inputting MIDI messages to a designated port, and you can turn the relevant channel on or off on the APP.
- The main options are as follows. (Please refer to the "APP" section for details.)
- DIN to DIN: Whether to forward received MIDI IN messages to MIDI OUT.
- DIN to USB: Whether to forward the received MIDI IN messages to USB.
- USB to DIN: Whether to forward received USB messages to MIDI OUT.
MIDI OUTPUT FORWARDING
- The B1's keyboard, sequencer and arpeggiator all output MIDI messages by default, and you can decide whether to output MIDI messages to MIDI OUT and USB via the APP.
- The main options are as follows. (Please refer to the "APP" section for details.)
- Keyboard: Local keyboard (note message) output settings.
- RT: Local synchronous clock message output setting.
- Sequencer: Sequencer (note message) output setting.
- Arpeggiator: Arpeggiator (note message) output settings.
SYNCHRONIZING THE SEQUENCER/ARPEGGIATOR
- The Clock Source option on the APP allows you to set the B1 as the master (Internal) or the slave device (DIN/USB/TRG).
SYNC IN/OUT
SYNC IN:
- Connect the SYNC IN connector of the B1 to the SYNC OUT connector of an external device with a Sync Cable so that the B1 can be synchronized with the pulse signal of the external device.


SYNC OUT:
- Connect the SYNC OUT connector of the B1 to the SYNC IN connector of the external device with a Sync Cable, so that the B1 can output pulses and control the external device.

- Note that you also need to set the Clock Source of the slave device to TRG (or SYNC IN) and check whether the pulse type settings are match (1PPS/2PPQ/24PPQ/48PPQ, etc.) to ensure proper operation.

SYNC IN/OUT RELATED SETTINGS
CLOCK SOURCE
To use SYNC IN, you need to set the Clock Source to TRG or AUTO on the APP or boot command so that the B1 can synchronize with external devices.
- Note that SYNC OUT is on by default at all times, no additional setting is required.
SYNC POLARITY
- To complete synchronization of the B1 with external devices, the polarity of SYNC IN/OUT may need to be set as appropriate. This setting can be changed on the APP.
SYNC IN
- Rise - B1 will perform synchronization when the input pulse reaches the wave peak.
- Fall - B1 will perform synchronization when the input pulse reaches the wave trough.
SYNC OUT
- Rise -- B1 will output a pulse at the wave peak.
- Fall -- B1 will output a pulse at the wave trough.
SYNC RATE
- When in SYNC IN, this setting determines how much the sequencer or arpeggiator advances when the pulse signal is received.
- When in SYNC OUT, this setting determines how much of the sequencer or arpeggiator is advanced before outputting the pulse signal. - This setting can be changed on the APP.
SYNC IN
1PPS – Play 1 step per pulse.
2PPQ - Play 1/4 note every 2 pulses (KORG mode).
24PPQ - Play 1/4 note every 24 pulses.
48PPQ - Play 1/4 note every 48 pulses.
SYNC OUT
1PPS – Output 1 pulse per step.
2PPQ - Output 2 pulses per 1/4 note (KORG mode).
24PPQ - Output 24 pulses per 1/4 note.
48PPQ - Output 48 pulses per 1/4 note.
POWER ON COMMANDS
Pressing specific buttons before booting the device can change the MIDI channel, clock source, multi-trigger, button priority and other parameters. The following is a detailed description:
| 1 | MIDI channel |  Press and hold any of the step buttons from 1 to 16 to boot and set the MIDI channel value 1 to 16 Note: This will change both the MIDI input and MIDI output channels. |
| 2 | Clock source |  Press and hold any of C#2, D#2, C#3, D#3 to boot to set the synchronized clock source corresponding to: C#2 - Internal D#2 - DIN C#3 - USB D#3 - TRG |
| 3 | Multi Trigger |  Press and hold any of F#2, G#2, A#2 to boot to set the multi-trigger option corresponding to: F#2 -- Slide (multi trigger off) G#2 - multi trigger on A#2 -- Legato (multi trigger off) |
| 4 | Key Priority |  Press and hold any of F#3, G#3, A#3 to boot to set the Key priority option corresponding to: F#3 - Low G#3 - High A#3 - Last |
| 5 | Factory Reset |  Press and hold the B1, C2, D2 and E2 buttons simultaneously to boot the device to reset all device parameters (but not the saved pattern). |
| 6 | Factory Reset and erase all patterns |  Press and hold the G3, A3 and C4 buttons simultaneously to boot the device to reset all device parameters and stored Patterns. (Please use this function with caution as it cannot be restored after performing.) |
APP

SYSTEM EXCLUSIVE DATA
In addition to the APP, you can also set each of the B1 parameters via MIDI System Exclusive.
The format of the System Exclusive data received by B1 is as follows:
F0 00 60 50 00 00 05 DID aa D0...Dn F7
Of which:
00 60 50 = Donner SYSEX ID number
00 00 05 = Unique ID for B1
DID = Device ID: 00-7F (0x00 to address all devices)
aa = packet number
D0...Dn = parameter payload
System Exclusive Table:
| Packet number | Parameter payload | Function |
| 0E | D0 D1 D2 | Set MIDI channel (software channel). D0 = Reserved, set it to '0' D1 = TX channel value 0-15 for channel 1-16 D2 = RX channel value 0-15 for channel 1-16. 16 means all channels |
| 0F | D0 | Set MIDI in transpose. D0 = transpose value 0 - 24 for transpose -12 to + 12 (value 12 is no transpose) |
| 12 | D0 | Set key priority. D0 = Key priority, 0—Low, 1—Hight, 2--Last |
| 14 | D0 D1 | Set multi trigger. D0 = Multi trigger, 0-off (slide), 1-on, 2-off (legato) D1 = Reserved, set it to '0' |
| 17 | D0 D1 D2 D3 D4 D5 D6 | Set midi forwarding. D0 = Keyboard midi forwarding: 0 - OFF, 1 – DIN, 2 – USB, 3 - BOTH D1 = Sequencer midi forwarding: 0 - OFF, 1 – DIN, 2 – USB, 3 -BOTH D2 = Arpeggiator midi forwarding: 0 - OFF, 1 – DIN, 2 – USB, 3 - BOTH D3 = Realtime midi forwarding: 0 - OFF, 1 – DIN, 2 – USB, 3 - BOTH D4 = Reserved, set it to '0' D5 = Reserved, set it to '0' D6 = Reserved, set it to '0' |
| 19 | D0 D1 | Set sync clock polarity. D0 = Sync polarity, 0 – fall, 1 – rise D1 = Reserved, set it to '0' |
| 1A | D0 | Set sync clock rate D0 = clock rate, 0 – 1 PPS, 1 – 2 PPQ, 2 – 24 PPQ, 3- 48 PPQ, |
| 1B | D0 | Set sync clock source. D0 = clock source, 0 – Internal, 1 – MIDI, 2 – USB, 3 – TRIG, 4 – Automatic |
| 1C | D0 | Set accent velocity threshold. D0 = Accent velocity threshold, value 0–127 |
| 28 | D0 D1 D2 | Set midi soft through configuration. D0 = DIN to USB, 0 – Disable, 1 – Enable D1 = DIN to DIN, 0 – Disable, 1 – Enable D2 = USB to DIN, 0 – Disable, 1 – Enable |
| 2F | D0 D1 D2 | Set local control configuration. D0 = Keyboard local control, 0 – Disable, 1 – Enable D1 = DIN local control, 0 – Disable, 1 – Enable D2 = USB local control, 0 – Disable, 1 – Enable |
| 32 | D0 D1 | Set pattern waiting configuration D0 = Waiting until current pattern finished 0 – NO, 1 – YES D1 = Reserved, set it to '0' |
| 7D | None | Restore factory settings |
System Exclusive Example:
| Packet number | System Exclusive Packet | Function |
| 0E | F0 00 60 50 00 00 05 00 0E 01 00 01 F7 | Set MIDI TX channel as 1, RX channel as 2 |
| 0F | F0 00 60 50 00 00 05 00 0F 0C F7 | Set MIDI in transpose as 0 (no transpose) |
| 12 | F0 00 60 50 00 00 05 00 12 01 F7 | Set key priority as HIGHT |
| 14 | F0 00 60 50 00 00 05 00 14 02 00 F7 | Set multi trigger as off (legato) |
| 17 | F0 00 60 50 00 00 05 00 17 01 02 03 00 00 00 00 F7 | Set keyboard midi forwarding as DIN. Set sequencer midi forwarding as USB. Set arpeggiator midi forwarding as BOTH. Set real time midi forwarding as OFF. |
| 19 | F0 00 60 50 00 00 05 00 19 01 00 F7 | Set sync clock polarity as RISE. |
| 1A | F0 00 60 50 00 00 05 00 1A 02 F7 | Set sync clock rate as 24 PPQ |
| 1B | F0 00 60 50 00 00 05 00 1B 04 F7 | Set sync clock source as AUTO |
| 1C | F0 00 60 50 00 00 05 00 1C 7F F7 | Set accent velocity threshold as 7F (accent off) |
| 28 | F0 00 60 50 00 00 05 00 28 00 01 01 F7 | Set midi DIN to USB through as DISABLE Set midi DIN to DIN through as ENABLE Set midi USB to DIN through as ENABLE |
| 2F | F0 00 60 50 00 00 05 00 2F 01 00 01 F7 | Set keyboard local control as ENABLE. Set DIN local control as DISABLE. Set USB local control as ENABLE. |
| 32 | F0 00 60 50 00 00 05 00 32 01 00 F7 | Set pattern waiting configuration as YES. |
| 7D | F0 00 60 50 00 00 05 00 7D F7 | Restore factory settings |
Please check the official website regularly for firmware updates, which can be downloaded and stored on your computer, and then used to update the device with detailed instructions about the update process.
PRODUCT SPECIFICATION
| Synthesizer Architecture | |
| Number of voices | Monophonic |
| Type | Analog |
| Oscillators | 1 |
| VCF | 1 low pass |
| Envelopes | 1 |
| Connectivity | |
| Power input | DC input connector |
| Power switch | Slide switch on/off |
| MIDI IN/OUT | MIDI In and MIDI Out, 5-pin DIN |
| USB (MIDI) | USB 2.0, type C |
| Outputs | Line output: 1/4" TRS, unbalanced, max. +16 dBu |
| Output impedance | 1.5 kΩ |
| Headphones | 3.5 mm TRS, max. 125 mW@32 Ω |
| Headphones output impedance | 10 Ω |
| USB | |
| Type | Class compliant USB 2.0, type C |
| Supported Operating Systems | Windows 7 or higher / Mac OS X 10.6.8 or higher |
| Inputs and Outputs (TS 3.5 mm) | |
| Inputs | AUX in: maximum input +5 dBu |
| Sync in: More than 2.5 V | |
| Power Requirements | |
| External power adaptor (use only the supplied adapter) | 9 VDC 500 mA inner positive |
| Power consumption | 2.25W maximum |
| Environmental | |
| Operating temperature range | 5°C – 40°C (41°F – 104°F) |
| Physical | |
| Dimensions (H x W x D) | 54*323*130mm (2.1 x 12.7 x 5.1") |
| Product Net Weight | 0.66kg(1.45 lbs) |
| Shipping Weight | 1.02kg(2.25 lbs) |


TO REDUCE THE RISK OF FIRE OR ELECTRIC SHOCK, DO NOT EXPOSE THIS EQUIPMENT TO RAIN OR MOISTURE.
TO REDUCE THE RISK OF FIRE, ELECTRIC SHOCK AND ANNOYING INTERFERENCE, PLEASE USE ONLY THE RECOMMENDED ACCESSORIES FOR UNINTERRUPTED SERVICE OF THIS DEVICE!
*DESIGN AND SPECIFICATIONS MAY CHANGE WITHOUT NOTICE.
ELECTRIC SHOCK HAZARD DO NOT OPEN
Documents / ResourcesDownload manual
Here you can download full pdf version of manual, it may contain additional safety instructions, warranty information, FCC rules, etc.
Advertisement


Need help?
Do you have a question about the B1 and is the answer not in the manual?
Questions and answers