Advertisement
PACKAGE INCLUDES
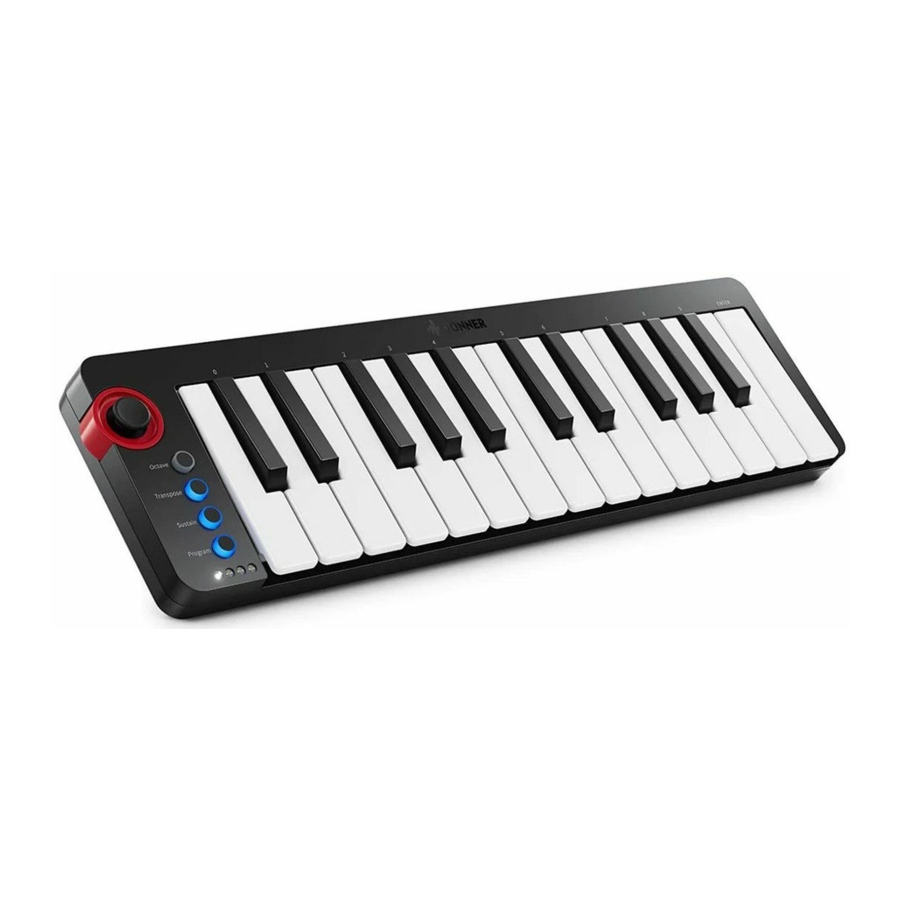
- N-25 MIDI Keyboard
- USB Cable
- Owner's Manual
If any of the items above are missing, please let us know via email: service@donnerdeal.com
CONNECTABLE SOFTWARE
- Cubase/Nuendo
- Waveform
- Audition
- Pro Tools
- Kontakt
- Ableton Live
- FL studio
- Cakewalk/Sonar
- Reaper
- Garageband
- Reason
- GarageBand
- Logic
CONNECTING YOUR KEYBOARD
- Plug the USB cable provided with your N-25 MIDI keyboard into a free USB port on your computer.
- Plug the other end of the USB cable into the USB port on the N-25 MIDI keyboard.
The single USB cable not only powers the keyboard but also sends MIDI data to and from your computer system.
Using a passive USB hub which does not use a power supply may not provide enough power.
You can also use N-25 MIDI Keyboard with your IPAD/IPHONE to control supported music creation apps.
Connecting your N-25 MIDI Keyboard to an IPAD/IPHONE requires the iPad Camera Connection Kit, which is available from the Apple Store.
GETTING STARTED
Once you have finished the installation, you will need to configure your music software for use with N-25 MIDI Keyboard. Connect N-25 MIDI Keyboard to your computer and then open your software.
In your software's Preferences, Options, or Device Set-Up menu, select N-25 MIDI Keyboard. (In Windows XP SP3, N-25 MIDI Keyboard will appear in your software under the name USB Audio Device.) Windows Vista, Windows 8, Windows 7, and MacOS will recognize the device as N-25 MIDI Keyboard.
For further information about configuring your software to receive MIDI data from your N-25 MIDI Keyboard, and using software instruments within the application, refer to the documentation provided with that product.
PANEL OVERVIEW

USB/ DC IN
Provides the power and data connection from a computer.
MIDI OUT
Use a five-pin MIDI cable (sold separately) to connect this jack to the MIDI IN of an external sound module.
KEYBOARD
The N-25 MIDI Keyboard's range is approximately in the middle of an 88 note keyboard.
Using the Octave bugon, you can access the full 88 key range of a larger piano. The initial range is C3-C5.

OCTAVE
Whenever you power up the keyboard, the octave setting will be at the default value of "0".
Press the Octave bugon and use the joystick to adjust left and right, you can move the range of the keyboard up or down. When increasing or decreasing, a light flashes to indicate the change.
Long press the Octave button to return to the initial state.
A short press will exit the function, leaving the changes in place.
The initial range is C3-C5. The highest range can reach C8, and the lowest range can reach C-2. A total of 5 octaves can be added or subtracted from top to bogom.
TRANSPOSE
In some cases it may be useful to raise or lower the pitch by a number of semitones as opposed to an entire octave. When the transposition function is turned on, use the joystick to adjust the transposition up and down in pitch. After turning it on, the button light will always be on. Transposing up and down will cause a sing e light to flash. A short press of the button confirms the current selection, and a long press of this function key will exit the transposition function and return to the original transposition settings.
SUSTAIN
The N-25 does not have a sustain pedal jack, but you can activate the sustain function by holding the [Sustain] button. Release [Sustain] again to deactivate sustain
PROGRAM
Program Changes are used to change the instrument or voice you are using. For example, you could use this function to change the instrument to a bass sound.
Sending a program change:
If your MIDI hardware or software can receive MIDI program changes, the buttons will increment or decrement between 0 and 127. You can also enter the program number using the numerical keys (the black keys are labeled 0 - 9) in conjunction with the "PROGRAM" key on your N-25 keyboard. If you want to edit the program code in the currently selected program group, long press for 1.5 seconds, until the program button flashes. When the function light flashes, enter the edit mode. You can confirm your CC code with the number buttons on the keyboard.
To send a Program Change message using the numerical keys:
- Press the [PROGRAM] button
- Use the numbers 0-9 on the keyboard (above the black keys) to select the CC code to confirm, and then press the enter key to complete the confirmation. (the key all the way on the right)
- There are four groups of sound libraries in the program. When you need to select the next group, please use the left and right direction of the joystick to select up and down.
[PITCH] BEND JOYSTICK
The assignable pitch bend joystick is primarily used to bend the notes played on the keyboard up or down. The default Continuous Controller number (MIDI CC) for Modulation is 64. The minimum value is 0, the maximum value is 127.
TECHNICAL SPECIFICATION
| POWER | USB bus powered |
| DIMENSION (Length x Width x Height) | 13.48" x 3.85" x 1.22" 342.5 x 98 x 31mm |
| WEIGHT | 0.75Ib 0.34KG |

SHOCK HAZARD. DO NOT OPEN.
TO REDUCE THE RISK OF FIRE OR ELECTRIC SHOCK, DO NOT EXPOSE THIS EQUIPMENT TO RAIN OR MOISTURE.
TO REDUCE THE RISK OF FIRE, ELECTRIC SHOCK AND ANNOYING INTERFERENCE, PLEASE USE ONLY THE RECOMMENDED ACCESSORIES. FOR UNINTERRUPTED SERVICE OF THIS DEVICE!
*DESIGN AND SPECIFICATIONS MAY CHANGE WITHOUT NOTICE
Documents / ResourcesDownload manual
Here you can download full pdf version of manual, it may contain additional safety instructions, warranty information, FCC rules, etc.
Advertisement


Need help?
Do you have a question about the N-25 and is the answer not in the manual?
Questions and answers