Advertisement
Quick Links
Advertisement

Related Manuals for SYNERGEE Power Rack


Summary of Contents for SYNERGEE Power Rack
- Page 1 POWER RACK...
-
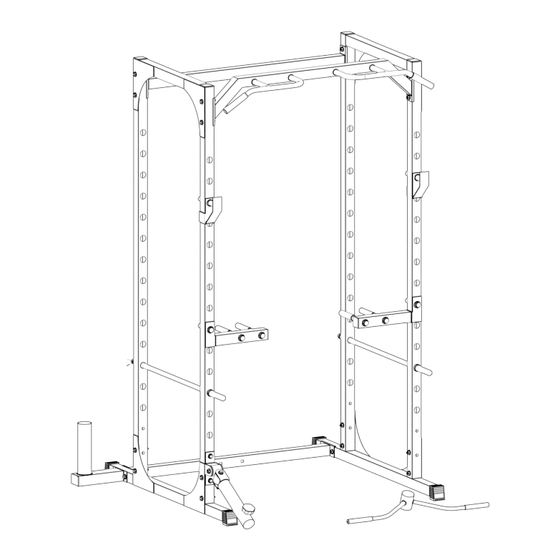
Page 2: Parts List
UPPER FRAME LEFT UPPER FRAME LANDMINE RIGHT PULL-UP BAR SAFETY BAR BARBELL STORAGE ATTACHEMENT UPRIGHT RIGHT J-CUP LEFT J-CUP LEFT DIP HANDLE RIGHT DIP HANDLE V-BAR M10X75 FULLY M10X70 FULLY THREADED BOLT THREADED BOLT M10 WASHER M10 NUT POWER RACK... - Page 3 ASSEMBLY STEP PART GUIDE STEP: 1 PART NAME LEFT BASE RIGHT BASE LOWER STABALIZER BARBELL STORAGE M10x75 BOLT M10x70 BOLT M10 WASHER M10 NUT POWER RACK...
- Page 4 ASSEMBLY STEP PART GUIDE STEP: 2 PART NAME UPRIGHT M10X70 BOLT M10 WASHER M10 NUT 11 11 POWER RACK...
- Page 5 ASSEMBLY STEP PART GUIDE STEP: 3 PART NAME UPPER STABALZIER LEFT UPPER FRAME RIGHT UPPER FRAME PULL-UP BAR M10X75 BOLT M10 WASHER M10 NUT POWER RACK...
- Page 6 STEP PART GUIDE STEP: 4 PART NAME SAFETY BARS LANDMINE RIGHT J-CUP LEFT J-CUP LEFT DIP BAR RIGHT DIP BAR V-BAR M10X70 BOLT M10 WASHER M10 NUT 12 12 13 13 15 15 14 14 10 10 16 16 POWER RACK...
- Page 7 As with any workout equipment that involves heavy weights, there is a risk of injury when using the Synergee Power rack. The best way to reduce the risk of serious injury is to exercise caution. Follow the instructions in this manual and familiarize yourself with all warnings on your product before using it.
Need help?
Do you have a question about the Power Rack and is the answer not in the manual?
Questions and answers