Advertisement
Quick Links
KEY
P
1.
TOP UPRIGHT
2.
BOTTOM UPRIGHT
A
3.
M10X20 BOLTS (FULLY THREADED)
4.
M10 WASHERS (FOR UPRIGHTS)
R
5.
6.
T
7.
M16X80 BOLTS (PARTIALLY THREADED)
8.
S
WALL MOUNTS
9.
10.
MOUNTING ARMS
IF ANY PIECES ARE MISSING, PLEASE CONTACT US IMMEDIATELY: HELLO@SYNERGEEFITNESS.COM OR 1.855.217.7136
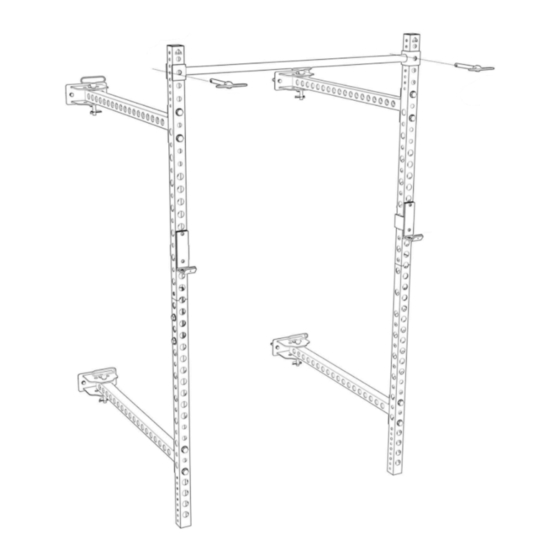
STEP 1
Slide the top upright into
the bottom upright
aligning the two half
circles.
The top upright will be
indicated by the arrow at
the top.
1
STEP 2
Insert bolt into the uprights. Fasten into
the built in fastener in the rack uprights.
REPEAT STEPS FOR BOTH
UPRIGHTS BEFORE MOVING ON
PART
QTY BOX KEY
2
2
4
4
1
PULL UP BAR
2
J CUP
2
4
4
SAFETY PIN
4
STEP 3
Assemble the rack wall mount frame to the
uprights as illustrated below.
Slide the bolt through the back most hole
on the upright using 4 washers as
illustrated. Repeat step for all 4 rack
REPEAT STEPS FOR BOTH UPRIGHTS BEFORE MOVING ON
PART
1
11.
EXPANSION SCREWS M10X80 SET
1
12.
SELF TAPPING SCREW M10X80
1
13.
M10 WASHER
1
14.
M16X75 BOLTS (PARTIALLY THREADED)
2
15.
M16X100 BOLTS (PARTIALLY THREADED)
2
16.
M16 WASHER
2
17.
M16 NUT
2
18.
SAFETY PIN (FOR PULL UP BAR)
2
3
9
frame mounts (9).
SF 2200-WF
QTY BOX
8
3
8
3
8
3
8
3
4
3
36
3
14
3
2
3
Advertisement

Related Manuals for SYNERGEE SF 2200-WF

Summary of Contents for SYNERGEE SF 2200-WF
- Page 1 SF 2200-WF PART QTY BOX KEY PART QTY BOX TOP UPRIGHT EXPANSION SCREWS M10X80 SET BOTTOM UPRIGHT SELF TAPPING SCREW M10X80 M10X20 BOLTS (FULLY THREADED) M10 WASHER M10 WASHERS (FOR UPRIGHTS) M16X75 BOLTS (PARTIALLY THREADED) PULL UP BAR M16X100 BOLTS (PARTIALLY THREADED)
- Page 2 STEP 2 Once assembled with the pull-up bar hold the rack against the wall and you may begin to install the rack to your wall at your own discretion. Use the folding rack mounting (8) to. Attach to the wall using parts (10 or parts 11 and 12). To secure to the floor use the expansion screw set (16).
Need help?
Do you have a question about the SF 2200-WF and is the answer not in the manual?
Questions and answers