Table of Contents
Advertisement
Quick Links
Item #1000 000 000
Model #HPSA21CWB
USER GUIDE
SMART HOME ALARM SYSTEM
HOME
THANK YOU
We appreciate the trust and con dence you have placed in De ant through the purchase of our
Smart Home Alarm System Kit. We strive to continually create quality products designed to enhance
your home. Visit us online to see our full line of products available for your home improvement
needs. Thank you for choosing De ant!
Advertisement
Table of Contents

Related Manuals for Defiant HPSA21CWB


Summary of Contents for Defiant HPSA21CWB
- Page 1 Item #1000 000 000 Model #HPSA21CWB USER GUIDE SMART HOME ALARM SYSTEM HOME THANK YOU We appreciate the trust and con dence you have placed in De ant through the purchase of our Smart Home Alarm System Kit. We strive to continually create quality products designed to enhance your home.
-
Page 2: Table Of Contents
Table of Contents Safety Information......3 Keypad........9 Warranty........4 Motion Sensor......11 Pre-Installation......5 Door/Window Sensor....12 Inspect All Components..... 5 Installation ........14 About Wireless Equipment ..5 Operation ........19 Installation Location ....5 Replace the Batteries ....22 Package Contents ..... 6 Specification.......23 Product Introduction .... -
Page 3: Safety Information
Safety Information WARNING: WARNING: Ensure the batteries are installed Remove and immediately recycle or correctly according to polarity (+ and -). dispose of used batteries according to Do not mix old and new batteries, local regulations and keep away from different brands or types of batteries, children. -
Page 4: Warranty
Warranty 1 YEAR LIMITED WARRANTY This product is guaranteed to be free of defects in materials and workmanship for 1 year from the date of purchase. Guarantee does not include normal wear and tear. Wireless Protocol The Wi-Fi CERTIFIED™ Logo is a registered trademark of Wi-Fi Alliance®. The Bluetooth word mark and logos are registered trademarks owned by Bluetooth SIG, Inc. -
Page 5: Pre-Installation
FCC Regulation (continued) The equipment (Door Window Sensor, Motion Sensor and Siren Hub) complies with FCC radiation exposure limits set forth for an uncontrolled environment. This equipment should be installed and operated with a minimum distance of 20cm between the radiator and any part of your body. Keypad -SAR limit of 1.6W/kg-1g is applied for this product. -
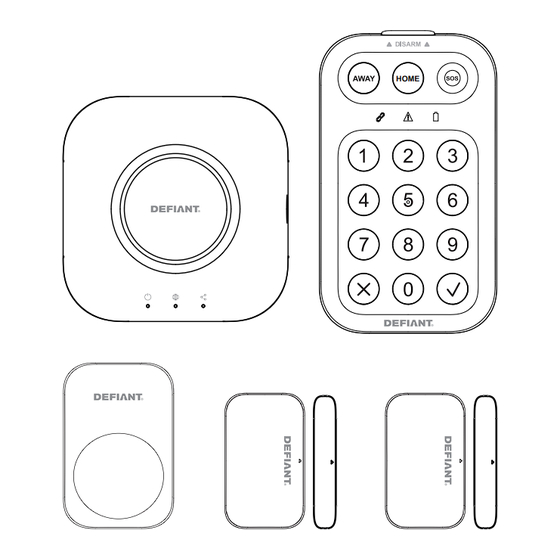
Page 6: Package Contents
Pre-Installation PACKAGE CONTENTS Part Description Quantity HOME Siren Hub with 3*AA Batteries Keypad with 3*AA Batteries Motion Sensor with 2*AAA Batteries Door/Window Sensors with CR2032 Battery Door/Window Sensor Magnet Power Adapter and Cable Double-Sided Adhesive Tape for Keypad Mounting Screws Sets WARNING THESE SENSORS HAVE TAMPER RESISTANT BRACKETS TO ENSURE THEY ARE NOT REMOVED FROM THEIR INSTALLATION PLACEMENT. -
Page 7: Product Introduction
Pre-Installation (continued) Product Introduction Siren Hub Your home Siren Hub connects the alarm system to your 2.4GHz Wireless network. It also sounds the alarm to alert you when a security breach has occurred. C D E Part Description Part Description Siren Reset/Pairing Button Alarm LED... - Page 8 Pre-Installation (continued) LED Indicator Action Description The system is on and the main power operates normally. The system shut down. *If the system is booting and battery is above 20%, the Power LED will blink until it is ready. Power LED Blinking * When the unit is reset, the power LED will blink while resetting.
-
Page 9: Keypad
Pre-Installation (continued) Keypad The keypad controls your alarm system via Bluetooth through connecting to the Siren Hub. It features four alarm modes: “Disarm” - deactivates sensors, “Arm Away” - activates all sensors, “Arm Home” - activates select sensors and “SOS” to active emergency alarm to suit your needs. HOME Part Description... - Page 10 Pre-Installation (continued) Items - Keypad (continued) Description Battery Indicator Solid green: Battery capacity >= 20% Solid yellow: Low battery, between 10% and 20%. Solid red: Very Low Battery capacity <= 10% Batteries should be replaced Sensor Error Indicator If certain sensors are not in a ready state (due to tampering, sensor malfunction, or requiring a bypass) during an attempt to arm the system, the application will promptly send a notification.
-
Page 11: Motion Sensor
Pre-Installation (continued) Motion Sensor Sends a notification or sounds the alarm whenever it triggers the alarm on motion. It seamlessly pairs with your Siren Hub and can be easily mounted to any wall or corner in your home. Part Description LED Indicator Pairing/Reset Button Anti-tamper Switch... -
Page 12: Door/Window Sensor
Pre-Installation (continued) Door/Window Sensor Sends a notification or sounds the alarm whenever a door or window is opened. Part Description Part Description LED Indicator Battery (3V CR2032) Magnet Battery Cover Anti-tamper Switch Bracket Sensor Front Cover (Pairing/Reset/Bypass) - Page 13 Pre-Installation (continued) Items - Door/Window Sensor Description (continued) Pairing To pair this sensor, remove the Bracket (F) and then press the sensor front cover (G) for 5 seconds when instructed by the app. Reset Press the sensor front cover (G) for 10 seconds to reset the device.
-
Page 14: Installation
Installation Plug the Power Cable (FF) into Siren Hub (AA) . Mounting the Siren Hub Ensure Power Cable (FF) inside the wire duct. IMPORTANT Be sure that when choosing your location, that it Can easily be seen when the strobe is flashing. - Page 15 Installation (continued) Pull out the battery insulator pull tab to Install the Keypad activate the battery. IMPORTANT Keypad must be within 130 feet of the Siren Hub.Do not install the keypad: Outdoors. Near large metal objects or mirrors as they sometimes cause radio signal interference.
- Page 16 Installation (continued) The Motion Sensor (CC) can be installed on the Determine your placement position and attach top of a cabinet or other tall furniture, on the the Bracket (E) with either Screws (HH) flat surface of a wall or in a corner wall area. or preinstalled double-sided adhesive tape.
- Page 17 Installation (continued) When placed on the top of cabinet or other Pull out the battery insulator pull tab to tall furniture, be sure the face of the sensor activate the battery. Hang the Motion Sensor and the face of the furniture are flush with (CC) on the Bracket (E) by following the each other, as shown in the illustration direction of lock...
- Page 18 Installation (continued) Hang the Door/Window Sensor(DD) on the Remove the Bracket (J) from the Door/Window Bracket (J) by following the direction of Sensor (DD) by following the direction of the lock marked in the side of Door/Window unlock marked on the side of Door/ sensor (DD).
-
Page 19: Operation
Operation Download the Hubspace™ app from Tap the ‘+’ button in the upper-right the Apple App Store or the Google corner on the app screen to add your Play Store. Siren Hub. My Home Sign in if you have an account, or register to create an account then sign in. - Page 20 Operation (continued) Using your Security Kit System. Once the Siren Hub added successfully in the app, tap the product in the app. to display the controls for adding the Keypads and Sensors. Press “+” in the app and follow the instructions. The Keypad or Sensor's Bracket must be removed first when pairing them with the siren hub.
- Page 21 Operation (continued) Wrong PIN Code (Disarming with Incorrect PIN): On the keypad: When a disarm attempt fails via the keypad, for example, the wrong PIN is used, the keypad will play two short beeps and the keypad will flash the warning icon red twice in sync with the beeps.
-
Page 22: Replace The Batteries
Replace the Batteries The app will notify you when a device’s battery Close the battery cover. gets too low. To replace the battery, please Hang the door/window sensor on the bracket. disarm the system first to avoid unintended anti-tamper alarms. Replace the Keypad batteries When you find the battery indicator is red and Use a screwdriver... -
Page 23: Specification
Specification Item Siren Hub Keypad Motion Sensor Door/Window Sensor & Magnet Product Size 3.19 in L x 3.19 in 4.29 in L x 2.52 in 2.36 in L x 1.57 in 1.92 in L x 1.14 in W x 1.6 in D W x 1 in D W x 1.34 in D W x 0.74 in D (Sensor) -
Page 24: Troubleshooting
Troubleshooting Problem Solution I cannot find the It is on the Siren Hub housing. A copy of the QR code is also included in your product’s documentation. QR code. The QR code has become Under the QR code is a 24-digit code. You can enter those manually damaged. - Page 25 Troubleshooting Problem Solution The Keypad does not When the keypad is communicating with the hub, it will not respond to button presses. respond when some When the Faulted Sensor Indicator is Yellow, only Confirm, Cancel and the keys are pressed Emergency buttons are allowed to be pressed.
- Page 26 IC Statement This device contains licence-exempt transmitter(s)/receiver(s) that comply with Innovation, Science and Economic Development Canada’s licence-exempt RSS(s). Operation is subject to the following two conditions: (1) This device may not cause interference. (2) This device must accept any interference, including interference that may cause undesired operation of the device.
- Page 27 Questions, problems, missing parts? Before returning to the store, 8 a.m. - 7 p.m., EST, Monday-Friday, 9 a.m. - 6 p.m., EST, Saturday 1-877-592-5233 HOMEDEPOT.COM/Hubspace Retain this manual for future use.
Need help?
Do you have a question about the HPSA21CWB and is the answer not in the manual?
Questions and answers