Advertisement
Quick Links
TOOLS
REQUIRED
(Socket) 7mm, 11/32, 7/16
(Wrench) 11/32, 7/16
(Allen) 5/64, 3/32, 5/32, 5/16
(Drill Bit) 17/64
Ratchet
SKILL
-Easy/Intermediate
-BEFORE YOU INSTALL THIS KIT-
Read and understand all instructions, warnings,
cautions, & notes contained in this installation
instruction guide. Consult your vehicle owner's manual
for proper disconnection of electrical and lifting of
vehicle if required for installation of this product.
This install may require some technical skills and
knowledge of basic mechanical work. If you do not feel
that you are capable of performing this install please
take this product to a trained professional.
After reading this guide please contact us with any
questions or concerns before installing product.
Customer Service (480) 671-0820
21+/FORD F150/RAPTOR
LEVEL
WARNINGS/CAUTIONS BEFORE STARTING INSTALLATION
Addictive desert designs is not responsible for any
bodily injury or harm to you or your vehicle as a result
of an improper install.
Proper installation of this kit required knowledge of
the factory recommended procedures for removal and
installation of original equipment components.
We recommend that the factory shop manual and
any special tools needed to service your vehicle be
on hand during the installation. Installation of this kit
without proper knowledge of the factory recommended
procedures may affect the performance of these
components and the safety of the vehicle.
INSTALLATION
DASH MOUNT
AC1901701NA
- 30 Minutes for OEM Removal/Install
TIME
REQUIRED
INCLUDED
IN KIT
4- 1/4-20 X 3/4" Button Head Bolt
4- 1/4" Self Retaining Washer
4- 1/4-20" Nylon Lock Nut
4- 1/4-20 X 3/4" Hex Flat Head Bolt
2- 8-32 X 3/4" Button Head Bolt
2- 8-32" Nylon Lock Nut
1- 12v 24v Input 5v Dual Output USB
Inspect all contents of this package to make sure
product is not damaged and all installation hardware
has been included. If parts are missing from kit, please
be prepared to provide the following information:
1. Name of purchase location
2. Bar Code on side of box
3. Date above bar code
4. Date inside box cover
*ALWAYS WEAR EYE PROTECTION
WHEN OPERATING POWER TOOLS*
guide
Advertisement

Related Manuals for Addictive Desert Designs AC1901701NA


Summary of Contents for Addictive Desert Designs AC1901701NA
- Page 1 -BEFORE YOU INSTALL THIS KIT- Inspect all contents of this package to make sure Addictive desert designs is not responsible for any product is not damaged and all installation hardware bodily injury or harm to you or your vehicle as a result Read and understand all instructions, warnings, has been included.
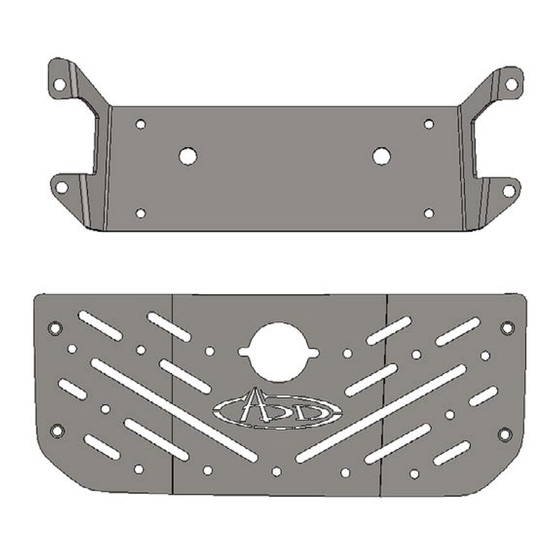
- Page 2 INSTALLATION guide HARDWARE/parts 1/4-20 x 3/4" button head bolt 1/4" self retaining washer 1/4-20" nylon lock nut QTY: 4 QTY: 4 QTY: 4 1/4-20 x 3/4" hex flat head bolt 8-32 x 3/4" button head bolt 8-32" nylon lock nut QTY: 4 QTY: 2 QTY: 2...
- Page 3 INSTALLATION guide DASH MOUNT removal 21-UP/FORD F-150/RAPTOR STEP 1 Remove the rubber tray by pulling up. Page 3 | Addictive Desert Designs...
- Page 4 STEP 2 Place the dash mount in place. Line up the larger aligning holes located on the mounting plate with the existing holes in the dash. Mark the 4x mounting holes as shown below. Page 4 | Addictive Desert Designs...
- Page 5 INSTALLATION guide DASH MOUNT INSTALL 21-UP/FORD F-150/RAPTOR STEP 3 Remove the speaker cover by pulling upwards. Page 5 | Addictive Desert Designs...
- Page 6 INSTALLATION guide DASH MOUNT removal 21-UP/FORD F-150/RAPTOR STEP 4 Using a 7mm socket, remove the hardware holding the plastic dash in place. Page 6 | Addictive Desert Designs...
- Page 7 INSTALLATION guide DASH MOUNT removal 21-UP/FORD F-150/RAPTOR STEP 5 Using a 7mm socket, Remove the speaker hardware and unplug the speaker. Page 7 | Addictive Desert Designs...
- Page 8 INSTALLATION guide DASH MOUNT Removal 21-UP/FORD F-150/RAPTOR STEP 6 Remove the plastic dash by pulling upwards. Page 8 | Addictive Desert Designs...
- Page 9 INSTALLATION guide DASH MOUNT INSTALL 21-UP/FORD F-150/RAPTOR STEP 7 Using a 17/64 drill bit, Drill the marked holes from step 2. Page 9 | Addictive Desert Designs...
- Page 10 21-UP/FORD F-150/RAPTOR STEP 8 Using a 5/16 allen and a 7/16 wrench, Install the mounting bracket to the plastic dash with the provided (A, A1) 1/4-20 X 3/4 Button head bolt, and nylon lock nut. Page 10 | Addictive Desert Designs...
- Page 11 INSTALLATION guide DASH MOUNT INSTALL 21-UP/FORD F-150/RAPTOR STEP 9 Using a 7mm socket, re install the dash. Ensure to plug the speaker back in. Page 11 | Addictive Desert Designs...
- Page 12 INSTALLATION guide DASH MOUNT INSTALL 21-UP/FORD F-150/RAPTOR STEP 10 Install the speaker cover. Page 12 | Addictive Desert Designs...
- Page 13 DASH MOUNT INSTALL 21-UP/FORD F-150/RAPTOR STEP 11 Using a 3/32 allen and a 11/32 wrench, install the USB charger with the provided (C, C1) 8-32 x 3/4 button head bolt, and nylon lock nut. Page 13 | Addictive Desert Designs...
- Page 14 STEP 12 Using a 5/32 allen, install the dash plate with the provided 1/4-20 X 3/4 counter sunk bolts. **(Optional) you can use the (A1) self retaining washers to space the dash plate up** Page 14 | Addictive Desert Designs...
- Page 15 Check and re-tighten, if needed, all mounting bolts after 100 miles and periodically thereafter. This product is protected by one or more U.S. patents For Additional Support or Technical Questions, www.addictivedesertdesigns.com/patents Please Call 480-671-0820 or Email Info@AddictiveDesertDesigns.com Page 15 | Addictive Desert Designs...
Need help?
Do you have a question about the AC1901701NA and is the answer not in the manual?
Questions and answers