
Related Manuals for Mitsubishi Electric SD220U


Summary of Contents for Mitsubishi Electric SD220U
-
Page 1: User Manual
DATA PROJECTOR MODEL SD220U User Manual This User Manual is important to you. Please read it before using your projector. - Page 2 The attached power cord is to be used exclusively for this product. Never use it for other products. Note: This symbol mark is for Your MITSUBISHI ELECTRIC product is designed and manufactured with high quality EU countries only. materials and components which can be recycled and/or reused.
-
Page 3: Table Of Contents
SD220U Trade Name : MITSUBISHI ELECTRIC Responsible party : Mitsubishi Digital Electronics America, Inc. 9351 Jeronimo Road, Irvine, CA 92618 U.S.A Telephone number : +1-(949) 465-6000 This device complies with Part 15 of the FCC Rules. Operation is subject to the following two conditions: (1) this device may not cause harmful interference, and (2) this device must accept any interference received, including interference that may cause undesired operation. -
Page 4: Important Safeguards
Important safeguards Please read all these instructions regarding your projector and retain Overloading them for future reference. Follow all warnings and instructions marked Do not overload wall outlets and extension cords as this can on the projector. result in a fire or electric shock. Read instructions Objects and liquids All the safety and operating instructions should be read before... - Page 5 • Consult the dealer or an experienced Radio / TV technician for help. Changes or modifications not expressly approved by Mitsubishi could void the user’s authority to operate this equipment. COMPLIANCE NOTICE OF INDUSTRY CANADA This Class B digital apparatus complies with Canadian ICES-003.
-
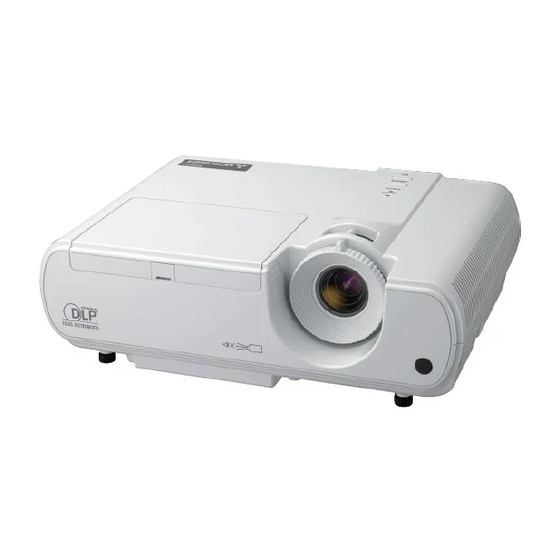
Page 6: Overview
Overview FOCUS ring ZOOM ring Control panel Air inlet grille Remote control sensor (Front) Air outlet grille Terminal board Speaker Adjustment feet 10 Lock bar 11 Lamp cover Caution: Do not replace the lamp immediately after using the pro- jector because the lamp would be extremely hot and it may cause burns. -
Page 7: Remote Control
Overview (continued) Bottom side Adjustment feet Remote control ON button STANDBY MAGNIFY button VOLUME UP, DOWN buttons MAGNIFY ASPECT KEYSTONE button MENU button Two types of MENU display are equipped. QUICK This model does not PAGE MENU appears on the screen when pressing MENU KEYSTONE DOWN have these functions. -
Page 8: Remote Control
Remote control Battery installation Use two (AA, R6) size batteries. Remove the back cover of the remote control by pushing the battery compartment door in the direction of the arrow. Load the batteries making sure that they are positioned correctly (+ to +, and - to -). •... -
Page 9: Installation
Installation Layout of the projector Image size varies depending on the distance between the screen and the projector. Front projection L : Between the screen and the front edge of the projector Hd : Height of the projected image Screen Distance from the screen : L Diagonal size Width : W... -
Page 10: Basic Connections
Basic connections This projector can be connected with various devices such as a VCR, video camera, videodisc player, and personal computer that have analog RGB output connectors. Important: • Make sure that the connected device is turned off before starting connection. •... - Page 11 Basic connections (continued) Projector + Computer For computer with Mini D-SUB RGB cable for PC COMPUTER IN Computer to monitor port AUDIO IN PC audio cable (option) to PC audio output For analog connection: Connect one end of the supplied RGB cable to the COMPUTER IN terminal of the projector. Connect the other end of the RGB cable to the monitor port of the computer.
-
Page 12: Preparation
Preparation Preparation for projection Important: • Install the screen on a flat wall at 90 degrees to the floor. To protect the projector during transportation, protective tapes are adhered to the terminal board of the projector. • Slanting the projector more than ±10° (right and left) or ±15° (front Please remove the protective tapes before use. -
Page 13: Basic Operation
Basic operation STANDBY 1, 2 FOCUS MAGNIFY ASPECT ZOOM PAGE KEYSTONE DOWN AUTO MENU POSITION ENTER MUTE FREEZE VIEWER VIDEO COMPUTER S - VIDEO UNPLUG WIRELESS 1, 2 Power-on • By blinking red, the STATUS indicator indicates that the lamp should be replaced soon. - Page 14 Basic operation (continued) Power-off Volume from the speaker Use the following procedure to turn off the projector. Press the VOLUME button to change the volume The lamp may deteriorate if the projector is powered off and on from the speaker. repeatedly within 30 minutes after the lamp is lighted.
- Page 15 Basic operation (continued) Wall Screen This function is to reproduce natural color tones when images are pro- jected directly onto a screen or wall surface. You can select from BEIGE, LIGHT BLUE, LIGHT GREEN, PINK, BLACK BOARD, WHITE BOARD, and OFF, to match the color of the screen or wall to be used for projection.
-
Page 16: Menu Operation
Menu operation As one of the two types of MENU display, following QUICK MENU appears on the screen when pressing MENU button on the remote control. In addition, DETAIL MENU (See page 18) appears when selecting DETAIL MENU in this MENU and pressing ENTER button. •... -
Page 17: Menu Options
Menu operation (continued) Menu Options Set the following options provided in the respective menus. 1. QUICK MENU Menu option Setting Feature description Automatically sets an optimal color balance based on the input signal. AUTO Use this setting for most cases. QUICK MENU COLOR PRESENTATION... - Page 18 Menu operation (continued) DETAIL MENU * Menus are not displayed when no signal is supplied to the projector. IMAGE COLOR ENHANCER AUTO PRESENTATION STANDARD THEATER USER GAMMA MODE DYNAMIC, NATURAL, DETAIL BrilliantColor 0-10 RGB-COLOR ±10 RGB-TINT ±10 CONTRAST ±30 BRIGHTNESS ±30 COLOR TEMP.
- Page 19 Menu operation (continued) Basic operation Press the button to select AUTO POWER OFF. Several settings can be adjusted using the menu. AUTO POWER Example : Auto power off time setting AUTO POWER Press the MENU button. Select the DETAIL MENU and press the ENTER button (or Press the button to adjust the auto power off time.
-
Page 20: Installation Menu
Menu operation (continued) 2. INSTALLATION menu Menu option Setting Feature description opt. OFF/BEIGE / LIGHT Selects a desired setting based on the color of the screen or wall on BLUE / LIGHT INSTALLATION which images are projected. (See page 15.) When selecting a setting WALL SCREEN GREEN / PINK... - Page 21 Menu operation (continued) 3. FEATURE menu Menu option Setting Feature description opt. Automatically sets the aspect ratio in relative to the input signal. Use NORMAL this setting for most cases. FEATURE Selects a desired screen position for anamorphically squeezed or hor- ASPECT NORMAL ASPECT...
-
Page 22: Information Menu
Menu operation (continued) 4. SINGAL menu Menu option Setting Feature description opt. HORIZ. POSITION 0-999 Select this setting to adjust the horizontal position of projected images. SIGNAL VERT. POSITION 0-999 Select this setting to adjust the vertical position of projected images. Select this setting to eliminate flickering or blurs, if they appear, when HORIZ. -
Page 23: Image Adjustment
Image adjustment Adjusting projected images To adjust the tone of white (To customize the color tem- perature): To adjust the brightness (CONTRAST and BRIGHT- To set (and store) a user-defined color temperature, perform the fol- NESS): lowing procedure. You can make adjustments of the brightness of the projected image (See page 19 for the menu options.) using the menu. - Page 24 Image adjustment (continued) BrilliantColor To cancel the menu: Use this setting to make colors with medium brightness, such as yel- Press the MENU button. low and the skin tone appear natural. Press the button to decrease • Do not change the settings of the SIGNAL menu for ordinary the value to lessen the effect.
-
Page 25: Advanced Features
Advanced features Freeze To cancel the password function: Display the FEATURE menu. To stop the motion in the image temporarily (or to dis- Press the button to select PASSWORD FUNCTION. play a still image): Press the ENTER button. Press the FREEZE button on the remote control. •... -
Page 26: Lamp Replacement
Be sure to use the lamp dedicated to this projector, VLT-XD221LP those in the above picture. If do, it might cause the failure of prod- for SD220U. Use of other lamps may cause a failure of the projec- uct. tor. -
Page 27: Interval Of Lamp Replacement
Confirm that the lamp unit (j) is securely held inside the lamp dispos- able bag of the lamp attachment unit. And then loosen the screw (h) SD220U that come with the lamp attachment unit. Then remove the lamp 3000 Hours attachment unit. -
Page 28: Troubleshooting
Troubleshooting Before asking for repair of the projector, check the following. If the symptom persists, stop using the projector, be sure to unplug the power plug, and then contact your dealer. No image appears on the screen. Problem Solution • Check whether the indicators are on or off and how they are lightning. - Page 29 Troubleshooting (continued) Images are not displayed correctly. Problem Solution • Check that the cable connected to the external device isn’t intermittent. • Connect the cable’s plug with the external device’s connector firmly. Projected images are shaking. • Press the AUTO POSITION button. •...
- Page 30 Troubleshooting (continued) Others Problem Solution The exhaust vents emit warm air. • This air comes out after cooling the inside of the projector. You may feel hot, but this is not a malfunction. • The microcomputers inside the projector may be wrongly operating because of noise. Press the POWER button to turn off the lamp and unplug the power cord from the wall outlet.
-
Page 31: Indicators
Indicators This projector has two indicators, each of which shows the operation condition of the projector. The following offer solutions to possible problems. If these problem persist, turn the projector off and consult your dealer. POWER indicator STATUS indicator Normal condition POWER STATUS CONDITION... -
Page 32: Specifications
Specifications Type DLP™ DATA projector Model SD220U Rated power supply 100 - 240 V AC, 50 / 60 Hz 2.6 A During standby : Power consumption AC 100-120 V : 0.4 W AC 220-240 V : 0.5 W 0.55-inch Single chip Digital Micromirror Device (DMD) - Page 33 1 Remote control for EU J2552-0066-01 1 Safety Manual/Quick Start up for UK J2552-0065-01 1 CD-ROM 1 RGB cable for PC J2552-0072-03 2 Battery 1 Soft case Replacement part (Option / Not included in the box) Spare lamp for SD220U VLT-XD221LP EN-33...
- Page 34 Specifications (continued) Specification of RGB signals in each computer mode of the projector resolution horizontal vertical SD220U Signal mode (H x V) frequency (kHz) frequency (Hz) (H x V) TV60, 480i (525i) 15.73 59.94 800 x 600 TV50, 576i (625i) 15.63...
- Page 35 :+886-2-2833-9813 Phone :+852-2422-0161 Centro Direzionale Colleoni, Palazzo Sirio, Viale Colleoni 7, :+852-2487-0181 MKY (Mitsubishi Electric Kang Yong Watana Co., Ltd. ) 20041 Agrate Brianza, Italy http://www.mitsubishi-kyw.co.th/ SINGAPORE (Mitsubishi Electric Asia Pte. Ltd.) Sales & Technical Inquiries Road, Huamark Bangkapi, Bangkok 10240, Thailand http://www.mitsubishielectric.com.sg...
Need help?
Do you have a question about the SD220U and is the answer not in the manual?
Questions and answers