
Subscribe to Our Youtube Channel
Related Manuals for Zamel supla mSLW-01


Summary of Contents for Zamel supla mSLW-01
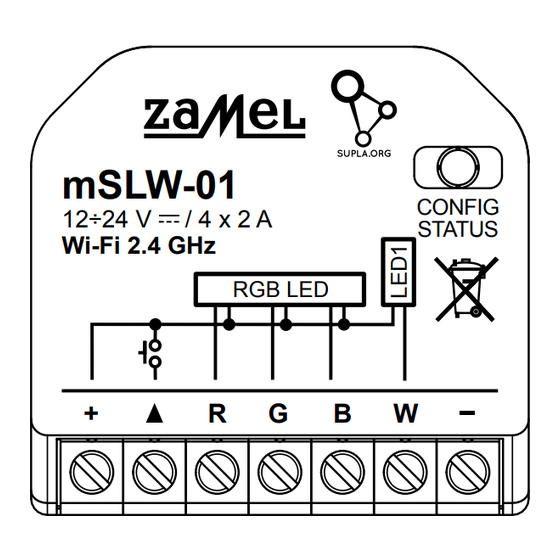
- Page 1 USER MANUAL mSLW-01 CONFIG 12÷24 V / 4 x 2 A STATUS Wi-Fi 2.4 GHz RGB LED RGBW Wi-Fi LED controller supla mSLW-01 DE ES IT PT FR RUS...
-
Page 2: Before Getting Started
1. BEFORE GETTING STARTED FEATURES: • Easy installation – just connect RGBW LED strip with mSLW-01 device. Once the RGBW LED strip is connected to the controller and concealed in an electrical box, local and remote controlis possible, • in the app the device is shown as RGBW lighting, which can be controlled by means of two sliders –... - Page 3 2. WARNING The device must be connected to power supply in accordance with applicable electri- cal and safety standards or regulations. See this User Manual for the wiring instructions. Installation, wiring and setting of this CAUTION product shall only be done by qualified electrical engineers who have read and understood this User Manual and the product features.
- Page 4 – in particular where connection terminals are located. ZAMEL Sp. z o.o. hereby declares that the type of mSLW-01 radio device complies with Directive 2014/53/EU. The entire EU declaration of conformity is available at: www.zamel.com...
-
Page 5: Technical Data
4. TECHNICAL DATA mSLW-01 Rated supply voltage: 12÷24 V Rated power 0.4 W consumption: Transmission: Wi-Fi 2.4 GHz b/g/n Maximum ERP < 20 mW transmit power: Number of inputs: Number of output 4 x PWM transistor channels: 7 (conductor cross-section Number of terminals: up to 1.5 mm Enclosure installation:... -
Page 6: Let's Begin
5. GETTING STARTED IN 5 STEPS LET’S BEGIN download, install and launch the supla mobile app... - Page 7 STEP 1 Install the app 5.1 INSTALL THE SUPLA MOBILE APP...
- Page 8 STEP 2 create an account / log in 5.2 CREATING A SUPLA ACCOUNT IF YOU DO NOT HAVE AN ACCOUNT Create it by tapping “Create Account” in your app. IF YOU ALREADY HAVE AN ACCOUNT Enter the e-mail address which you have used to create the account.
-
Page 9: Create An Account
CREATE AN ACCOUNT On this page, enter the following data: • e-mail address, • password, • password confirmation. Confirm all information by tapping “Create an account”. English SUPLA Cloud 24.01.01 www.supla.org reCAPTCHA Sign In... -
Page 10: Wiring Connection Diagram
STEP 3 connect the power input wiring 5.3 WIRING CONNECTION DIAGRAM Wire the mSLW-01 to the power supply system as shown in the diagram. 12÷24 V / 4 x 2 A mSLW-01 LED RGBW... - Page 11 STEP 4 add the device 5.4 ADDING THE DEVICE AUTOMATICALLY LAUNCH THE APP Launch the app and tap “Add a device” in the menu. WWW.SUPLA.ORG LAUNCHING THE WIZARD The “Add a device” wizard will be displayed. Tap “Next” to continue.
-
Page 12: Network Password
NETWORK PASSWORD Choose a WiFi network to enable Internet connectivity for the device. Enter the network password and tap “Next” to continue. Enter Wi-Fi Network name and password to use with new I/O Device Remember password CONNECTING THE DEVICE Wire the power supply to the device as shown in the diagram. - Page 13 NEW DEVICE REGISTRATION DISABLED If the “New Device Registration Disabled” message is displayed, open this website: https://cloud.supla.org/, Log into your account, go to the “My SUPLA” tab and Enable Device Registration. Next, repeat the device adding process. supla My SUPLA Smartphones Locations Access Identifiers...
- Page 14 Tap OK. Now, the supla app should display the device which you have just added on the list. The mSLW-01 ZAMEL-mSLW-01 STATUS LED in the front goes on steadily when the connection with the server is active. CAUTION!
-
Page 15: Configuring The Device
Wi-Fi network list on Sony_Direct11 Unable to connect to the internet your mobile device and connect AVAILABLE NETWORKS to it. The Wi-Fi network name TP-Link_POCKET_3046_26F7892 should begin with iPhone Marcin “ZAMEL-mSLW-01”, followed TP-Link_DC79 by the device serial number. Samsung 4765 Guest Refresh... - Page 16 Open a web browser and type the following address in the 192.168.4.1 address bar: 192.168.4.1 and open it. The configuration page will be ZAMEL MEW-01 ZAMEL mSLW-01 displayed. Here, you can easily LAST STATE: Firmware: 2.7.3 change the network settings.
-
Page 17: App Functions
STEP 5 control the lights 5.5. APP FUNCTIONS Salon Main app window Start controlling the lights remotely. Dimmer and RGB Lighting Power switch Power switch Lighting switch... - Page 18 5.6. SETTING PARAMETERS RGBW LED Dimmer and RGB Lighting DIMMER Brightness setting. Color setting. ON/OFF the LED bar. Color memorization fields. Hold longer to remember.
- Page 19 Dimmer and RGB Lighting DIMMER ON/OFF the dimmer. Brightness setting. WHEEL SLIDER...
-
Page 20: Resetting The Device To Default Settings
6. RESETTING THE DEVICE RESETTING THE DEVICE TO DEFAULT SETTINGS mSLW-01 CONFIG 12÷24 V / 4 x 2 A STATUS Wi-Fi 2.4 GHz RGB LED 1. Press and hold CONFIG The STATUS LED should flash fast. 2. Release the CONFIG button The STATUS LED will keep flashing. -
Page 21: Warranty
1. ZAMEL Sp. z o.o. grants a 24-month warranty for the products it sells. 2. The warranty granted by ZAMEL Sp. z o.o. does not cover: a) defects caused by transport, handling or other factors; b) defects caused by improper installation or operation of the products manufactured ZAMEL Sp.
Need help?
Do you have a question about the supla mSLW-01 and is the answer not in the manual?
Questions and answers