Table of Contents
Advertisement
Quick Links
Advertisement
Table of Contents

Subscribe to Our Youtube Channel
Related Manuals for Levenhuk MAGUS Stereo 7TH


Summary of Contents for Levenhuk MAGUS Stereo 7TH
- Page 1 M AG U S ST ER EO 7 T H | 8T H M IC ROS C OPE H E A D S U S E R M A N U A L...
-
Page 3: Safety Precautions
Before using the microscope head, please read this user manual carefully to study the design, operation modes and procedures, operational limitations, and safety precautions. Due to the continuous improvements in the head design, this manual may not reflect minor design changes that do not affect the performance and operation procedures. -
Page 4: Table Of Contents
CONTENTS 1 DESCRIPTION OF THE MICROSCOPE HEAD Purpose Specifications Microscope head kit 2 COMPONENTS Microscope head Objectives and eyepieces 3 UNPACKING AND ASSEMBLING 4 ASSEMBLY DIAGRAMS MAGUS UT1 Stand MAGUS UT2 Stand MAGUS UT3 Stand 5 USING THE MICROSCOPE HEAD Adjusting the eyepiece tubes Calculating the total magnification Calculating the field of view... -
Page 5: Description Of The Microscope Head
15° stereo angle. The microscope head magnifies an image with no loss of spatial orientation. The microscope head mounted on a universal stand can be used for restoration, soldering, assembly, quality control, and other similar activities. S P ECIFICATION S ( TAB LE 1 ) MAGUS Stereo 7TH MAGUS Stereo 8TH Image field Stereo... -
Page 6: Microscope Head Kit
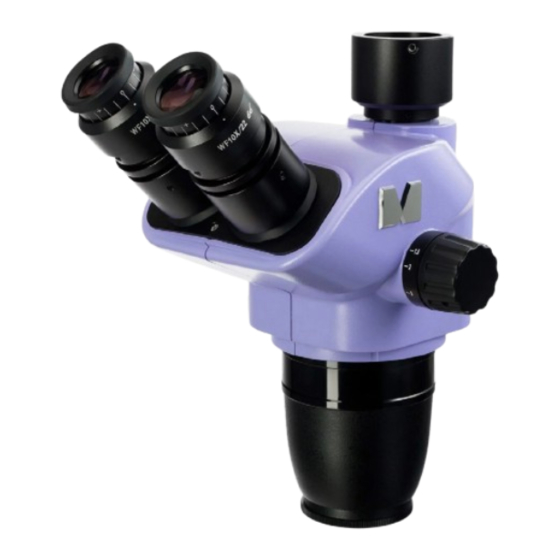
M ICROS COPE H EA D K IT The kit includes the following main components: – microscope head – objective part and eyepiece tubes – 10х/22mm eyepiece with eye relief and diopter adjustment (2 pcs) – user manual and warranty card. See Section 8 of the User manual for a full kit contents. - Page 7 Fig. 1. MAGUS Stereo 7TH/8TH Microscope Head 1. Eyepieces 6. Zoom knob 2. Diopter adjustment (each barrel) 7. Objective cap 3. Trinocular tube dust cap 8. Objective part 4. Cap or C-mount adapter screw 9. Eyepiece tubes 5. Trinocular tube...
-
Page 8: Components
O BJ ECTIVES AN D E YE P I ECES The zoom objective lens 8 (Fig. 1) has the magnification of 0.67–4.5x (MAGUS Stereo 7TH) / 0.65–5.5x (MAGUS Stereo 8TH) and allows for smooth change of magnification up to 6.7 (7TH) / 8.4 (8TH) times with no loss of quality and maintaining a large working distance. -
Page 9: Unpacking And Assembling
3 UNPACKING AND ASSEMBLING – Remove the microscope head from package. – Check the scope of delivery using Section 8 of the User Manual. – Place the microscope base on the flat surface. – Install the microscope head in the ring of the mount. Secure the head with a fixing screw from the kit of the microscope or universal stand. -
Page 10: Assembly Diagrams
The MAGUS UT1 stand is made up of four sections and is attached to the edge of the work table using a clamp. It is height and sideways adjustable, as well as rotatable. The stand is intended for mounting the MAGUS Stereo 7TH and Stereo MAGUS 8TH microscope heads with MAGUS FM1 and FM3 focusing mechanisms. -
Page 11: Magus Ut2 Stand
M AGU S U T2 STA N D It is height and sideways adjustable, and it features a smooth (fine) lateral adjustment knob. The stand is intended for mounting the MAGUS Stereo 7TH and Stereo MAGUS 8TH microscope heads with MAGUS FM2 and FM3 focusing mechanisms. -
Page 12: Magus Ut3 Stand
It features a reinforced double arm to move the microscope head in parallel relative to the table surface. It is height and sideways adjustable. The stand is intended for mounting the MAGUS Stereo 7TH and Stereo MAGUS 8TH microscope heads with MAGUS FM2 and FM3 focusing mechanisms. -
Page 13: Using The Microscope Head
Set the zoom knob 3 (Fig. 2) to maximum magnification: 4.5 (MAGUS Stereo 7TH) or 5.5 (MAGUS Stereo 8TH). Bring the specimen into focus and adjust the diopter settings on both eyepieces. Set the zoom knob to minimum magnification: 0.67 (MAGUS Stereo 7TH) or 0.65... -
Page 14: Using Optional Equipment
6 USING OPTIONAL EQUIPMENT U SIN G AUXIL IARY O B JECT I VE LE N SES Screw the required objective lens 8 (Fig. 1) into the thread of the objective part. The 0.5x reducing objective lens increases the working distance and field of view. The 1.5x and 2x magnifying objective lenses reduce the working distance and field of view. -
Page 15: Using The Camera
Using these data to determine the actual linear size of the specimen, you just need to count the number of divisions of the eyepiece scale aligned with the area of the specimen being measured, and multiply this number by the scale division value specified in this table. -
Page 16: Troubleshooting
7 TROUBLESHOOTING Potential problems and remedies are given in Table 3: Problem Cause Remedy OPTICS AND I MAGE REPRODUCT ION Vignetting or sharp drop in There is dirt on the eyepiece Remove dirt illumination at the edges of the field of view; uneven illumination Dirt and dust are visible in the There is dirt on the eyepiece Remove dirt... -
Page 17: Magus Warranty
MAGUS provides a 5-year international warranty from date of purchase (valid for the entire life of the instrument). The Levenhuk company warrants the product to be free from defects in materials and workmanship. The Seller warrants that the MAGUS product you have purchased meets specification requirements, provided that the Buyer complies with terms and conditions of transport, storage, and operation of the product. - Page 18 www.magusmicro.com...
Need help?
Do you have a question about the MAGUS Stereo 7TH and is the answer not in the manual?
Questions and answers