
Related Manuals for JVC TH-M65AS


Summary of Contents for JVC TH-M65AS
- Page 1 DVD DIGITAL CINEMA SYSTEM TH-M65 Consists of XV-THM65, SP-PWM65, SP-THM65C and SP-THM65F INSTRUCTIONS LVT1024-010B [US]...
- Page 2 Warnings, Cautions and Others / CAUTION To reduce the risk of electrical shocks, fire, etc.: 1. Do not remove screws, covers or cabinet. 2. Do not expose this appliance to rain or moisture. CAUTION — . button! (XV-THM65) Disconnect the mains plug to shut the power off completely (the STANDBY lamp goes off).
- Page 3 Warnings, Cautions and Others / Caution: Proper Ventilation To avoid risk of electric shock and fire and to protect from damage, place the apparatus on a level surface. The minimal clearances are shown below: No obstructions Front Wall or obstructions Wall or 1 cm 1 cm...
-
Page 4: Table Of Contents
Table of contents Introduction........2 Creating realistic sound fields ..28 Notes on handling..............2 Using the surround mode ............30 Supplied accessories .............2 Adjusting the sound.............31 About discs ........3 Advanced operations ..... 32 Playable disc types ..............3 Using the on-screen bar ............32 Disc structure ................4 Playing from a specified position on a disc......33 Playback Control function (PBC) —... -
Page 5: Introduction
Introduction Safety precautions Notes on handling Avoid moisture, water and dust Do not place the system in moist or dusty places. Important cautions Avoid high temperatures Installation of the system Do not expose the system to direct sunlight and do not place it near •... -
Page 6: About Discs
About discs Especially, the configuration and characteristics of an MP3 disc Playable disc types or a JPEG disc are determined by the writing (encoding) software and hardware used for recording. Therefore, due to the software and hardware used, the following symptoms may occur: This system has been designed to play back the following discs: Some discs may not be played back. -
Page 7: Disc Structure
About discs IMPORTANT Playback Control function Before playing a disc, make sure of the following; (PBC) — VCD and SVCD • Check the connection with the TV. • Turn on your TV and select the correct input mode on the TV to view only the pictures or on-screen information on the TV screen. -
Page 8: Names Of Parts And Controls
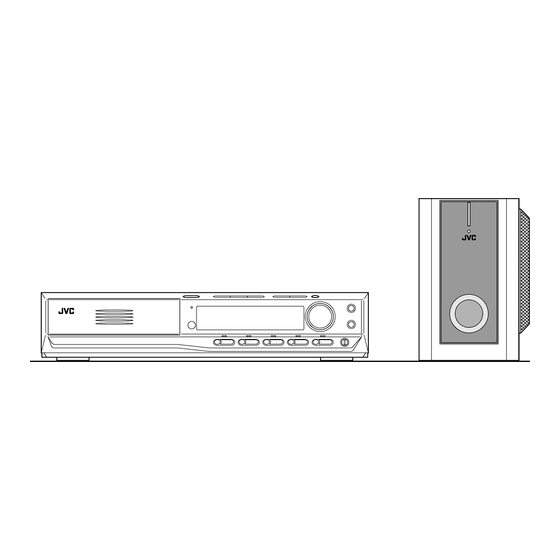
Names of parts and controls Front panel (center unit) A Standby lamp (STANDBY) A pg. 18 J Microphone jacks (MIC 1/2) A pg. 55 STANDBY/ON) A pg. 18 K Disc trays A pg. 22 B Standby-on button ( C Stop button ( ) A pg. 22 L Illumination lamp A pg. -
Page 9: Powered Subwoofer
Names of parts and controls Display window (center unit) A Disc indicators A pg. 24 PLII) A pg. 28 Dolby Pro Logic II indicator ( • B MP3 indicator A pg. 23 Linear PCM indicator (LPCM) A pg. 29 • C Channel indicator (CH) A pg. - Page 10 Names of parts and controls A Remote control mode selector A pg. 16 – 53 Remote control AUDIO, TV, VCR/DBS B Muting button (MUTING) A pg. 19 C Disc buttons (DISC 1-5) A pg. 22 D TV volume buttons (TV VOL +/–) A pg. 16 E Operating buttons Play button ( ) A pg.
-
Page 11: Getting Started
Getting started Connections • Do not connect the AC power cord until all other connections have been made. • Since different components often have different terminal names, carefully read the instructions supplied with the components you are going to connect. Connecting a TV To view pictures and on-screen displays, connect the TV to the center unit. -
Page 12: Connecting The Fm And Am Antennas
Getting started Connecting the FM and AM antennas If reception is poor Connect an outdoor single vinyl-covered wire antenna (not Make sure the antenna conductors do not touch any other terminals, supplied) to the AM EXT terminal. (Keep the AM loop antenna connecting cords and power cords. -
Page 13: Connecting The Powered Subwoofer
Getting started Connecting the powered subwoofer Connect the supplied powered subwoofer (SP-PWM65) using the system cord (supplied). • Connect the system cord by matching the marks on the plugs to the ones on the center unit and powered subwoofer. System cord (supplied) Ensure that the mark on... - Page 14 Getting started Assembling the satellite speakers Fix the stand to the speaker section. Each speaker (except the center speaker) has been divided into two • Be sure to tighten the screws firmly. parts for shipment. Before connecting the satellite speakers, first Speaker section assemble them by following the procedure below.
- Page 15 Getting started Connecting the satellite (front, center, surround) speakers Each speaker (SP-THM65F) can be used as a front or surround speaker. CAUTION • When you connect (larger) speakers other than the supplied ones, only use speakers with the same speaker impedance (SPEAKER IMPEDANCE) as indicated by the speaker terminals on the rear of the powered subwoofer.
-
Page 16: Connecting To An Analog Component
Getting started Connecting to an analog component You can enjoy the sound of an analog component such as a VCR, TV, or Cassette recorder with this system. Use RCA pin plug cords (not supplied) for connection. Center unit A To composite video output B To S-video output C To audio output White... -
Page 17: Setting The Voltage Selector Switch
Getting started Setting the VOLTAGE SELECTOR switch To avoid damaging the powered subwoofer, set the VOLTAGE SELECTOR switch on the rear panel to the correct voltage for your area. When you change the position of the VOLTAGE SELECTOR switch, use a tool such as a slotted screwdriver, etc. CAUTION DO NOT plug the power cord of the powered subwoofer before setting the VOLTAGE SELECTOR switch to the correct voltage. -
Page 18: Using The Remote Control
Getting started Operating the system from the remote Using the remote control control The remote control makes it easy to use many of the system Aim the remote control directly at the remote sensor on the center functions from a distance of up to 7 m away. unit. - Page 19 • Refer also to the instruction manuals supplied with your TV. CHANNEL +/–. To set the manufacturer’s code For DBS tuner or CATV converter You can operate a JVC TV without setting the remote control signal. operations Slide the remote control mode selector You can operate your DBS tuner or CATV converter using the to TV.
- Page 20 CHANNEL +/–*: Changes the TV channels on the VCR. this system. 1-10, 0: Selects the channel. (for the JVC’s VCR only) • Refer also to the instruction manuals supplied with your VCR. * Be sure to set the Karaoke mode switch to OFF before using To set the manufacturer’s code...
-
Page 21: Basic Operations
Basic operations This section mainly explains operations commonly used when you Turning the system on/off enjoy this system. • Turn on your TV and select the correct input mode on the TV. To turn the power on IMPORTANT On the remote control: Before using the remote control for the following operation, Press . -
Page 22: Selecting The Source To Play
Basic operations Selecting the source to Turning off the sound play temporarily On the remote control: On the remote control: Press one of the source selecting buttons Press MUTING. (DVD, FM/AM, VCR or DBS). “MUTING” appears on the display window and the sound turns off. DVD: To play back a disc (DVD, Video CD etc.). -
Page 23: Using The Sleep Timer
Basic operations To change the remaining time until the shut-off time IMPORTANT Press SLEEP repeatedly. Before using the remote control for the • Each time you press the button, the shut-off time changes. following operation, • Set the remote control mode selector to AUDIO. To cancel the Sleep Timer Press SLEEP repeatedly until “0min”... -
Page 24: Changing The Decode Mode
DVD in the progressive scan mode. In such a case, change the scan mode to “INTERLACE”. To check the compatibility of your TV, contact your local JVC customer service center. • All JVC progressive TVs and High-Definition TVs are fully... -
Page 25: Playback
Playback This section explains basic operations of DVD player. Basic playback For more details about DVD player operations, see pages 32 to 44. • shows the types of discs the operation is To load a disc available for. • Turn on your TV and select the correct input mode on the TV. Up to 5 discs can be loaded. - Page 26 Playback Playback information on the display window NOTE • You can also start playback by pressing (play button) or DVD. • Regardless of the operation for starting playback, the system plays Example: When a DVD encoded with Dolby Digital 5.1ch is played back all available discs sequentially until you stop playback.
-
Page 27: Playback Features
Playback NOTE Playback features • You can change the time information mode. (A pg. 33) • You can also check the playback information on the TV screen. IMPORTANT (A pg. 32) Before using the remote control for the Disc information on the display window following operation;... - Page 28 Playback Fast-forward/fast-reverse search Locating a desired selection using number buttons You can search for a particular point while playing a disc. You can locate the desired title, chapter, During playback track or file by On the remote control: selecting its number. Press For DVD (title, chapter): Each time you press the button, the search speed changes as...
-
Page 29: Tuner Operations
Tuner operations You can browse through all the stations or use the preset function to Manual tuning go immediately to a particular station. IMPORTANT On the remote control: Before using the remote control for the following operation; Press FM/AM repeatedly to select the 1 Set the remote control mode selector to band. -
Page 30: Selecting The Fm Reception Mode
Tuner operations Press MEMORY. Selecting the FM The channel number position starts flashing on the display reception mode window for about 5 seconds. When the stereo FM program currently tuned in is noisy, you can change the FM reception mode to improve the reception. •... -
Page 31: Creating Realistic Sound Fields
Creating realistic sound fields You can use the following surround modes to reproduce a realistic DTS Digital Surround sound field. Used to reproduce multichannel soundtracks of the software • Dolby Surround encoded with DTS Digital Surround ( Dolby Pro Logic II •... - Page 32 Creating realistic sound fields Creating sound field Indicators on the display window Reflections from behind Digital signal format indicators LPCM: Lights when Linear PCM signal comes in. Early reflections DIGITAL: Lights when Dolby Digital signals come in. Lights when DTS Digital (Surround) signals come No indication: No digital signal indicator lights when analog signals come in.
-
Page 33: Using The Surround Mode
Creating realistic sound fields IMPORTANT Using the surround mode Before using the remote control for the following operation; The system is set up to automatically select the optimal surround • Set the remote control mode selector to mode for input signal from digital multichannel software. AUDIO. -
Page 34: Adjusting The Sound
Creating realistic sound fields Adjusting the sound NOTE Before you start operation; • Set the Karaoke mode switch to On the remote control: Press TEST. Check if you can hear the sounds through all the speakers at the equal level. “TEST TONE”... -
Page 35: Advanced Operations
Advanced operations This section explains advanced operations for disc playback using Contents of the on-screen bar during playback the remote control. • shows the types of discs an operation is available for. • Turn on your TV and select the correct input mode on the TV. NOTE •... -
Page 36: Playing From A Specified Position On A Disc
Advanced operations Basic operation on the on-screen bar Example: During DVD playback Example: When selecting the Repeat mode of DVD (back to the beginning) During playback or while stopped • TIME: Elapsed playing time of current chapter/track Press ON SCREEN twice. •... - Page 37 Advanced operations Locating a desired chapter using the on- screen bar When playing back a DVD, you can locate the chapter Cursor number to be played using the on-screen bar. ( / / / ) /ENTER During playback Press ON SCREEN twice. The on-screen bar appears on the TV screen.
-
Page 38: Using The Mp3 Control Display
Advanced operations Use number buttons (0-10, +10) to enter NOTE the desired title or group number. • You can also use the 10 button to enter “0”. • The +10 button is not used by this function. The system starts playback from the first chapter/track/file of •... -
Page 39: Using The Jpeg Control Display
Advanced operations To select the other group Press Cursor to return to the group list, then press Cursor to select the desired group. (play button) To skip groups/tracks during playback Press Cursor repeatedly for forward-skip. Cursor Press Cursor repeatedly for reverse-skip. ( / / / ) /ENTER To start playback by specifying the track number... -
Page 40: Selecting A View Angle Of Dvd
Advanced operations When using the on-screen bar: Selecting a view angle of Press ON SCREEN twice. The on-screen bar appears on the TV screen. Press Cursor to move While playing back a DVD containing multi-view angles, you can enjoy the same scene at different angles. Press ENTER. -
Page 41: Selecting The Subtitle/Audio Languages
Advanced operations When using the on-screen bar: Selecting the subtitle/ Press ON SCREEN twice. audio languages The on-screen bar appears on the TV screen. Press Cursor to move When playing back a DVD (or SVCD) containing subtitles in several languages, you can select the subtitle language to be Press ENTER. -
Page 42: Audio Language
Advanced operations When using the on-screen bar: Press Cursor to select the desired audio language. Press ON SCREEN twice. Each time you press the button, the audio language changes. The on-screen bar appears on the TV screen. Press ENTER. Press Cursor to move The pop-up window disappears. -
Page 43: Special Picture Playback
Advanced operations To return to normal playback Special picture playback Press (play button). NOTE This system provides special picture playback functions including • Sound cannot be heard during slow-motion playback. frame-by-frame, slow-motion and zoom. Zooming in (play button) During playback or while paused Press ZOOM. -
Page 44: Changing The Vfp Setting
Advanced operations Changing the VFP setting Press Cursor repeatedly to select a parameter you want to adjust. The VFP (Video Fine Processor) function Adjust gradually and confirm picture appearance results are as enables you to adjust the picture character preferred. according to the type of programming, •... -
Page 45: Program Playback
Advanced operations Example for 4 A Program Playback You can play up to 99 titles (for DVD) or tracks (for other types of discs) in any order Example for 4 B from among multiple discs. You may program the same title or track more than once. -
Page 46: Random Playback
Advanced operations Repeating the current selection or all Random Playback discs You can play titles or tracks For DVD/Audio CD/MP3/JPEG: During playback on a disc in random order. For Video CD/SVCD: During playback without PBC function When using the REPEAT button: Press REPEAT. -
Page 47: Repeating A Desired Part
Advanced operations Press A-B REPEAT again at the end of NOTE the part you want to repeat (point B). • If you press REPEAT while stopped, you need to press (play button) to start Repeat Playback. The repeat mode indicator on the display window changes to •... -
Page 48: Setting Dvd Preferences
Setting DVD preferences : Audio menu (AUDIO) (A A A A pg. 48) You can adjust the initial settings for DVD playback according to your preference or needs using 5 choice menus shown on the TV You can adjust sound settings. screen. - Page 49 Setting DVD preferences Basic operation on the choice menus Press ENTER. The pop-up window, listing the selectable options, appears on IMPORTANT the choice menu. Before using the remote control for the following operation; 1 Set the remote control mode selector to AUDIO.
-
Page 50: Menu Description
Setting DVD preferences SUBTITLE Menu description Some DVDs have multiple subtitle languages. • Select the initial subtitle language*. OFF (no indication of subtitles), ENGLISH, SPANISH, FRENCH, CHINESE, GERMAN, ITALIAN, JAPANESE and Language menu (LANGUAGE) language codes from AA to ZU (see below) NOTE ON SCREEN LANGUAGE •... - Page 51 Setting DVD preferences Picture menu (PICTURE) MP3/JPEG If both MP3 files and JPEG files are recorded on a disc, you can MONITOR TYPE select which files to play. You can select the monitor type to match your TV when you play •...
- Page 52 Setting DVD preferences Speaker setting menu Level menu (LEVEL) (SPK. SETTING) CENTER SPEAKER /SURROUND LEFT SPEAKER SURROUND RIGHT SPEAKER /SUB WOOFER SIZE Adjust the output level of related speakers. Accesses the SIZE sub-menu (speaker size setting Within the range from –10 dB to +10 dB. menu).
-
Page 53: Parental Lock
Setting DVD preferences Other setting menu (OTHERS) Setting Parental Lock NOTE Press CHOICE. • You can select “PARENTAL LOCK” only while playback is Press Cursor to display the stopped. OTHERS menu. RESUME Press Cursor repeatedly to move You can activate or deactivate Resume Playback function. to “PARENTAL LOCK”, then press •... -
Page 54: Releasing Parental Lock Temporarily
Setting DVD preferences Press ENTER. Press number buttons (0-9) to enter your password, then press ENTER. • If you enter a wrong password, “WRONG! RETRY...” appears under the PARENTAL LOCK sub-menu. You cannot go to the next steps before you enter the correct password. - Page 55 Setting DVD preferences Country/Area codes list for Parental Lock Andorra Eritrea RW Rwanda Lao People’s Democratic Republic United Arab Emirates Spain Saudi Arabia Afghanistan Ethiopia Lebanon Solomon Islands Antigua and Barbuda Finland Saint Lucia Seychelles Anguilla Fiji Liechtenstein Sudan Albania Falkland Islands (Malvinas) Sri Lanka Sweden...
-
Page 56: System Setting
System setting You can adjust the sound and speaker settings of this system. • BAL: • The adjustments on a source take effect for the other sources. You can adjust the balance between the front left and front right speakers. (A pg. 48) IMPORTANT •... -
Page 57: Av Compu Link Remote Control System
• To correctly use the automatic selection of TV input mode, select the JVC TVs and VCRs through the center unit. This system is correct “M. OUT” setting. (A pg. 53) equipped with the AV COMPU LINK-III, which adds a function to operate JVC’s video components via the video components... -
Page 58: Karaoke Operations
KARAOKE operations This section explains various KARAOKE features including echo Basic KARAOKE and chorus effects, etc. to enjoy singing along with Karaoke disc. • shows the types of discs an operation is available operation for. • Turn on your TV and select the correct input mode on the TV. Set the Karaoke •... -
Page 59: Reserving Songs
KARAOKE operations IMPORTANT Reserving songs Before using the remote control for the following operation; You can reserve your desired songs 1 Set the Karaoke mode switch to ON. (titles/tracks) to play in the order of 2 Press the KARAOKE button so that your choice. -
Page 60: Selecting Audio
KARAOKE operations 7 During playback Selecting audio When using the SOUND button: Most Karaoke discs have the capability of adding “Guide vocal” or Press SOUND. “Guide melody” to the Karaoke accompaniment. The following pop-up window appears on the TV screen. •... - Page 61 KARAOKE operations Masking the vocal recorded on a normal IMPORTANT disc [VOCAL MASK] Before using the remote control for the following operation; You can enjoy Karaoke with a normal 1 Set the Karaoke mode switch to ON. disc (containing no multiplex audio 2 Press KARAOKE button so that or multi-sound Karaoke audio, etc.) “KARAOKE”...
-
Page 62: Adding An Effect To Your Voice
KARAOKE operations Resuming the masked vocal sound only Adding an effect to your when you stop singing [VOCAL REPLACE] voice You may have experiences that you could not sing in the middle of You can add 3 types of sound effect Karaoke because you forgot the (ECHO, CHORUS, and FLANGER) melody, etc. -
Page 63: Shifting The Pitch Of The Playback Sound
KARAOKE operations Adding sound effects to your voice Shifting the pitch of the playback sound When using the EFFECT button: Press EFFECT. You can sharp/flat the pitch of a The following pop-up window appears on the TV screen. song recorded on a disc by a •... -
Page 64: References
• Avoid exposure to direct sunlight, temperature extremes and moisture. Trouble shooting Use this chart to help you solve daily operational problems. If there is any problem you cannot solve, contact your JVC service center. General PROBLEM POSSIBLE CAUSE... -
Page 65: Dvd Playback
References PROBLEM POSSIBLE CAUSE SOLUTION No sound. The system cord and/or speaker cord is not connected. Check the connection. (A pg. 10 – 12) There is a short in the speaker cord. Reconnect the speaker cord. The audio cord is not connected to AUDIO IN (VCR) Connect the cord correctly. -
Page 66: Mp3 Playback
References MP3 Playback PROBLEM POSSIBLE CAUSE SOLUTION A disc cannot be played. No MP3 files are recorded to the disc. Replace the disc. MP3 files do not have the file extension in their file Add correct file extension (.mp3, .Mp3, .mP3 or .MP3) names. -
Page 67: Glossary
References Multiangle Glossary By recording multiple scenes progressing at the same time in a single title, the user can select view angles. This feature is called Aspect ratio the multiangle function. The ratio of vertical and horizontal sizes of a displayed image. The Multichannel horizontal vs. -
Page 68: Index
References Index Left/Right speaker balance (L/R BALANCE) ......48, 53 Low frequency effect attenuater (LFE ATT.)......48, 53 A-B Repeat Playback..............44 Menu language (MENU LANGUAGE) ........47 All Channel Stereo (ALL CH ST.) ........29 – 31 Monitor type (MONITOR TYPE) ..........48 Angle..................... -
Page 69: Specifications
References 7 Subwoofer (SP-PWM65) Specifications Amplifier section 80 W per channel, RMS at 6 C at Front/Center/Surround: 7 Center unit (XV-THM65) 1 kHz, with 10 % total harmonic distortion. Audio section 120 W, RMS at 4 C at 100 Hz, with Subwoofer: Total Harmonic Distortion 0.02 % 10 % total harmonic distortion. - Page 70 Mains (AC) Line Instruction (not applicable for Hong Kong, Europe, U.S.A., Canada, Australia and U.K.) SP-PWM65 CAUTION for mains (AC) line BEFORE PLUGGING IN, do check that your mains (AC) line voltage corresponds with the position of the voltage selector switch provided on the outside of this equipment and, if different, reset the voltage selector switch, to prevent from a damage or risk of fire/electric shock.
- Page 71 DVD DIGITAL CINEMA SYSTEM SYSTEMA DVD DIGITAL CINEMA SISTEMA DE CINEMA DE DVD DIGITAL TH-M65 Consists of XV-THM65, SP-PWM65, SP-THM65C and SP-THM65F Consta de XV-THM65, SP-PWM65, SP-THM65C y SP-THM65F Consiste em XV-THM65, SP-PWM65, SP-THM65C e SP-THM65F TH-M45 Consists of XV-THM45, SP-PWM45, SP-THM45C, SP-THM45F and SP-THM45S Consta de XV-THM45, SP-PWM45, SP-THM45C, SP-THM45F y SP-THM45S Consiste em XV-THM45, SP-PWM45, SP-THM45C, SP-THM45F e SP-THM45S INSTRUCTIONS...
- Page 72 Warnings, Cautions and Others / Avisos, precauciones y otras notas / Advertêcias, precauções e outras notas IMPORTANT FOR LASER PRODUCTS / CAUTION IMPORTANTE PARA LOS PRODUCTOS To reduce the risk of electrical shocks, fire, etc.: LÁSER / IMPORTANTE PARA PRODUCTOS 1.
- Page 73 Warnings, Cautions and Others / Avisos, precauciones y otras notas / Advertêcias, precauções e outras notas CAUTION PRECAUÇÃO • Do not block the ventilation openings or holes. • Não obstrua as aberturas e orifícios de ventilação. (Se os (If the ventilation openings or holes are blocked by a newspaper orifícios ou aberturas de ventilação estiverem obstruídos por or cloth, etc., the heat may not be able to get out.) qualquer papel ou tecido, não haverá...
- Page 74 Table of contents Introduction........2 Creating realistic sound fields ..29 Notes on handling..............2 Using the surround mode ............31 Supplied accessories .............2 Adjusting the sound.............32 About discs ........3 Advanced operations ..... 33 Playable disc types ..............3 Using the on-screen bar ............33 Disc structure ................4 Playing from a specified position on a disc......34 Playback Control function (PBC) —...
-
Page 75: Introduction
Introduction % Safety precautions Notes on handling Avoid moisture, water and dust Do not place the system in moist or dusty places. % Important cautions Avoid high temperatures Installation of the system Do not expose the system to direct sunlight and do not place it near •... -
Page 76: About Discs
About discs Especially, the configuration and characteristics of an MP3 disc Playable disc types or a JPEG disc are determined by the writing (encoding) software and hardware used for recording. Therefore, due to the software and hardware used, the following symptoms may occur: This system has been designed to play back the following discs: Some discs may not be played back. -
Page 77: Disc Structure
About discs IMPORTANT Playback Control function Before playing a disc, make sure of the following; (PBC) — VCD and SVCD • Check the connection with the TV. • Turn on your TV and select the correct input mode on the TV to view only the pictures or on-screen information on the TV screen. -
Page 78: Names Of Parts And Controls
Names of parts and controls The illustrations of the center unit and the subwoofer used in this manual are of TH-M65 unless otherwise noted. Front panel (center unit) For TH-M45 A Standby lamp (STANDBY) A pg. 19 J Microphone jacks (MIC 1/2) (TH-M65) A pg. 56 STANDBY/ON) A pg. - Page 79 Names of parts and controls Display window (center unit) A Disc indicators A pg. 25 PLII) A pg. 29 Dolby Pro Logic II indicator ( • B MP3 indicator A pg. 24 Linear PCM indicator (LPCM) A pg. 30 • C Channel indicator (CH) A pg.
- Page 80 Names of parts and controls A Remote control mode selector A pg. 17 – 54 Remote control AUDIO, TV, VCR/DBS B Muting button (MUTING) A pg. 20 C Disc buttons (DISC 1-5) A pg. 23 D TV volume buttons (TV VOL +/–) A pg. 17 E Operating buttons Play button ( ) A pg.
-
Page 81: Getting Started
Getting started Connections • Do not connect the AC power cord until all other connections have been made. • Since different components often have different terminal names, carefully read the instructions supplied with the components you are going to connect. Connecting a TV To view pictures and on-screen displays, connect the TV to the center unit. - Page 82 Getting started Connecting the FM and AM antennas If reception is poor Connect an outdoor single vinyl-covered wire antenna (not Make sure the antenna conductors do not touch any other terminals, supplied) to the AM EXT terminal. (Keep the AM loop antenna connecting cords and power cords.
-
Page 83: Speaker Layout
Getting started Connecting the powered subwoofer Connect the supplied powered subwoofer (SP-PWM65/SP-PWM45) using the system cord (supplied). • Connect the system cord by matching the marks on the plugs to the ones on the center unit and powered subwoofer. System cord (supplied) Ensure that the mark on... - Page 84 Getting started This page is for % Assembling the satellite speakers (TH-M65 only) Fix the stand to the speaker section. Each speaker (except the center speaker) has been divided into two • Be sure to tighten the screws firmly. parts for shipment. Before connecting the satellite speakers, first Speaker section assemble them by following the procedure below.
- Page 85 Getting started This page is for % Connecting the satellite (front, center, surround) speakers (TH-M65) Each speaker (SP-THM65F) can be used as a front or surround speaker. CAUTION • When you connect (larger) speakers other than the supplied ones, only use speakers with the same speaker impedance (SPEAKER IMPEDANCE) as indicated by the speaker terminals on the rear of the powered subwoofer.
- Page 86 Getting started This page is for % Connecting the satellite (front, center, surround) speakers (TH-M45) Be sure to identify each speaker (SP-THM45C/SP-THM45F/SP-THM45S) and connect them to the corresponding terminals of the powered subwoofer. CAUTION • When you connect (larger) speakers other than the supplied ones, only use speakers with the same speaker impedance (SPEAKER IMPEDANCE) as indicated by the speaker terminals on the rear of the powered subwoofer.
- Page 87 Getting started Connecting to an analog component You can enjoy the sound of an analog component such as a VCR, TV, or Cassette recorder with this system. Use RCA pin plug cords (not supplied) for connection. Center unit A To composite video output B To S-video output C To audio output White...
- Page 88 Getting started Setting the VOLTAGE SELECTOR switch To avoid damaging the powered subwoofer, set the VOLTAGE SELECTOR switch on the rear panel to the correct voltage for your area. When you change the position of the VOLTAGE SELECTOR switch, use a tool such as a slotted screwdriver, etc. CAUTION DO NOT plug the power cord of the powered subwoofer before setting the VOLTAGE SELECTOR switch to the correct voltage.
-
Page 89: Putting Batteries In The Remote Control
Getting started Operating the system from the remote Using the remote control control The remote control makes it easy to use many of the system Aim the remote control directly at the remote sensor on the center functions from a distance of up to 7 m away. unit. - Page 90 • Refer also to the instruction manuals supplied with your TV. CHANNEL +/–. (for TH-M65 only) % To set the manufacturer’s code For DBS tuner or CATV converter You can operate a JVC TV without setting the remote control signal. operations Slide the remote control mode selector You can operate your DBS tuner or CATV converter using the to TV.
- Page 91 CHANNEL +/–*: Changes the TV channels on the VCR. this system. 1-10, 0: Selects the channel. (for the JVC’s VCR only) • Refer also to the instruction manuals supplied with your VCR. * Be sure to set the Karaoke mode switch to OFF before using % To set the manufacturer’s code...
-
Page 92: Basic Operations
Basic operations This section mainly explains operations commonly used when you Turning the system on/off enjoy this system. • Turn on your TV and select the correct input mode on the TV. To turn the power on IMPORTANT On the remote control: Before using the remote control for the following operation, Press... -
Page 93: Selecting The Source To Play
Basic operations Selecting the source to Listening with headphones play (TH-M45 only) On the remote control: CAUTION Press one of the source selecting buttons Be sure to turn down the volume; • Before connecting or putting on headphones as high volume may (DVD, FM/AM, VCR or DBS). -
Page 94: Using The Sleep Timer
Basic operations To change the remaining time until the shut-off time IMPORTANT Press SLEEP repeatedly. Before using the remote control for the • Each time you press the button, the shut-off time changes. following operation, • Set the remote control mode selector to AUDIO. To cancel the Sleep Timer Press SLEEP repeatedly until “0min”... -
Page 95: Changing The Decode Mode
DVD in the progressive scan mode. In such a case, change the scan mode to “INTERLACE”. To check the compatibility of your TV, contact your local JVC customer service center. • All JVC progressive TVs and High-Definition TVs are fully... -
Page 96: Playback
Playback This section explains basic operations of DVD player. Basic playback For more details about DVD player operations, see pages 33 to 45. • shows the types of discs the operation is To load a disc available for. • Turn on your TV and select the correct input mode on the TV. Up to 5 discs can be loaded. - Page 97 Playback Playback information on the display window NOTE • You can also start playback by pressing (play button) or DVD. • Regardless of the operation for starting playback, the system plays Example: When a DVD encoded with Dolby Digital 5.1ch is played back all available discs sequentially until you stop playback.
-
Page 98: Playback Features
Playback NOTE Playback features • You can change the time information mode. (A pg. 34) • You can also check the playback information on the TV screen. IMPORTANT (A pg. 33) Before using the remote control for the Disc information on the display window following operation;... - Page 99 Playback Fast-forward/fast-reverse search Locating a desired selection using number buttons You can search for a particular point while playing a disc. You can locate the desired title, chapter, During playback track or file by On the remote control: selecting its number. Press For DVD (title, chapter): Each time you press the button, the search speed changes as...
-
Page 100: Tuner Operations
Tuner operations You can browse through all the stations or use the preset function to Manual tuning go immediately to a particular station. IMPORTANT On the remote control: Before using the remote control for the following operation; Press FM/AM repeatedly to select the 1 Set the remote control mode selector to band. -
Page 101: Selecting The Fm Reception Mode
Tuner operations Press MEMORY. Selecting the FM The channel number position starts flashing on the display reception mode window for about 5 seconds. When the stereo FM program currently tuned in is noisy, you can change the FM reception mode to improve the reception. •... -
Page 102: Creating Realistic Sound Fields
Creating realistic sound fields You can use the following surround modes to reproduce a realistic DTS Digital Surround sound field. Used to reproduce multichannel soundtracks of the software • Dolby Surround encoded with DTS Digital Surround ( Dolby Pro Logic II •... - Page 103 Creating realistic sound fields Creating sound field Indicators on the display window Reflections from behind Digital signal format indicators LPCM: Lights when Linear PCM signal comes in. Early reflections DIGITAL: Lights when Dolby Digital signals come in. Lights when DTS Digital (Surround) signals come No indication: No digital signal indicator lights when analog signals come in.
-
Page 104: Using The Surround Mode
Creating realistic sound fields IMPORTANT Using the surround mode Before using the remote control for the following operation; The system is set up to automatically select the optimal surround • Set the remote control mode selector to mode for input signal from digital multichannel software. AUDIO. -
Page 105: Adjusting The Sound
Creating realistic sound fields Adjusting the sound NOTE Before you start operation; • Set the Karaoke mode switch to OFF. (for TH-M65 only) On the remote control: Press TEST. Check if you can hear the sounds through all the speakers at the equal level. -
Page 106: Advanced Operations
Advanced operations 7 Contents of the on-screen bar during playback This section explains advanced operations for disc playback using the remote control. • shows the types of discs an operation is available for. • Turn on your TV and select the correct input mode on the TV. NOTE •... -
Page 107: Playing From A Specified Position On A Disc
Advanced operations Basic operation on the on-screen bar Example: During DVD playback Example: When selecting the Repeat mode of DVD (back to the beginning) 7 During playback or while stopped • TIME: Elapsed playing time of current chapter/track Press ON SCREEN twice. •... - Page 108 Advanced operations Locating a desired chapter using the on- screen bar When playing back a DVD, you can locate the chapter Cursor number to be played using the on-screen bar. ( / / / ) /ENTER During playback Press ON SCREEN twice. The on-screen bar appears on the TV screen.
-
Page 109: Using The Mp3 Control Display
Advanced operations Use number buttons (0-10, +10) to enter NOTE the desired title or group number. • You can also use the 10 button to enter “0”. • The +10 button is not used by this function. The system starts playback from the first chapter/track/file of •... -
Page 110: Using The Jpeg Control Display
Advanced operations To select the other group Press Cursor to return to the group list, then press Cursor to select the desired group. (play button) To skip groups/tracks during playback Press Cursor repeatedly for forward-skip. Cursor Press Cursor repeatedly for reverse-skip. ( / / / ) /ENTER To start playback by specifying the track number... -
Page 111: Selecting A View Angle Of Dvd
Advanced operations When using the on-screen bar: Selecting a view angle of Press ON SCREEN twice. The on-screen bar appears on the TV screen. Press Cursor 3/2 to move While playing back a DVD containing multi-view angles, you can enjoy the same scene at different angles. Press ENTER. -
Page 112: Selecting The Subtitle/Audio Languages
Advanced operations When using the on-screen bar: Selecting the subtitle/ Press ON SCREEN twice. audio languages The on-screen bar appears on the TV screen. Press Cursor 3/2 to move When playing back a DVD (or SVCD) containing subtitles in several languages, you can select the subtitle language to be Press ENTER. - Page 113 Advanced operations Press Cursor //5 to select the desired When using the on-screen bar: audio language. Press ON SCREEN twice. Each time you press the button, the audio language changes. The on-screen bar appears on the TV screen. Press ENTER. Press Cursor 3/2 to move The pop-up window disappears.
-
Page 114: Special Picture Playback
Advanced operations To return to normal playback Special picture playback Press (play button). NOTE This system provides special picture playback functions including • Sound cannot be heard during slow-motion playback. frame-by-frame, slow-motion and zoom. Zooming in (play button) During playback or while paused Press ZOOM. - Page 115 Advanced operations Press Cursor //5 repeatedly to select Changing the VFP setting a parameter you want to adjust. The VFP (Video Fine Processor) function Adjust gradually and confirm picture appearance results are as enables you to adjust the picture character preferred.
-
Page 116: Program Playback
Advanced operations Example for 4 A Program Playback You can play up to 99 titles (for DVD) or tracks (for other types of discs) in any order Example for 4 B from among multiple discs. You may program the same title or track more than once. -
Page 117: Random Playback
Advanced operations Repeating the current selection or all Random Playback discs You can play titles or tracks For DVD/Audio CD/MP3/JPEG: During playback on a disc in random order. For Video CD/SVCD: During playback without PBC function When using the REPEAT button: Press REPEAT. - Page 118 Advanced operations Press A-B REPEAT again at the end of NOTE the part you want to repeat (point B). • If you press REPEAT while stopped, you need to press (play button) to start Repeat Playback. The repeat mode indicator on the display window changes to •...
-
Page 119: Setting Dvd Preferences
Setting DVD preferences : Audio menu (AUDIO) (A A A A pg. 49) You can adjust the initial settings for DVD playback according to your preference or needs using 5 choice menus shown on the TV You can adjust sound settings. screen. - Page 120 Setting DVD preferences Basic operation on the choice menus Press ENTER. The pop-up window, listing the selectable options, appears on IMPORTANT the choice menu. Before using the remote control for the following operation; 1 Set the remote control mode selector to AUDIO.
-
Page 121: Menu Description
Setting DVD preferences SUBTITLE Menu description Some DVDs have multiple subtitle languages. • Select the initial subtitle language*. OFF (no indication of subtitles), ENGLISH, SPANISH, FRENCH, CHINESE, GERMAN, ITALIAN, JAPANESE and :Language menu (LANGUAGE) language codes from AA to ZU (see below) NOTE ON SCREEN LANGUAGE •... - Page 122 Setting DVD preferences : Picture menu (PICTURE) MP3/JPEG If both MP3 files and JPEG files are recorded on a disc, you can MONITOR TYPE select which files to play. You can select the monitor type to match your TV when you play •...
- Page 123 Setting DVD preferences 7 Level menu (LEVEL) : Speaker setting menu (SPK. SETTING) CENTER SPEAKER /SURROUND LEFT SPEAKER SURROUND RIGHT SPEAKER /SUB WOOFER SIZE Adjust the output level of related speakers. Accesses the SIZE sub-menu (speaker size setting Within the range from –10 dB to +10 dB. menu).
-
Page 124: Parental Lock
Setting DVD preferences : Other setting menu (OTHERS) Parental Lock NOTE Using this function, you can restrict playback of a DVD containing • You can select “PARENTAL LOCK” only while playback is violent scenes or scenes not suitable for your other family stopped. - Page 125 Setting DVD preferences Press ENTER. Press number buttons (0-9) to enter your password, then press ENTER. • If you enter a wrong password, “WRONG! RETRY...” appears under the PARENTAL LOCK sub-menu. You cannot go to the next steps before you enter the correct password.
- Page 126 Setting DVD preferences Country/Area codes list for Parental Lock Andorra Eritrea RW Rwanda Lao People’s Democratic Republic United Arab Emirates Spain Saudi Arabia Afghanistan Ethiopia Lebanon Solomon Islands Antigua and Barbuda Finland Saint Lucia Seychelles Anguilla Fiji Liechtenstein Sudan Albania Falkland Islands (Malvinas) Sri Lanka Sweden...
-
Page 127: System Setting
System setting You can adjust the sound and speaker settings of this system. • BAL: • The adjustments on a source take effect for the other sources. You can adjust the balance between the front left and front right speakers. (A pg. 49) IMPORTANT •... -
Page 128: Av Compu Link Remote Control System
• To correctly use the automatic selection of TV input mode, select the JVC TVs and VCRs through the center unit. This system is correct “M. OUT” setting. (A pg. 54) equipped with the AV COMPU LINK-III, which adds a function to operate JVC’s video components via the video components... -
Page 129: Karaoke Operations (Th-M65 Only)
KARAOKE operations (TH-M65 only) This section explains various KARAOKE features including echo Basic KARAOKE and chorus effects, etc. to enjoy singing along with Karaoke disc. • shows the types of discs an operation is available operation for. • Turn on your TV and select the correct input mode on the TV. Set the Karaoke •... -
Page 130: Reserving Songs
KARAOKE operations (TH-M65 only) IMPORTANT Reserving songs Before using the remote control for the following operation; You can reserve your desired songs 1 Set the Karaoke mode switch to ON. (titles/tracks) to play in the order of 2 Press the KARAOKE button so that your choice. -
Page 131: Selecting Audio
KARAOKE operations (TH-M65 only) 7 During playback Selecting audio When using the SOUND button: Most Karaoke discs have the capability of adding “Guide vocal” or Press SOUND. “Guide melody” to the Karaoke accompaniment. The following pop-up window appears on the TV screen. •... - Page 132 KARAOKE operations (TH-M65 only) Masking the vocal recorded on a normal IMPORTANT disc [VOCAL MASK] Before using the remote control for the following operation; You can enjoy Karaoke with a normal 1 Set the Karaoke mode switch to ON. disc (containing no multiplex audio or 2 Press KARAOKE button so that multi-sound Karaoke audio, etc.) by “KARAOKE”...
-
Page 133: Adding An Effect To Your Voice
KARAOKE operations (TH-M65 only) Resuming the masked vocal sound only Adding an effect to your when you stop singing [VOCAL REPLACE] voice You may have experiences that you could not sing in the middle of You can add 3 types of sound effect Karaoke because you forgot the (ECHO, CHORUS, and FLANGER) melody, etc. -
Page 134: Shifting The Pitch Of The Playback Sound
KARAOKE operations (TH-M65 only) Adding sound effects to your voice Shifting the pitch of the playback sound When using the EFFECT button: Press EFFECT. You can sharp/flat the pitch of a The following pop-up window appears on the TV screen. song recorded on a disc by a •... -
Page 135: References
• Avoid exposure to direct sunlight, temperature extremes and moisture. Trouble shooting Use this chart to help you solve daily operational problems. If there is any problem you cannot solve, contact your JVC service center. General PROBLEM POSSIBLE CAUSE... - Page 136 References PROBLEM POSSIBLE CAUSE SOLUTION No sound. The system cord and/or speaker cord is not connected. Check the connection. (A pg. 10 – 13) There is a short in the speaker cord. Reconnect the speaker cord. The audio cord is not connected to AUDIO IN (VCR) Connect the cord correctly.
- Page 137 References MP3 Playback PROBLEM POSSIBLE CAUSE SOLUTION A disc cannot be played. No MP3 files are recorded to the disc. Replace the disc. MP3 files do not have the file extension in their file Add correct file extension (.mp3, .Mp3, .mP3 or .MP3) names.
-
Page 138: Glossary
References Multiangle Glossary By recording multiple scenes progressing at the same time in a single title, the user can select view angles. This feature is called Aspect ratio the multiangle function. The ratio of vertical and horizontal sizes of a displayed image. The Multichannel horizontal vs. -
Page 139: Index
References Index Left/Right speaker balance (L/R BALANCE) ......49, 54 Low frequency effect attenuater (LFE ATT.)......49, 54 A-B Repeat Playback..............45 Menu language (MENU LANGUAGE) ........48 All Channel Stereo (ALL CH ST.) ........30 – 32 Monitor type (MONITOR TYPE) ..........49 Angle..................... -
Page 140: Specifications
References % Subwoofer (SP-PWM65) Specifications Amplifier section 80 W per channel, RMS at 6 C at Front/Center/Surround: % Center unit (XV-THM65/XV-THM45) 1 kHz, with 10 % total harmonic distortion. Audio section 120 W, RMS at 4 C at 100 Hz, with Subwoofer: Total Harmonic Distortion 0.02 % 10 % total harmonic distortion. - Page 141 References % Satellite Speakers (SP-THM65F) % Accessories 5.5 cm M 2 Speakers: • Remote control (1) Bass-reflex, Magnetically Shielded • Batteries (2) Power Handling Capacity: 80 W • FM antenna (1) Impedance: • AM loop antenna (1) Frequency Range: 90 Hz to 20 kHz Dimensions (W M H M D):250 mm M 1 103 mm M 250 mm •...
- Page 142 Mains (AC) Line Instruction (not applicable for Europe, U.S.A., Canada, Australia and U.K.) Instrucción sobre la línea de la red (CA) (no aplicable para Europa, EE.UU., Canadá, Australia, ni el Reino Unido) Instrução sobre a tensão da rede eléctrica (CA) (não aplicável para a Europa, os E.U.A., o Canadá, a Austrália e o Reino Unido) SP-PWM65...
- Page 143 DVD DIGITAL CINEMA SYSTEM TH-M65 Consists of XV-THM65, SP-PWM65, SP-THM65C and SP-THM65F INSTRUCTIONS LVT1024-014B [UG]...
- Page 144 Warnings, Cautions and Others / CAUTION To reduce the risk of electrical shocks, fire, etc.: 1. Do not remove screws, covers or cabinet. 2. Do not expose this appliance to rain or moisture. CAUTION — . button! ° WOzU dNJ « W UD « — “...
- Page 145 Warnings, Cautions and Others / IMPORTANT FOR LASER PRODUCTS / REPRODUCTION OF LABELS / A CLASSIFICATION LABEL, PLACED ON EXTERIOR SURFACE 2 WARNING LABEL, PLACED INSIDE THE UNIT 1. CLASS 1 LASER PRODUCT 2. CAUTION: Visible and invisible laser radiation when open and interlock failed or defeated.
- Page 146 Table of contents Introduction........2 Creating realistic sound fields ..28 Notes on handling..............2 Using the surround mode ............30 Supplied accessories .............2 Adjusting the sound.............31 About discs ........3 Advanced operations ..... 32 Playable disc types ..............3 Using the on-screen bar ............32 Disc structure ................4 Playing from a specified position on a disc......33 Playback Control function (PBC) —...
-
Page 147: Introduction
Introduction % Safety precautions Notes on handling Avoid moisture, water and dust Do not place the system in moist or dusty places. % Important cautions Avoid high temperatures Installation of the system Do not expose the system to direct sunlight and do not place it near •... -
Page 148: About Discs
About discs Especially, the configuration and characteristics of an MP3 disc Playable disc types or a JPEG disc are determined by the writing (encoding) software and hardware used for recording. Therefore, due to the software and hardware used, the following symptoms may occur: This system has been designed to play back the following discs: Some discs may not be played back. -
Page 149: Disc Structure
About discs IMPORTANT Playback Control function Before playing a disc, make sure of the following; (PBC) — VCD and SVCD • Check the connection with the TV. • Turn on your TV and select the correct input mode on the TV to view only the pictures or on-screen information on the TV screen. -
Page 150: Names Of Parts And Controls
Names of parts and controls Front panel (center unit) A Standby lamp (STANDBY) A pg. 18 J Microphone jacks (MIC 1/2) A pg. 55 STANDBY/ON) A pg. 18 K Disc trays A pg. 22 B Standby-on button ( C Stop button ( ) A pg. 22 L Illumination lamp A pg. - Page 151 Names of parts and controls Display window (center unit) A Disc indicators A pg. 24 PLII) A pg. 28 Dolby Pro Logic II indicator ( • B MP3 indicator A pg. 23 Linear PCM indicator (LPCM) A pg. 29 • C Channel indicator (CH) A pg.
- Page 152 Names of parts and controls A Remote control mode selector A pg. 16 – 53 Remote control AUDIO, TV, VCR/DBS B Muting button (MUTING) A pg. 19 C Disc buttons (DISC 1-5) A pg. 22 D TV volume buttons (TV VOL +/–) A pg. 16 E Operating buttons Play button ( ) A pg.
-
Page 153: Getting Started
Getting started Connections • Do not connect the AC power cord until all other connections have been made. • Since different components often have different terminal names, carefully read the instructions supplied with the components you are going to connect. Connecting a TV To view pictures and on-screen displays, connect the TV to the center unit. - Page 154 Getting started Connecting the FM and AM antennas If reception is poor Connect an outdoor single vinyl-covered wire antenna (not Make sure the antenna conductors do not touch any other terminals, supplied) to the AM EXT terminal. (Keep the AM loop antenna connecting cords and power cords.
- Page 155 Getting started Connecting the powered subwoofer Connect the supplied powered subwoofer (SP-PWM65) using the system cord (supplied). • Connect the system cord by matching the marks on the plugs to the ones on the center unit and powered subwoofer. System cord (supplied) Ensure that the mark on...
- Page 156 Getting started % Assembling the satellite speakers Fix the stand to the speaker section. Each speaker (except the center speaker) has been divided into two • Be sure to tighten the screws firmly. parts for shipment. Before connecting the satellite speakers, first Speaker section assemble them by following the procedure below.
- Page 157 Getting started % Connecting the satellite (front, center, surround) speakers Each speaker (SP-THM65F) can be used as a front or surround speaker. CAUTION • When you connect (larger) speakers other than the supplied ones, only use speakers with the same speaker impedance (SPEAKER IMPEDANCE) as indicated by the speaker terminals on the rear of the powered subwoofer.
- Page 158 Getting started Connecting to an analog component You can enjoy the sound of an analog component such as a VCR, TV, or Cassette recorder with this system. Use RCA pin plug cords (not supplied) for connection. Center unit A To composite video output B To S-video output C To audio output White...
- Page 159 Getting started Setting the VOLTAGE SELECTOR switch To avoid damaging the powered subwoofer, set the VOLTAGE SELECTOR switch on the rear panel to the correct voltage for your area. When you change the position of the VOLTAGE SELECTOR switch, use a tool such as a slotted screwdriver, etc. CAUTION DO NOT plug the power cord of the powered subwoofer before setting the VOLTAGE SELECTOR switch to the correct voltage.
-
Page 160: Using The Remote Control
Getting started Operating the system from the remote Using the remote control control The remote control makes it easy to use many of the system Aim the remote control directly at the remote sensor on the center functions from a distance of up to 7 m away. unit. - Page 161 • Refer also to the instruction manuals supplied with your TV. % To set the manufacturer’s code For DBS tuner or CATV converter You can operate a JVC TV without setting the remote control signal. operations Slide the remote control mode selector You can operate your DBS tuner or CATV converter using the to TV.
- Page 162 CHANNEL +/–*: Changes the TV channels on the VCR. this system. 1-10, 0: Selects the channel. (for the JVC’s VCR only) • Refer also to the instruction manuals supplied with your VCR. * Be sure to set the Karaoke mode switch to OFF before using % To set the manufacturer’s code...
-
Page 163: Basic Operations
Basic operations This section mainly explains operations commonly used when you Turning the system on/off enjoy this system. • Turn on your TV and select the correct input mode on the TV. To turn the power on IMPORTANT On the remote control: Before using the remote control for the following operation, Press... -
Page 164: Selecting The Source To Play
Basic operations Selecting the source to Turning off the sound play temporarily On the remote control: On the remote control: Press one of the source selecting buttons Press MUTING. (DVD, FM/AM, VCR or DBS). “MUTING” appears on the display window and the sound turns off. DVD: To play back a disc (DVD, Video CD etc.). -
Page 165: Using The Sleep Timer
Basic operations To change the remaining time until the shut-off time IMPORTANT Press SLEEP repeatedly. Before using the remote control for the • Each time you press the button, the shut-off time changes. following operation, AUDIO • Set the remote control mode selector to To cancel the Sleep Timer Press SLEEP repeatedly until “0min”... -
Page 166: Changing The Decode Mode
DVD in the progressive scan mode. In such a case, change the scan mode to “INTERLACE”. To check the compatibility of your TV, contact your local JVC customer service center. • All JVC progressive TVs and High-Definition TVs are fully... -
Page 167: Playback
Playback This section explains basic operations of DVD player. Basic playback For more details about DVD player operations, see pages 32 to 44. • shows the types of discs the operation is To load a disc available for. • Turn on your TV and select the correct input mode on the TV. Up to 5 discs can be loaded. - Page 168 Playback Playback information on the display window NOTE • You can also start playback by pressing (play button) or DVD. • Regardless of the operation for starting playback, the system plays Example: When a DVD encoded with Dolby Digital 5.1ch is played back all available discs sequentially until you stop playback.
-
Page 169: Playback Features
Playback NOTE Playback features • You can change the time information mode. (A pg. 33) • You can also check the playback information on the TV screen. IMPORTANT (A pg. 32) Before using the remote control for the Disc information on the display window following operation;... - Page 170 Playback Fast-forward/fast-reverse search Locating a desired selection using number buttons You can search for a particular point while playing a disc. You can locate the desired title, chapter, During playback track or file by On the remote control: selecting its number. Press For DVD (title, chapter): Each time you press the button, the search speed changes as...
-
Page 171: Tuner Operations
Tuner operations You can browse through all the stations or use the preset function to Manual tuning go immediately to a particular station. IMPORTANT On the remote control: Before using the remote control for the following operation; Press FM/AM repeatedly to select the 1 Set the remote control mode selector to band. -
Page 172: Selecting The Fm Reception Mode
Tuner operations Press MEMORY. Selecting the FM The channel number position starts flashing on the display reception mode window for about 5 seconds. When the stereo FM program currently tuned in is noisy, you can change the FM reception mode to improve the reception. •... -
Page 173: Creating Realistic Sound Fields
Creating realistic sound fields You can use the following surround modes to reproduce a realistic DTS Digital Surround sound field. Used to reproduce multichannel soundtracks of the software • Dolby Surround encoded with DTS Digital Surround ( Dolby Pro Logic II •... - Page 174 Creating realistic sound fields Creating sound field Indicators on the display window Reflections from behind Digital signal format indicators LPCM: Lights when Linear PCM signal comes in. Early reflections DIGITAL: Lights when Dolby Digital signals come in. Lights when DTS Digital (Surround) signals come No indication: No digital signal indicator lights when analog signals come in.
-
Page 175: Using The Surround Mode
Creating realistic sound fields IMPORTANT Using the surround mode Before using the remote control for the following operation; The system is set up to automatically select the optimal surround • Set the remote control mode selector to mode for input signal from digital multichannel software. AUDIO. -
Page 176: Adjusting The Sound
Creating realistic sound fields Adjusting the sound NOTE Before you start operation; • Set the Karaoke mode switch to On the remote control: Press TEST. Check if you can hear the sounds through all the speakers at the equal level. “TEST TONE”... -
Page 177: Advanced Operations
Advanced operations 7 Contents of the on-screen bar during playback This section explains advanced operations for disc playback using the remote control. • shows the types of discs an operation is available for. • Turn on your TV and select the correct input mode on the TV. NOTE •... -
Page 178: Playing From A Specified Position On A Disc
Advanced operations Basic operation on the on-screen bar Example: During DVD playback Example: When selecting the Repeat mode of DVD (back to the beginning) During playback or while stopped • TIME: Elapsed playing time of current chapter/track Press ON SCREEN twice. •... - Page 179 Advanced operations Locating a desired chapter using the on- screen bar When playing back a DVD, you can locate the chapter Cursor number to be played using the on-screen bar. ( / / / ) /ENTER During playback Press ON SCREEN twice. The on-screen bar appears on the TV screen.
-
Page 180: Using The Mp3 Control Display
Advanced operations Use number buttons (0-10, +10) to enter NOTE the desired title or group number. • You can also use the 10 button to enter “0”. • The +10 button is not used by this function. The system starts playback from the first chapter/track/file of •... -
Page 181: Using The Jpeg Control Display
Advanced operations To select the other group Press Cursor to return to the group list, then press Cursor to select the desired group. (play button) To skip groups/tracks during playback Press Cursor repeatedly for forward-skip. Cursor Press Cursor repeatedly for reverse-skip. ( / / / ) /ENTER To start playback by specifying the track number... -
Page 182: Selecting A View Angle Of Dvd
Advanced operations When using the on-screen bar: Selecting a view angle of Press ON SCREEN twice. The on-screen bar appears on the TV screen. Press Cursor 3/2 to move While playing back a DVD containing multi-view angles, you can enjoy the same scene at different angles. Press ENTER. -
Page 183: Selecting The Subtitle/Audio Languages
Advanced operations When using the on-screen bar: Selecting the subtitle/ Press ON SCREEN twice. audio languages The on-screen bar appears on the TV screen. Press Cursor 3/2 to move When playing back a DVD (or SVCD) containing subtitles in several languages, you can select the subtitle language to be Press ENTER. - Page 184 Advanced operations Press Cursor //5 to select the desired When using the on-screen bar: audio language. Press ON SCREEN twice. Each time you press the button, the audio language changes. The on-screen bar appears on the TV screen. Press ENTER. Press Cursor 3/2 to move The pop-up window disappears.
-
Page 185: Special Picture Playback
Advanced operations To return to normal playback Special picture playback Press (play button). NOTE This system provides special picture playback functions including • Sound cannot be heard during slow-motion playback. frame-by-frame, slow-motion and zoom. Zooming in (play button) During playback or while paused Press ZOOM. - Page 186 Advanced operations Press Cursor //5 repeatedly to select Changing the VFP setting a parameter you want to adjust. The VFP (Video Fine Processor) function Adjust gradually and confirm picture appearance results are as enables you to adjust the picture character preferred.
-
Page 187: Program Playback
Advanced operations Example for 4 A Program Playback You can play up to 99 titles (for DVD) or tracks (for other types of discs) in any order Example for 4 B from among multiple discs. You may program the same title or track more than once. -
Page 188: Random Playback
Advanced operations Repeating the current selection or all Random Playback discs You can play titles or tracks For DVD/Audio CD/MP3/JPEG: During playback on a disc in random order. For Video CD/SVCD: During playback without PBC function When using the REPEAT button: Press REPEAT. - Page 189 Advanced operations Press A-B REPEAT again at the end of NOTE the part you want to repeat (point B). • If you press REPEAT while stopped, you need to press (play button) to start Repeat Playback. The repeat mode indicator on the display window changes to •...
-
Page 190: Setting Dvd Preferences
Setting DVD preferences : Audio menu (AUDIO) (A A A A pg. 48) You can adjust the initial settings for DVD playback according to your preference or needs using 5 choice menus shown on the TV You can adjust sound settings. screen. - Page 191 Setting DVD preferences Basic operation on the choice menus Press ENTER. The pop-up window, listing the selectable options, appears on IMPORTANT the choice menu. Before using the remote control for the following operation; 1 Set the remote control mode selector to AUDIO.
-
Page 192: Menu Description
Setting DVD preferences 7 SUBTITLE Menu description Some DVDs have multiple subtitle languages. • Select the initial subtitle language*. OFF (no indication of subtitles), ENGLISH, SPANISH, FRENCH, CHINESE, GERMAN, ITALIAN, JAPANESE and Language menu (LANGUAGE) language codes from AA to ZU (see below) NOTE 7 ON SCREEN LANGUAGE •... - Page 193 Setting DVD preferences 7 MP3/JPEG Picture menu (PICTURE) If both MP3 files and JPEG files are recorded on a disc, you can 7 MONITOR TYPE select which files to play. You can select the monitor type to match your TV when you play •...
- Page 194 Setting DVD preferences 7 Level menu (LEVEL) Speaker setting menu (SPK. SETTING) CENTER SPEAKER /SURROUND LEFT SPEAKER SURROUND RIGHT SPEAKER /SUB WOOFER 7 SIZE Adjust the output level of related speakers. Accesses the SIZE sub-menu (speaker size setting Within the range from –10 dB to +10 dB. menu).
-
Page 195: Parental Lock
Setting DVD preferences Other setting menu (OTHERS) Parental Lock NOTE Using this function, you can restrict playback of a DVD containing • You can select “PARENTAL LOCK” only while playback is violent scenes or scenes not suitable for your other family stopped. - Page 196 Setting DVD preferences Press ENTER. Press number buttons (0-9) to enter your password, then press ENTER. • If you enter a wrong password, “WRONG! RETRY...” appears under the PARENTAL LOCK sub-menu. You cannot go to the next steps before you enter the correct password.
- Page 197 Setting DVD preferences Country/Area codes list for Parental Lock Andorra Eritrea RW Rwanda Lao People’s Democratic Republic United Arab Emirates Spain Saudi Arabia Afghanistan Ethiopia Lebanon Solomon Islands Antigua and Barbuda Finland Saint Lucia Seychelles Anguilla Fiji Liechtenstein Sudan Albania Falkland Islands (Malvinas) Sri Lanka Sweden...
-
Page 198: System Setting
System setting You can adjust the sound and speaker settings of this system. • BAL: • The adjustments on a source take effect for the other sources. You can adjust the balance between the front left and front right speakers. (A pg. 48) IMPORTANT •... -
Page 199: Av Compu Link Remote Control System
• To correctly use the automatic selection of TV input mode, select the JVC TVs and VCRs through the center unit. This system is correct “M. OUT” setting. (A pg. 53) equipped with the AV COMPU LINK-III, which adds a function to operate JVC’s video components via the video components... -
Page 200: Karaoke Operations
KARAOKE operations This section explains various KARAOKE features including echo Basic KARAOKE and chorus effects, etc. to enjoy singing along with Karaoke disc. • shows the types of discs an operation is available operation for. • Turn on your TV and select the correct input mode on the TV. Set the Karaoke •... -
Page 201: Reserving Songs
KARAOKE operations IMPORTANT Reserving songs Before using the remote control for the following operation; You can reserve your desired songs 1 Set the Karaoke mode switch to ON. (titles/tracks) to play in the order of 2 Press the KARAOKE button so that your choice. -
Page 202: Selecting Audio
KARAOKE operations 7 During playback Selecting audio When using the SOUND button: Most Karaoke discs have the capability of adding “Guide vocal” or Press SOUND. “Guide melody” to the Karaoke accompaniment. The following pop-up window appears on the TV screen. •... - Page 203 KARAOKE operations Masking the vocal recorded on a normal IMPORTANT disc [VOCAL MASK] Before using the remote control for the following operation; You can enjoy Karaoke with a normal 1 Set the Karaoke mode switch to ON. disc (containing no multiplex audio 2 Press KARAOKE button so that or multi-sound Karaoke audio, etc.) “KARAOKE”...
-
Page 204: Adding An Effect To Your Voice
KARAOKE operations Resuming the masked vocal sound only Adding an effect to your when you stop singing [VOCAL REPLACE] voice You may have experiences that you could not sing in the middle of You can add 3 types of sound effect Karaoke because you forgot the (ECHO, CHORUS, and FLANGER) melody, etc. -
Page 205: Shifting The Pitch Of The Playback Sound
KARAOKE operations Adding sound effects to your voice Shifting the pitch of the playback sound When using the EFFECT button: Press EFFECT. You can sharp/flat the pitch of a The following pop-up window appears on the TV screen. song recorded on a disc by a •... -
Page 206: References
• Avoid exposure to direct sunlight, temperature extremes and moisture. Trouble shooting Use this chart to help you solve daily operational problems. If there is any problem you cannot solve, contact your JVC service center. General PROBLEM POSSIBLE CAUSE... - Page 207 References PROBLEM POSSIBLE CAUSE SOLUTION No sound. The system cord and/or speaker cord is not connected. Check the connection. (A pg. 10 – 12) There is a short in the speaker cord. Reconnect the speaker cord. The audio cord is not connected to AUDIO IN (VCR) Connect the cord correctly.
- Page 208 References MP3 Playback PROBLEM POSSIBLE CAUSE SOLUTION A disc cannot be played. No MP3 files are recorded to the disc. Replace the disc. MP3 files do not have the file extension in their file Add correct file extension (.mp3, .Mp3, .mP3 or .MP3) names.
-
Page 209: Glossary
References Multiangle Glossary By recording multiple scenes progressing at the same time in a single title, the user can select view angles. This feature is called Aspect ratio the multiangle function. The ratio of vertical and horizontal sizes of a displayed image. The Multichannel horizontal vs. -
Page 210: Index
References Index Left/Right speaker balance (L/R BALANCE) ......48, 53 Low frequency effect attenuater (LFE ATT.)......48, 53 A-B Repeat Playback..............44 Menu language (MENU LANGUAGE) ........47 All Channel Stereo (ALL CH ST.) ........29 – 31 Monitor type (MONITOR TYPE) ..........48 Angle..................... -
Page 211: Specifications
References % Subwoofer (SP-PWM65) Specifications Amplifier section 80 W per channel, RMS at 6 C at Front/Center/Surround: % Center unit (XV-THM65) 1 kHz, with 10 % total harmonic distortion. Audio section 120 W, RMS at 4 C at 100 Hz, with Subwoofer: Total Harmonic Distortion 0.02 % 10 % total harmonic distortion. - Page 212 Mains (AC) Line Instruction (not applicable for Hong Kong, Europe, U.S.A., Canada, Australia and U.K.) SP-PWM65 CAUTION for mains (AC) line BEFORE PLUGGING IN, do check that your mains (AC) line voltage corresponds with the position of the voltage selector switch provided on the outside of this equipment and, if different, reset the voltage selector switch, to prevent from a damage or risk of fire/electric shock.
- Page 213 DVD DIGITAL CINEMA SYSTEM TH-M65 Consists of XV-THM65, SP-PWM65, SP-THM65C and SP-THM65F INSTRUCTIONS LVT1024-016B [UJ]...
- Page 214 Warnings, Cautions and Others CAUTION To reduce the risk of electrical shocks, fire, etc.: 1. Do not remove screws, covers or cabinet. 2. Do not expose this appliance to rain or moisture. CAUTION — . button! (XV-THM65) Disconnect the mains plug to shut the power off completely (the STANDBY lamp goes off).
- Page 215 Warnings, Cautions and Others Caution: Proper Ventilation To avoid risk of electric shock and fire and to protect from damage, place the apparatus on a level surface. The minimal clearances are shown below: No obstructions Wall or obstructions Wall or Front 1 cm 1 cm...
- Page 216 Table of contents Introduction........2 Creating realistic sound fields ..28 Notes on handling..............2 Using the surround mode ............30 Supplied accessories .............2 Adjusting the sound.............31 About discs ........3 Advanced operations ..... 32 Playable disc types ..............3 Using the on-screen bar ............32 Disc structure ................4 Playing from a specified position on a disc......33 Playback Control function (PBC) —...
-
Page 217: Introduction
Introduction Safety precautions Notes on handling Avoid moisture, water and dust Do not place the system in moist or dusty places. Important cautions Avoid high temperatures Installation of the system Do not expose the system to direct sunlight and do not place it near •... -
Page 218: About Discs
About discs Especially, the configuration and characteristics of an MP3 disc Playable disc types or a JPEG disc are determined by the writing (encoding) software and hardware used for recording. Therefore, due to the software and hardware used, the following symptoms may occur: This system has been designed to play back the following discs: Some discs may not be played back. -
Page 219: Disc Structure
About discs IMPORTANT Playback Control function Before playing a disc, make sure of the following; (PBC) — VCD and SVCD • Check the connection with the TV. • Turn on your TV and select the correct input mode on the TV to view only the pictures or on-screen information on the TV screen. -
Page 220: Names Of Parts And Controls
Names of parts and controls Front panel (center unit) A Standby lamp (STANDBY) A pg. 18 J Headphones jack (PHONES) A pg. 19 STANDBY/ON) A pg. 18 K Disc trays A pg. 22 B Standby-on button ( C Stop button ( ) A pg. 22 L Illumination lamp A pg. - Page 221 Names of parts and controls Display window (center unit) A Disc indicators A pg. 24 PLII) A pg. 28 Dolby Pro Logic II indicator ( • B MP3 indicator A pg. 23 Linear PCM indicator (LPCM) A pg. 29 • C Channel indicator (CH) A pg.
- Page 222 Names of parts and controls A Remote control mode selector A pg. 16 – 53 Remote control AUDIO, TV, VCR/DBS B Muting button (MUTING) A pg. 19 C Disc buttons (DISC 1-5) A pg. 22 D TV volume buttons (TV VOL +/–) A pg. 16 E Operating buttons Play button ( ) A pg.
-
Page 223: Getting Started
Getting started Connections • Do not connect the AC power cord until all other connections have been made. • Since different components often have different terminal names, carefully read the instructions supplied with the components you are going to connect. Connecting a TV To view pictures and on-screen displays, connect the TV to the center unit. - Page 224 Getting started Connecting the FM and AM antennas If reception is poor Connect an outdoor single vinyl-covered wire antenna (not Make sure the antenna conductors do not touch any other terminals, supplied) to the AM EXT terminal. (Keep the AM loop antenna connecting cords and power cords.
- Page 225 Getting started Connecting the powered subwoofer Connect the supplied powered subwoofer (SP-PWM65) using the system cord (supplied). • Connect the system cord by matching the marks on the plugs to the ones on the center unit and powered subwoofer. System cord (supplied) Ensure that the mark on...
- Page 226 Getting started Assembling the satellite speakers Fix the stand to the speaker section. Each speaker (except the center speaker) has been divided into two • Be sure to tighten the screws firmly. parts for shipment. Before connecting the satellite speakers, first Speaker section assemble them by following the procedure below.
- Page 227 Getting started Connecting the satellite (front, center, surround) speakers Each speaker (SP-THM65F) can be used as a front or surround speaker. CAUTION • When you connect (larger) speakers other than the supplied ones, only use speakers with the same speaker impedance (SPEAKER IMPEDANCE) as indicated by the speaker terminals on the rear of the powered subwoofer.
- Page 228 Getting started Connecting to an analog component You can enjoy the sound of an analog component such as a VCR, TV, or Cassette recorder with this system. Use RCA pin plug cords (not supplied) for connection. Center unit A To composite video output B To S-video output C To audio output White...
- Page 229 Getting started Setting the VOLTAGE SELECTOR switch To avoid damaging the powered subwoofer, set the VOLTAGE SELECTOR switch on the rear panel to the correct voltage for your area. When you change the position of the VOLTAGE SELECTOR switch, use a tool such as a slotted screwdriver, etc. CAUTION DO NOT plug the power cord of the powered subwoofer before setting the VOLTAGE SELECTOR switch to the correct voltage.
-
Page 230: Using The Remote Control
Getting started Operating the system from the remote Using the remote control control The remote control makes it easy to use many of the system Aim the remote control directly at the remote sensor on the center functions from a distance of up to 7 m away. unit. - Page 231 For DBS tuner or CATV converter operations To set the manufacturer’s code You can operate a JVC TV without setting the remote control You can operate your DBS tuner or CATV converter using the signal. remote control supplied with this system.
- Page 232 • Refer also to the instruction manuals supplied with your VCR. CHANNEL +/–: Changes the TV channels on the VCR. To set the manufacturer’s code 1-10, 0: Selects the channel. (for the JVC’s VCR only) NOTE Slide the remote control mode selector When operating a VCR or DBS tuner/CATV converter;...
-
Page 233: Basic Operations
Basic operations This section mainly explains operations commonly used when you Turning the system on/off enjoy this system. • Turn on your TV and select the correct input mode on the TV. To turn the power on IMPORTANT On the remote control: Before using the remote control for the following operation, Press . -
Page 234: Selecting The Source To Play
Basic operations Selecting the source to Listening with headphones play CAUTION On the remote control: Be sure to turn down the volume; • Before connecting or putting on headphones as high volume may Press one of the source selecting buttons damage both the headphones and your hearing. -
Page 235: Using The Sleep Timer
Basic operations To change the remaining time until the shut-off time IMPORTANT Press SLEEP repeatedly. Before using the remote control for the • Each time you press the button, the shut-off time changes. following operation, AUDIO • Set the remote control mode selector to To cancel the Sleep Timer Press SLEEP repeatedly until “0min”... -
Page 236: Changing The Decode Mode
DVD in the progressive scan mode. In such a case, change the scan mode to “INTERLACE”. To check the compatibility of your TV, contact your local JVC customer service center. • All JVC progressive TVs and High-Definition TVs are fully... -
Page 237: Playback
Playback This section explains basic operations of DVD player. Basic playback For more details about DVD player operations, see pages 32 to 44. • shows the types of discs the operation is To load a disc available for. • Turn on your TV and select the correct input mode on the TV. Up to 5 discs can be loaded. - Page 238 Playback Playback information on the display window NOTE (play button) or DVD. • You can also start playback by pressing • Regardless of the operation for starting playback, the system plays Example: When a DVD encoded with Dolby Digital 5.1ch is played back all available discs sequentially until you stop playback.
-
Page 239: Playback Features
Playback NOTE Playback features • You can change the time information mode. (A pg. 33) • You can also check the playback information on the TV screen. IMPORTANT (A pg. 32) Before using the remote control for the Disc information on the display window following operation;... - Page 240 Playback Fast-forward/fast-reverse search Locating a desired selection using number buttons You can search for a particular point while playing a disc. You can locate the desired title, chapter, During playback track or file by On the remote control: selecting its number. Press For DVD (title, chapter): Each time you press the button, the search speed changes as...
-
Page 241: Tuner Operations
Tuner operations You can browse through all the stations or use the preset function to Manual tuning go immediately to a particular station. IMPORTANT On the remote control: Before using the remote control for the following operation; Press FM/AM repeatedly to select the 1 Set the remote control mode selector to band. -
Page 242: Selecting The Fm Reception Mode
Tuner operations Press MEMORY. Selecting the FM The channel number position starts flashing on the display reception mode window for about 5 seconds. When the stereo FM program currently tuned in is noisy, you can change the FM reception mode to improve the reception. •... -
Page 243: Creating Realistic Sound Fields
Creating realistic sound fields DTS Digital Surround You can use the following surround modes to reproduce a realistic sound field. Used to reproduce multichannel soundtracks of the software • Dolby Surround encoded with DTS Digital Surround ( Dolby Pro Logic II •... - Page 244 Creating realistic sound fields Creating sound field Indicators on the display window Reflections from behind Digital signal format indicators LPCM: Lights when Linear PCM signal comes in. Early reflections DIGITAL: Lights when Dolby Digital signals come in. Lights when DTS Digital (Surround) signals come No indication: No digital signal indicator lights when analog signals come in.
-
Page 245: Using The Surround Mode
Creating realistic sound fields IMPORTANT Using the surround mode Before using the remote control for the following operation; The system is set up to automatically select the optimal surround • Set the remote control mode selector to mode for input signal from digital multichannel software. AUDIO. -
Page 246: Adjusting The Sound
Creating realistic sound fields Adjusting the sound On the remote control: Press TEST. Check if you can hear the sounds through all the speakers at the equal level. “TEST TONE” and the corresponding signal indicator starts flashing on the display window, and the test tone comes out of the speakers in the following order;... -
Page 247: Advanced Operations
Advanced operations Contents of the on-screen bar during playback This section explains advanced operations for disc playback using the remote control. • shows the types of discs an operation is available for. • Turn on your TV and select the correct input mode on the TV. NOTE •... -
Page 248: Playing From A Specified Position On A Disc
Advanced operations Basic operation on the on-screen bar Example: During DVD playback Example: When selecting the Repeat mode of DVD (back to the beginning) During playback or while stopped • TIME: Elapsed playing time of current chapter/track Press ON SCREEN twice. •... - Page 249 Advanced operations Locating a desired chapter using the on- screen bar When playing back a DVD, you can locate the chapter Cursor number to be played using the on-screen bar. ( / / / ) /ENTER During playback Press ON SCREEN twice. The on-screen bar appears on the TV screen.
-
Page 250: Using The Mp3 Control Display
Advanced operations Use number buttons (0-10, +10) to enter NOTE the desired title or group number. • You can also use the 10 button to enter “0”. • The +10 button is not used by this function. The system starts playback from the first chapter/track/file of •... -
Page 251: Using The Jpeg Control Display
Advanced operations To select the other group Press Cursor to return to the group list, then press Cursor to select the desired group. (play button) To skip groups/tracks during playback Press Cursor repeatedly for forward-skip. Cursor Press Cursor repeatedly for reverse-skip. ( / / / ) /ENTER To start playback by specifying the track number... -
Page 252: Selecting A View Angle Of Dvd
Advanced operations When using the on-screen bar: Selecting a view angle of Press ON SCREEN twice. The on-screen bar appears on the TV screen. Press Cursor to move While playing back a DVD containing multi-view angles, you can enjoy the same scene at different angles. Press ENTER. -
Page 253: Selecting The Subtitle/Audio Languages
Advanced operations When using the on-screen bar: Selecting the subtitle/ Press ON SCREEN twice. audio languages The on-screen bar appears on the TV screen. Press Cursor to move When playing back a DVD (or SVCD) containing subtitles in several languages, you can select the subtitle language to be Press ENTER. - Page 254 Advanced operations When using the on-screen bar: Press Cursor to select the desired audio language. Press ON SCREEN twice. Each time you press the button, the audio language changes. The on-screen bar appears on the TV screen. Press ENTER. Press Cursor to move The pop-up window disappears.
-
Page 255: Special Picture Playback
Advanced operations To return to normal playback Special picture playback Press (play button). NOTE This system provides special picture playback functions including • Sound cannot be heard during slow-motion playback. frame-by-frame, slow-motion and zoom. Zooming in (play button) During playback or while paused Press ZOOM. - Page 256 Advanced operations Changing the VFP setting Press Cursor repeatedly to select a parameter you want to adjust. The VFP (Video Fine Processor) function Adjust gradually and confirm picture appearance results are as enables you to adjust the picture character preferred. according to the type of programming, •...
-
Page 257: Program Playback
Advanced operations Example for 4 A Program Playback You can play up to 99 titles (for DVD) or tracks (for other types of discs) in any order Example for 4 B from among multiple discs. You may program the same title or track more than once. -
Page 258: Random Playback
Advanced operations Repeating the current selection or all Random Playback discs You can play titles or tracks For DVD/Audio CD/MP3/JPEG: During playback on a disc in random order. For Video CD/SVCD: During playback without PBC function When using the REPEAT button: Press REPEAT. - Page 259 Advanced operations Press A-B REPEAT again at the end of NOTE the part you want to repeat (point B). • If you press REPEAT while stopped, you need to press (play button) to start Repeat Playback. The repeat mode indicator on the display window changes to •...
-
Page 260: Setting Dvd Preferences
Setting DVD preferences : Audio menu (AUDIO) (A A A A pg. 48) You can adjust the initial settings for DVD playback according to your preference or needs using 5 choice menus shown on the TV You can adjust sound settings. screen. - Page 261 Setting DVD preferences Basic operation on the choice menus Press ENTER. The pop-up window, listing the selectable options, appears on IMPORTANT the choice menu. Before using the remote control for the following operation; 1 Set the remote control mode selector to AUDIO.
-
Page 262: Menu Description
Setting DVD preferences SUBTITLE Menu description Some DVDs have multiple subtitle languages. • Select the initial subtitle language*. OFF (no indication of subtitles), ENGLISH, SPANISH, Language menu (LANGUAGE) FRENCH, CHINESE, GERMAN, ITALIAN, JAPANESE and language codes from AA to ZU (see below) NOTE ON SCREEN LANGUAGE •... - Page 263 Setting DVD preferences Picture menu (PICTURE) MP3/JPEG If both MP3 files and JPEG files are recorded on a disc, you can MONITOR TYPE select which files to play. You can select the monitor type to match your TV when you play •...
- Page 264 Setting DVD preferences Speaker setting menu Level menu (LEVEL) (SPK. SETTING) CENTER SPEAKER /SURROUND LEFT SPEAKER SURROUND RIGHT SPEAKER /SUB WOOFER SIZE Adjust the output level of related speakers. Accesses the SIZE sub-menu (speaker size setting Within the range from –10 dB to +10 dB. menu).
-
Page 265: Parental Lock
Setting DVD preferences Other setting menu (OTHERS) Parental Lock NOTE Using this function, you can restrict playback of a DVD containing • You can select “PARENTAL LOCK” only while playback is violent scenes or scenes not suitable for your other family stopped. - Page 266 Setting DVD preferences Press ENTER. Press number buttons (0-9) to enter your password, then press ENTER. • If you enter a wrong password, “WRONG! RETRY...” appears under the PARENTAL LOCK sub-menu. You cannot go to the next steps before you enter the correct password.
- Page 267 Setting DVD preferences Country/Area codes list for Parental Lock Andorra Eritrea RW Rwanda Lao People’s Democratic Republic United Arab Emirates Spain Saudi Arabia Afghanistan Ethiopia Lebanon Solomon Islands Antigua and Barbuda Finland Saint Lucia Seychelles Anguilla Fiji Liechtenstein Sudan Albania Falkland Islands (Malvinas) Sri Lanka Sweden...
-
Page 268: System Setting
System setting You can adjust the sound and speaker settings of this system. • BAL: • The adjustments on a source take effect for the other sources. You can adjust the balance between the front left and front right speakers. (A pg. 48) IMPORTANT •... -
Page 269: Av Compu Link Remote Control System
• To correctly use the automatic selection of TV input mode, select the JVC TVs and VCRs through the center unit. This system is correct “M. OUT” setting. (A pg. 53) equipped with the AV COMPU LINK-III, which adds a function to operate JVC’s video components via the video components... -
Page 270: References
• Avoid exposure to direct sunlight, temperature extremes and moisture. Trouble shooting Use this chart to help you solve daily operational problems. If there is any problem you cannot solve, contact your JVC service center. General PROBLEM POSSIBLE CAUSE... - Page 271 References PROBLEM POSSIBLE CAUSE SOLUTION No sound. The system cord and/or speaker cord is not connected. Check the connection. (A pg. 10 – 12) There is a short in the speaker cord. Reconnect the speaker cord. The audio cord is not connected to AUDIO IN (VCR) Connect the cord correctly.
- Page 272 References MP3 Playback PROBLEM POSSIBLE CAUSE SOLUTION A disc cannot be played. No MP3 files are recorded to the disc. Replace the disc. MP3 files do not have the file extension in their file Add correct file extension (.mp3, .Mp3, .mP3 or .MP3) names.
-
Page 273: Glossary
References Multiangle Glossary By recording multiple scenes progressing at the same time in a single title, the user can select view angles. This feature is called Aspect ratio the multiangle function. The ratio of vertical and horizontal sizes of a displayed image. The Multichannel horizontal vs. -
Page 274: Index
References Index Menu language (MENU LANGUAGE) ........47 Monitor type (MONITOR TYPE) ..........48 16:9 AUTO................48 16:9 NORMAL................48 A-B Repeat Playback..............44 4:3 LB..................48 All Channel Stereo (ALL CH ST.) ........29 – 31 4:3 PS ..................48 Angle..................... 37 MP3..................3, 4, 35 Audio CD .................. -
Page 275: Specifications
References 7 Subwoofer (SP-PWM65) Specifications Amplifier section 80 W per channel, RMS at 6 C at Front/Center/Surround: 7 Center unit (XV-THM65) 1 kHz, with 10 % total harmonic distortion. Audio section 120 W, RMS at 4 C at 100 Hz, with Subwoofer: Total Harmonic Distortion 0.02 % 10 % total harmonic distortion. - Page 276 Mains (AC) Line Instruction (not applicable for Europe, U.S.A., Canada, Australia and U.K.) SP-PWM65 CAUTION for mains (AC) line BEFORE PLUGGING IN, do check that your mains (AC) line voltage corresponds with the position of the voltage selector switch provided on the outside of this equipment and, if different, reset the voltage selector switch, to prevent from a damage or risk of fire/electric shock.
Need help?
Do you have a question about the TH-M65AS and is the answer not in the manual?
Questions and answers