Table of Contents
Advertisement
Available languages
Available languages
Quick Links
Bedienungsanleitung
Manual de instrucciones
Notice d'utilisation
Istruzioni per l'uso
Gebruiksaanwijzing
User manual
DAB+ Premium Küchenradio
Radio de cuisine DAB+ Premium
DAB+ Premium keukenradio
Radio de cocina DAB+ prémium
Radio da cucina DAB+ Premium
Premium DAB+ kitchen radio
MEDION P66750
(MD 43750)
Advertisement
Chapters
Table of Contents

Related Manuals for Medion P66750


Summary of Contents for Medion P66750
- Page 1 Manual de instrucciones Notice d‘utilisation Istruzioni per l‘uso Gebruiksaanwijzing User manual DAB+ Premium Küchenradio Radio de cuisine DAB+ Premium DAB+ Premium keukenradio Radio de cocina DAB+ prémium Radio da cucina DAB+ Premium Premium DAB+ kitchen radio MEDION P66750 (MD 43750)
-
Page 3: Table Of Contents
Inhaltsverzeichnis Informationen zu dieser Bedienungsanleitung ..........5 1.1. Zeichenerklärung ..................5 Bestimmungsgemäßer Gebrauch ..............5 Allgemeine Sicherheitshinweise ..............5 Lieferumfang ....................7 Geräteübersicht .....................8 Gerät aufstellen/montieren ................11 6.1. Allgemeines zum Aufstellungsort / zur -umgebung ........11 6.2. Hängende Montage ...................11 6.3. Gerät aufstellen..................12 Vorbereitungen zur Inbetriebnahme ..............13 7.1. - Page 4 23. Impressum ....................29...
-
Page 5: Informationen Zu Dieser Bedienungsanleitung
1. Informationen zu die- Hinweise in der Bedienungsan- ser Bedienungsanlei- leitung beachten! tung Außerhalb der Reichweite von Kindern aufbewahren. Vielen Dank, dass Sie sich für unser Produkt entschieden haben. Wir wünschen Ihnen viel Freude mit dem Gerät. 2. Bestimmungsgemäßer Lesen Sie vor Inbetriebnahme die Sicher- Gebrauch heitshinweise und die gesamte Anleitung aufmerksam durch. - Page 6 Öffnen Sie niemals das Ge- aufsichtigt oder erhielten von ihr Anweisungen, wie häuse des Gerätes und des das Gerät zu benutzen ist. Netzteils und führen Sie kei- Kinder müssen beaufsichtigt ne Gegenstände durch die Schlitze und Öffnungen ins werden, um sicherzustellen, Innere des Gerätes/Netzteils.
-
Page 7: Lieferumfang
4. Lieferumfang Bereichen. Hierzu zählen z. B. Tankanlagen, Kraftstoff- GEFAHR! lagerbereiche oder Bereiche, Erstickungsgefahr! in denen Lösungsmittel Es besteht Erstickungsgefahr durch Verschlu- verarbeitet werden. Auch in cken oder Einatmen von Kleinteilen oder Bereichen mit teilchenbe- Folien. Halten Sie die Verpackungsfolie von Kin- lasteter Luft (z. -
Page 8: Geräteübersicht
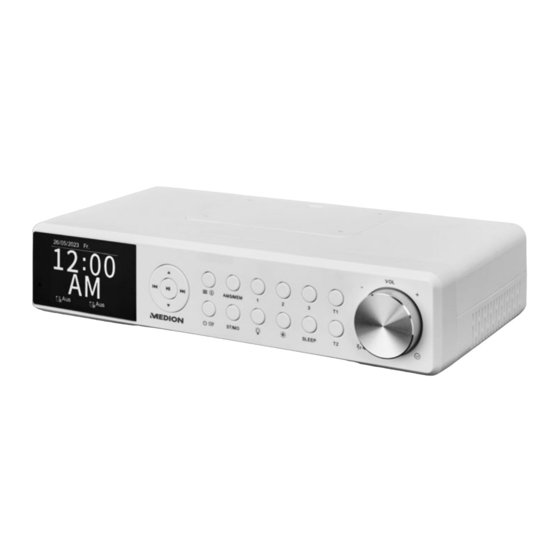
5. Geräteübersicht V OL AMS/MEM ST/MO SLEEP Abb. 1 – Vorderansicht 1. Infrarotempfänger 2. Display — Menünavigation 4. Abstandshalter — nächster Titel / Menünavigation — Menüaufrufen / Anzeigeinformationen (Frequenz / Sendername) wählen 7. AMS/MEM — Radiosender speichern / Speicherplatz wählen 8. - Page 9 Abb. 2 – Rückansicht 20. Montageplatte 21. DC IN — Anschluss Netzadapter 22. FM ANT. — Wurfantenne Abb. 3 – Unterseite 23. USB — USB Anschluss 24. Lautsprecher 25. Standfuß 26. LED-Licht...
- Page 10 Abb. 4 – Fernbedienung — Menü aufrufen — Gerät ein-/ausschalten — Quelle wählen — Stummschaltung 31. SLEEP — Sleep Timer ein-/ausschalten — Anzeigeinformationen (Frequenz / Sendername) wählen — Wiedergabe starten / Wiedergabe pausieren / Menü bestätigen — nächster Titel / Menünavigation —...
-
Page 11: Gerät Aufstellen/Montieren
6. Gerät aufstellen/montieren 6.1. Allgemeines zum Aufstellungsort / zur -umgebung HINWEIS! Beschädigungsgefahr! Bei großen Temperatur- oder Feuchtigkeitsschwankungen kann es durch Kondensation zur Feuchtigkeitsbildung innerhalb des Gerätes kommen, die einen elektrischen Kurzschluss ver- ursachen kann. Warten Sie nach einem Transport des Gerätes solange mit der Inbetriebnahme, bis es die Umgebungstemperatur angenommen hat. -
Page 12: Gerät Aufstellen
Die mitgelieferten Schrauben sind für die Montage in Holz geeignet. Für andere Materialien müssen geeignete Schrauben verwendet werden. Bei einer Montage in Holz ist ein Vorboh- ren in der Regel nicht notwendig. Schrauben Sie die Halterung mit den Abstandshaltern an den Schrank- oder Regalboden. ... -
Page 13: Vorbereitungen Zur Inbetriebnahme
7. Vorbereitungen zur Inbetriebnahme HINWEIS! Mögliche Sachschäden Durch unsachgemäße Verwendung des Netzadapters oder Verwendung eines nicht kompa- tiblen Netzadapters können Geräteschäden entstehen. Schließen Sie das Gerät nur an eine ordnungsgemäß installierte, geerdete und elektrisch abgesicherte Steckdose an. Die Netzspannung muss den technischen Daten des Gerätes entsprechen ... -
Page 14: Batterie In Die Fernbedienung Einlegen
7.2. Batt erie in die Fernbedienung einlegen 7.2.1. Umgang mit Batt erien Die Fernbedienung dieses Gerätes wird mit einer Batterie betrieben. Beachten Sie hierzu folgende Hinweise: WARNUNG! Verätzungsgefahr! Die mitgelieferte Fernbedienung beinhaltet eine Knopfzellen-Batterie. Wird diese Batterie verschluckt, kann sie innerhalb von 2 Stunden ernsthafte innere Verätzungen verursachen, die zum Tode führen können. -
Page 15: Inbetriebnahme
Lösen Sie die Sicherungsschraube mit einem Kreuz- schlitzschraubendreher. Drücken Sie wie auf der nebenstehenden Abbildung dargestellt den Arretierungshebel (A) und ziehen Sie die Batteriehalterung mit der Batterie (B) aus der Fern- bedienung heraus. Entsorgen Sie die Altbatterie entsprechend den ge- setzlichen Bestimmungen. -
Page 16: Timer-Funktionen
9. Timer-Funktionen Sie haben die Möglichkeit bis zu zwei Timer zu programmieren. Kurz vor und nach Ablauf einer eingestellten Zeit (max. 240 Minuten) erklingen Signaltöne. 9.1. Timer-Zeit einstellen Drücken Sie die Taste T1 oder T2, um Timer 1 oder Timer 2 einzustellen. ... -
Page 17: Radioeinstellungen
10.1. Radioeinstellungen Sie haben in den beiden Radiomodus verschiedene Einstell- und Steuerungsmöglichkeiten. Drücken und halten Sie die Taste , um das Einstellungsmenü zu öffnen. Wählen Sie mit dem Einstellungsrad, die gewünschet Menüoption. Bestätigen Sie diese und alle weiterem Auswahlen mit einem Druck auf das Einstellungs- rad. -
Page 18: Geräte Über Bluetooth® Verbinden
11. Geräte über Bluetooth® verbinden Schalten Sie das Gerät ein und wählen Sie den Bluetooth-Betrieb mehrmals, bis im Display Bluetooth angezeigt wird. Drücken Sie die Taste Solange kein Gerät über Bluetooth mit dem Küchenradio verbunden ist, blinkt die Anzeige Getrennt im Display. -
Page 19: Wiedergabe/Pause/Stopp
12.1. Wiedergabe/Pause/Stopp Mit der Taste am Gerät startet die Wiedergabe von Titeln. Um die Wiedergabe zu unterbrechen, drücken Sie die Taste erneut. Ein weiterer Druck auf die Taste setzt die Wie- dergabe fort. 12.2. Titelwahl, Schneller Rück-/Vorlauf Drücken Sie während der Wiedergabe die Taste ... -
Page 20: Alarm Beenden / Schlummer-Funktion
Im Display, erscheint zusätzlich zum jeweiligen Symbol die eingeschaltete Weckzeit. Sie die Wecker ausgeschaltet steht hinter dem Symbol AUS. 13.1. Alarm beenden / Schlummer-Funktion Ist die eingestellte Weckzeit erreicht, schaltet sich das Radio ein und es ertönt der zuvor festgelegte Weckton/Radiosender. -
Page 21: Einstellungen
14. Einstellungen In den unterschiedlichen Einstellungsmenüs bleiben die folgenden Bedienmöglichkeiten gleich: Drücken und halten Sie die Taste , um das Einstellungsmenü zu öffnen. Das Einstellungsmenü kann auch bei ausgeschaltetem Radio aufgerufen werden, hierzu reicht ein einfacher Druck auf die Taste ... -
Page 22: Reinigung
Menüname Beschreibung BELEUCHTUNG Dimmer nach Wählen Sie eine Zeitspanne aus, nach der das Display gedimmt wird. Helligkeit Legen Sie die gewünschte Beleuchtungs- stärke des Displays fest. Der Wert dieser Einstellung lässt sich auch mit der Taste einstellen. DIMmer Legen Sie die gewünschte Beleuchtungs- Helligkeit stärke des gedimmten Displays fest. -
Page 23: Fehlersuche
16. Fehlersuche Sollte das Gerät Funktionsstörungen zeigen, kann es sein, dass eine elektrostatische Entla- dung stattgefunden hat. Störung Mögliche Ursache Maßnahme Erhöhen Sie die Laut- Kein Ton • Die aktuelle Lautstärke ist zu gering eingestellt. stärke. Schalten Sie die •... -
Page 24: Lagerung Bei Nichtbenutzung
18. Lagerung bei Nichtbenutzung Wenn Sie das Gerät für einen längeren Zeitraum nicht benutzen, lagern Sie es an einen trockenen, kühlen Ort und achten Sie darauf, dass das Gerät vor Staub und extremen Temperaturschwankungen geschützt ist. Entfernen Sie bei längerem Nichtgebrauch den Netzadapter. 19. -
Page 25: Eu Konformitätsinformation
Wenden Sie sich für nähere Auskünfte an Ihr örtliches Entsorgungsunternehmen oder Ihre kommunale Verwaltung. 20. EU Konformitätsinformation Hiermit erklärt die MEDION AG, dass der Funkanlagentyp MD 43750 der Richtlinie 2014/53/EU [(RE-Richtlinie), sowie der Richtlinie 2009/125/EG (Öko-Design-Richtli- nie) und der Richtlinie 2011/65/EU (RoHS-Richtlinie)] entspricht. Der vollständige Text der EU-Konformitätserklärung ist unter der folgenden Internetadresse ver-... - Page 26 Hersteller Dong Guan Reyi Power Electronics Co.,Ltd., China Importeur: MEDION AG Am Zehnthof 77 45307 Essen Deutschland HR-Nummer: HRB 13274 Modellbezeichnung RY15K050200EU Eingangsspannung / Strom / Eingangs- 100 - 240 V~, 50/60 Hz, 0,3 A wechselstromfrequenz Ausgangsspannung / Strom 5,0 V...
-
Page 27: Serviceinformationen
Ihre Erfahrungen austauschen und Ihr Wissen weitergeben. Sie finden unsere Service-Community unter community.medion.com. • Gerne können Sie auch unser Kontaktformular unter www.medion.com/contact nutzen. • Selbstverständlich steht Ihnen unser Serviceteam auch über unsere Hotline oder posta- lisch zur Verfügung. - Page 28 Schweiz Öffnungszeiten Rufnummer Mo. - Fr.: 09:00 - 19:00 0848 - 33 33 32 Serviceadresse MEDION/LENOVO Service Center Ifangstrasse 6 8952 Schlieren Schweiz Belgien & Luxemburg Öffnungszeiten Rufnummer (Belgien) Mo. - Fr.: 09:00 - 19:00 02 - 200 61 98 Rufnummer (Luxemburg) ...
- Page 29 Diese Bedienungsanleitung ist urheberrechtlich geschützt. Vervielfältigung in mechanischer, elektronischer und jeder anderen Form ohne die schrift- liche Genehmigung des Herstellers ist verboten. Das Copyright liegt bei der Firma: MEDION AG Am Zehnthof 77 45307 Essen Deutschland Bitte beachten Sie, dass die oben stehende Anschrift keine Retourenanschrift ist. Kontaktie-...
- Page 31 Sommaire Informations concernant la présente notice d’utilisation ........ 33 1.1. Explication des symboles ................. 33 Utilisation conforme ..................33 Consignes de sécurité générales ..............33 Contenu de la livraison .................. 35 Vue d’ensemble de l’appareil .................36 Installation/montage de l’appareil ..............39 6.1.
- Page 32 23. Mentions légales ................... 55...
-
Page 33: Informations Concernant La Présente Notice D'utilisation
1. Informations concer- À conserver hors de portée des nant la présente no- enfants. tice d’utilisation 2. Utilisation conforme Nous vous remercions d’avoir choisi notre produit. Nous vous souhaitons La radio encastrable de cuisine sert à lire du une bonne utilisation. matériel audio qui peut être transmis via Veuillez lire attentivement les consignes de Bluetooth. - Page 34 Les enfants doivent être sur- tation par les fentes et les veillés, afin de s’assurer qu’ils ouvertures. Si l’adaptateur secteur, le ne jouent pas avec l’appareil. Conservez l’appareil et les câble de raccordement ou accessoires dans un endroit l’appareil est endommagé, situé...
-
Page 35: Contenu De La Livraison
4. Contenu de la livraison dans lesquelles des solvants sont traités. Cet appareil ne DANGER ! doit pas non plus être utilisé Risque de suffocation ! dans des zones où l’air est Il existe un risque de suffocation en cas d’in- chargé de particules (p. ex. halation ou d’ingestion de films ou de petites poussière de farine ou de pièces. -
Page 36: Vue D'ensemble De L'appareil
5. Vue d’ensemble de l’appareil V OL AMS/MEM ST/MO SLEEP Fig. 1 – Vue de face 1. Récepteur infrarouge 2. Écran — Navigation dans le menu 4. Entretoise — Titre suivant / Navigation dans le menu — Ouvrir le menu / Sélectionner les informations d’affichage (fréquence / nom de la station) 7. - Page 37 Fig. 2 – Vue arrière 20. Plaque de montage 21. DC IN — Connexion de l’adaptateur secteur 22. FM ANT. — Antenne filaire Fig. 3 – Partie inférieure 23. USB — Port USB 24. Haut-parleurs 25. Pied 26. Éclairage LED...
- Page 38 Fig. 4 – Télécommande — Afficher le menu — Allumer/éteindre l’appareil — Sélection de la source — Désactivation du son 31. SLEEP — Activer/désactiver le minuteur de mise en veille — Sélectionner les informations d’affichage (fréquence / nom de la station) —...
-
Page 39: Installation/Montage De L'appareil
6. Installation/montage de l’appareil 6.1. Généralités sur l’emplacement / l’environnement d’ins- tallation AVIS ! Risque d’endommagement ! En cas de fortes variations de température ou d’humidité, il est possible que de l’humidité par condensation se forme dans l’appareil, ce qui peut provoquer un court-circuit électrique. ... -
Page 40: Installation De L'appareil
Les vis fournies conviennent pour une fixation sur du bois. Pour d’autres matériaux, il convient d’utiliser des vis adaptées. Si le support est en bois, il n’est généralement pas néces- saire de le pré-percer. Vissez le support avec les entretoises en bas de l’armoire ou sur l’étagère. ... -
Page 41: Préparations Pour La Mise En Service
7. Préparations pour la mise en service AVIS ! Dommages matériels possibles Une utilisation inappropriée de l’adaptateur secteur ou l’utilisation d’un adaptateur secteur non compatible peut endommager l’appareil. Branchez l’appareil uniquement sur une prise de courant correctement installée, mise à la terre et protégée par un fusible. -
Page 42: Insertion De La Pile Dans La Télécommande
7.2. Insertion de la pile dans la télécommande 7.2.1. Manipulation des piles La télécommande de cet appareil fonctionne avec une pile. Veuillez respecter les consignes suivantes : AVERTISSEMENT ! Risque de brûlure ! La télécommande est livrée avec une pile bouton. Si cette pile est avalée, elle peut provoquer dans les 2 heures qui suivent de graves brûlures internes et entraîner la mort. -
Page 43: Mise En Marche
Desserrez la vis de sécurité à l’aide d’un tournevis cru- ciforme. Appuyez sur le levier de verrouillage (A) comme in- diqué sur la figure ci-contre et tirez le support de pile avec la pile (B) hors de la télécommande. ... -
Page 44: Fonctions Minuterie
9. Fonctions minuterie Vous avez la possibilité de programmer jusqu’à deux minuteries. Des signaux sonores reten- tissent peu avant et après l’expiration d’une durée réglée (240 minutes max.). 9.1. Réglage de l’heure de la minuterie Appuyez sur le bouton T1 ou T2 pour régler la minuterie 1 ou la minuterie 2. ... -
Page 45: Réglages Radio
10.1. Réglages radio Vous avez différentes possibilités de réglage et de commande dans les deux modes radio. Maintenez le bouton enfoncé pour ouvrir le menu des paramètres. Utilisez la molette de réglage pour sélectionner l’option de menu souhaitée. ... -
Page 46: Connexion D'appareils Via Bluetooth
11. Connexion d’appareils via Bluetooth® Allumez l’appareil et sélectionnez le mode Bluetooth. jusqu’à ce que Bluetooth s’affiche à l’écran. Appuyez plusieurs fois sur le bouton Lorsqu’aucun appareil n’est connecté à la radio de cuisine via Bluetooth, l’affichage Coupé clignote sur l’écran. -
Page 47: Lecture/Pause/Arrêt
12.1. Lecture/pause/arrêt Appuyez sur le bouton de l’appareil pour démarrer la lecture des titres. Pour inter- rompre la lecture, appuyez de nouveau sur le bouton. Appuyez à nouveau sur ce bouton pour reprendre la lecture. 12.2. Sélection de titres, retour/avance rapides ... -
Page 48: Arrêt De L'alarme / Fonction De Répétition De L'alarme
Sur l’écran, en plus du symbole correspondant , l’heure de réveil activée apparaît. Si vous avez désactivé le réveil, Arrêt est affiché après le symbole. 13.1. Arrêt de l’alarme / Fonction de répétition de l’alarme Lorsque l’heure de réveil réglée est atteinte, la radio s’allume et la sonnerie du réveil/la station radio prédéfinie retentit. -
Page 49: Réglages
14. Réglages Dans les différents menus de configuration, les options de commande suivantes restent les mêmes : Maintenez le bouton enfoncé pour ouvrir le menu des paramètres. Le menu des paramètres peut être ouvert même lorsque la radio est éteinte, il suffit d’ap- puyer sur le bouton ... -
Page 50: Nettoyage
Nom du menu Description RÉTROÉCLAIRÉ Temporisation Sélectionnez une période après laquelle la luminosité de l’écran sera réduite. Niveau marche Définissez la luminosité souhaitée de l’écran. Vous pouvez aussi utiliser le bouton pour régler la valeur de ce paramètre. Niveau Définissez la luminosité réduite souhaitée attén. -
Page 51: Recherche D'erreurs
16. Recherche d’erreurs Si l’appareil présente des dysfonctionnements, il se peut qu’une décharge électrostatique se soit produite. Panne Cause possible Mesure Augmentez le volume. Pas de son • Le volume actuel est réglé sur un niveau trop bas. Désactivez la mise en •... -
Page 52: Stockage En Cas De Non-Utilisation
à la municipalité. 20. Information relative à la conformité UE L’entreprise MEDION AG déclare par la présente que le type d’équipement radio MD 43750 est conforme aux directives 2014/53/UE [(directive RE), 2009/125/CE (di- rective sur l’écoconception) et à la directive 2011/65/UE (directive RoHS)]. La dé- claration de conformité... - Page 53 Adaptateur secteur Fabricant Dong Guan Reyi Power Electronics Co.,Ltd., Chine Importateur : MEDION AG Am Zehnthof 77 45307 Essen Allemagne Numéro HR : HRB 13274 Modèle RY15K050200EU Tension/courant d’entrée/fréquence du 100 – 240 V~, 50/60 Hz, 0,3 A courant alternatif d’entrée Tension/courant de sortie 5,0 V 2,0 A Puissance de sortie 10,0 W...
-
Page 54: Informations Relatives Au Sav
• Au sein de notre Service-Community, vous pouvez discuter avec d’autres utilisateurs ainsi qu’avec nos collaborateurs pour partager vos expériences et vos connaissances. Vous pouvez accéder à notre Service-Community ici : community.medion.com. • Vous pouvez également utiliser notre formulaire de contact disponible ici : www.medion.com/contact. -
Page 55: Mentions Légales
02 - 200 61 98 Hotline SAV (Luxembourg) 34 - 20 808 664 Adresse du service après-vente MEDION B.V. John F.Kennedylaan 16a 5981 XC Panningen Pays-Bas La présente notice d’utilisation et bien d’autres sont disponibles au télé- chargement sur le portail du SAV www.medionservice.com. - Page 57 Inhoudsopgave Informatie over deze gebruiksaanwijzing ............59 1.1. Betekenis van de symbolen ..............59 Gebruiksdoel ....................59 Algemene veiligheidsvoorschriften ...............59 Omvang van de levering ................61 Overzicht van het apparaat ................62 Apparaat plaatsen/monteren ...............65 6.1. Algemene informatie over de locatie/omgeving ........65 6.2. Hangende montage ................. 65 6.3.
- Page 58 23. Colofon ......................81...
-
Page 59: Informatie Over Deze Gebruiksaanwijzing
1. Informatie over deze Buiten bereik van kinderen gebruiksaanwijzing bewaren. Hartelijk dank dat u voor ons pro- duct hebt gekozen. Wij wensen u 2. Gebruiksdoel veel plezier met het apparaat. Lees de veiligheidsvoorschriften en de vol- De onderbouwradio voor in de keuken is be- ledige gebruiksaanwijzing aandachtig door doeld voor het afspelen van audio via blue- voordat u het apparaat in gebruik neemt. - Page 60 niet met het apparaat spe- of het apparaat onmiddel- len. lijk de netadapter uit het Bewaar het apparaat en de stopcontact. Dit geldt ook als er vloeistof of vreemde accessoires buiten het bereik voorwerpen in het apparaat van kinderen. terecht zijn gekomen.
-
Page 61: Omvang Van De Levering
Bouw het apparaat zonder 4. Omvang van de leve- onze toestemming niet ring om en gebruik het niet in GEVAAR! combinatie met hulp- of Verstikkingsgevaar! aanbouwapparaten die niet Er bestaat verstikkingsgevaar door het inslik- door ons zijn goedgekeurd ken of inademen van kleine onderdelen of of geleverd. -
Page 62: Overzicht Van Het Apparaat
5. Overzicht van het apparaat V OL AMS/MEM ST/MO SLEEP Afb. 1 – Vooraanzicht 1. Infraroodontvanger 2. Display — Menunavigatie 4. Afstandshouder — Volgend nummer / menunavigatie — Het menu openen / Weergave-informatie (frequentie / zendernaam) selecteren 7. AMS/MEM — Radiozender opslaan / geheugenlocatie selecteren 8. - Page 63 Afb. 2 – Achteraanzicht 20. Montageplaat 21. DC IN — Aansluiting netadapter 22. FM ANT. — Draadantenne Afb. 3 – Onderkant 23. USB — USB-aansluiting 24. Luidspreker 25. Voetje 26. Ledlampje...
- Page 64 Afb. 4 – Afstandsbediening — Menu openen — Apparaat in-/uitschakelen — Bron kiezen — Geluid dempen 31. SLEEP — Slaaptimer in-/uitschakelen — Weergave-informatie (frequentie / zendernaam) selecteren — Afspelen starten / afspelen pauzeren / Menu bevestigen — Volgend nummer / menunavigatie —...
-
Page 65: Apparaat Plaatsen/Monteren
6. Apparaat plaatsen/monteren 6.1. Algemene informatie over de locatie/omgeving LET OP! Gevaar voor beschadiging! Bij grote schommelingen in temperatuur of luchtvochtigheid kan er door condensatie vocht in het apparaat terechtkomen, waardoor er kortsluiting kan ontstaan. Neem het apparaat nadat het is vervoerd pas weer in gebruik als het de omgevingstem- peratuur heeft aangenomen. -
Page 66: Apparaat Plaatsen
De meegeleverde schroeven zijn geschikt voor montage in hout. Voor ander materiaal moet u daarvoor geschikte schroeven gebruiken. Bij montage in hout is voorboren meestal niet nodig. Schroef de houder met de afstandshouders aan de onderkant van de kast of de plank vast. -
Page 67: Voorbereidingen Voor Ingebruikname
7. Voorbereidingen voor ingebruikname LET OP! Mogelijke materiële schade Onjuist gebruik van de netadapter of gebruik van een niet-compatibele netadapter kan lei- den tot schade aan het apparaat. Sluit het apparaat alleen aan op een volgens de voorschriften geïnstalleerd, geaard en elektrisch beveiligd stopcontact. -
Page 68: Batterij In De Afstandsbediening Plaatsen
7.2. Batt erij in de afstandsbediening plaatsen 7.2.1. Omgaan met batt erijen De afstandsbediening van dit apparaat werkt op een batterij. Neem de volgende aanwijzingen in acht: WAARSCHUWING! Gevaar voor brandwonden! De meegeleverde afstandsbediening is voorzien van een knoopcelbatterij. Als deze batterij wordt ingeslikt, kunnen er binnen 2 uur ernstige inwendige brandwonden ontstaan die de dood tot gevolg kunnen hebben. -
Page 69: Ingebruikname
Draai de borgschroef los met een kruiskopschroeven- draaier. Druk de vergrendeling (A) in en trek de batterijhouder met de batterij (B) uit de afstandsbediening, zoals op de afstandsbediening hiernaast. Voer de oude batterij af volgens de wettelijke voor- schriften. -
Page 70: Timerfuncties
9. Timerfuncties U kunt maximaal twee timers programmeren. Kort voor en na het verstrijken van een inge- stelde tijd (max. 240 minuten) klinken er geluidssignalen. 9.1. Tijd van de timer instellen Druk op de toets T1 of T2 om timer 1 of timer 2 in te stellen. ... -
Page 71: Radio-Instellingen
10.1. Radio-instellingen Er zijn verschillende instel- en bedieningsmogelijkheden in de twee radiomodi. Houd de toets ingedrukt om het instellingenmenu te openen. Selecteer met de draaikop de gewenste menuoptie. Bevestig deze en alle andere selecties door op de draaiknop te drukken. Menu Omschrijving STATIONSLIJST (alleen DAB-modus) -
Page 72: Apparaten Verbinden Via Bluetooth
11. Apparaten verbinden via Bluetooth® Schakel het apparaat in en selecteer de bluetoothmodus. tot op het display Bluetooth wordt weergegeven. Druk herhaaldelijk op de toets Zolang het apparaat niet via bluetooth met de keukenradio is verbonden, knippert Koppe- len op het display. -
Page 73: Afspelen/Onderbreken/Stoppen
12.1. Afspelen/onderbreken/stoppen Met de toets op het apparaat wordt het afspelen van nummers gestart. Druk op- nieuw op de toets om het afspelen te onderbreken. Als u nog een keer op de toets drukt, gaat het apparaat verder met afspelen. 12.2. -
Page 74: Alarm Beëindigen/Sluimerfunctie
Op het display verschijnt naast het betreffende symbool de ingeschakelde wektijd. Als u de wekker hebt uitgeschakeld, staat UIT achter het symbool. 13.1. Alarm beëindigen/sluimerfunctie Wanneer de ingestelde wektijd is bereikt, wordt de radio ingeschakeld en klinkt de vooraf ingestelde wektoon/radiozender. -
Page 75: Instellingen
14. Instellingen In de verschillende instellingenmenu’s blijven de volgende bedieningsmogelijkheden het- zelfde: Houd de toets ingedrukt om het instellingenmenu te openen. Het instellingenmenu kan ook worden opgeroepen als de radio is uitgeschakeld, met een simpele druk op de toets ... -
Page 76: Reiniging
Menu Omschrijving BACKLIGHT Time-out Selecteer een tijdsduur waarna het scherm wordt gedimd. Niveau voor 'aan' De gewenste verlichtingssterkte van het display instellen. De waarde van deze instelling kan ook wor- den ingesteld met de toets Niveau voor De gewenste verlichtingssterkte van het dimmen gedimde display instellen. -
Page 77: Problemen Oplossen
16. Problemen oplossen Als het apparaat niet goed werkt, is het mogelijk dat er een elektrostatische ontlading heeft plaatsgevonden. Storing Mogelijke oorzaak Maatregel Verhoog het volume. Geen geluid • Het volume is te laag ingesteld. Schakel de geluidsdem- •... -
Page 78: Opslag Bij Niet-Gebruik
Neem voor meer informatie contact op met uw plaatselijke afvalverwerkingsbedrijf of uw gemeente. 20. EU-conformiteitsinformatie Hiermee verklaart MEDION AG dat het type radiografische apparatuur MD 43750 voldoet aan richtlijn 2014/53/EU [(RE-richtlijn) evenals richtlijn 2009/125/EG (eco- designrichtlijn) en richtlijn 2011/65/EU (RoHS-richtlijn)]. Ga voor de volledige tekst van de EU-conformiteitsverklaring naar: www.medion.com/conformity. - Page 79 Netadapter Fabrikant Dong Guan Reyi Power Electronics Co.,Ltd., China Importeur: MEDION AG Am Zehnthof 77 45307 Essen Duitsland HR-nummer: HRB 13274 Modeltype RY15K050200EU Ingangsspanning/stroom/ingangsfre- 100 - 240 V~, 50/60 Hz, 0,3 A quentie Uitgangsspanning/stroom 5,0 V 2,0 A Uitgangsvermogen 10,0 W Gemiddelde efficiëntie tijdens gebruik 79,32% Efficiëntie bij lage belasting (10%)
-
Page 80: Service-Informatie
U vindt onze Service-Community onder community.medion.com. • U kunt natuurlijk ook ons contactformulier gebruiken onder www.medion.com/contact. • En bovendien staat ons serviceteam ook via de klantenservice of per post ter beschikking. - Page 81 Deze gebruiksaanwijzing is auteursrechtelijk beschermd. Verveelvoudiging in mechanische, elektronische of welke andere vorm dan ook zonder schriftelijke toestemming van de fabrikant is verboden. Het copyright berust bij de firma: MEDION AG Am Zehnthof 77 45307 Essen Duitsland Houd er rekening mee dat het bovenstaande adres geen retouradres is. Neem eerst contact...
- Page 83 Índice Información acerca de este manual de instrucciones ........85 1.1. Explicación de los símbolos ..............85 Uso conforme a lo previsto ................85 Indicaciones generales de seguridad ............. 85 Volumen de suministro .................. 87 Vista general del aparato ................88 Colocación/Montaje del aparato ..............
- Page 84 23. Aviso legal ....................107...
-
Page 85: Información Acerca De Este Manual De Instrucciones
1. Información acerca Respete las indicaciones del de este manual de ins- manual de instrucciones. trucciones Guardar fuera del alcance de los niños. Muchas gracias por haber elegido nuestro producto. Le deseamos que disfrute con este aparato. Antes de la puesta en servicio, lea atenta- 2. - Page 86 Los niños deben vigilarse En caso de daños en el adap- para garantizar que no jue- tador de alimentación, en gan con el aparato. el cable de conexión o en el Guarde el aparato y los acce- aparato, desenchufe inme- diatamente el adaptador de sorios fuera del alcance de...
-
Page 87: Volumen De Suministro
4. Volumen de suministro utilizar en entornos con aire contaminado de partículas ¡PELIGRO! (p. ej., polvo de harina o de ¡Peligro de asfixia! serrín). Existe peligro de asfixia por la ingestión o No realice ninguna modi- inhalación de piezas pequeñas o láminas de plástico. -
Page 88: Vista General Del Aparato
5. Vista general del aparato V OL AMS/MEM ST/MO SLEEP Fig. 1 – Vista delantera 1. Receptor de infrarrojos 2. Pantalla : navegación por el menú 4. Distanciadores : pista siguiente/navegación por el menú : acceso a menús/seleccionar información de visualización (frecuencia/nombre de la emisora) 7. - Page 89 Fig. 2 – Vista trasera 20. Placa de montaje 21. DC IN: conexión para el adaptador de alimentación 22. FM ANT. : antena de cable Fig. 3 – Parte inferior 23. USB: conexión USB 24. Altavoz 25. Pata 26. Luz led...
- Page 90 Fig. 4 – Mando a distancia : abrir menú : encender/apagar el aparato : seleccionar la fuente : modo silencioso 31. SLEEP: activar/desactivar el temporizador de apagado : seleccionar información de visualización (frecuencia/nombre de la emisora) : iniciar/pausar la reproducción o confirmar el menú...
-
Page 91: Colocación/Montaje Del Aparato
6. Colocación/Montaje del aparato 6.1. Información general sobre el lugar y el entorno de colo- cación ¡AVISO! ¡Peligro de daños! En caso de grandes variaciones de temperatura o humedad, puede formarse humedad den- tro del aparato por condensación y esta puede provocar un cortocircuito eléctrico. ... -
Page 92: Colocación Del Aparato
Los tornillos suministrados son adecuados para el montaje en madera. Para otros materiales deben utilizarse tornillos adecuados. En caso de montaje en madera no es necesario pretala- drar el estante. Atornille el soporte con los distanciadores en la base del armario o de la estantería. ... -
Page 93: Preparativos Para La Puesta En Servicio
7. Preparativos para la puesta en servicio ¡AVISO! Posibles daños materiales El uso incorrecto del adaptador de alimentación o el uso de un adaptador de alimentación incompatible pueden dañar el aparato. Conecte el aparato solamente a una toma de corriente debidamente instalada, conectada a tierra y protegida eléctricamente. -
Page 94: Colocación De La Pila En El Mando A Distancia
7.2. Colocación de la pila en el mando a distancia 7.2.1. Manipulación de las pilas El mando a distancia de este aparato funciona con una pila. Observe al respecto las siguientes indicaciones: ¡ADVERTENCIA! ¡Peligro de quemaduras! El mando a distancia suministrado contiene una pila de botón. En caso de ingestión, en el plazo de 2 horas la pila puede provocar quemaduras internas serias con posibles consecuen- cias letales. -
Page 95: Puesta En Servicio
Afloje el tornillo de seguridad con un destornillador de estrella. Presione la palanca de inmovilización (A) mostrada en la figura de al lado y tire del soporte de la pila con la pila (B) hacia fuera para extraerlo del mando a distan- cia. -
Page 96: Funciones De Temporizador
9. Funciones de temporizador Tiene la posibilidad de programar hasta dos temporizadores. Poco antes y después de que haya transcurrido un tiempo ajustado (máx. 240 minutos) suenan señales acústicas. 9.1. Ajuste del tiempo del temporizador Pulse la tecla T1 o T2 para configurar el temporizador 1 o el temporizador 2. ... -
Page 97: Ajustes De Radio
10.1. Ajustes de radio En los dos modos de radio dispone de diferentes opciones de ajuste y control. Pulse y mantenga pulsada la tecla para abrir el menú de configuración. Con la rueda de ajuste, seleccione la opción de menú deseada. ... -
Page 98: Conexión De Aparatos Mediante Bluetooth
11. Conexión de aparatos mediante Bluetooth® Encienda el aparato y seleccione el modo Bluetooth. varias veces hasta que en la pantalla se muestre Bluetooth. Pulse la tecla Si no hay ningún aparato conectado a la radio de cocina mediante Bluetooth, la indicación Desconectando parpadeará... -
Page 99: Reproducción/Pausa/Detención
12.1. Reproducción/Pausa/Detención Con la tecla del aparato se inicia la reproducción de pistas. Para interrumpir la repro- ducción, vuelva a pulsar la tecla. Si pulsa de nuevo la tecla, la reproducción se reanudará. 12.2. Selección de pistas, avance/retroceso rápidos ... -
Page 100: Finalización De La Alarma/Función De Repetición
En la pantalla, además del símbolo correspondiente, aparece la hora de la alarma activa- da. Si el despertador está desactivado, se encuentra detrás del símbolo NO ACTIVA. 13.1. Finalización de la alarma/función de repetición Cuando se alcanza la hora de la alarma programada, la radio se enciende y suena el tono de alarma o la emisora de radio escogidos. -
Page 101: Ajustes
14. Ajustes En los diferentes menús de ajuste, las siguientes opciones de funcionamiento siguen siendo las mismas: Pulse y mantenga pulsada la tecla para abrir el menú de configuración. Al menú de configuración también se puede acceder con la radio apagada pulsando la tecla ... -
Page 102: Limpieza
Nombre del menú Descripción RETROILUMINA- Tiempo Seleccionar un período de tiempo después del cual se atenuará la pantalla. Nivel activo Determinar la intensidad deseada de la ilu- minación de la pantalla. También puede establecer el valor de este ajuste pulsando la tecla Nivel Determinar el nivel de iluminación deseado atenuado... -
Page 103: Localización De Fallos
16. Localización de fallos En caso de que el aparato muestre fallos de funcionamiento, es posible que se haya produci- do una descarga electrostática. Fallo Posible causa Medida Suba el volumen. No hay sonido. • El volumen se ha ajusta- do muy bajo. -
Page 104: Almacenamiento En Caso De No Utilizarse
20. Información de conformidad UE Por la presente, MEDION AG declara que el tipo de equipo inalámbrico MD 43750 cumple la directiva 2014/53/UE [(Directiva sobre la comercialización de equipos radioeléctricos), así como la directiva 2009/125/CE (Directiva sobre diseño ecoló- gico) y la directiva 2011/65/UE (Directiva sobre restricciones de sustancias peligro- sas)]. - Page 105 Adaptador de alimentación Fabricante Dong Guan Reyi Power Electronics Co.,Ltd., China Importador: MEDION AG Am Zehnthof 77 45307 Essen Alemania N.º de registro mercantil: HRB 13274 Nombre del modelo RY15K050200EU Tensión y corriente de entrada/frecuencia 100 - 240 V~, 50/60 Hz, 0,3 A de corriente alterna de entrada Tensión/corriente de salida...
-
Page 106: Informaciones De Asistencia Técnica
Horario Hotline de posventa Lu-Vi: 08:30-17:30 (+34) 91 904 28 00 Dirección de asistencia técnica MEDION Service Center ENAME, S.A Parque Industrial de Coimbrões, LOTE 4 E 5 São João de Lourosa 3500-618 VISEU Portugal Puede descargarse tanto este como muchos otros manuales de instruc- ciones a través del portal de servicio www.medionservice.com. -
Page 107: Aviso Legal
Este manual de instrucciones está protegido por derechos de autor. Queda prohibida la reproducción mecánica, electrónica o de cualquier otro tipo sin la autori- zación por escrito del fabricante. El copyright pertenece a la empresa: MEDION AG Am Zehnthof 77 45307 Essen Alemania Tenga en cuenta que la dirección indicada arriba no es una dirección para devoluciones. - Page 109 Indice Informazioni relative a queste istruzioni per l’uso ..........111 1.1. Spiegazione dei simboli ................111 Utilizzo conforme ..................111 Indicazioni generali di sicurezza ..............111 Contenuto della confezione................113 Panoramica del dispositivo ................114 Posizionamento/montaggio del dispositivo ..........117 6.1. Informazioni generali sul luogo/ambiente di posizionamento .....117 6.2.
- Page 110 23. Note legali ....................133...
-
Page 111: Informazioni Relative A Queste Istruzioni Per L'uso
1. Informazioni relative Conservare fuori dalla portata a queste istruzioni per dei bambini. l’uso 2. Utilizzo conforme Grazie per aver scelto il nostro pro- dotto. Ci auguriamo che ne sia sod- La radio per il montaggio sottopensile è de- disfatto. stinata alla riproduzione di materiale audio Prima di utilizzare il prodotto, leggere atten- trasmesso via Bluetooth. - Page 112 Tenere il dispositivo e gli scollegare immediatamente accessori fuori dalla portata l’alimentatore dalla presa dei bambini. elettrica. Ciò è necessario I bambini non possono ese- anche nel caso in cui liquidi o corpi estranei penetrino guire la pulizia e la manuten- all’interno del dispositivo.
-
Page 113: Contenuto Della Confezione
Non modificare il dispositivo 4. Contenuto della con- senza la nostra approvazio- fezione ne e non utilizzare alcun al- PERICOLO! tro dispositivo ausiliario non Pericolo di soffocamento! approvato o non fornito da Pericolo di soffocamento in caso di ingestio- noi. -
Page 114: Panoramica Del Dispositivo
5. Panoramica del dispositivo V OL AMS/MEM ST/MO SLEEP Fig. 1 – Vista anteriore 1. Ricevitore a infrarossi 2. Display — Navigazione all’interno dei menu 4. Distanziatori — Brano successivo/navigazione all’interno dei menu — Apertura dei menu / Informazioni visualizzate (frequenza/nome della stazione) 7. - Page 115 19. Microfono Fig. 2 – Vista posteriore 20. Piastra di montaggio 21. DC IN — Presa per l’alimentatore 22. FM ANT. — Antenna filare Fig. 3 – Lato inferiore 23. USB — Presa USB 24. Diffusori acustici 25. Supporto 26. Luce a LED...
- Page 116 Fig. 4 – Telecomando — Apertura del menu — Accensione/spegnimento del dispositivo — Selezione della sorgente — Disattivazione dell’audio 31. SLEEP — Attivazione/disattivazione del timer Sleep — Selezione delle informazioni visualizzate (frequenza/nome della stazione) — Avvio della riproduzione/pausa della riproduzione/ conferma del menu ...
-
Page 117: Posizionamento/Montaggio Del Dispositivo
6. Posizionamento/montaggio del dispositivo 6.1. Informazioni generali sul luogo/ambiente di posiziona- mento AVVISO! Pericolo di danni! In caso di forte escursione termica o di notevoli variazioni dell’umidità dell’aria, la formazione di condensa all’interno del dispositivo può causare un cortocircuito. Dopo avere trasportato il dispositivo, aspettare che abbia raggiunto la temperatura am- biente prima di metterlo in funzione. -
Page 118: Posizionamento Del Dispositivo
Le viti fornite sono adatte per il montaggio su legno. Per altri materiali vanno utilizzate viti adatte. In caso di montaggio su legno, di norma non è necessario preforare. Avvitare il supporto con i distanziatori alla parte inferiore del pensile o del ripiano. ... -
Page 119: Preparazione Della Messa In Funzione
7. Preparazione della messa in funzione AVVISO! Possibili danni materiali L’uso improprio dell’alimentatore o l’uso di un alimentatore incompatibile possono causare danni al dispositivo. Collegare il dispositivo esclusivamente a una presa installata, messa a terra e protetta a regola d’arte. La tensione di rete deve corrispondere a quella indicata nei dati tecnici del dispositivo ... -
Page 120: Inserire La Batteria Nel Telecomando
7.2. Inserire la batt eria nel telecomando 7.2.1. Utilizzo delle batt erie Il telecomando del dispositivo funziona con una batteria. Osservare le indicazioni seguenti: AVVERTENZA! Pericolo di ustione chimica! Il telecomando fornito contiene una batteria a bottone. Se ingerita, nel giro di 2 ore la batteria può... -
Page 121: Messa In Funzione
Allentare la vite di fissaggio con un cacciavite a croce. Premere la levetta di arresto (A), quindi estrarre il sup- porto e la batteria (B) dal telecomando come illustrato nella figura sottostante. Smaltire la batteria usata nel rispetto delle norme di legge. -
Page 122: Funzioni Timer
9. Funzioni timer Si possono programmare fino a due timer. Poco prima e poco dopo lo scadere dell’orario im- postato (max. 240 minuti) vengono emessi dei segnali acustici. 9.1. Impostazione del timer Premere il tasto T1 o T2 per impostare il timer 1 o il timer 2. ... -
Page 123: Impostazioni Radio
10.1. Impostazioni radio In entrambe le modalità radio sono disponibili diverse possibilità di regolazione e controllo. Premere e tenere premuto il tasto per aprire il menu delle impostazioni. Con il selettore selezionare l’opzione di menu desiderata. Confermare questa e tutte le altre opzioni selezionate premendo il selettore. Nome menu Descrizione LISTA STAZIONI (solo modalità... -
Page 124: Collegamento Di Dispositivi Tramite Bluetooth
11. Collegamento di dispositivi tramite Bluetooth® Accendere il dispositivo e selezionare la modalità Bluetooth. Premere più volte il tasto fino a che sul display viene visualizzata l’indicazione Bluetooth. Fintanto che il Bluetooth non rileva nessun dispositivo connesso alla radio da cucina, sul di- splay lampeggia l’indicazione Scollegato. -
Page 125: Riproduzione/Pausa/Arresto
12.1. Riproduzione/pausa/arresto Per avviare la riproduzione delle tracce premere il tasto sul dispositivo. Per interrom- pere la riproduzione premere nuovamente lo stesso tasto. Un’ulteriore pressione del tasto consente di proseguire la riproduzione. 12.2. Selezione del brano, riavvolgimento/avanzamento rapi- Durante la riproduzione premere il tasto ... -
Page 126: Spegnimento Della Sveglia/Funzione Sonno
Impostazione Opzione Volume 4-16 Sul display, oltre al simbolo corrispondente , appare l’ora della sveglia attivata. Se la sve- glia è disattivata, accanto al simbolo viene visualizzata l’indicazione OFF. 13.1. Spegnimento della sveglia/funzione sonno All’orario impostato per la sveglia la radio si accende e viene riprodotto il segnale sveglia/ la stazione radio secondo quanto precedentemente impostato. -
Page 127: Impostazioni
14. Impostazioni Le seguenti voci di comando sono le stesse indipendentemente dai menu di impostazione: Premere e tenere premuto il tasto per aprire il menu delle impostazioni. Il menu delle impostazioni può essere richiamato anche quando la radio è spenta semplice- mente premendo il tasto ... -
Page 128: Pulizia
Nome menu Descrizione RETROILLUMI- Timeout Selezionare un intervallo di tempo trascor- NAZ. so il quale la luminosità del display verrà ridotta. Livello attivo Impostazione della luminosità desiderata del display. Il valore di questa impostazione può essere impostato anche con il tasto Livello Impostazione della luminosità... -
Page 129: Ricerca Dei Guasti
16. Ricerca dei guasti Se il dispositivo presenta dei malfunzionamenti, è possibile che si sia verificata una scarica elettrostatica. Anomalia Possibile causa Rimedio Aumentare il volume. Audio assente • Il volume attuale è im- postato troppo basso. Riattivare l’audio. •... -
Page 130: Come Conservare Il Dispositivo Se Non Utilizzato
20. Informazioni sulla conformità UE Con la presente MEDION AG dichiara che il tipo di apparecchiatura radio MD 43750 è conforme alla direttiva 2014/53/UE [(Direttiva RED), alla direttiva 2009/125/ CE (Direttiva sulla progettazione ecocompatibile) e alla direttiva 2011/65/UE (Di- rettiva RoHS)]. - Page 131 Produttore Dong Guan Reyi Power Electronics Co.,Ltd., China Importatore: MEDION AG Am Zehnthof 77 45307 Essen Germania Numero di registro delle imprese: HRB 13274 Nome del modello RY15K050200EU Tensione di ingresso/corrente/frequenza 100-240 V~, 50/60 Hz, 0,3 A della corrente alternata di ingresso Tensione/corrente di uscita 5,0 V 2,0 A...
-
Page 132: Informazioni Sul Servizio Di Assistenza
Orari di apertura Assistenza Post-Vendita Lun.-ven.: 9.00-19.00 0848 - 33 33 32 Indirizzo del servizio di assistenza MEDION/LENOVO Service Center Ifangstrasse 6 8952 Schlieren Svizzera Queste e altre istruzioni per l’uso possono essere scaricate dal portale dell’assistenza www.medionservice.com. Per ragioni di sostenibilità abbiamo deciso di non stampare le condizio- ni di garanzia: le nostre condizioni di garanzia sono reperibili sul nostro portale dell’assistenza. -
Page 133: Note Legali
Le presenti istruzioni per l’uso sono protette da copyright. È vietata la riproduzione in forma meccanica, elettronica e in qualsiasi altra forma senza l’au- torizzazione scritta da parte del produttore. Il copyright appartiene all’azienda: MEDION AG Am Zehnthof 77 45307 Essen Germania L’indirizzo riportato sopra non è... - Page 135 Contents Information about this user manual .............137 1.1. Explanation of symbols ................137 Proper use ....................137 General safety instructions ................137 Package contents ..................139 Device overview ..................140 Setting up / mounting the device ..............143 6.1. General information on the installation location / environment ....143 6.2.
- Page 136 23. Legal Notice ....................158...
-
Page 137: Information About This User Manual
1. Information about this 2. Proper use user manual The kitchen under cabinet radio is used to play back audio material that can be played Thank you for choosing our product. via Bluetooth. In addition, radio stations can We hope you enjoy using this de- be played. - Page 138 Unplug the mains adapter not be carried out by chil- dren. from the socket if you are Before using the device for away for a long period or there is a thunderstorm. the first time, check the de- ...
-
Page 139: Package Contents
Check the device and the 4. Package contents connection cable for dam- DANGER! age before using the device Risk of choking and suffocation! for the first time, and after There is a risk of choking and suffocation each use. due to swallowing or inhaling small parts or ... -
Page 140: Device Overview
5. Device overview V OL AMS/MEM ST/MO SLEEP Fig. 1 – Front view 1. Infrared receiver 2. Display — Menu navigation 4. Spacer — Next track / menu navigation — Call up menu / select display information (frequency / station name) 7. - Page 141 Fig. 2 – Rear view 20. Mounting plate 21. DC IN — Mains adapter connection 22. FM ANT. — Wire antenna Fig. 3 – Bottom 23. USB — USB port 24. Speaker 25. Base 26. LED light...
- Page 142 Fig. 4 – Remote control — Call up menu — Switch device on/off — Select the source — Mute 31. SLEEP — Switch sleep timer on/off — Select display information (frequency / station name) — Start playback / pause playback / confirm menu ...
-
Page 143: Setting Up / Mounting The Device
6. Sett ing up / mounting the device 6.1. General information on the installation location / envi- ronment NOTICE! Risk of damage! Major changes in temperature or fluctuations in humidity can cause moisture to build up within the device due to condensation – this can cause an electrical short circuit. ... -
Page 144: Setting Up The Device
The screws supplied are suitable for mounting on wood. Appropriate screws must be used for other materials. It is not necessary to drill in the shelf when mounting on wood. Screw the mounting bracket with the spacers to the bottom of the cupboard or shelf. ... -
Page 145: Inserting The Battery In The Remote Control
Connect the mains adapter to a socket. Position the wire antenna for radio reception. When you connect the device for the first time, the message Install... appears on the display. An automatic update function and the automatic station search (AMS) starts as soon as a sig- nal is received. -
Page 146: Getting Started
When you use the remote control for the first time, pull out the transparent strip marked “Re- move before use” without opening the battery compartment. Replace the battery if the device fails to react to commands from the remote control properly. Then follow these steps: ... -
Page 147: Timer Functions
9. Timer functions You have the option of programming up to two timers. Acoustic signals will sound shortly before and after a set time (maximum of 240 minutes). 9.1. Sett ing the time on the timer Press the T1 or T2 button to set timer 1 or timer 2. ... -
Page 148: Radio Settings
10.1. Radio sett ings You have various setting and control options in the two radio modes. Press and hold the button to open the settings menu. Use the controller to select the desired menu option. Confirm this and all other selections by pressing the controller. Menu name Description Station List (DAB operating mode only) -
Page 149: Connecting Devices Via Bluetooth
11. Connecting devices via Bluetooth® Switch on the device and select Bluetooth mode button several times until Bluetooth is shown on the display. Press the As long as no device is connected to the kitchen radio via Bluetooth, Disconnected flashes on the display. -
Page 150: Playback/Pause/Stop
12.1. Playback/pause/stop Press the button on the device to start playing tracks. To pause playback, press the button again. Press the button again to resume playback. 12.2. Track selection, rewind/fast forward During playback, press the button to go to the previous track. ... -
Page 151: Stopping The Alarm / Snooze Function
In addition to the relevant symbol , the switched-on alarm time appears on the display. If you switch off the alarm, OFF appears behind the symbol. 13.1. Stopping the alarm / snooze function When the set alarm time is reached, the radio switches on and the previously set alarm tone/radio station plays. -
Page 152: Settings
14. Sett ings The following operating options remain the same in the various settings menus: Press and hold the button to open the settings menu. The settings menu can also be accessed when the radio is switched off by simply pressing the button. -
Page 153: Cleaning
Menu name Description BACKLIGHT Timeout Select a time period after which the display is dimmed. On Level Specify the desired display lighting inten- sity. The value of this setting can also be set us- ing the button. Dim Level Specify the desired dimmed display light- ing intensity. -
Page 154: Troubleshooting
16. Troubleshooting If the device is malfunctioning, this may be due to electrostatic discharge. Fault Possible cause Corrective action Increase the volume. No sound. • The current volume is set too low. Switch off the mute • The mute setting is ac- tivated. -
Page 155: Storing The Device When Not In Use
20. EU Declaration of Conformity MEDION AG hereby declares that the radio equipment type MD 43750 complies with the directive 2014/53/EU [(RE directive), as well as the directive 2009/125/EC (ecodesign directive) and the directive 2011/65/EU (RoHS directive)]. The com- plete EU declaration of conformity is available at: www.medion.com/conformity. - Page 156 Mains adapter Manufacturer Dong Guan Reyi Power Electronics Co.,Ltd., China Importer: MEDION AG Am Zehnthof 77 45307 Essen Germany HR number: HRB 13274 Model name RY15K050200EU Input voltage/current/input AC frequency 100–240 V~, 50/60 Hz, 0.3 A Output voltage/current 5.0 V 2.0 A Output power 10.0 W...
-
Page 157: Service Information
You will find our Service-Community at community.medion.com. • Alternatively, use our contact form at www.medion.com/contact. • You can also contact our Service team via our hotline or by post. Opening times Hotline number UK ... -
Page 158: Legal Notice
These operating instructions are protected by copyright. Mechanical, electronic and any other forms of reproduction are prohibited without the writ- ten permission of the manufacturer. Copyright is owned by the company: MEDION AG Am Zehnthof 77 45307 Essen Germany Please note that you cannot use the address above for returns. Please always contact our Cus-... - Page 160 Prodott o in Cina...
Need help?
Do you have a question about the P66750 and is the answer not in the manual?
Questions and answers