Advertisement
Quick Links
What's Included • Ce qui est inclu
incluido
4K Battery Doorbell
Sonnette à batterie 4K
Timbre con batería de 4K
Vertical Wedge 5°
Support vertical 5°
Soporte vertical 5°
Wire Caps (×2)
Capuchons de fil
Tapas de cables
1
Mounting Bracket
Support de montage
Soporte de montaje
USB Power Cable
Cordon d'alimentation USB
Cable de alimentación USB
Épingle de dégagement
Pin de liberación
Tools Needed / Outils nécessaires / Herramientas necesarias:
• Drill
Perceuse / Taladro
Release Pin
• Screwdriver
EN / FR / ES
B861AJ Series
• Qué está
Horizontal Wedge 15°
Support horizontal 15°
Soporte horizontal 15°
Extension Wire
Fil d'extension
Cable de extensión
Anchors & Screws (×2)
Anclajes & Vis
Ancrages & Tornillos
Tournevis / Destornillador
Advertisement

Related Manuals for Lorex B861AJ Series


Summary of Contents for Lorex B861AJ Series
- Page 1 EN / FR / ES B861AJ Series • Qué está What's Included • Ce qui est inclu incluido 4K Battery Doorbell Mounting Bracket Horizontal Wedge 15° Sonnette à batterie 4K Support de montage Support horizontal 15° Timbre con batería de 4K Soporte de montaje Soporte horizontal 15°...
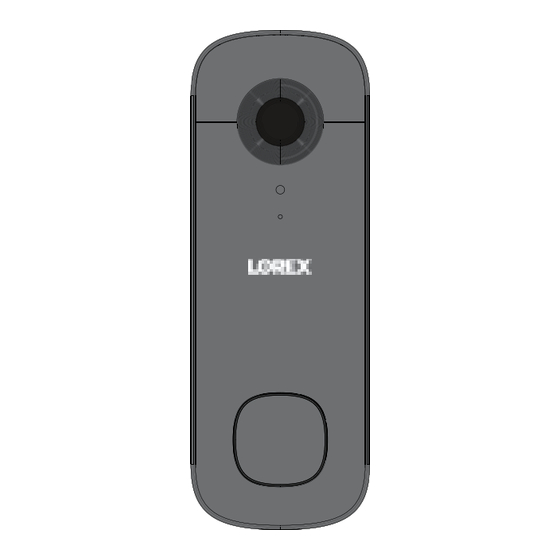
- Page 2 Overview • Aperçu • Descripción general PIR Sensor PIR Sensor Capteur passif à infrarouge Capteur passif à infrarouge Sensor PIR Sensor PIR 2. 2. Camera Lens Camera Lens Lentille de la caméra Lentille de la caméra Lente de la cámara Lente de la cámara 3.
- Page 3 Prêt pour la connexion réseau / Événement détecté Lista para conectarse a la red / Evento detectado Pairing to your Lorex account Jumelage au compte Lorex Emparejamiento con la cuenta de Lorex Battery charging Batterie en cours de chargement Cargando batería Device ready Appareil prêt...
- Page 4 • Ne retirez pas le câble d’alimentation lors de la connexion à l’application. ES - Configuración de la aplicación Descargue la aplicación Lorex. Presione brevemente el botón de reinicio y espere las indicaciones de audio. Pulse Nota: •...
- Page 5 EN - Battery Setup Fully charge your Battery Doorbell before mounting. This could take up to 4-6 hours. 5V 2A power adapter is recommended (not included). Once fully charged, the status indicator will turn solid blue. FR - Configuration de la batterie Chargez entièrement la sonnette à...
- Page 6 EN - Optional Wired Setup Always be careful when handling electrical wiring. If you are not comfortable doing it yourself, contact a licensed electrician. Turn off the breaker and test that power has been disconnected. Connect to 8-24 VAC wiring. If you do not have this voltage, you will require an 8-24 VAC transformer.
- Page 7 EN - Optional Wedge Installation Align and place either one of the Horizontal or Vertical Wedges behind the Mounting Bracket and in the direction you want the doorbell to face. To change the direction of the angle, flip the Horizontal or Vertical Wedge upside down. Horizontal Wedge Support horizontal •...
- Page 8 EN - Mounting Place the Mounting Bracket on the desired location with the arrow pointing Mark the holes for screws. Using a Phillips-head screwdriver and the provided screws, secure the Mounting Bracket to the surface. Optional: On drywall, use the provided 1/4”...
- Page 9 Note: • The doorbell's optimal operating temperatures are -4 °F to 122 °F / -20 °C to 50 °C. • To remove your doorbell from the bracket, hold onto the doorbell, and then insert the Release Pin into the hole at the bottom of the Mounting Bracket until the release tab is reached.
- Page 10 ES - Montaje Coloque el soporte de montaje en la ubicación deseada y asegúrese de que la flecha señale hacia arriba Marque los agujeros para los tornillos. Con un destornillador Phillips y los tornillos provistos, fije el soporte de montaje a la superficie. Opcional: Si se trata de una placa de yeso, utilice la broca de 1/4”...
- Page 11 6 events per day: approx. 7 months How do I activate the Deterrence Light and/or Smart Security LED when motion is detected? Open the Lorex app and tap above the camera’s thumbnail. Tap Light Settings, and then to enable Activate Deterrence Light on Detection.
- Page 12 6 événements par jour : environ 7 mois Comment activer la lumière de dissuasion et/ou la DEL de sécurité intelligente lorsqu’un mouvement est détecté? au-dessus de la Lancez l’application Lorex app et appuyez sur vignette de l’appareil photo. Appuyez sur Paramètres d’éclairage, puis sur pour activer l’option Activer la lumière de dissuasion en cas de détection.
- Page 13 6 eventos por día: aprox. 7 meses ¿Cómo activo la luz de disuasión o el led de seguridad inteligente cuando se detecta movimiento? Abra la app Lorex y toque encima de la vista en miniatura de la cámara. Toque Configuración de luz, y a continuación, para habilitar la función de Activar la luz de disuasión al detectar.
- Page 14 à des supports supplémentaires. Escanee el siguiente código QR para obtener la Guía de inicio rápido y material de apoyo adicional. help.lorex.com/B861AJSeries Register your product • Enregistrez votre produit • Registre su producto Please see our full Terms of Service and Limited Hardware Warranty Policy Veuillez lire nos Termes de Service et notre Politique de Garantie Matérielle...
- Page 16 Copyright © 2024 Lorex Technology Inc As our products are subject to continuous improvement, Lorex reserves the right to modify product design, specifications and prices, without notice and without incurring any obligation. E&OE. All rights reserved. This device complies with part 15 of the FCC Rules. Operation is...
Need help?
Do you have a question about the B861AJ Series and is the answer not in the manual?
Questions and answers